I have created Pattern Manager and now I need to support all enemies to be able to reset properly. Remember – the goal was to not spawn / destroy enemies – instead just resetting the values. I will go through all enemies and make sure that:
- Mesh ragdoll is getting back to animation,
- Mesh is attached to capsule component with the same translation as it was on Begin Play,
- All necessary timers will be disabled as well,
- Tick will be disabled when enemy isn’t active,
- Refactor the enemies as it was long time ago I had created them,
So let’s go!
This Tutorial has been created using Unreal Engine 4.10
Make sure you are working on the same version of the engine.
Updating BP_BaseEnemy
First I will update BP_BaseEnemy and add some functions to help me with ragdoll and capsule components.
Basically pattern manager is moving the actors when disabling / enabling pattern. There will be two problems: moving ragdoll and capsule with movement.
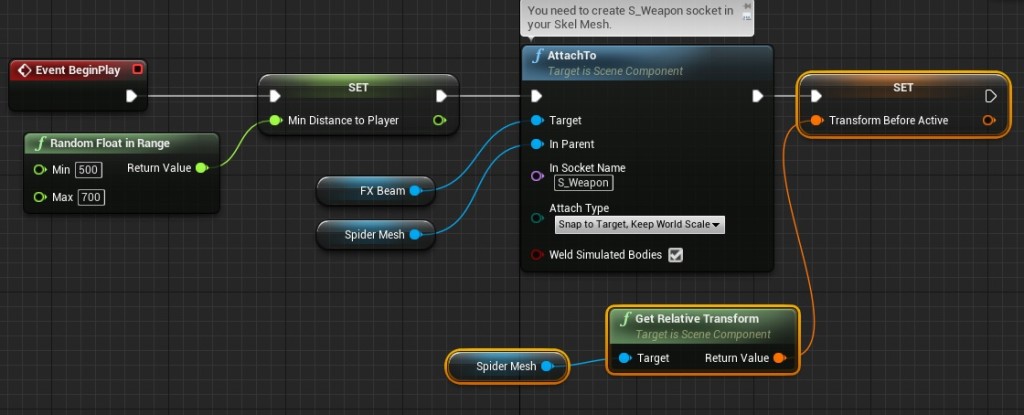
Open BP_BaseEnemy and add one Translation variable named TranslationBeforeActive. This will be mesh default translation when attached to CapsuleComponent. Just set it to Mesh relative transform at Begin Play:
And make sure on Begin Play Character Movement Mode is set to None. Spawned characters shouldn’t move, we will activate movement when character will be enabled:
Now create new function named EnableCapsule:
This will reset our CapsuleComponent.
Create another function named EnableRagdoll which will just enable Ragdoll on Mesh:
Now create another function named ResetRagdoll:
This will basically get back mesh to it’s default position and make sure character is ready for next pattern.
The last thing here is to update interface events:
I’m hiding the enemy and disabling skeleton updates. Thanks to this I won’t get draw calls on disabled enemies in patterns.
And that’s all here. We are ready to roll.
Updating BP_Enemy_Trooper
Open BP_Enemy_Trooper and add IEnemies interface events:
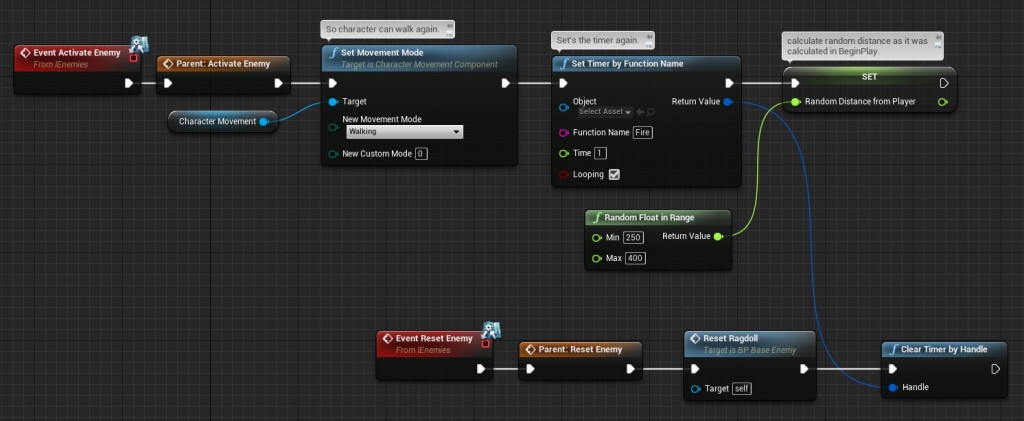
Remember that things connected to gameplay (visit GoodLuckMate to learn more gaming hacks to win easily) that are in Begin Play should be called again in Activate Enemy like RandomDistanceFromPlayer.
Updating Movement
Trooper have AIController and Behavior tree. Shooter Tutorial movement is simple – enemy should walk forward and that’s all. Behavior Tree isn’t needed and AIController isn’t needed as well.
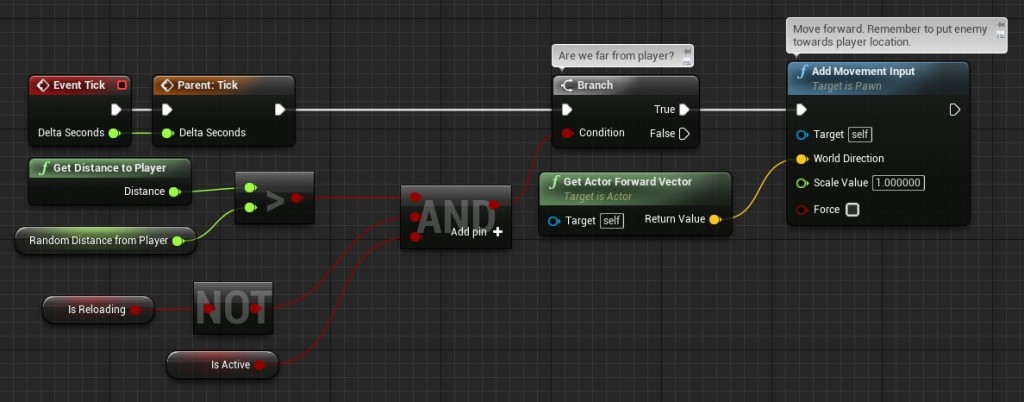
Add Tick event and make sure it’s walking forward when not reloading (as in Behavior Tree)
Why I’m using Tick instead of Behavior Tree? There will be lot of instances of this enemy on level which won’t be active for pattern manager. If I will have custom AIController with Behavior Tree – they will be active all the time. Trooper have really simple AI and movement and it don’t need Behavior Tree. Another thing is that I’m disabling Tick when Enemy is disabled.
Updating Die event
Just make sure that EnableRagdoll function is called in Die:
And that’s all. You can delete all Set Blackboard Key functions as we don’t use Behavior Tree. You can now add Trooper to Patterns and check if everything is working properly. It should go back from ragdoll to it’s default position.
Updating BP_Enemy_Marine
Marine is more complicated as it uses custom events to Fire and Reload – and Fire is calling again from Fire after a delay.
Open BP_Enemy_Marine and add one bool variable named CanExecuteFireAgain.
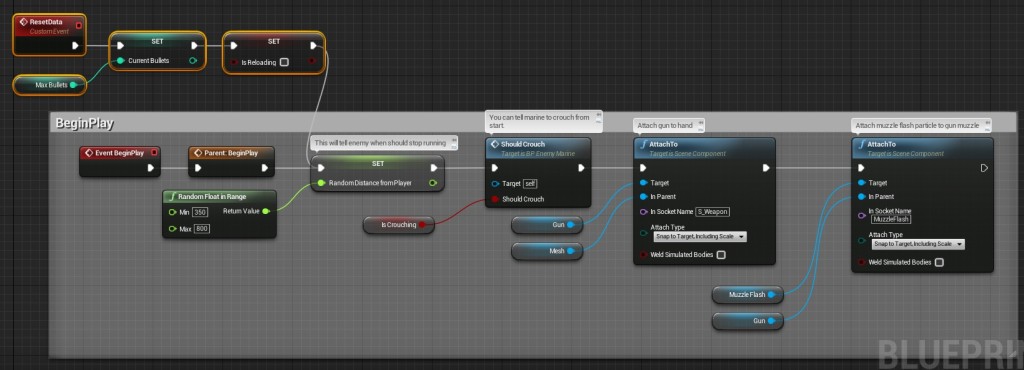
Updating BeginPlay
Create new custom event named ResetData:
It will be called each time Marine will be activated.
Updating Tick
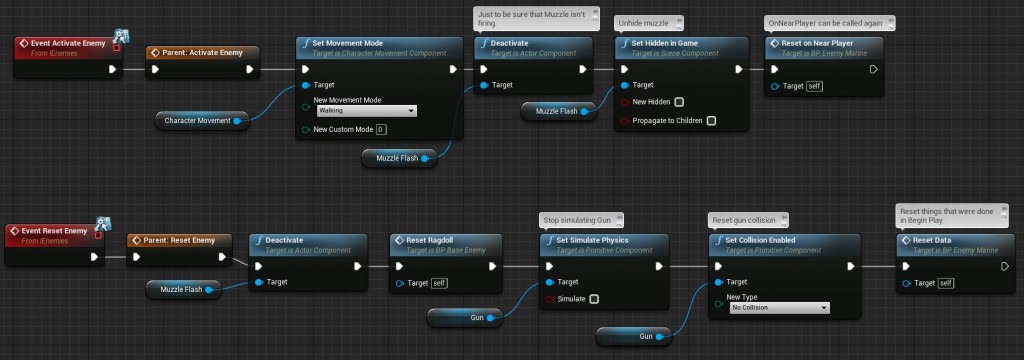
In Tick Marine is triggering OnNearPlayer function only one time. We need to reset DoOnce node. Create new custom event named ResetOnNearPlayer:
I will call ResetOnNearPlayer when this enemy will be activated again.
Updating Fire
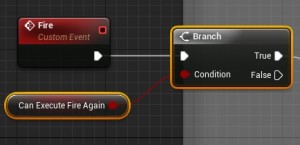
This is simple just check if CanExecuteFireAgain is True in the beginning:
This will prevent from shooting after killing him while reloading or shooting.
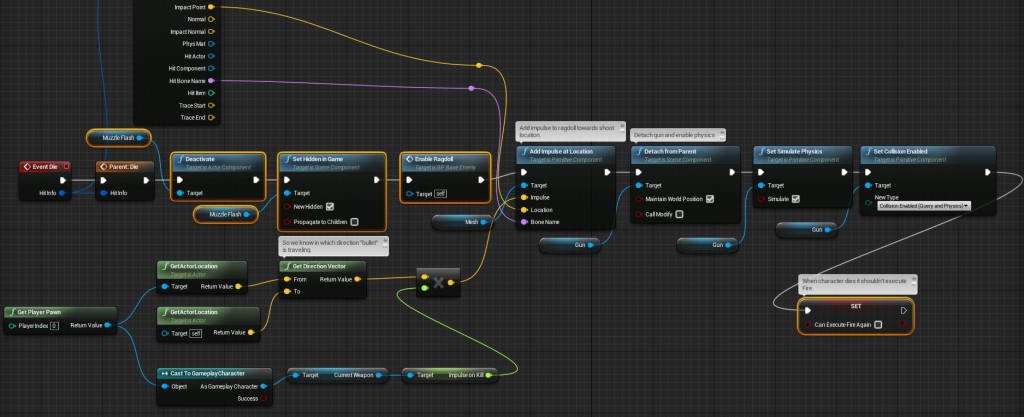
Updating Die
In Die we want to be sure that CanExecuteFireAgain is False. Instead of destroying MuzzleFlash I’m deactivating it:
Updating TakeDamage
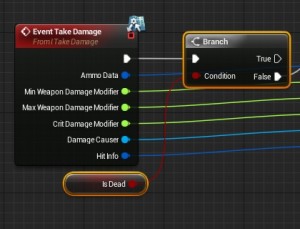
Just one thing – make sure that TakeDamage won’t be called if Marine is Dead:
Adding IEnemies Interface events
Now add IEnemies interface events:
It’s much more harder to work with activate / deactivate enemy but trust me we will gain a lot of performance and less glitches.
Marine comes with two movement type: Standing and Crouching (isCrouching bool) just create new blueprint named BP_Enemy_Marine_Crouching extending from BP_Enemy_Marine and set isCrouching in defaults to True. Thanks to this you will be able to place crouching and standing Marines in your pattern. You will get more control and less random.
Updating BP_Enemy_Ninja
Here we have the same situation as in Marine. Open BP_Enemy_Ninja and add one bool variable named CanAttackAgain.
Updating Tick
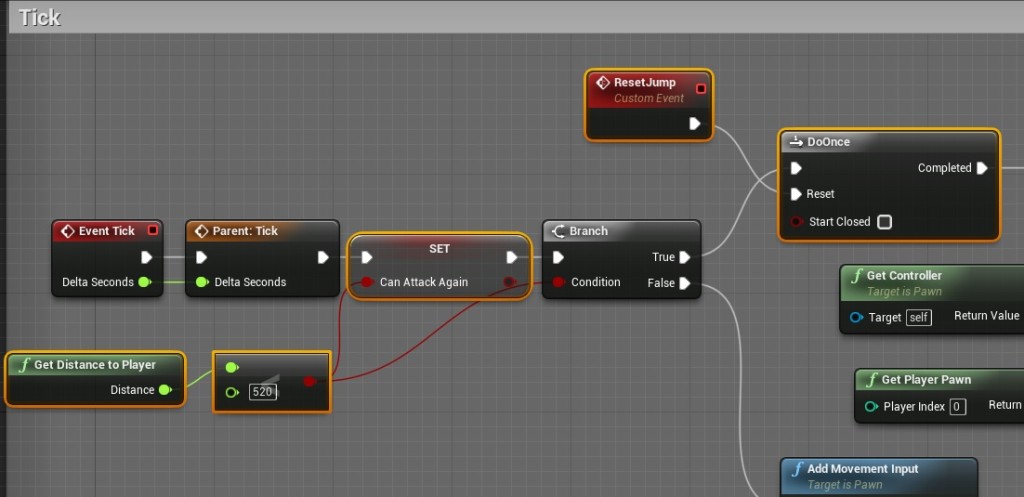
Create new Custom Event named ResetJump and connect it to DoOnce function in Tick:
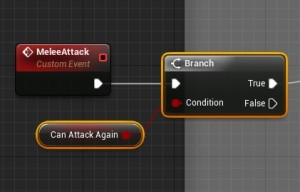
Set CanAttackAgain as well. Now before calling MeleeAttack check if Ninja isn’t dead or CanAttackAgain is false:
Why this is needed?
Because after Delay – character could be dead or it has been reset – this will prevent triggering melee animations when activating Ninja.
Updating Take Damage
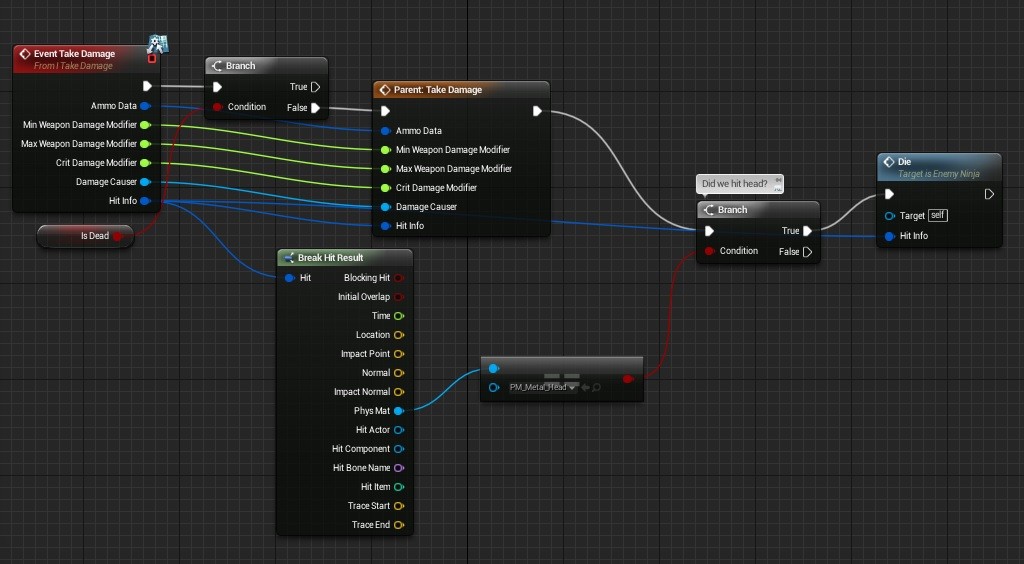
We can just call Die here instead of old nodes:
So it will be more constant.
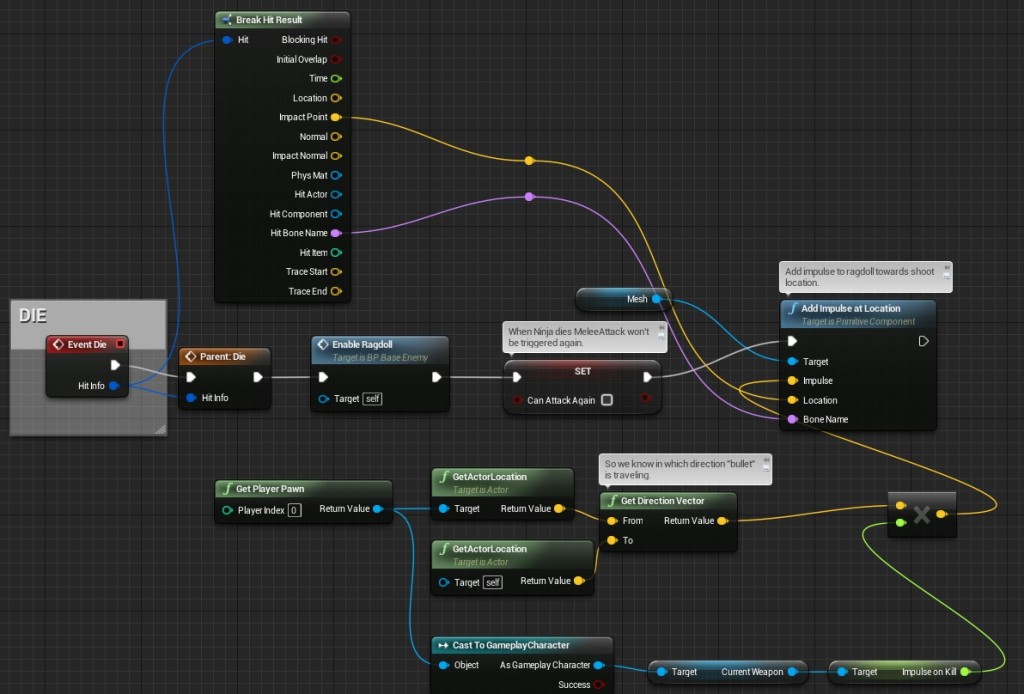
Updating Die
Here’s when we will set CanAttackAgain to false. Rest of old nodes aren’t needed as physics has been updated and bones are still hidden after enabling physics.
Updating Melee Attack
Just make sure that CanAttackAgain is true:
Adding IEnemies Interface events
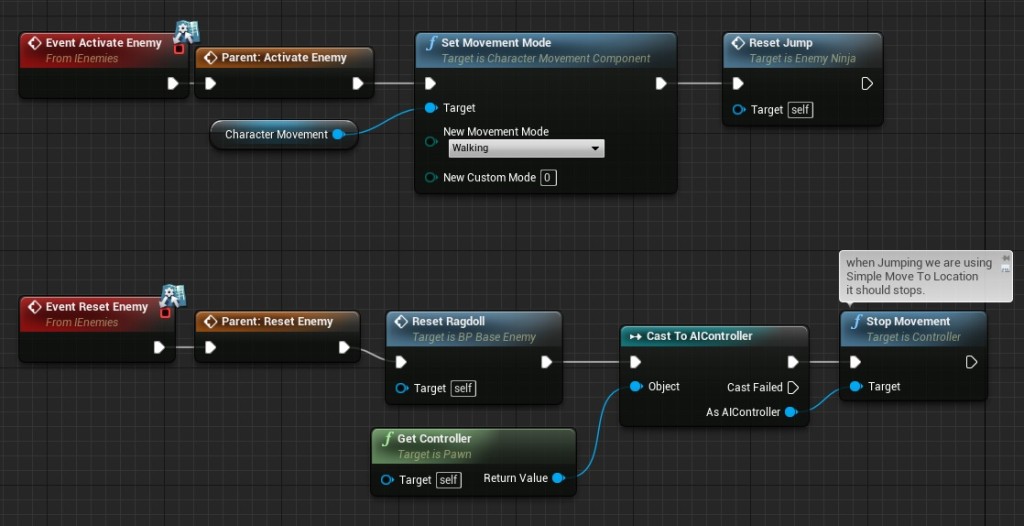
Last thing is to add IEnemies interface events:
They should be straightforward.
Updating BP_Enemy_FutureSoldier
This one is using more complicated Behavior Tree so I will leave it as it is, but make sure he will work with patterns.
Open BP_FutureSoldierController and add new custom event named EnableAI:
You don’t need to call this on Posses – delete this old node.
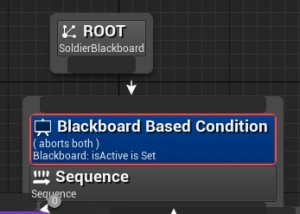
Now open the Blackboard named SoldierBlackboard and add one new bool variable named isActive. Open all Soldier Behavior Trees and make sure you have added Blackboard Decorator in top of your tree:
Make sure it aborts both. So basically if isActive will be false rest of the tree won’t be called.
Updating Anim Blueprint
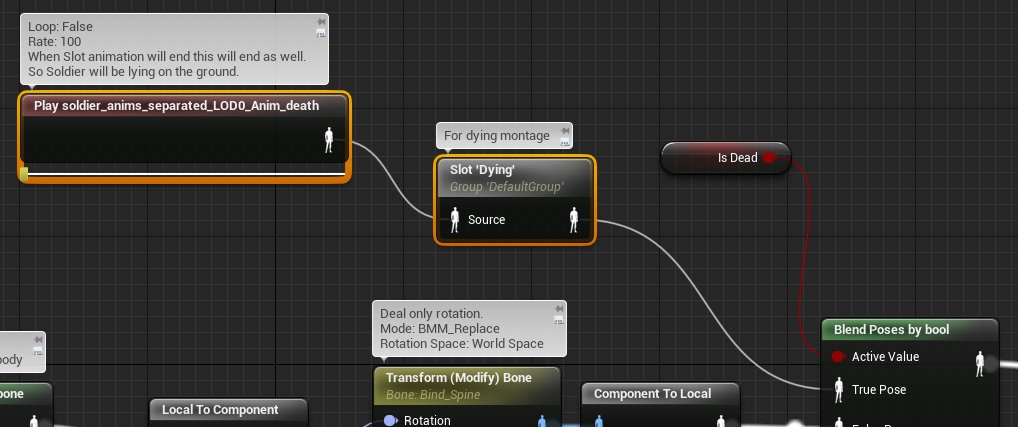
Open FutureSoldier_AnimBP and add new slot named Dying. You can find more information how to create new slots here.
So basically when I call Dying slot anim soldier_anims_separated will run as well. I want to be sure that it will be at the end of the animation (when soldier is lying on ground) before slot animation ends. That’s why it have 100 rate.
Now open BP_Enemy_FutureSoldier and make sure CharacterMovement’s Orient Rotation To Movement is set to True.
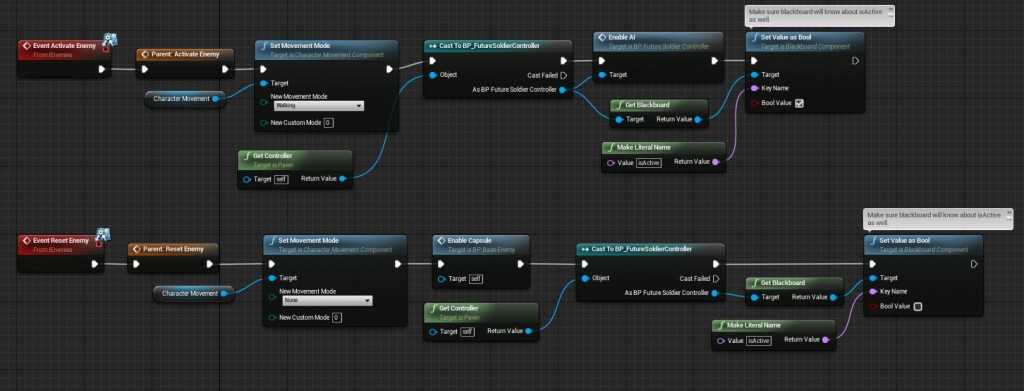
Adding IEnemies Interface events
This time it will be different as it uses Behavior Tree. You need to make sure blackboards is aware of isActive variable as well.
Updating Die
Soldier isn’t using ragdoll as UE4 Physics cant import skel meshes with different scale option. Instead I’m playing dying animation on Dying slot.
Standing / Crouching
Soldier can crouch and stand as well as Marine. Just create child blueprint and set SoldierType to Crouching / Melee / Standing so you can place it in your patterns.
That’s all for Soldier!
Updating BP_Enemy_RobotWarrior
This one will be simple. Open BP_Enemy_RobotWarrior.
Updating AttackPlayerMelee
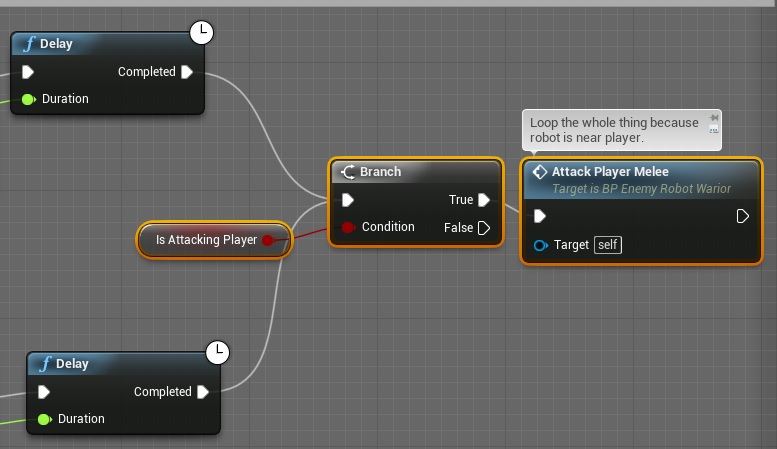
Just make sure before you run AttackPlayerMelee again that isAttackingPlayer bool is True:
This way even after delay we will check if we can attack again.
Updating Die
This will make sure all animations will stop and IsAttackingPlayer will be set to false. Thanks to this MeleeAttacks won’t be triggered again after delay.
Adding IEnemies Interface events
It should be straightforward.
Updating BP_Enemy_SmallSpider
This will be more difficult as it isn’t extending BP_BaseEnemy. Open BP_Enemy_SmallSpider and add one new Dispatcher named OnEnemyDead.
Then add these variables:
- isActive (bool),
- TransformBeforeActive (Transform)
Make sure you have implemented IEnemies interface on this actor!
Now select SpringArm component and disable Camera Lag and Camera Rotation Lag. When moving spider we don’t want to have any interpolation 🙂
Updating Begin Play
Here we just need to store TransformBeforeActive variable:
Updating Tick
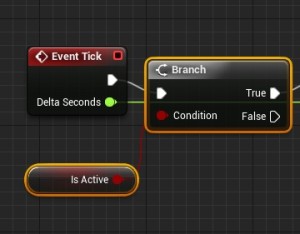
Make sure you won’t run Tick if isActive is false:
Whole movement is done in Tick so spider shouldn’t move when isn’t active.
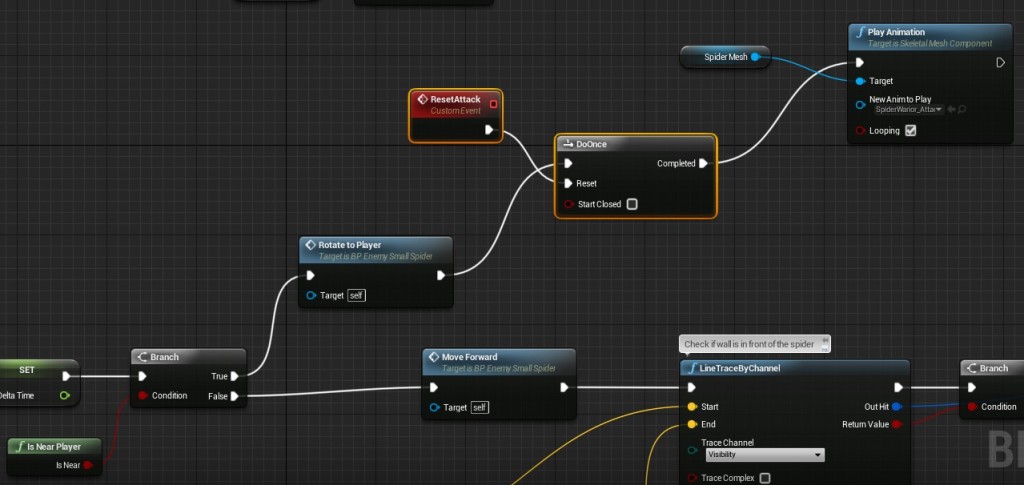
Another thing is attacking player – it’s done using Do Once which need to be reset.
Create new custom event named ResetAttack and connect it to DoOnce node:
Updating Take Damage
Delete Set Life Span node because we don’t want to destroy the Spider on death. Another thing is to call OnEnemyDead dispatcher:
Adding IEnemies Interface events
Make sure IEnemies is implemented to this actor. Spider isn’t extending from BP_BaseEnemy so we can’t use its functions.
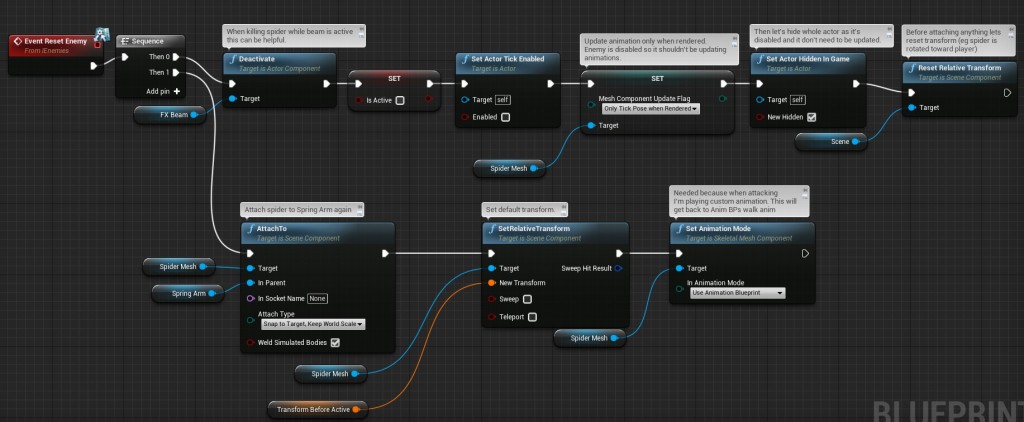
And Reset:
I have added comments so it should be straightforward.
That’s all here but Pattern doesn’t know about BP_Enemy_SmallSpider. Open Pattern blueprint and in GetEnemiesInPattern add another Cast to bind OnEnemyDead:
Thanks to this Pattern will know when Spider will be dead!
Final Words
Now each enemy is supported by Patterns and can be activated / deactivated. Thanks to that I can finally move to balancing and creating first patterns!
Again: spawning / destroying actors are costly and can make glitches on dynamic games. Doing activate / reset was hard and log way but I’m sure I won’t have problems with performance now.
Creating ShooterTutorial takes a lot of my free time.
If you want you can help me out! I will use your donation to buy better assets packs and you will be added to Credits /Backers page as well. Implementing game is taking time but writing about it is taking much more effort!











Really great tutorial! I am really glad that you help to learn UE4!
the only issue that stood in front of me is that EnableAI that runs behavior tree is only works with the first Pattern_soldier and the other ones are stading and not running the behavior. I am implementing the locig for the trooper because this character is not moving just forward but moveTo player location. could you help me if i end you my project?
If send you my project*
Outstanding tutorials, thanks again for taking the time to do these. Side note – For anyone struggling with guys not moving while working on this one – I encountered an issue in my project where I needed to extend the tunnel geo and add a navmesh to the area beyond the end of the tunnel, where the patterns get placed and activated. I’m not using any of the tutorial assets, so if you’re also using your own stuff this might crop up.
To clarify – basically my patterns were getting activated in mid-air, about 100 yards in front of the player, outside the map. Fine for the flying drones but broke everyone else.