There was tutorial request to create Uncharted like equip system on third person character. In this tutorial you will learn how to:
- Attach weapons to third person character,
- Create simple inventory system to manage items,
- Drop and equip items,
- Use UMG to communicate with inventory manager and items,
System will be event based so it should be efficient.
It’s super easy!
This Tutorial has been created using Unreal Engine 4.10
Make sure you are working on the same version of the engine.
Live Stream
You can watch Live Stream of developing this Tutorial:
Info
I’m using Military Weapon Silver pack for weapons, you don’t need to use it to complete this tutorial but it’s recommended pack if you are doing game with military weapons.
Project is based on Third Person Template which can be found when creating new project.
I have found similar system in marketplace but I don’t know if it’s event based.
Creating Sockets
First let’s start by adding sockets to character. Open SK_Mannequin and go to skeleton. Add those sockets:
| Socket Name | To Bone | Location | Rotation |
| S_Right | thigh_r | (X=1.395696,Y=-1.684754,Z=11.188174) | (Pitch=-6.486207,Yaw=-7.920663,Roll=-89.091843) |
| S_Left | thigh_l | (X=-1.446448,Y=1.746050,Z=-11.595024) | (Pitch=9.878475,Yaw=172.529236,Roll=-74.138725) |
| S_Back | spine_03 | (X=3.236346,Y=-19.379486,Z=-0.000076) | (Pitch=29.549173,Yaw=-1.433733,Roll=-5.432457) |
| S_BackSecond | spine_02 | (X=-15.713704,Y=-19.643719,Z=0.000013) | (Pitch=-39.672302,Yaw=-2.018809,Roll=5.592505) |
| S_Pistol | hand_r | (X=-7.519445,Y=4.337661,Z=-0.000212) | (Pitch=-10.000312,Yaw=179.999939,Roll=-0.000291) |
| S_Rifle | hand_r | (X=-13.532258,Y=4.385181,Z=-0.000752) | (Pitch=-0.001052,Yaw=179.999893,Roll=-0.000213) |
| S_Launcher | hand_r | (X=-10.995573,Y=4.979963,Z=-0.000205) | (Pitch=-0.001011,Yaw=179.999893,Roll=-0.000207) |
Right, left, back and back second will be used as attach point for weapons. Rest are weapon locations when equipped.
Base Classes
Whole system will use two base classes:
- BP_BaseWeapon,
- InventoryManager,
Create new Blueprint extending from Actor named BP_BaseWeapon. Then create new blueprint extending from Actor Component named InventoryManager.
Leave them for now and let’s add base data.
AmmoType Enum
Create new Enum named AmmoInfo and add following:
- Pistol,
- Rifle,
- Launcher,
It will be used to determine which type of ammo weapon is using.
AttachPoint Enum
Create another enum named AttachPoint and add following:
- Right,
- Left,
- Back,
- BackSecond,
This will be used to determined which part of body weapon can be attached.
AttachInfo Structure
Create new structure named AttachInfo and it should contain:
- inUse (bool),
- AttachPoint (AttachPoint),
- WeaponRef (BP_BaseWeapon)
AmmoInfo Structure
Add another structure named AmmoInfo and add following:
- AmmoType (AmmoType enum),
- AmmoCount (int),
This will be used to store data about how many ammo for which type we have.
MyLibrary
Create new function library named MyLibrary.
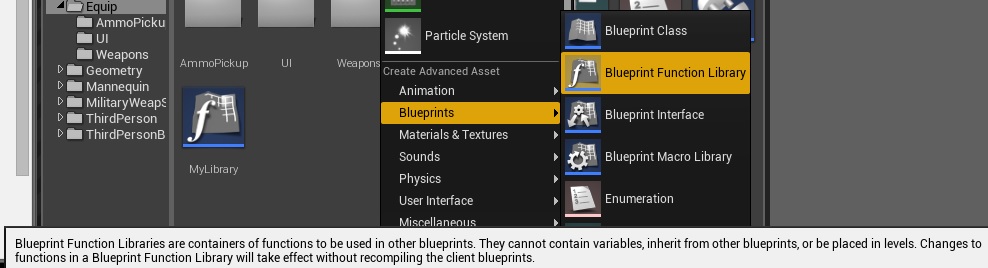
Library functions can be called from all classes so they are super useful. One thing to note – they don’t have world context which means nodes like Get Player Controller, Get Game State, Get Player Pawn won’t work as they need world context. You need to pass world context to functions if you really need them. Libraries are great for storing math functions that you will use in different classes.
For our example we will create functions that will return socket name depending on AttachPoint enum.
Open MyLibrary and add two functions.
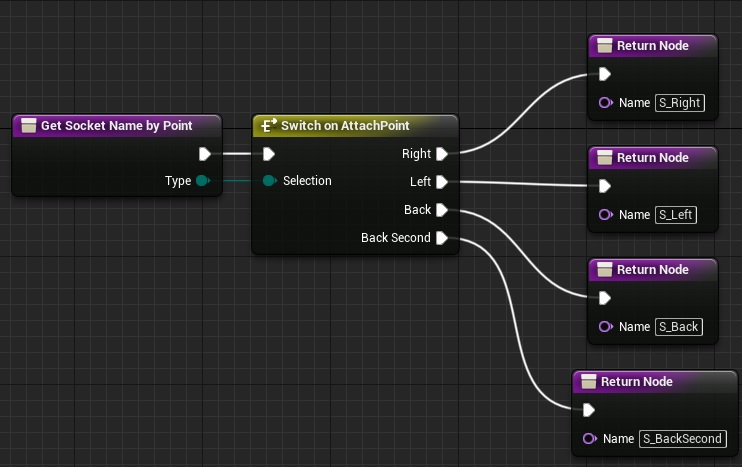
GetSocketNameByPoint
- Input: Type (AttachPoint),
- Output: SocketName (name)
- It should be pure,
And add GetSocketPointByName:
- Input: Name (name),
- Output: Type (AttachPoint)
- It should be pure as well,
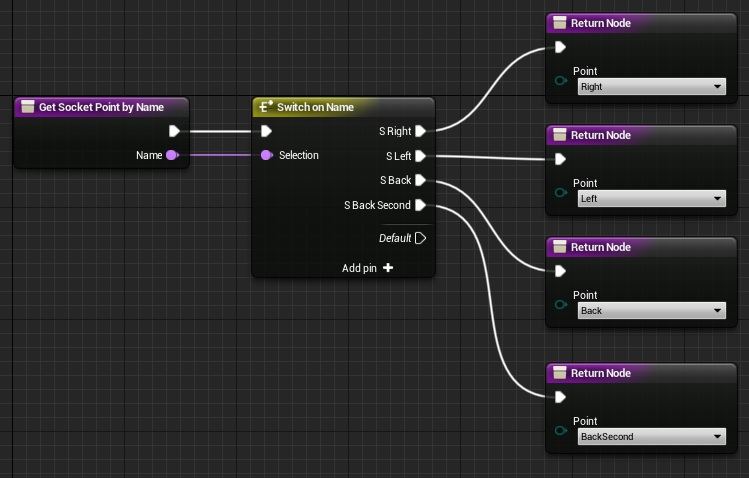
Names in Switch should be equal to socket names added in character mesh.
BP_BaseWeapon
Now we can move to filling base classes. Open BP_BaseWeapon and add these components:
- BoxCollision named Box. Add OnBeginOverlap Event from it as well, (this should be root of components)
- Skeletal Mesh named SkeletalMesh,

Now open event graph and add those variables:
| Var Name | Var Type | Description |
| AmmoCurrent | int | Holds how many ammo do we have in magazine. |
| AmmoMaxInMag | int | Holds maximum capacity of magazine. |
| WeaponName | Text | What’s the name of the weapon used in UI. |
| AttachPoints | AttachPoint enum array | Array of points that this gun can be attached to character. |
| CurrentAttachPoint | AttachPoint | Holds current attach point. (updated when weapon will be added to character) |
| AmmoType | AmmoType enum | Which ammo type this weapon use. |
| isEquipped | bool | Is weapon currently equipped. |
| EquipSocketName | Name | Name of the sockets that should be used when equipping weapon to hand. |
| isDropping | bool | Is weapon currently being dropped. |
Now in Event Graph create new custom event named AttachWeaponToCharacter:
- Input: SocketName (Name)
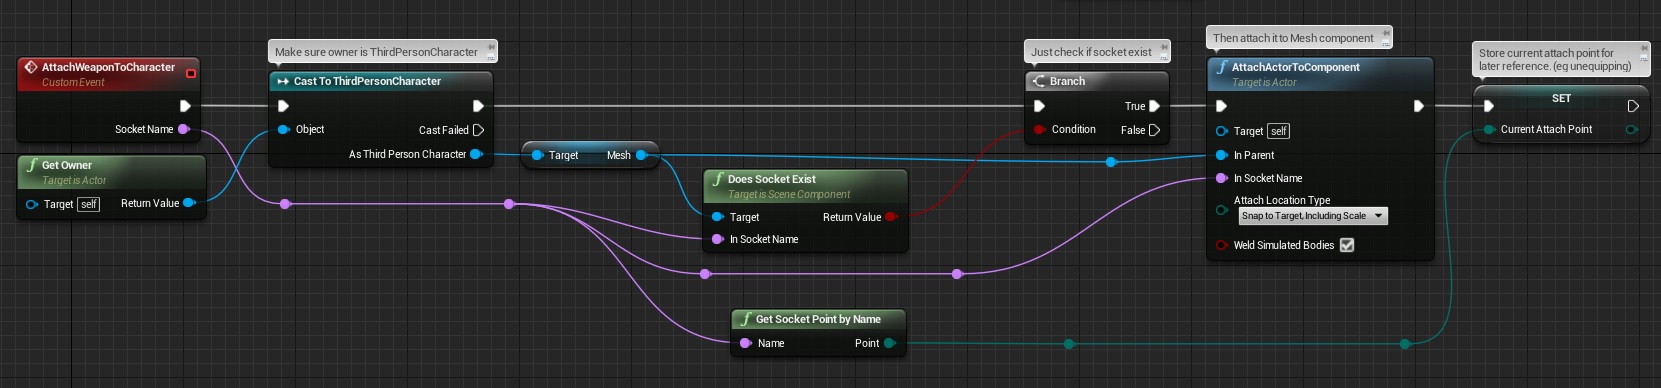
For now let’s leave BP_BaseWeapon – we will get back here later.
InventoryManager
Open InventoryManager and add these variables:
| Var Name | Var Type | Description |
| InventoryItems | BP_BaseWeapon Reference Array | Holds all weapons stored in inventory. |
| SocketStates | AttachInfo Array | Defines state of all available sockets in inventory. |
| Ammo | AmmoInfo Array | Defines state of all ammo types that are in inventory. |
| EquippedWeapon | BP_BaseWeapon Reference | Holds currently equipped weapon reference. |
SocketStates:
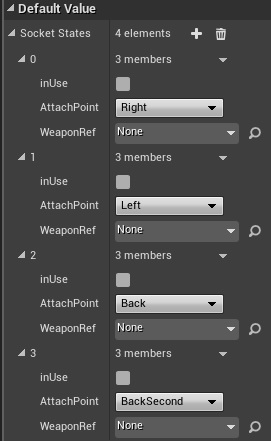
In default we are defining the ‘slots’ that this inventory can support.
Ammo:
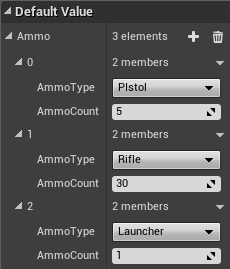
It holds default amount of ammo for each ammo type.
Open event graph and add one dispatcher:
- OnInventoryStateUpdated. It will be called each time something will change in inventorymanager – this way we will communicate with Character that have InventoryManager.
Functions:
Now we can add some basics functions. Create new function named FindFreeSocket:
- Input: For Weapon (BP_BaseWeapon reference)
- Output: FreePoint (AttachPoint),
- Output: Found? (bool),
- Local Variable named Local_FoundSocket (bool),
- Local variable named Local_SocketPoint (AttachPoint),
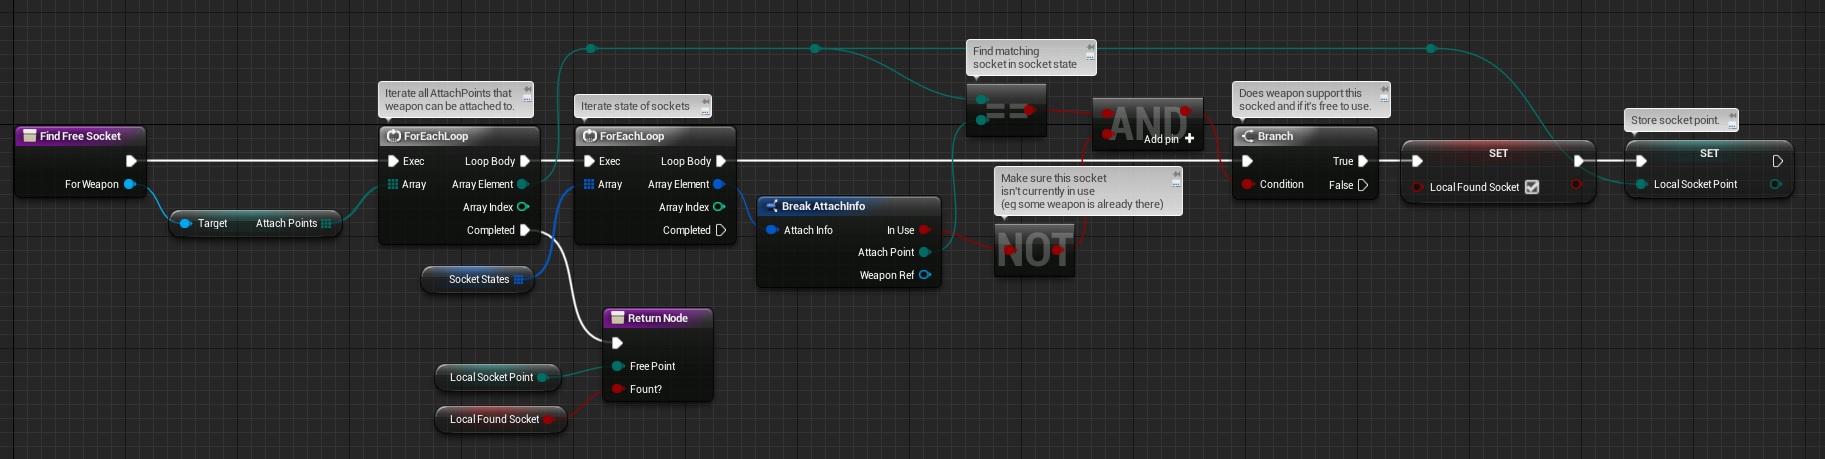
This is basically checking if weapon sockets match SocketStates and if socket state is available. We don’t want to attach weapon to socket that have already weapon attached.
Create another function named MarkSocketAsInUse:
- Input: Point (AttachPoint)
- Input: WeaponRef (BP_BaseWeapon reference)
- Local Variable: Local_Index (int),
- Local Variable: Local_NewAttachInfo (AttachInfo),
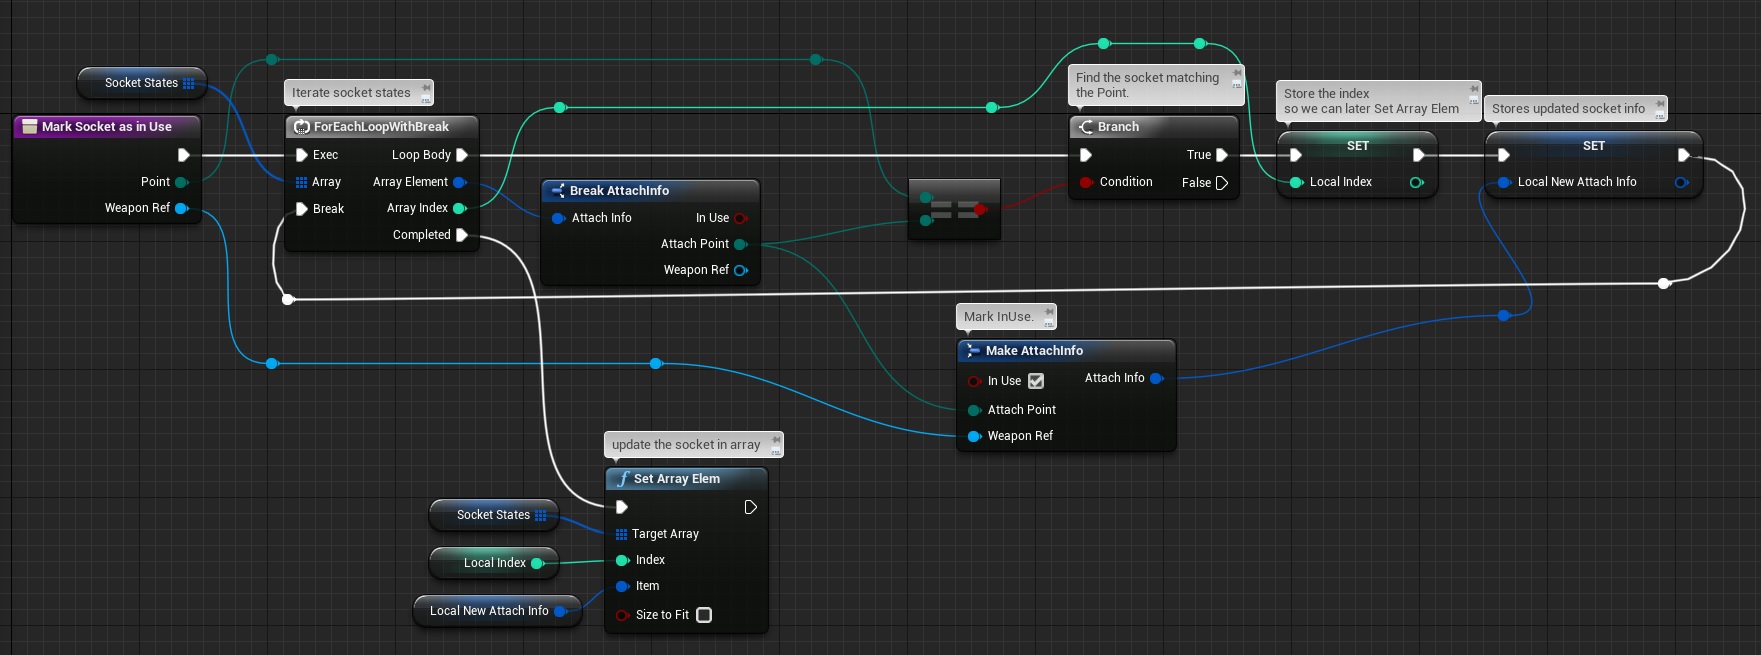
This is basically finding matching socket in SocketStates and mark InUse bool as True. This is basically the best way to work with Array Structures in Blueprints. Store index, store make new structure info and then set array element. It’s proven to work on Standalone / Mobile and cooked builds without a problem. It sounds complicated but it’s super easy.
Now create another function named MarkSocketAsAvailable which will do the same thing but mark InUse to false:
- Input: Point (AttachPoint),
- Local Variable: Local_Index (int),
- Local Variable: Local_NewAttachInfo (AttachInfo),

I’m not using WeaponReference here as I want to clear it from SocketStates as we are marking the socket as available for attachment.
Create another function named AddAmmo:
- Input: Type (AmmoType),
- Ammount (int),
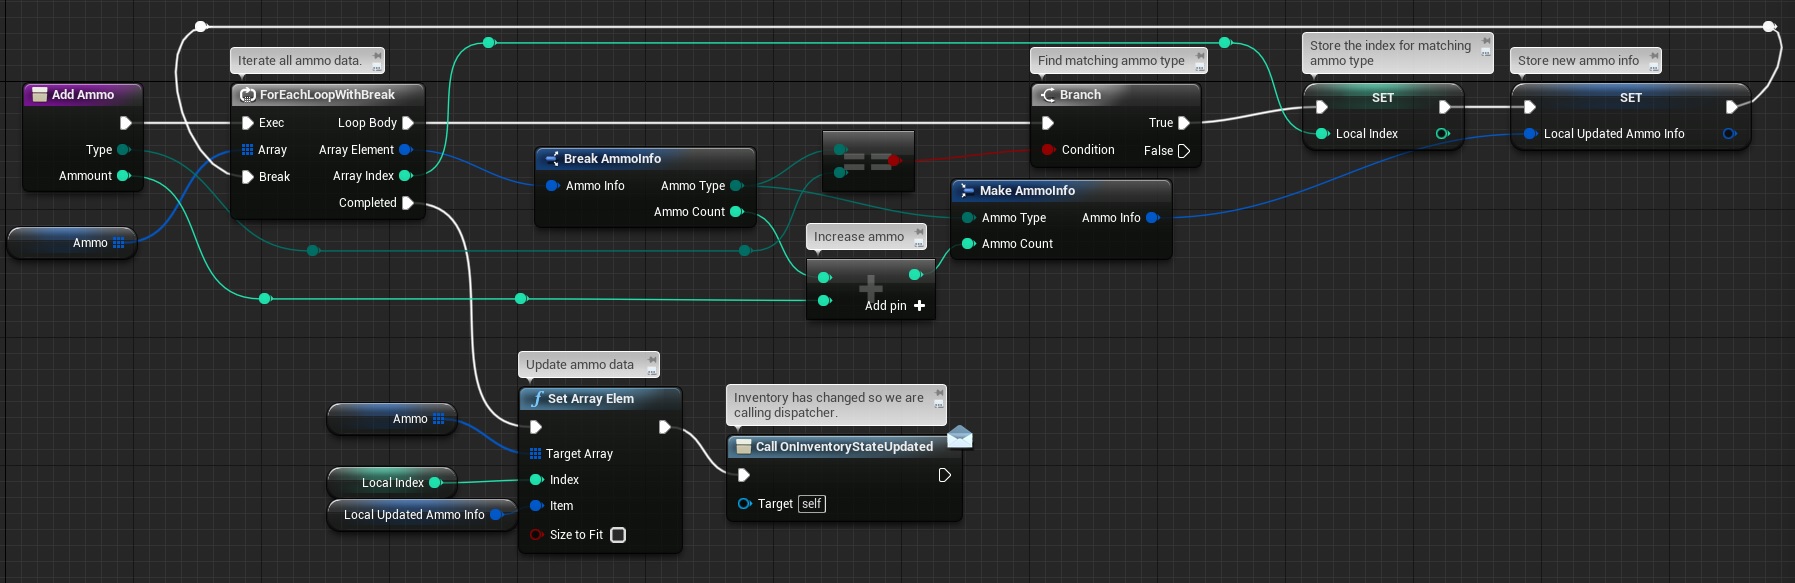
This is the easiest example how to use structure arrays. We want to add ammo for a weapon type. I’m searching for matching type in the array, then store the index and store updated ammo info. Then set array elem.
For example we want to add 5 ammo for Pistol. It will search Pistol type in Ammo Array, increase the ammo and then set the array elem.
Create another function named GetCurrentAmmo:
- Input: ForType (AmmoType),
- Output: Ammo (int),
- Function can be pure,

Create another new function named SetEquipedWeapon:
- Input: Weapon (BP_BaseWeapon reference)
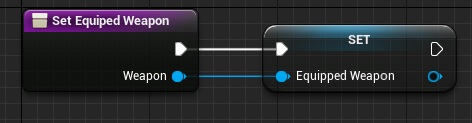
It’s just setting EquippedWeapon variable.
USEFUL TIP: I’m always using Functions to change variables if I think I would need to set variable from different class. Setting variables from different classes can cause crashes on cooked build as it creates circular dependencies. Calling functions that set the variable instead directly set it from different class is “good programming practice” and you should use it in Blueprints as well.
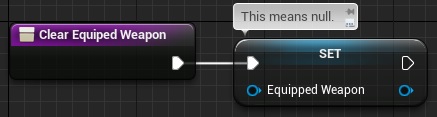
Create another function named ClearEquipedWeapon:
Create another one named GetCurrentEquippedWeapon:
- Output: Weapon (BP_BaseWeapon reference),
- Output: Equipping (bool),
- Function can be pure,

This will return currently equipped weapon and information if it’s valid. (which means if something is equipped)
And now the most important functions. Create new function named AddToInventory:
- Input: Weapon (BP_BaseWeapon Reference)
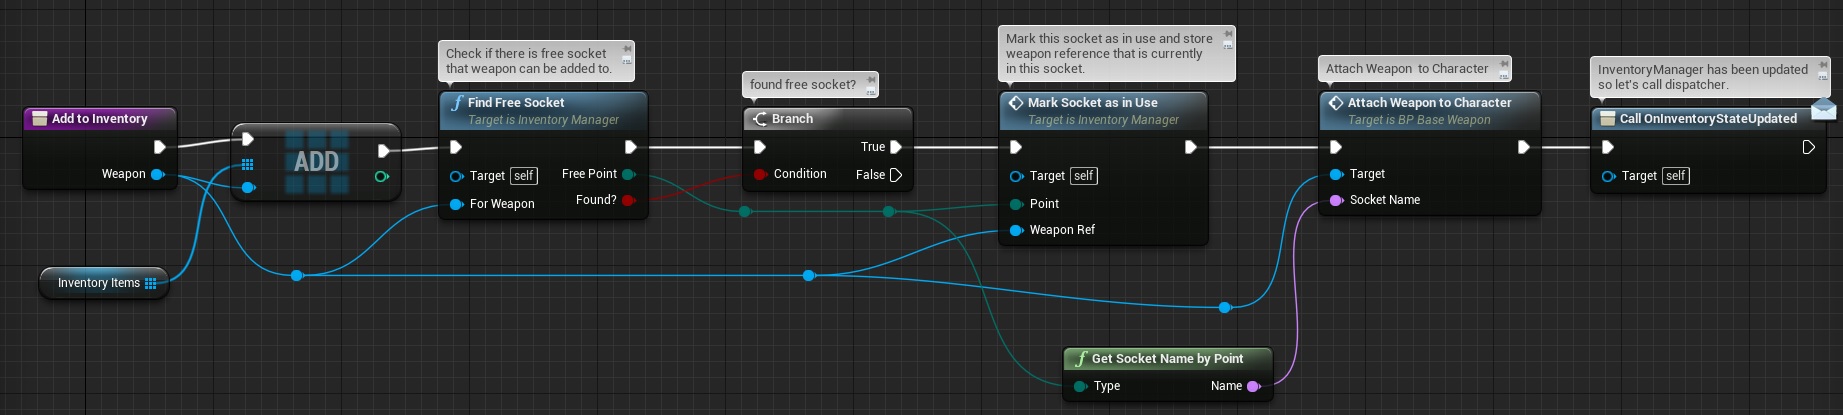
It’s easy. Search for socket that Weapon can support and check if it’s available. If yes – update the socket, store the weapon reference and call Attach on Weapon.
Create last function named RemoveFromInventory:
- Input: Weapon (BP_BaseWeapon Reference)
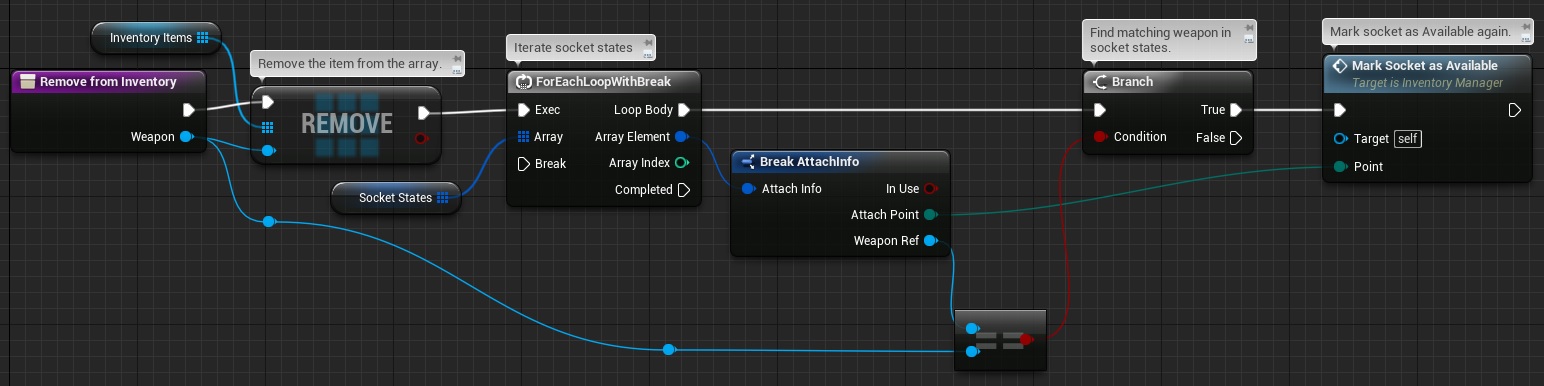
Again it’s easy. Find matching Weapon in Socket States and clear it out so it can be used again.
Events
We have added all necessary functions now it’s time to add three events.
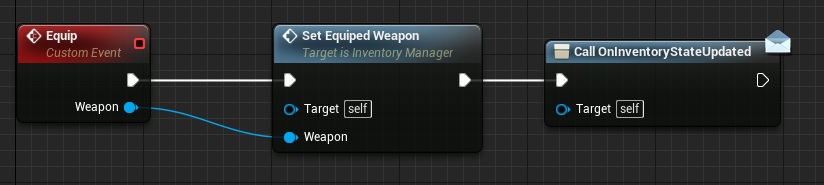
Create new event named Equip with one BP_BaseWeapon reference input:
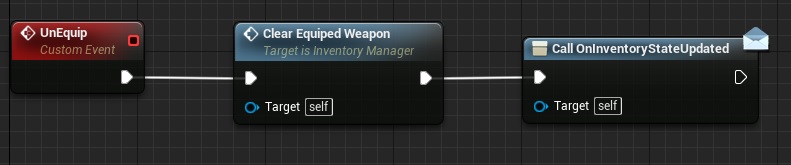
And UnEquip event:
And last DropItem with one BP_BaseWeapon Reference input:

And that’s all in InventoryManager! Now we need to move back to BP_BaseWeapon.
Make sure you have added InventoryManager component to ThirdPersonCharacter blueprint!
Back in BP_BaseWeapon
Go back to BP_BaseWeapon and if you havent added OnComponentBeginOverlap to your Box add it now:
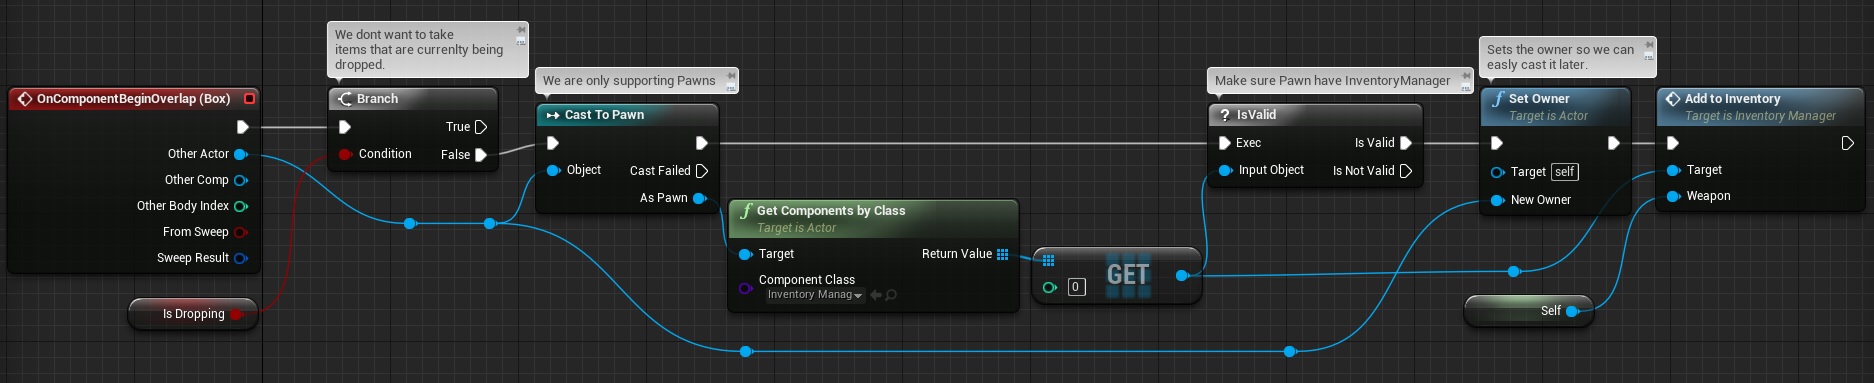
This is basically the start of adding items to inventory.
Now add Equip and UnEquip events:
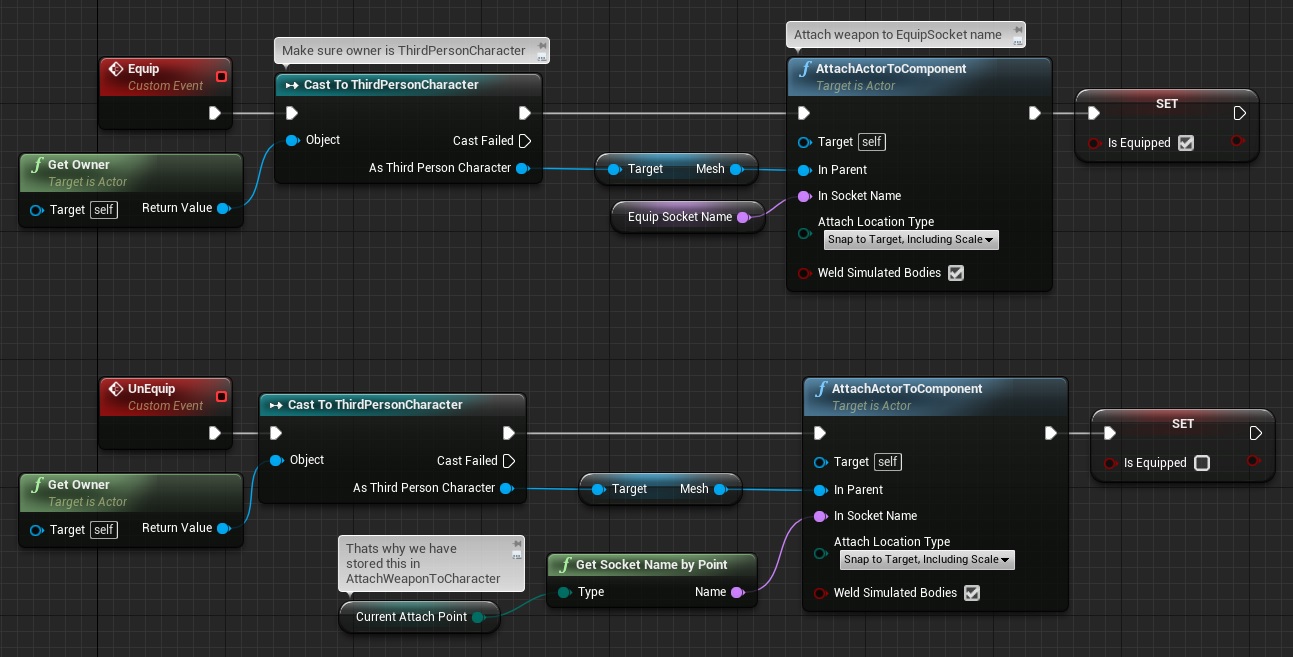
It should be self explanatory.
Now last event – Drop which should be treated as placeholder.
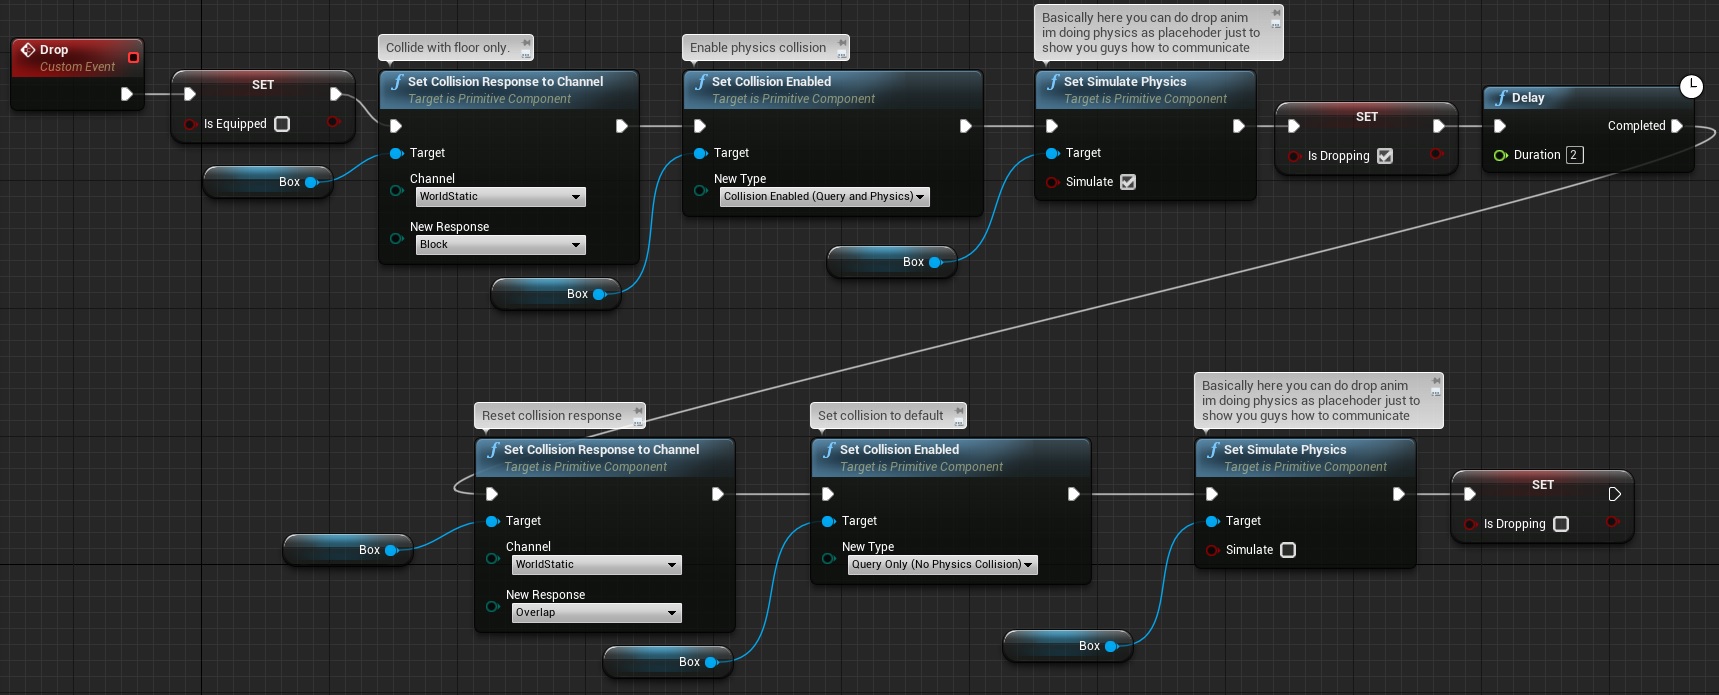
And this is all in BP_BaseWeapon!
Creating Weapons
Now create Weapon_Rifle, Weapon_Launcher and Weapon_Pistol blueprints extending from BP_BaseWeapon and fill the variables.
Weapon_Pistol:
| Var Name | Value |
| AmmoCurrent | |
| AmmoMaxInMag | |
| WeaponName | Pistol |
| AttachPoints | Right, Left |
| CurrentAttachPoint | |
| AmmoType | Pistol |
| isEquipped | |
| EquipSocketName | S_Pistol |
| isDropping |
Weapon_Rifle:
| Var Name | Value |
| AmmoCurrent | |
| AmmoMaxInMag | |
| WeaponName | Rifle |
| AttachPoints | Back, BackSecond |
| CurrentAttachPoint | |
| AmmoType | Rifle |
| isEquipped | |
| EquipSocketName | S_Rifle |
| isDropping |
Weapon_Launcher:
| Var Name | Value |
| AmmoCurrent | |
| AmmoMaxInMag | |
| WeaponName | Launcher |
| AttachPoints | Back, BackSecond |
| CurrentAttachPoint | |
| AmmoType | Launcher |
| isEquipped | |
| EquipSocketName | S_Launcher |
| isDropping |
Now place those weapons to your level so you can pick it up!
Creating Ammo Pickups
Create new blueprint extending from Actor named BP_AmmoPickup. It should have two variables:
| Var Name | Var Type | Description |
| AmmoType | AmmoType. Editable. | Which ammo type it should add ammo to. |
| AmmoToAdd | Int. Editable. | How much ammo it should add. |
Components:
- StaticMeshComponent named StaticMesh,
- Box Collision named Box. Add OnComponentBeginOverlap event,
Now in construction script let’s change pickup mesh depending on AmmoType:
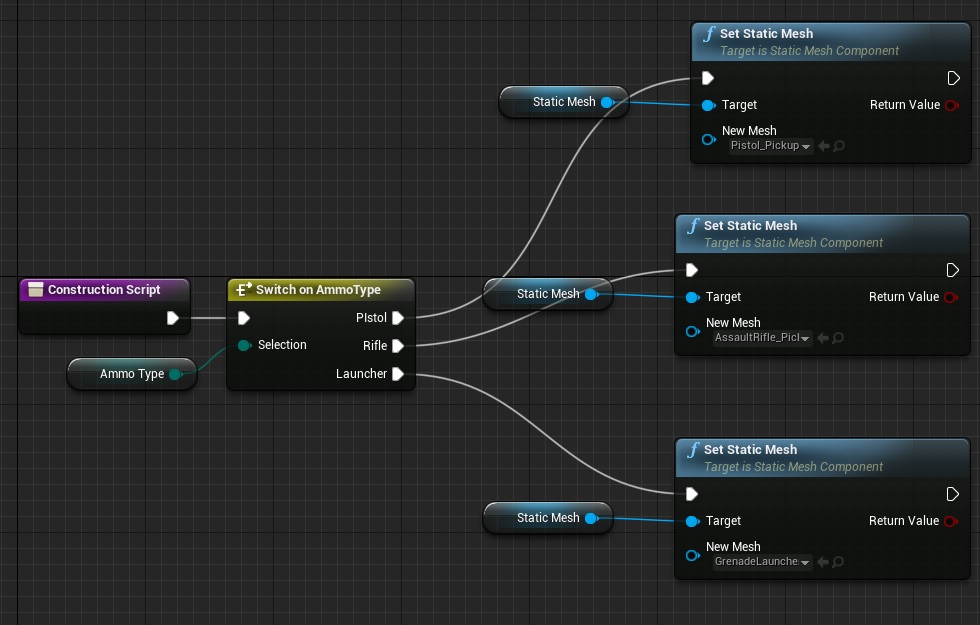
You can use different meshes.
Now Box Overlap which will increase the ammo:

And that’s all, now you can pickup ammo!
Creating UMG
Widget_ItemActions
Create new widget named Widget_ItemActions. Here you can find hierarchy:
Now open event graph and add those variables:
| Var Name | Var Type | Description |
| InvManagerRer | InventoryManager Reference | |
| InvItemRef | BP_BaseWeapon Reference | |
| isActive | bool. Should be set to True in defaults. | Holds if this widget is currently visible. |
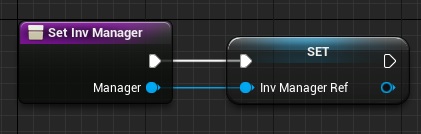
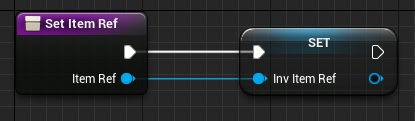
Add new Function named SetInvManager with one InventoryManager reference input:
And another one named SetItemRef with one BP_BaseWeapon reference input:
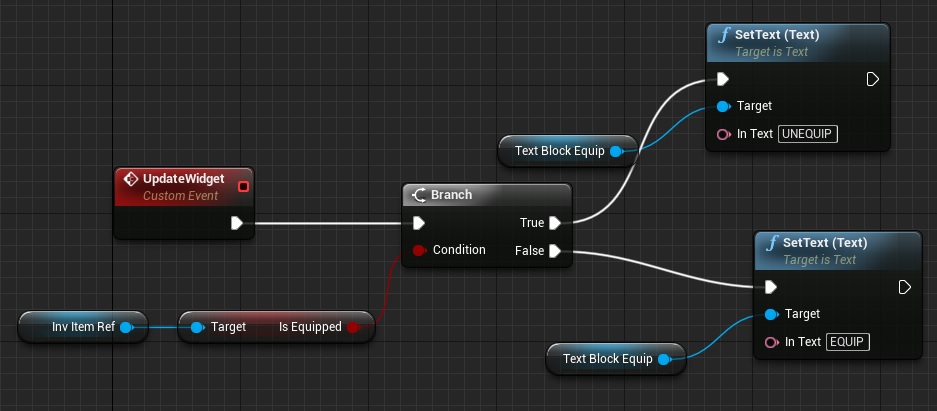
Add new custom event named UpdateWidget:
Now in OnClicked(Button_Equip):
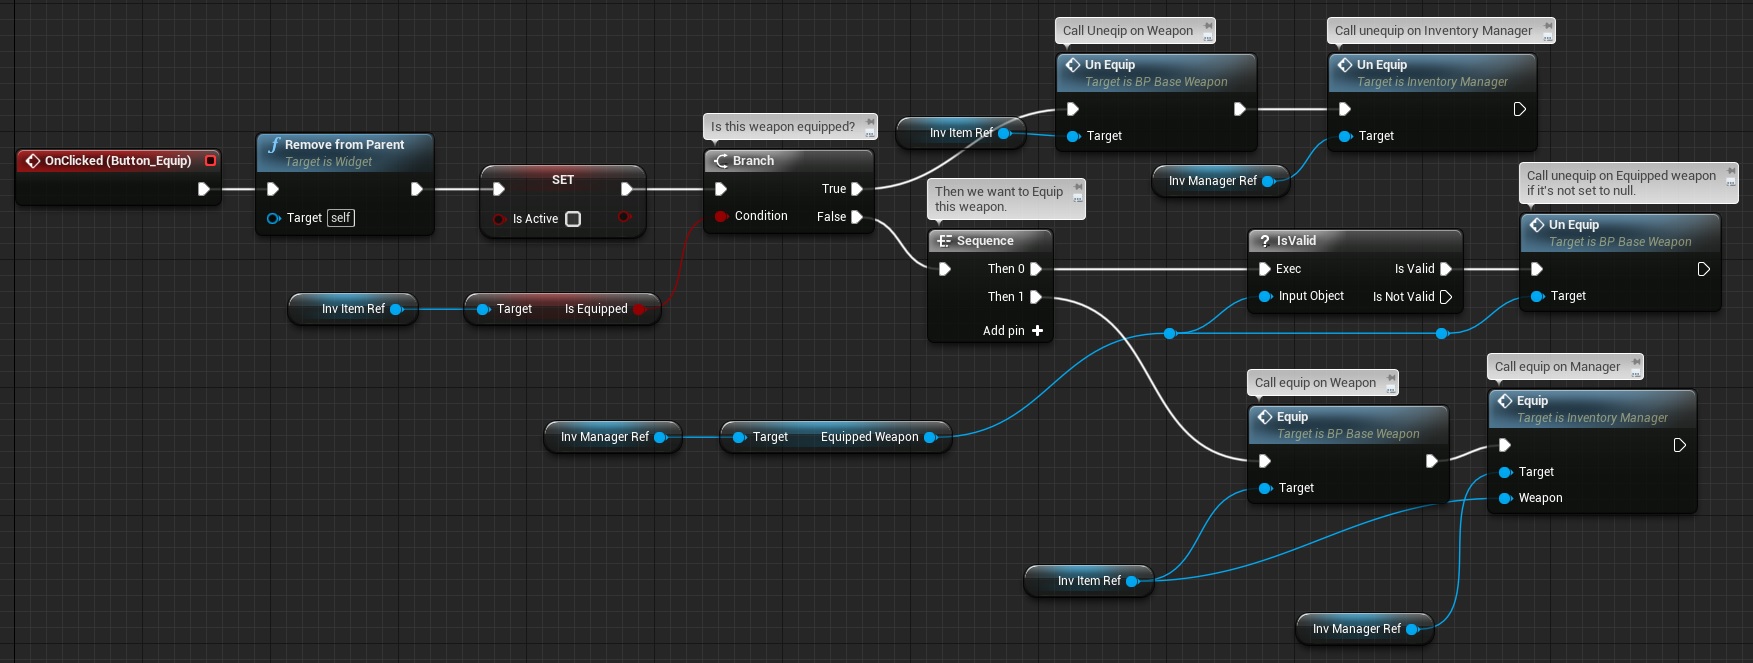
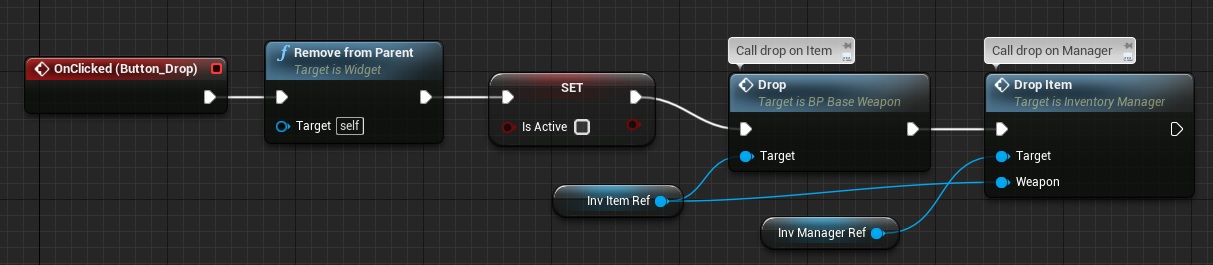
This is just calling equip and unequip events in item and manager. Now in OnClicked (Button_Drop) make sure to call Drop on weapon and manager:
Now add Tick function to determine if player clicked outside the widget so we can close it:
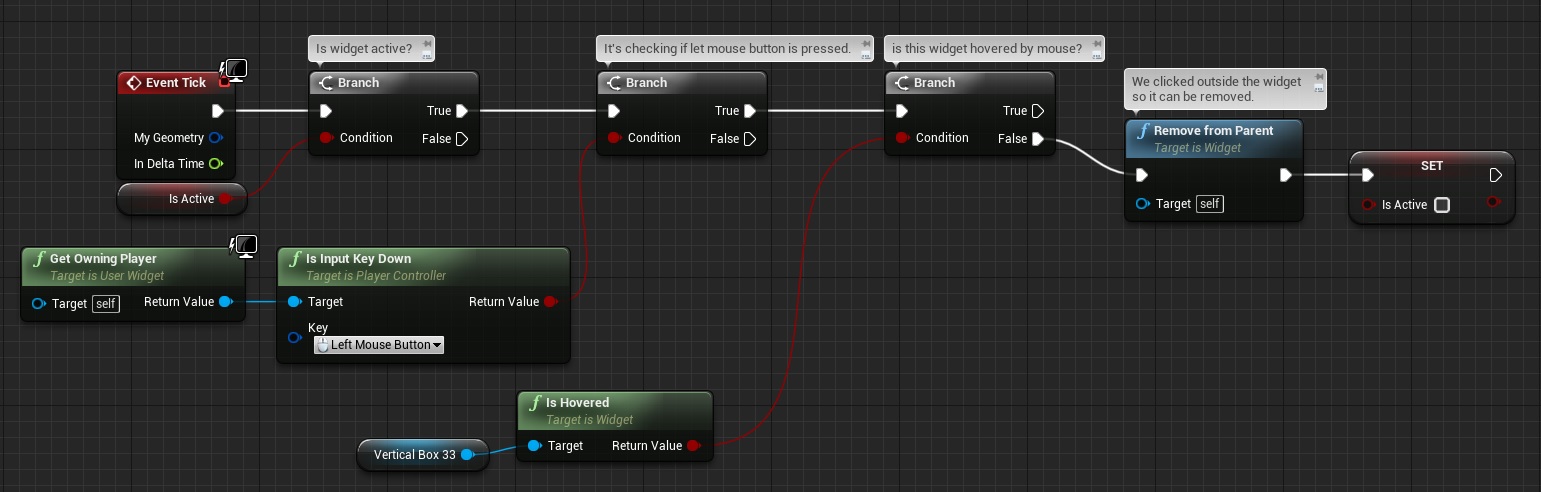
Currently (UE4.10) there is no other way to get input in Widgets. You need to use Player Controller.
And that’s all in this widget!
Widget_ItemInfo
Create new widget named Widget_ItemInfo. Here you can find hierarchy:
Open Event Graph and add these variables:
| Var Name | Var Type | Description |
| InventoryRef | InventoryManager Reference | |
| ItemRef | BP_BaseWeapon Reference |
Add new Distpacher named OnClicked.
Add new Function named SetInvManager with one InventoryManager reference input:
And another one named SetItemRef with one BP_BaseWeapon reference input:
Now create new custom event named UpdateWidget:

It just hides Equipped text if weapon is equipped and sets the name of the weapon to the UI.
Now in OnClicked(button_item) we need to create ItemActions widget and change its location to mouse location:

As you can see I’m passing Weapon and Manager references.
UI_Inventory
Now we have our Widgets we can move with Inventory UMG. Create new widget named UI_Inventory.
First create a screenshot of your character on black background.

(you can download it here)
Import it and create new material named M_Character:
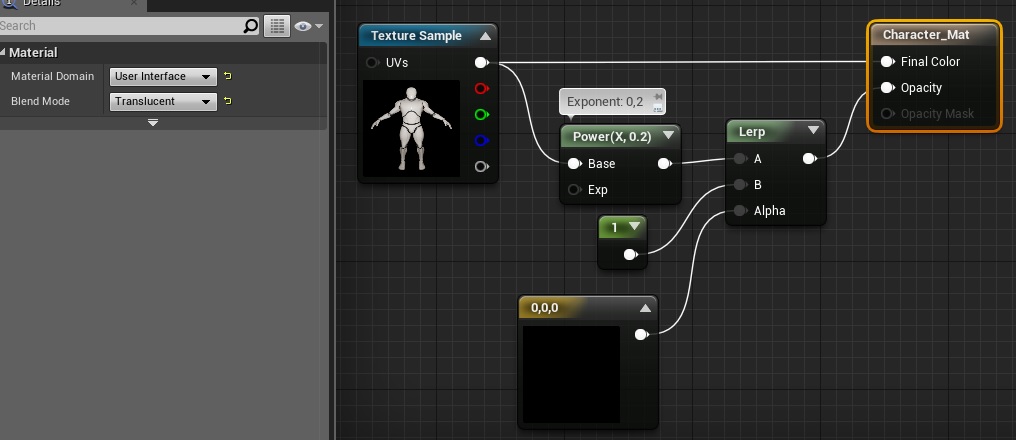
This way we can get alpha in UMG.
Open UI_Inventory and here is the hierarchy:
Open Event Graph and add one InventoryRef variable which is InventoryManager reference.
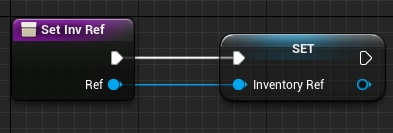
Add new function named SetInvManager:
Add another function named ClearSlots:
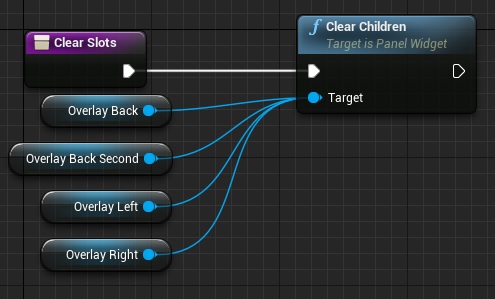
This is basically deleting widgets that are added to Overlays.
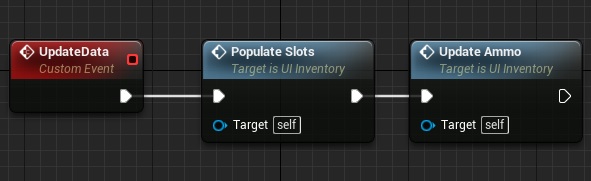
Add another function named UpdateAmmo:
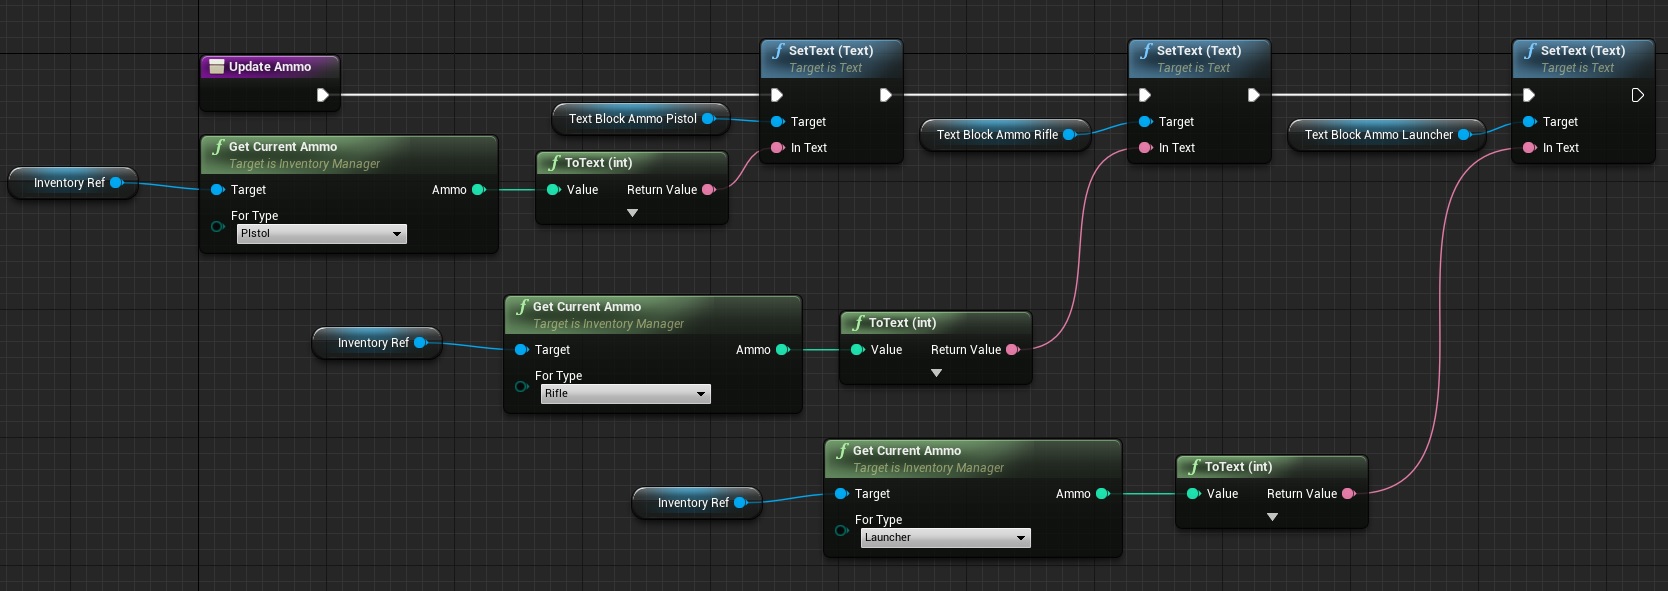
This is just setting text widgets.
Add another function named PopulateSlots with one local variable:
- L_WeaponRef (BP_BaseWeapon reference)
Part 1:
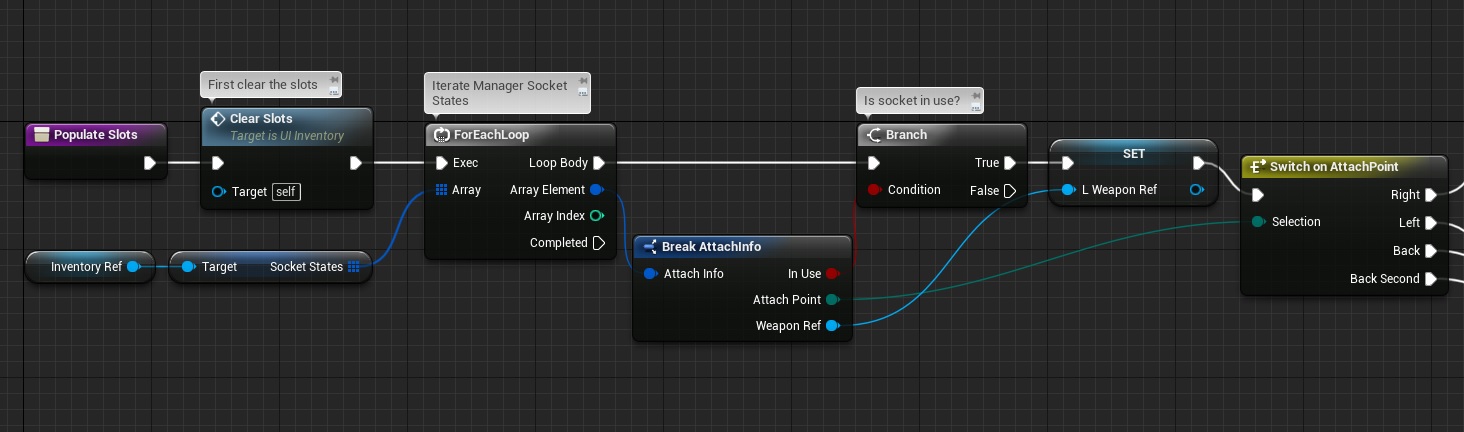
Part 2:
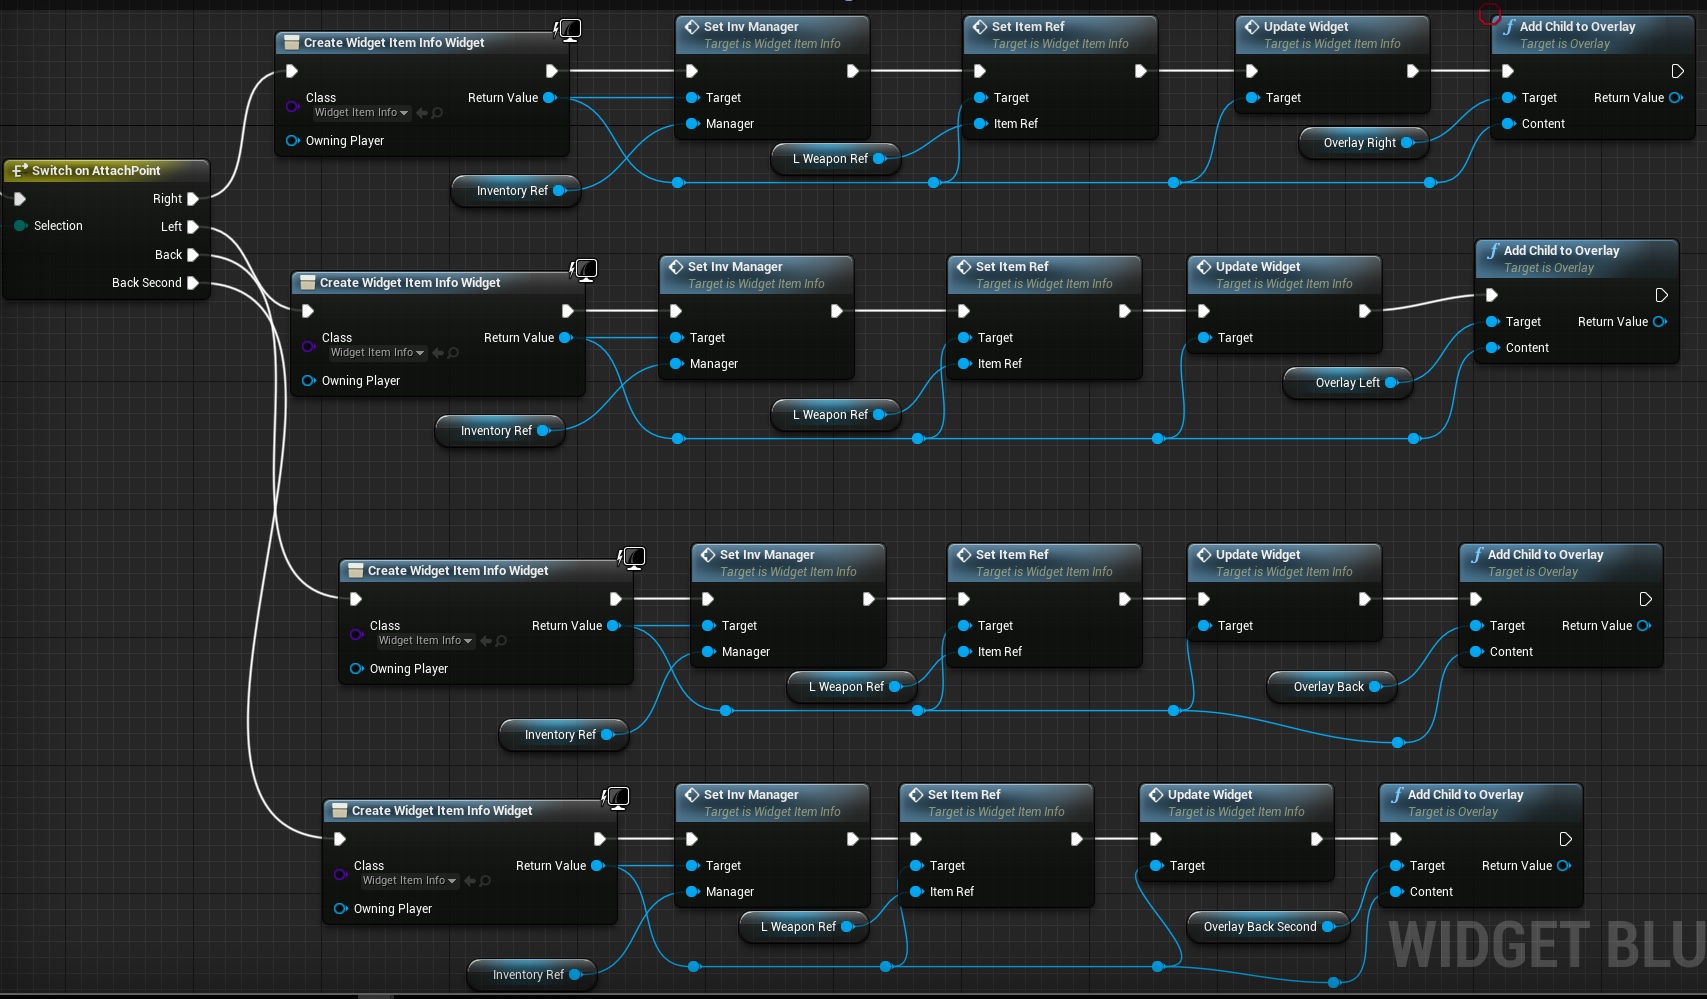
It looks complicated but it’s just updating data on created widgets. Simple as that.
Now create new custom event named UpdateData:
In Construct let’s set Input Mode and show mouse:

Create new custom event named CloseInventory:
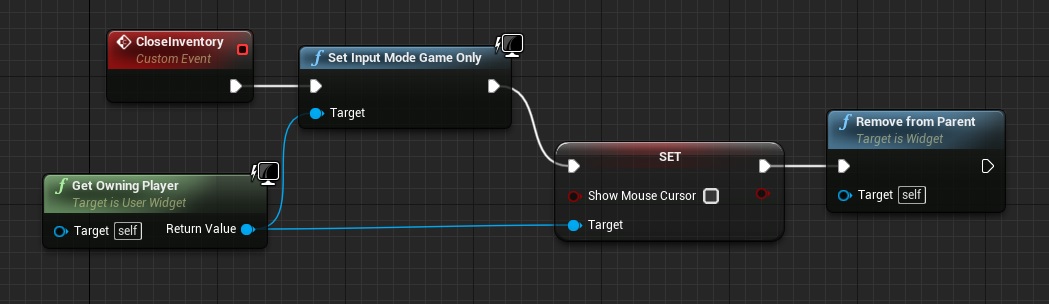
And last thing OnClicked (Button_Close):
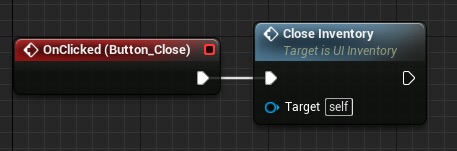
That’s all in UMG!
Showing Inventory
Now we need to trigger UI_Inventory. Open ThirdPersonCharacter and add UI_Inventory reference variable named UI_Inventory.
If you right click on InventoryManager Component you will see that you can add On Inventory State Changed event:
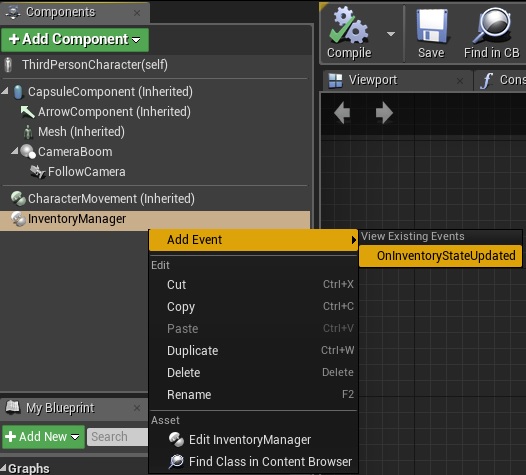
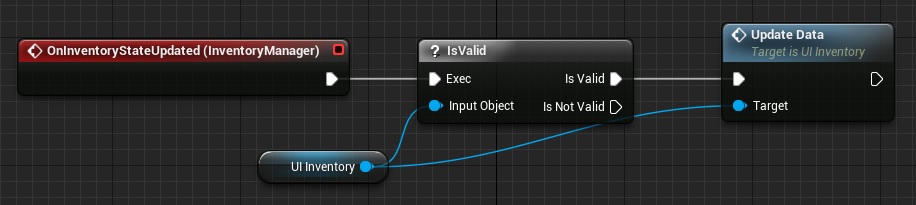
Thanks to this we are only updating UMG when inventory is updated.
I’m using “I” key event to trigger the inventory UI:
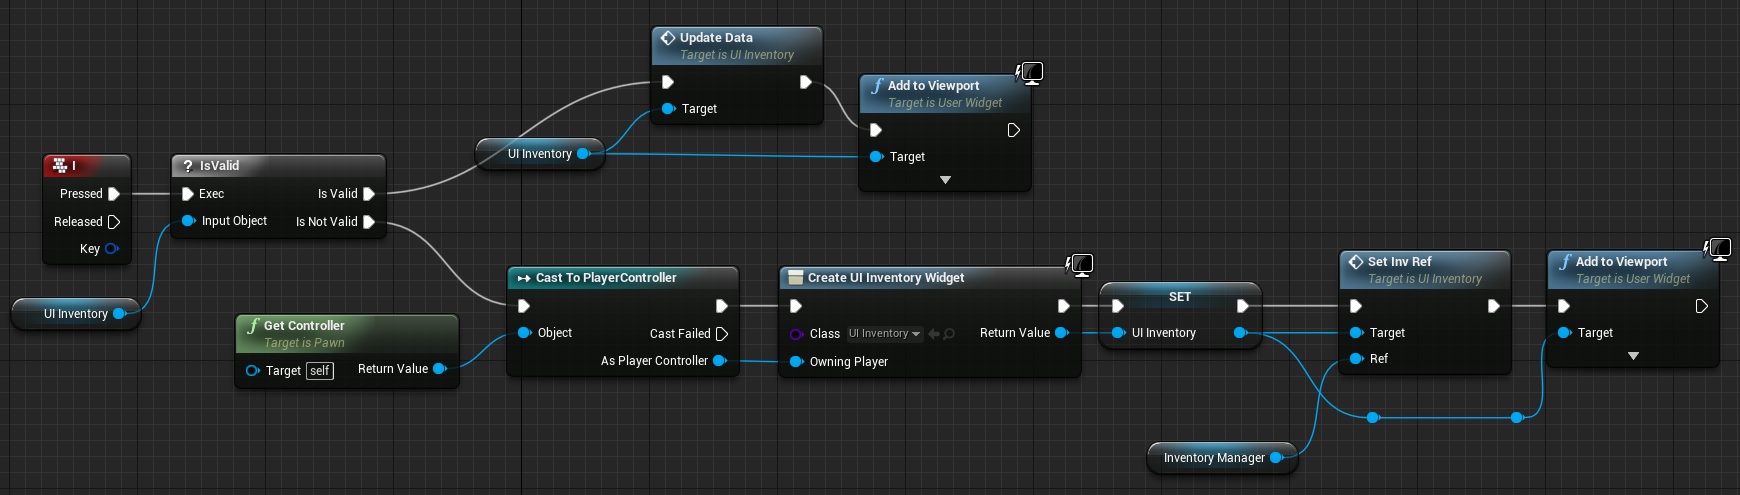
Easy as that!
Final Result:
Creating ShooterTutorial takes a lot of my free time.
If you want you can help me out! I will use your donation to buy better assets packs and you will be added to Credits /Backers page as well. Implementing game is taking time but writing about it is taking much more effort!
Awesome Set with the video i managed it .. pheww loooks good to…
wanted to know will you be adding on to this for firing logic??
You can learn fire logic from Shooter Tutorial and add it by yourself.
Roger that.. ps some slight variations but all is working Love it will check that logic hes using as well
Did you get the fire logic to work?
i followed this tutorial along time ago and was able to add my own firing logic, ifyou need help he has tutorials on fire logic reload etc under the old tutorials category
Hi this tutorial is perfect for what I need, got to the end and it works fine but I cant get the Inventory to update, when I drop an item that works, when I pick up the item again, that is not displays in the inventory, I have to close inventory and reopen it for the newly equipped weapon to display, anyone else have that same problem?!
Thanks a lot man you really got the cake I’ll donate 10$ as soon as possible.
Its a great tutorial and i managed to get to the end and everything is working fine,,but 1 problem is there—when i drop a weapon its showing in inventory but the mesh still lies on the ground and when i walk over the mesh again it is picked up in inventory but the mesh lies there…please help me….
EDITING MY COMMENT—-when i drop a weapon its removed from inventory and the mesh lies on ground but when i pick it up….the inventory shows it but mesh remains on ground….Actually i did mistake on typing previous comment….Sorry….please help me with this problem…
Also I’m getting an error–“Warning Invalid Simulate Options: Body (Weapon_Rifle_122.Box) is set to simulate physics but Collision Enabled is incompatible”……its not only with rifle but all weapons that is pistol launcher and rifle everything else is working fine…any help would be much appreciated
The box collision needs to be the default scene component. I struggled with this for a few hours 🙁
You are awesome!!
By the way rather than using a texture sample, can we use an actual character
animating in a view port as you add weapons?
Can you show me or tell me how you would make that?
Do you have a video to how to add animation when the weapon is in his hands. and love this.
Hey great tutorial but can I use multiple weapons in same sockets? Example- 10 or 20 rifle classes in same socket??
Can I add more weapons to this system?
just to let everyone know this does not work properly in 4.15, I’ve tried multiple times to fix my problems the major problem is the ammo pickup and subtracting ammo from the ammo info structure it doesn’t update and it doesn’t read write, i set up an weapon system fie and reload and when reloading it doesn’t subtract the ammo from the ammo info it also will not read how much ammo is in the ammo info struct, now i know this is a problem with the engine version because I’ve done it in other version just fine. @andrzejkoloska if you now better way ive emailed you with these issues thanks
Hi i seem to be having a problem with one of my blueprints, i’ve followed the tutorial but i have narrowed the problem down to my “find a free socket” function and attachment points varible.
There is 4 sockets but it is only picking up the object to one of them and thenit doesn’t pick any objects up if the object is a single varible, if its set as an array it doesn’t pick anything up at all.
if i leave it as a single varible and then insert make array in the function before the loop it will pick the weapons up but will still go to the first socket and just swaps the mesh i’ve just walked over with the previous one upto 4 and then stops after that.
i’ve gone back through the video a few times to make sure i’ve done everything right and i’ve followed it through the same so i don’t know where i’ve gone wrong can you give any advice?
how did you became game producer? how вid you made first money for it?