In this Tutorial I will focus on basic summary screen and game loop:
- Showing player score and hi-score,
- Saving hi-score,
- Communicating between widgets and game to create simple loop main menu -> gameplay -> main menu,
Stats and leaderboards will be added in separated tutorials as I will do much more complicated stuff there.
This Tutorial has been created using Unreal Engine 4.10
Make sure you are working on the same version of the engine.
Live Stream
You can watch Live Stream of developing this Tutorial:
Game Instance
Hi Score
In ShooterGameInstance there is Levels array which stores hi-score for each level. Before moving forward open Save_Instance save class and add the same Levels array.
Now update Save and Load functions to store / get Levels array:
![]()

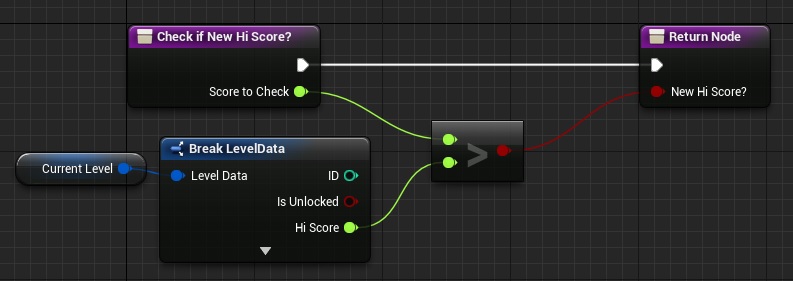
Now create new function named CheckIfNewHiScore? It should be pure:
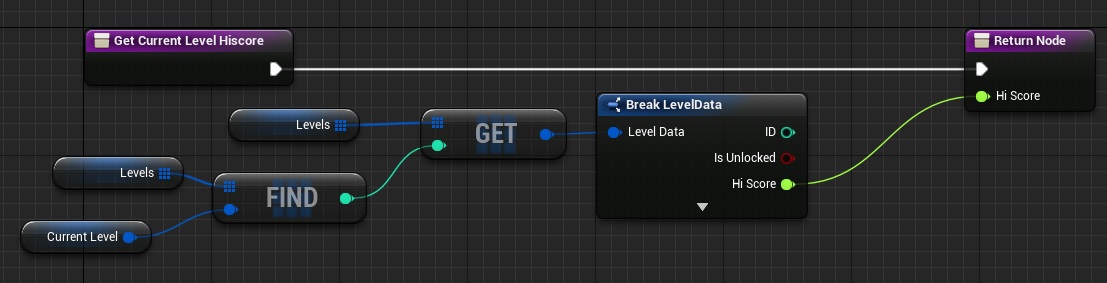
Add another function named GetCurrentLevelHiscore. Pure as well:
And the most important one: SubmitHiScore. With one local int variable named Index:
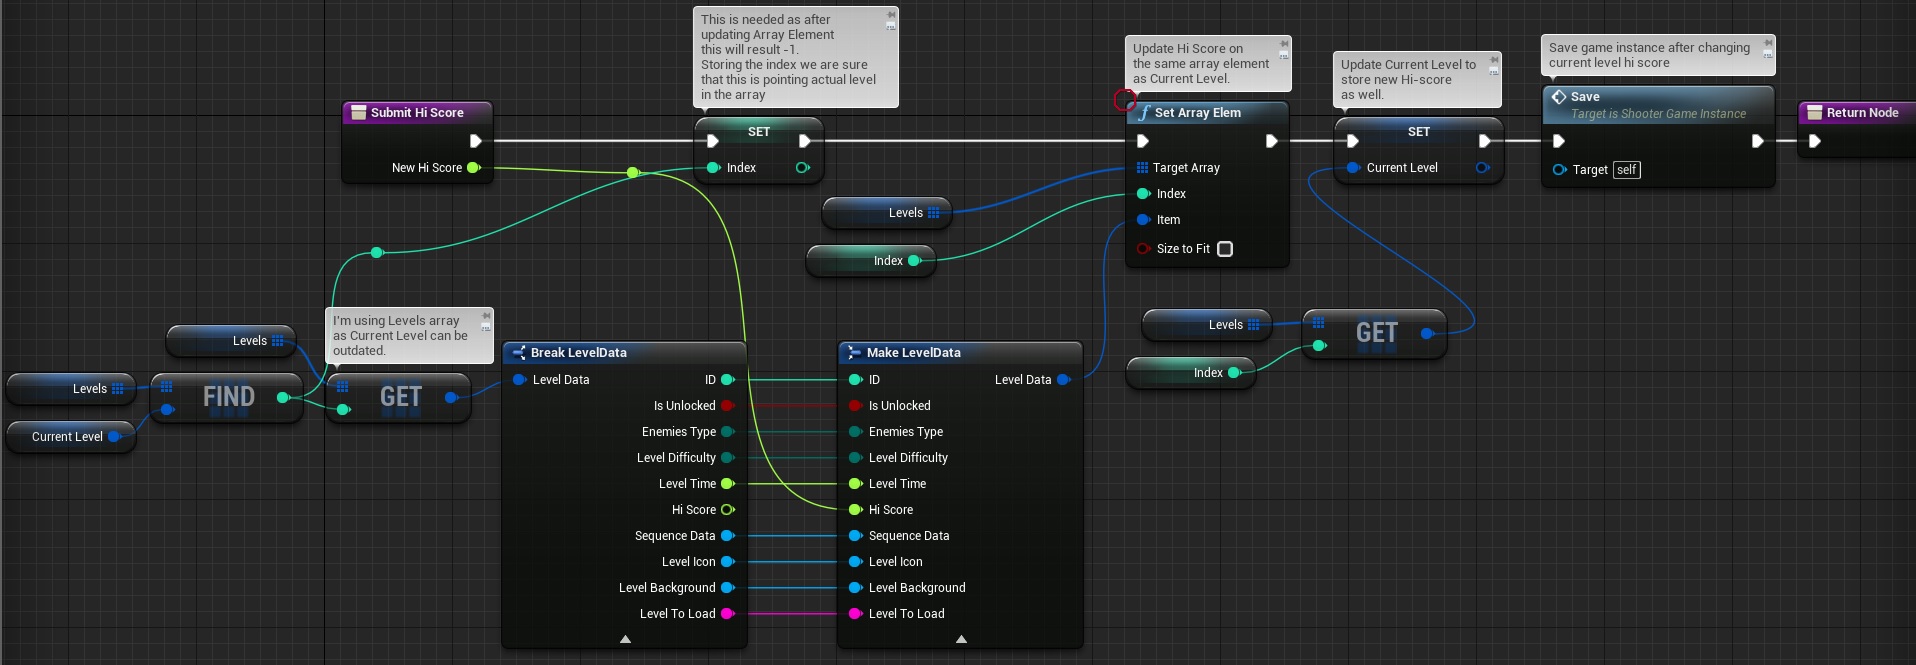
Please read the comments on the blocks as it is critical how to use Find In Array node after changing some values.
Functions to open Menu or Gameplay
Next part is to create functions that will open main menu map and gameplay map selected by player.
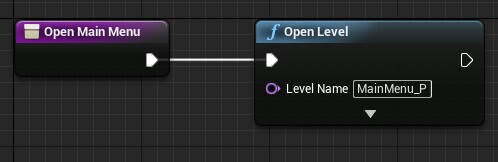
Create new function named OpenMainMenu:
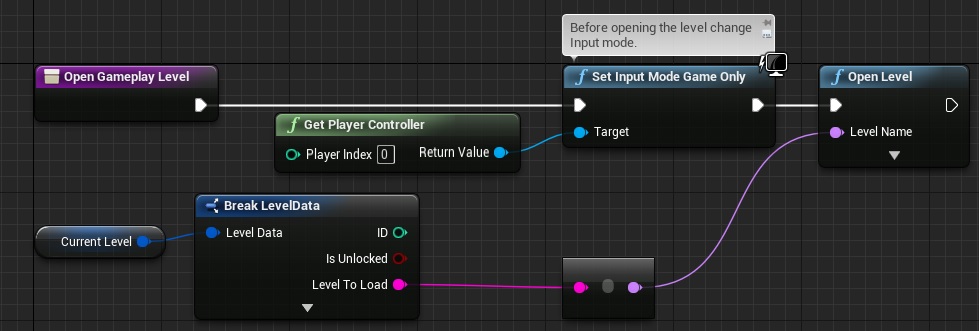
And function OpenGameplayLevel:
That’s all in Game Instance!
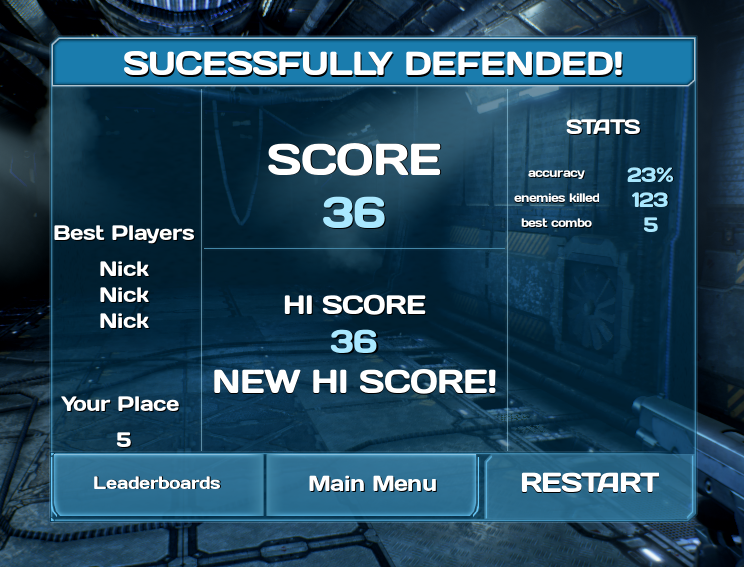
Summary Screen UMG
This UMG is complicated and the best way would be watch Live Stream.
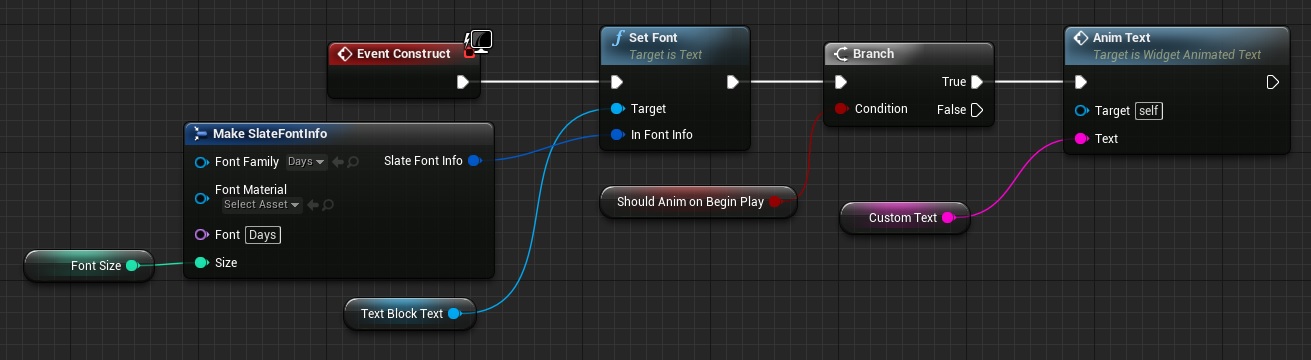
Before moving forward Widget_AnimatedText need to be updated. Open it and these variables:
| Var Name | Var Type | DefaultValue | Description |
| ShouldAnimOnBeginPlay | bool | Editable. This will trigger animation without calling function. | |
| CustomText | string | Editable. This will be used for text if ShouldAnimOnBeginPlay will be true. | |
| FontSize | int | 24 | Editable. |
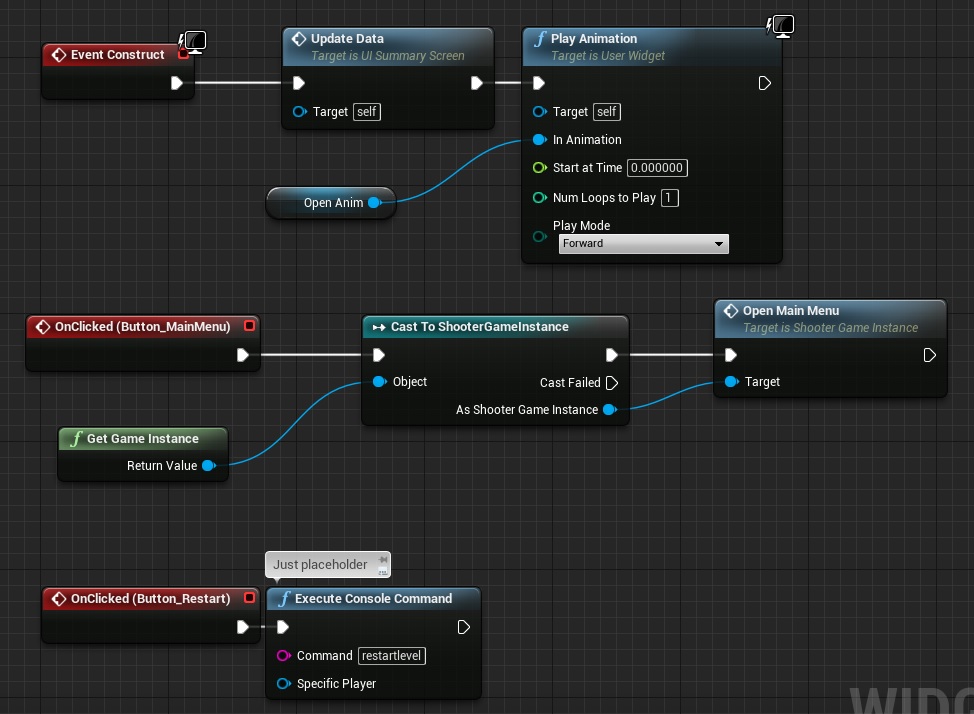
Now just use Construct to check the bool:
If you don’t have Anim Text function you should read tutorial about Level Selection. (Creating Animated Text Widget part)
Now create new widget named UI_SummaryScreen.
Hierarchy can be found here:
Now open Event Graph and add those variables:
| Var Name | Var Type | DefaultValue | Description |
| bNewHiScore | bool | Editable. Expose on Spawn. We will know if show new hi score text. | |
| bPlayerWasDead | bool | Editable. Expose on Spawn. We will know which title UI should have. | |
| Points | float | 24 | Editable. Expose on Spawn. Just storing points. |
| HiScore | float | Editable. Expose on Spawn. Just storing hi-score. |
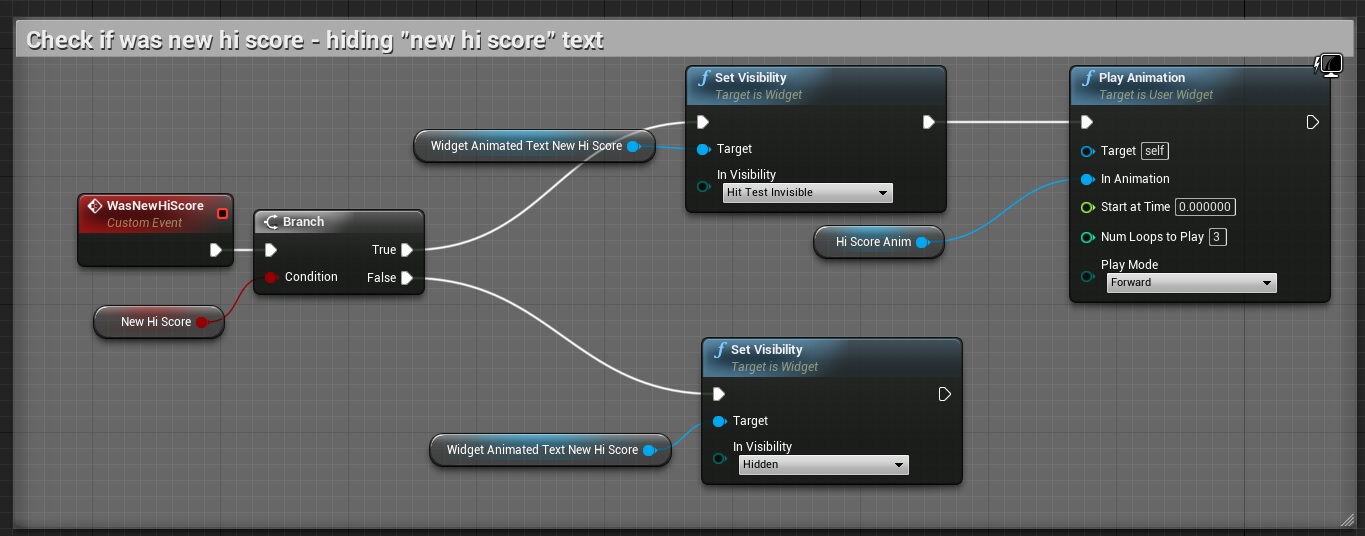
Now create new custom event named WasNewHiScore:
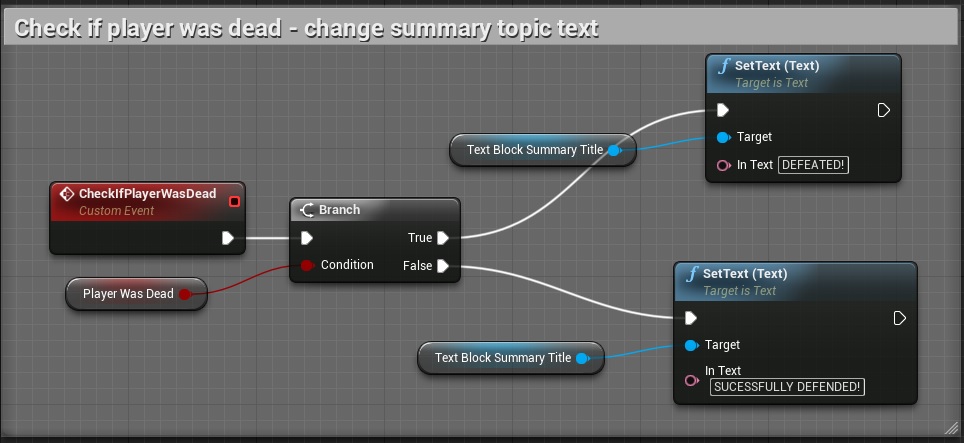
Another one named CheckIfPlayerWasDead:
And another one named UpdatePointsAndHiScore:
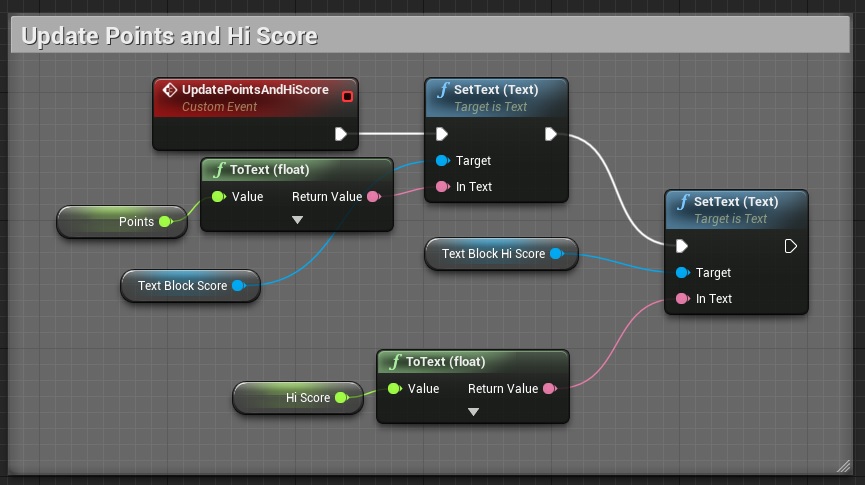
These are just simple events changing widgets on variables changes.
Now UpdateData custom event which will call all of those events:

Now in Construct call UpdateData and bind buttons:
Easy.
Game Ended Events
We need to know when game ended and if player was killed.
Open GameplayCharacter and add OnPlayerDeath dispatcher. Open GameplayGameState and add OnGameEnded dispatcher with one bool input named byPlayerDeath.
Still in GameplayGameState add one new bool variable named isGameEnded. Then add new function named SubmitScore with:
- Output: CurrentHiScore (float),
- Output: WasNewHiScore (bool),
- Local Variable: NewHiScore (bool),
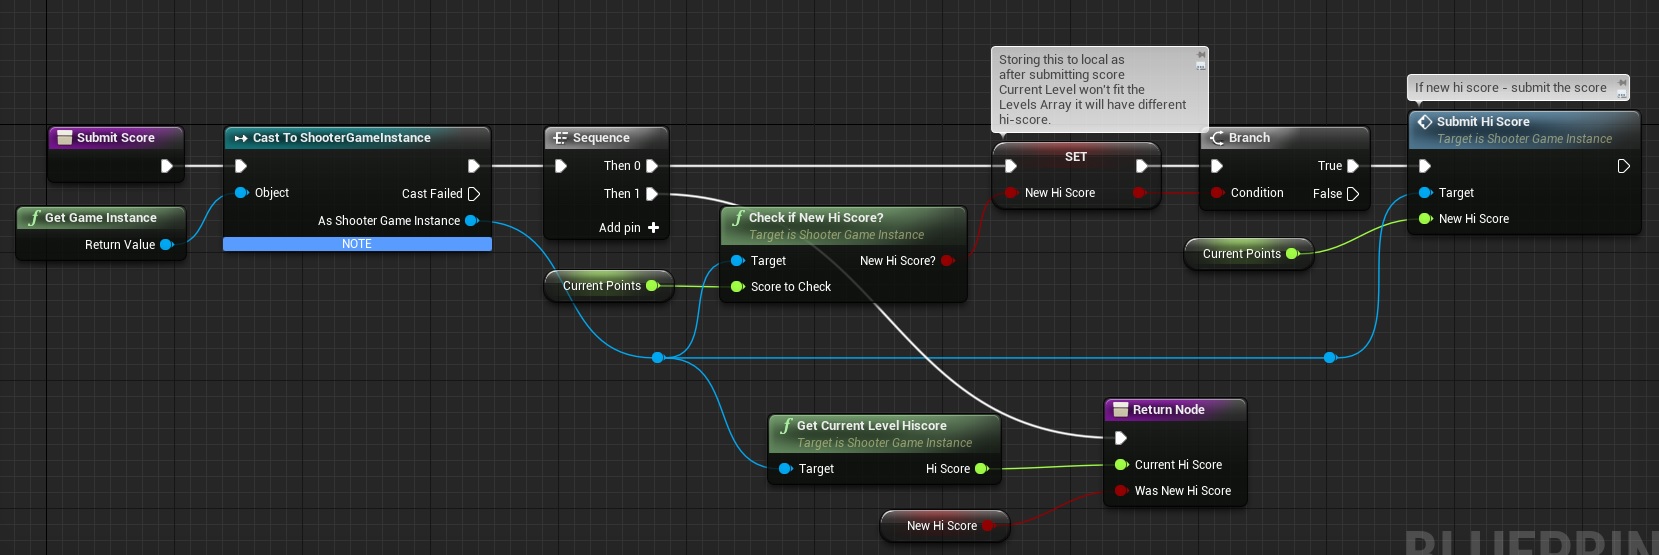
This is basically checking if there is new hi score – if yes it’s submitting it to ShooterGameInstance.
Create another function named ShowSummaryScreen with:
- Input: WasPlayerDead (bool),
- Input: NewHiScore (bool),
- Input: HiScore (float),

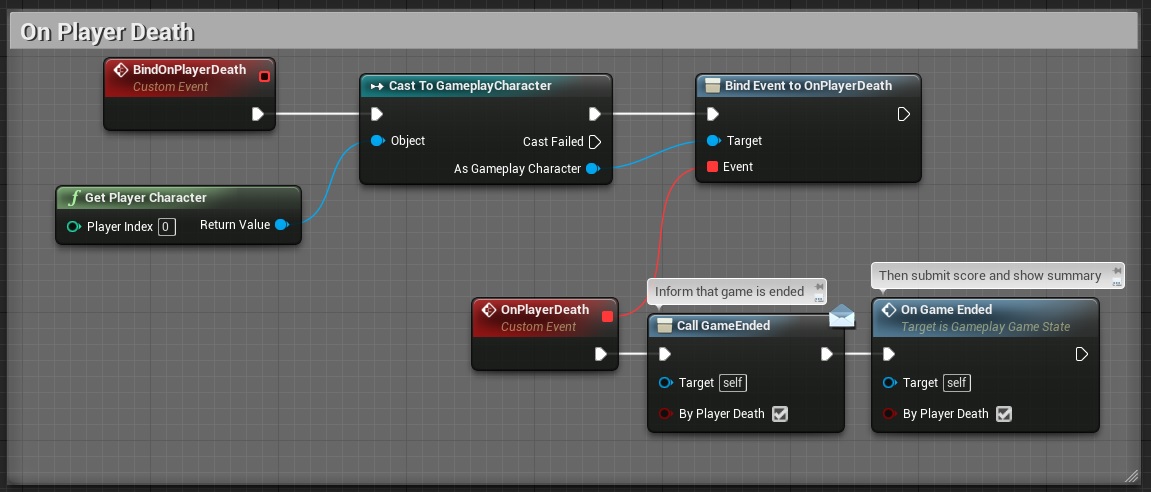
Create new custom event named OnGameEnded with one bool input named ByPlayerDeath:
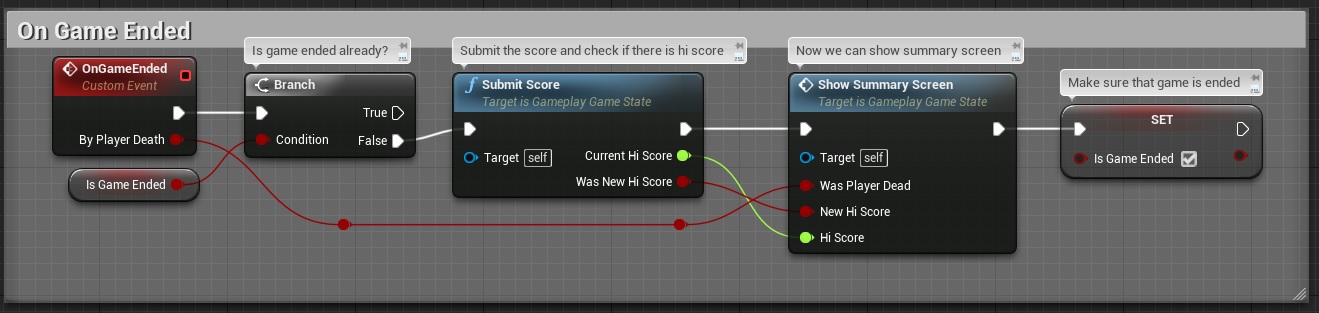
Add another custom event named BindOnPlayerDeath:
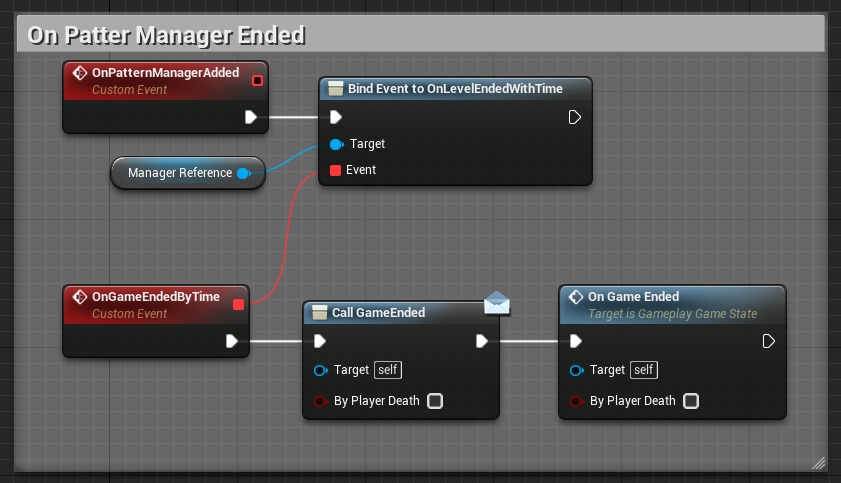
Now make sure you call OnGameEnded dispatcher and custom event on pattern manager finish:
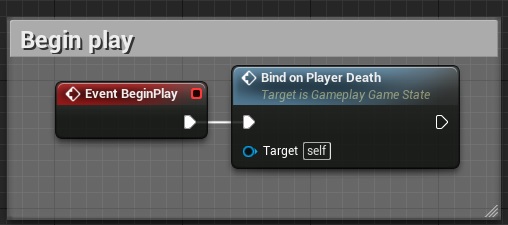
Now just bind OnPlayerDeath in Begin Play:
Now we have end game communication. Both for player death and level finished from pattern manager.
Updating GameplayCharacter
Open GameplayCharacter and add one new bool variable named isGameEnded. Next add new function named HideHud:
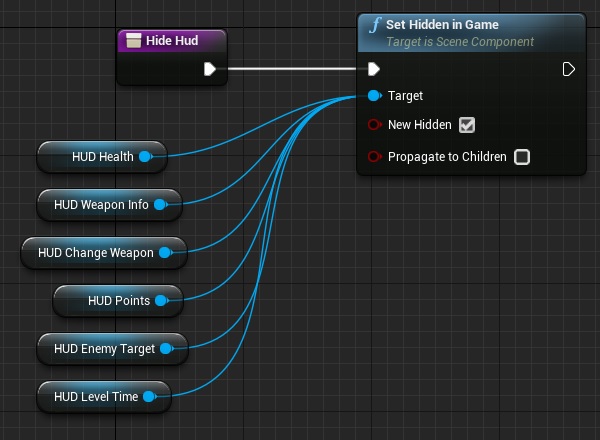
Its just hiding all 3d widgets.
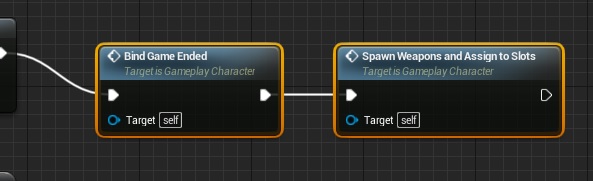
Character should know when game ends from Pattern Manager that’s why create new custom event named BindOnGameEnded:

Now let’s use earlier created PlayDying event to call dispatcher and hide hud as well:

Make sure your begin play calls BindOnGameEnded and earlier created function Spawn Weapons (did was called by Debug UI, now it’s time to call it properly)
Last thing is enemy target health hud update (UpdateEnemyTargetHUD):
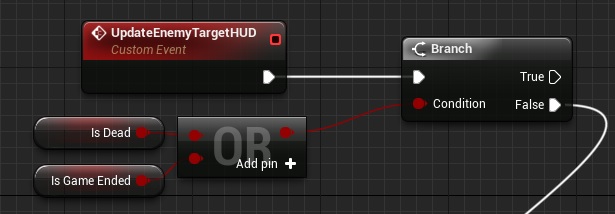
So it won’t be shown if player is dead or patter manager ended.
Updating UI_LevelSelectionActor
Now it’s time to update Level Selection UI and Actor to pass the chosen level data to Game Instance.
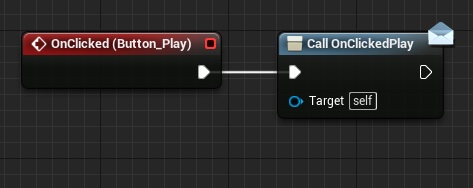
First open the UMG – UI_LevelSelection and add OnClickedPlay dispatcher which should be called on Play button:
In UI_LevelSelectionActor there is a lot of bindings in Begin Play to communicate between level selection and weapon selection. The problem is that 3d Widgets in Standalone Game aren’t loaded in Begin Play, they need more time to load so Get Widget Class will result Null.
Delete Begin Play event and add new custom event named BindWidgetsEvents. Just replace Begin Play with that.
In the end of BindWidgetEvents (which was Begin Play earlier) make sure you bind your OnClickedPlay from UI_LevelSelection:
This way I’m passing the data to Game Instance.
But if we don’t have Begin Play now all of the bindings won’t be called. In this example I’m triggering the Widgets when player is near so I can use this event to call BindWidgetsEvents.

This way Widgets will work in Standalone Game.
Final Result:
Creating ShooterTutorial takes a lot of my free time.
If you want you can help me out! I will use your donation to buy better assets packs and you will be added to Credits /Backers page as well. Implementing game is taking time but writing about it is taking much more effort!
Pingback: Adding PlayFab Online Leaderboards | Shooter Tutorial
Pingback: Adding Player Stats | Shooter Tutorial
execute console command “RestartLevel” is restarting the level but the player character controller is seams to be null because I can’t move with the mouse and any hotkey like “G” for weapon selection is not working. maybe there any other way of accomplishing Restart?
Make sure your controller is in mode: GameOnly. Maybe some UMG widget is still here and controller is in UIOnly mode.
thanks I made the following: before the executing the console command I have used Set input mode Game Only. And everything is working fine!))) Thanks a lot again man)
And my High Score is always is illustrated as 0. Maybe you didn’t mentioned where you assigned the velue of the Current points to the HighScore variable?
I dont know is it right or no but my own solution was the following: when we are checking “NewHiScore?” in WasNewHighScore (UI_SummaryScreen), when the contion is true, at the end of the line I am setting the value of the points to the HighScore
it is assigning the value to the high score but whenever you restart all data lost and event less score is evaluated as Highscore. help please
Another issue, Sorry for that man)) and thanks for your great tutorials))
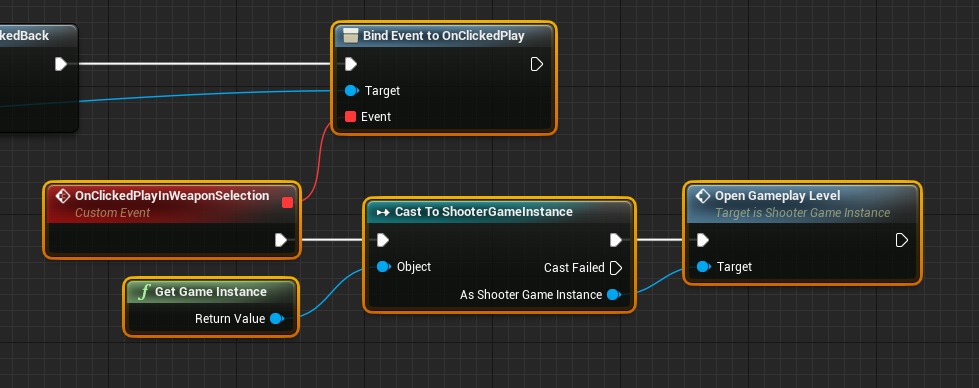
when i am clicking the play in weaponselection umg, where we select the weapon for playing and shooting with them, on click that button I am doing there the same casting to the shootergameinstance and getting from there the OpenGamePlayLevel function, as we did in SummaryScreen, it is not working and not loading but closing the playWindow. Can you please explain why that issue is happening?
Hi Farrukh, sorry for the incredibly late reply but I’m way, way behind you guys. To fix that I did the following –
– Add OnClickedPlay event handler to UI_WeaponSelection, instead of LevelSelection
– Hook up the same “Bind Event to OnClickedPlay” nodes as pictured, but make sure your ‘target’ pin is linked to the cast to UI_WeaponSelection, instead of LevelSelection
– Everything else should be same as pictured
Now, in your Game Instance node, find the “Levels” array variable, and populate all the “Level to Load” fields. If this is left blank the PIE window will simply close, complaining about invalid URL path. Filling these in with map name(s), you should be good to go.