Earlier I have created really simple leadeboards which can be used quickly in GameJams but now I will do something much more better. It will be simple as well, but have much more possibilities.
In this tutorial you will learn how to create online, cross platform leaderboards for your game using PlayFab.
This Tutorial has been created using Unreal Engine 4.10
Make sure you are working on the same version of the engine.
What’s PlayFab?
It’s backend platform which can be used to:
- Use JavaScript cloud code: thanks to this you can do klans, achievements, leaderboards, player gifts, online inventories etc – basically you have a way to store your data and get it crossplafrom. You have endless possibilities how to use Cloud scripts,
- Turn based and runtime multiplayer, (with Photon integration)
- Login with Facebook, Twitter, Steam, PSN ID etc – basically authenticate,
- Create cross platform marketplace and use payment providers like PayPal,
- Send messages or notification,
So basically if you are thinking about those features PlayFab is way to go because…
Why PlayFab?
I have tried all free services like Playfab to create leaderboards. Why Playfab?
- It’s FREE. It have usage limits but if you aren’t making 1 mln downloads in a week you will be totally fine,
- Because of great support – if you need help just make a ticket. Playfab Developers are really helpful and open minded!
- Because it’s the easiest system I have tried. Easy to learn and create simple stuff and have endless possibilities which more advanced users can use,
- It’s in cloud. Which means it will be cross platform – for example I will be able to show you top 10 players here at ShooterTutorial site. (not yet as I need to learn javascript and JSON -> PHP scripts, but yeah – it can be done!)
Prerequisites
You need to have Visual Studio installed to compile the Blueprints PlayFab plugin. Don’t worry you won’t be writing any code!
To install Visual Studio open editor and find File -> Add C++ Code To Project. In new window click Install Visual Studio 2015. It will take some time. When finished restart your computer.
In order to move forward you need to download PlayFab SDK. Just use download zip button. Please read the readme file and open client ExampleProject. Try to get your register / login to work using readme file at github site. It will guide you with Playfab account registration and you will get the most basics knowledge about framework. Take time to figure how to register / login!
If you are ready just copy PlayFab plugin to your plugins. Make sure you are using Client version.
Some theory
You should watch all of the tutorials made by Playfab – for example about leaderboards. They are in Unity but you will get a lot from them.
Playfab have simple architecture:
- User need to login,
- User can have stats, (which I will use for leaderboards and this tutorial is about player stats),
- User can have characters and they can have stats as well,
- Your game can have stats (Title Data),
- Your game can have marketplace (Economy)
- Your game have cloud script with functions that can be called by Player, and they can return something, (eg UpdateUserStat which is server function)
- You can get all of the data using Blueprints Nodes,
Playfab uses JSON to store data on the server and you will be sending and getting JSON data as well.
My loop is really simple:
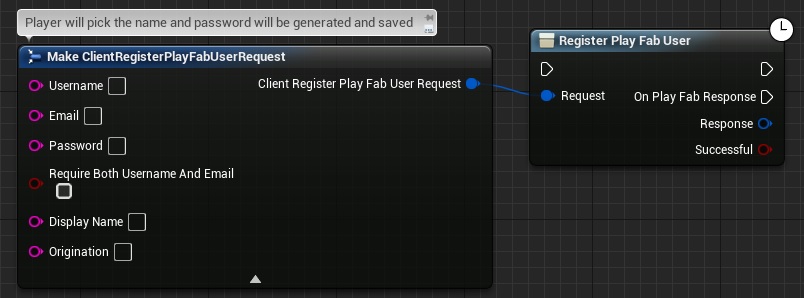
- If Player doesn’t have name (so he runs the game first time) register new user using Playfab so you don’t need to put email. Player just need to set nick and that’s all. Game will remember his nick and generated password so in next launch logging will be done without player knowledge,
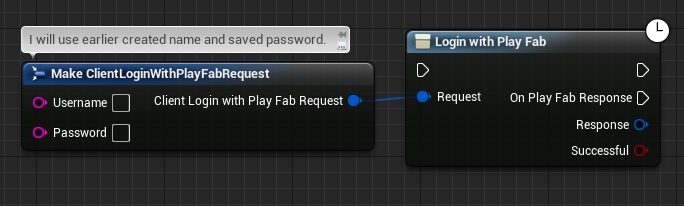
- If Player have name – login using earlier saved name and password,
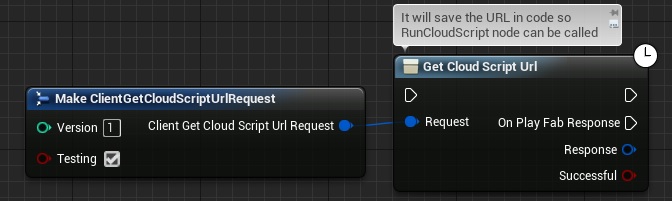
- When launching the game I’m getting CloudURL as well as is needed to call Cloud Script later.
- When player want to see leaderboards I’m just using GetLeaderboard nodes
- When new hi-score appears I’m calling cloud script which is updating player stat. You will see updateLevelScore function later.
That’s the basics.
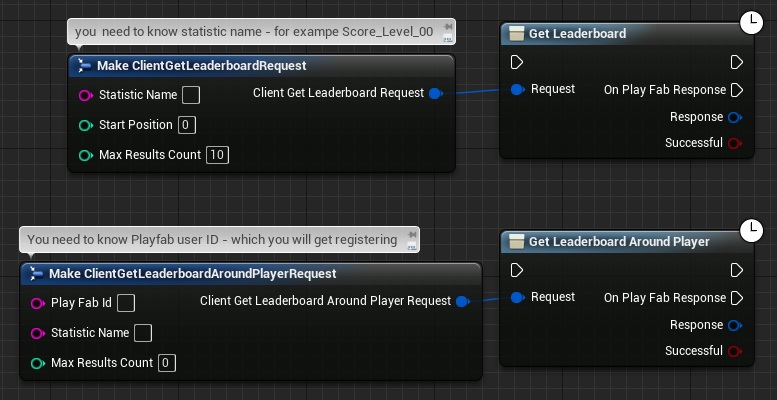
Theory – Getting Data
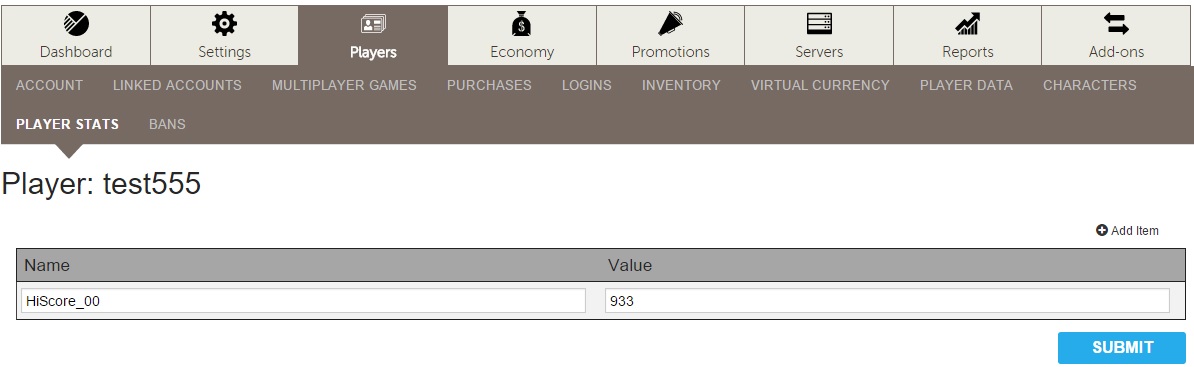
It is simple. You are storing player stats using names – in this short example “hiscore” with a value. (SetNumberField) In my case which I will show you later it’s “HiScore_LEVELID”.
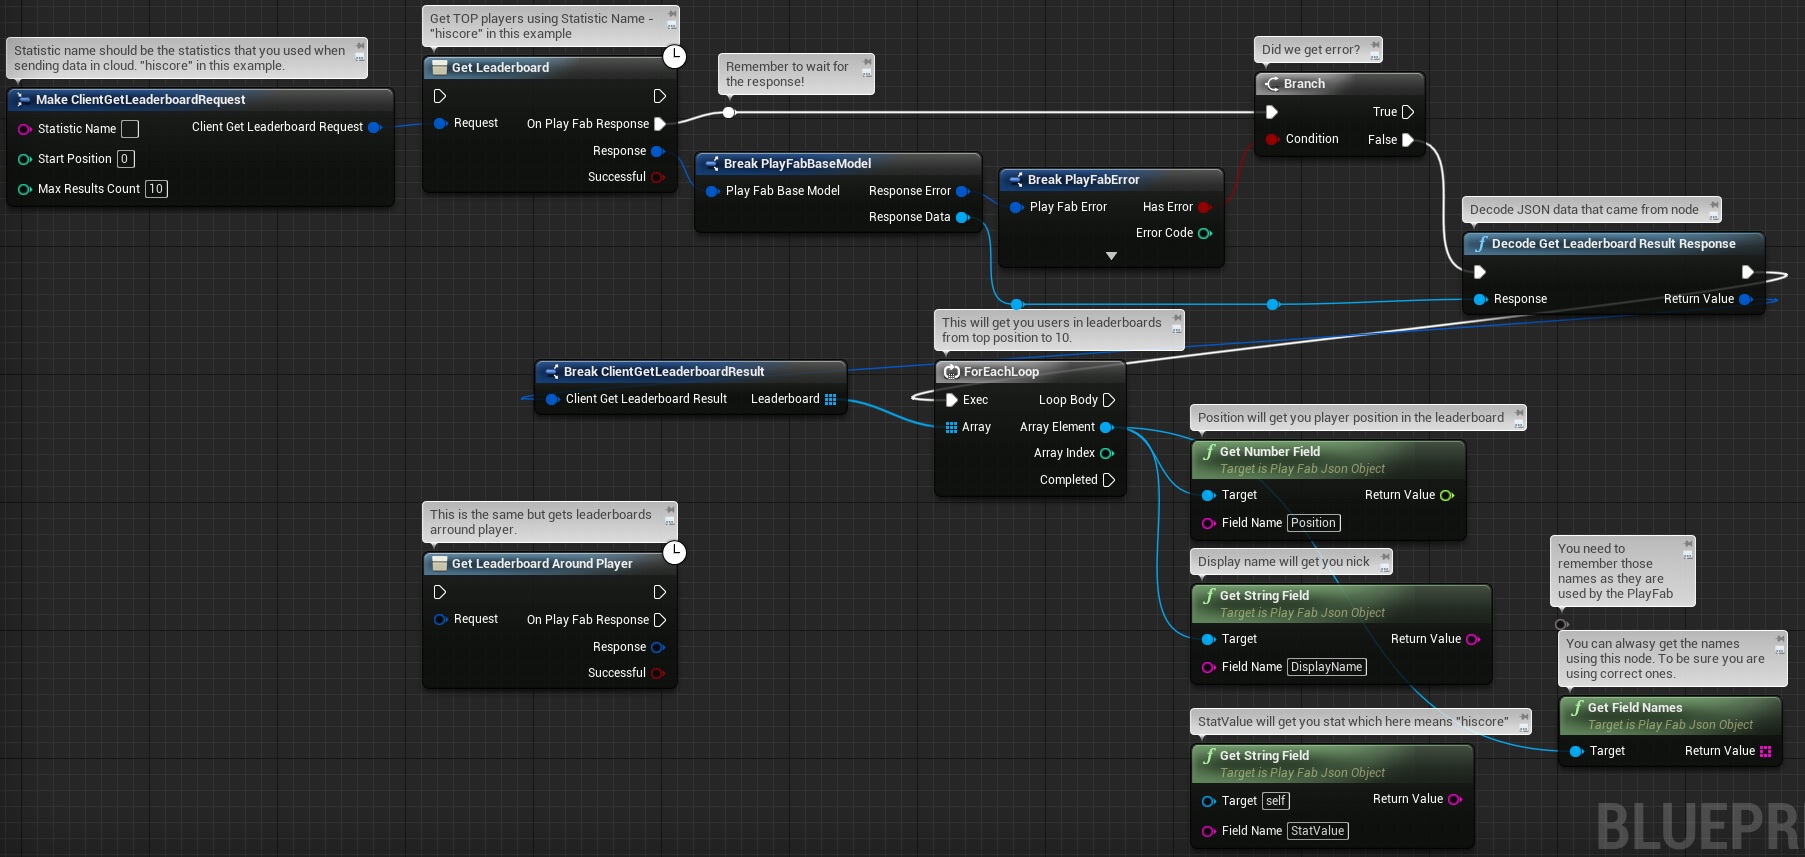
You are getting all players in range that you provided. You can decode JSON data and use foreach to get the values. They are hardcoded as:
- Position, (which means position in leaderboard)
- DisplayName, (which means DisplayName variable when registering)
- StatValue, (name of the value which you are trying to get leaderboards for – in this example it’s “hiscore”,
Getting data is really simple. You can use GetUserStatistics node as well to get the “hiscore” value. Leaderboards nodes gives you arranged players depending on the stat you are referring.
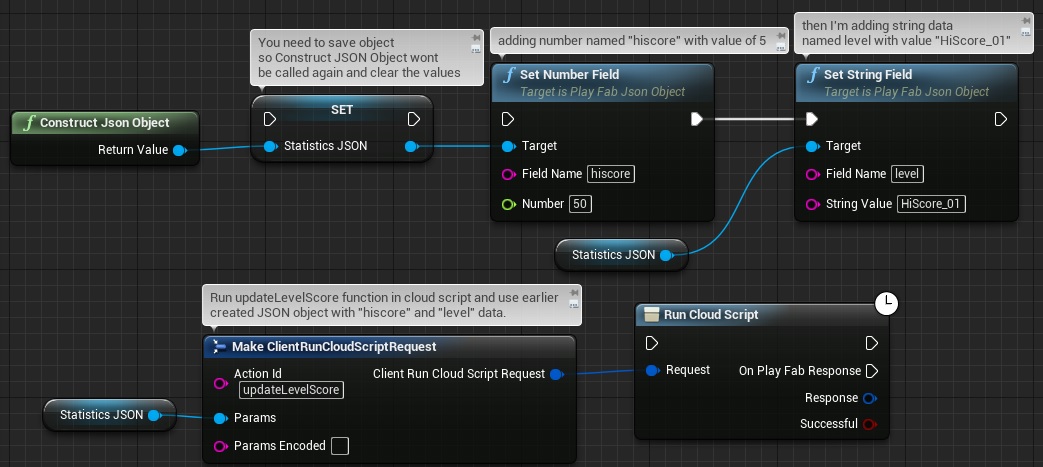
Theory – Sending Data
There is node called UpdateUserStatistics which can directly set player stats but you shouldn’t use that as players can figure out how to post results. By default PlayFab is disabling this feature but it can be enabled in your playfab settings:
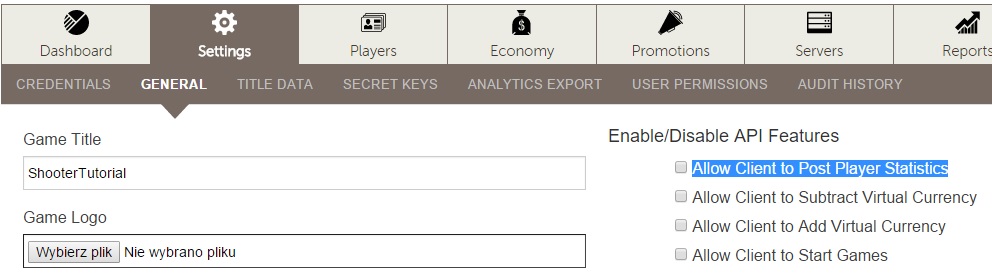
You can use this node to test things out but for sending (updating) actual data you should use cloud script.
This looks more complicated but it’s not. User just request to call function (in cloud script) with some input (JSON data) and server will give you results using JSON data.
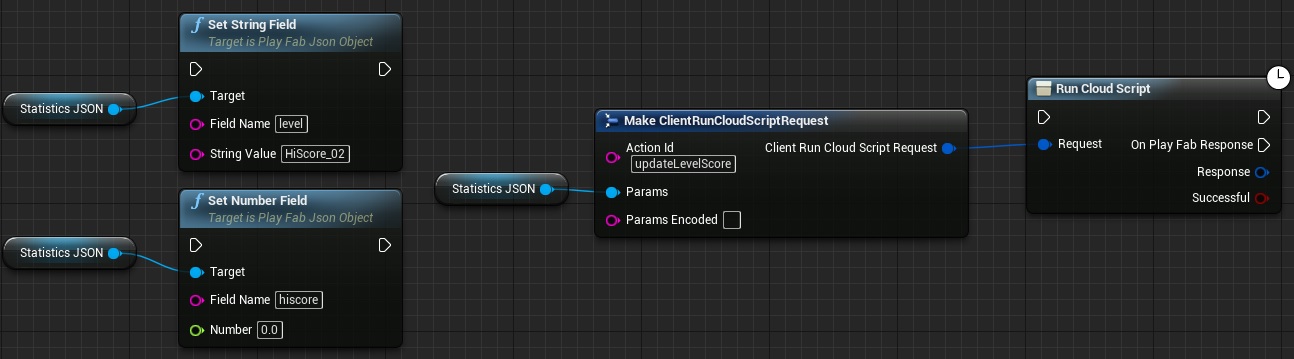
Here’s my function for updating player scores:
|
1 2 3 4 5 6 7 8 9 10 11 12 13 14 15 16 17 18 19 |
handlers.updateLevelScore = function (args) { //args. is JSON data we are passing to function from blueprints (Statistics JSON variable) var score = args.hiscore; // "hiscore" is the JSON number field named "hiscore" in example above var levelname = args.level; // "level" is the JSON string field named "level" var keyString = levelname; var dataToUpdate = {}; //this is creating empty JSON data object dataToUpdate[keyString] = score; // make sure we are updating levelname string by a number of score server.UpdateUserStatistics({ // this is server function which will update user statistic using dataToUpdate PlayFabId: currentPlayerId, // currentPlayerID will be there automatically if player is logged UserStatistics: dataToUpdate // this is actual JSON data that we will be updating. (<"levelname", "score">) }); var message = "levelname: " + levelname + " score: " + score; return { messageValue: message }; } |
I’m creating empty json data as I want to have one function to update each level scores, and you can’t use args.level in this case. You can learn more about this here.
Make sure you have the same function in your cloud script which can be found in PlayFab -> Game -> Server. Just download the file that’s already there. Add this function and upload the file – remember to publish after submitting.
That’s all basics information before we move forward with implementation. You should experiment with Example Project provided by PlayFab it’s super easy just learn how to get and set JSON data.
Game Instance – new variables
I will use ShooterGameInstance for functions / events used for PlayFab. For me it’s the best place as it will be always there even when I will reload the map.
Let’s start by adding new variables:
| Var Name | Var Type | Description |
| PlayerID | string | This will store player ID which we will get after registering. It will be saved and loaded as well later. |
| PlayerName | string | Storing player name which will be used to register/login. Saved /loaded as well. |
| PlayerPassword | string | With registration I will generate random password and it will be stored here. Saved / Loaded as well. Why I’m generating? Just for fun, you can make your password as you want – players won’t see it, but there may be some crackers that will get your hard coded password. That’s why I’m using random one so cracker will know only his password but not others. |
| RandomChars | string | Random characters used to generate password. It should be filled by each character you want to use in generator. Default value: 1234567890qwertyuiopasdfghjklzxcvbnm |
| CurrentBestHiScores | Playfab JSON Object Reference – ARRAY | Here I will store best hi scores – it’s array because I have couple of levels each array index == level ID. |
| CurrentScoresAtPlayer | Playfab JSON Object Reference – ARRAY | It will stores scores around player – array as above. |
| PlayerPosition | int – ARRAY | When downloading scores near player I will store player position in this variable for future use. Array because player can have different positions in different level. Array index == level ID. |
| StatisticsJSON | Playfab JSON Object Reference | Stores JSON object when sending data to Cloud Script. |
Save / Load
Create new blueprint named “Save_Player” extending form SaveGame and add two strings variables named: PlayerName and PlayerPass.
Now go back to ShooterGameInstance and add two new functions.
SavePlayerName:

LoadPlayerName:

Adding Helper Functions
Now I will add some helper functions.
GetRandomString
Local Variables:
- Local_CharArray (String Array),
- Local_Lenght (int),
- Local_RandomString (String),
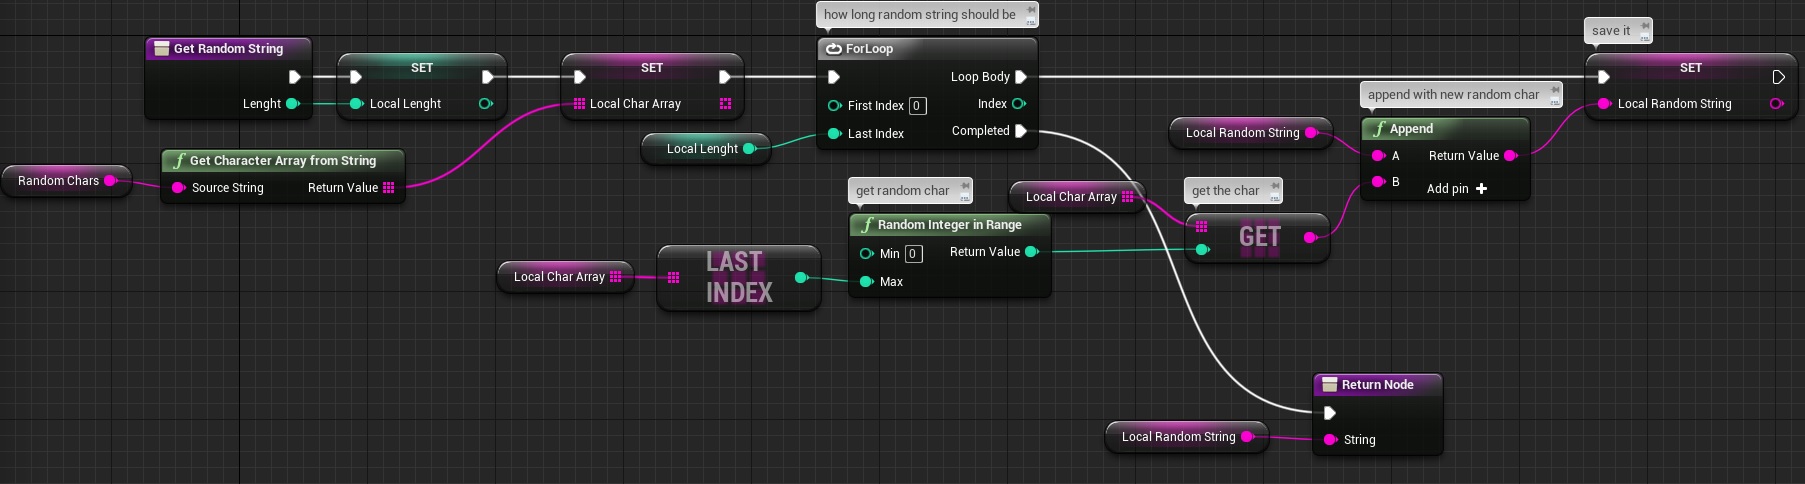
USEFUL TIP:String operations cost a lot of CPU and they should be added to C++. Don’t string operations often and in Tick.
SetPlayerName:

When changing player name I’m saving it with password right away.
PrintLeaderboardError with one PlayFab Error structure input named error:

I will use this function to print PlayFab errors – it will be easier to debug things.
Adding Core Functions
Before start add some dispatchers.
- OnHiScoresDownloaded (input: PlayFab Error Structure named Error),
- OnPlayerRegisterFailed (input: PlayFab Error Structure named Error),
- OnPlayerRegisterSucess,
Now this add core functions like register, login, getcloudID.
UpdatePlayerPosition:
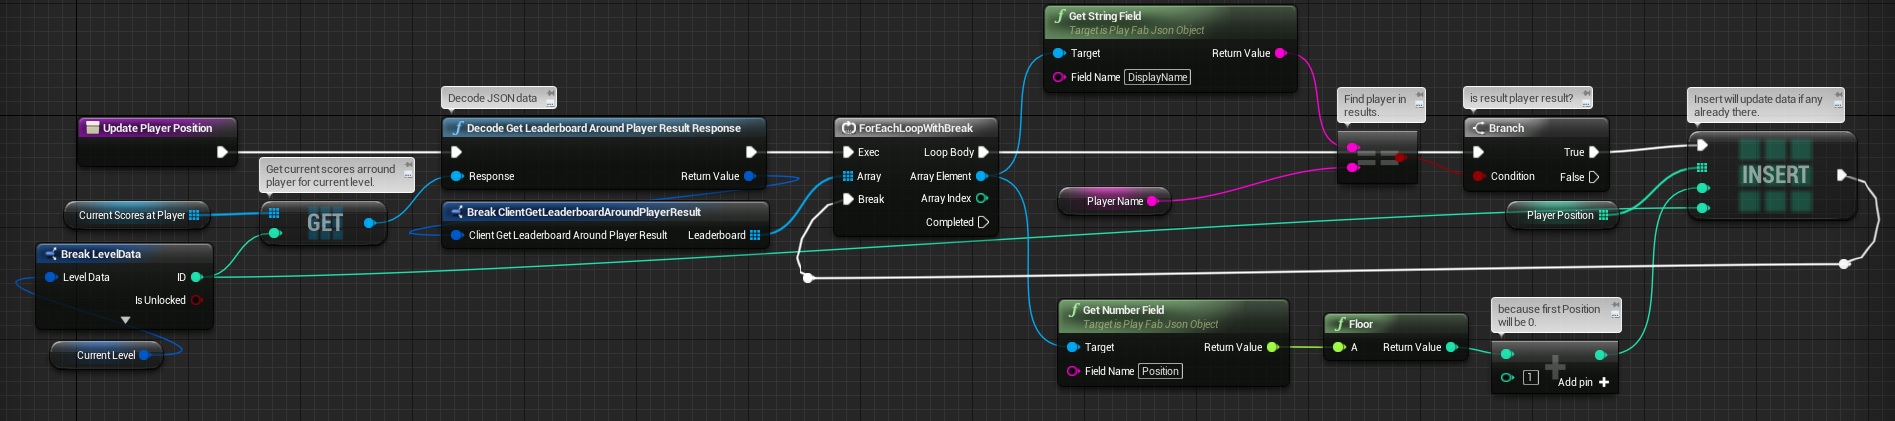
This will get current level leaderboards arround player and find player in results – then get the position and set it in PlayerPosition array.
SetPlayFabSettings:
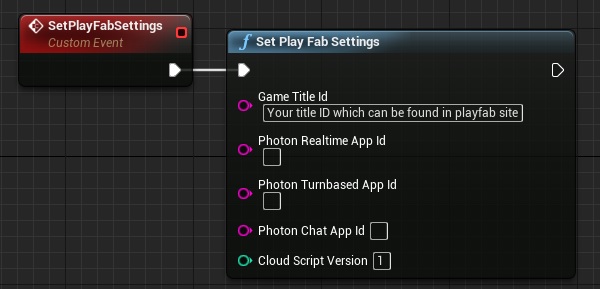
Without calling this node Playfab nodes won’t work.
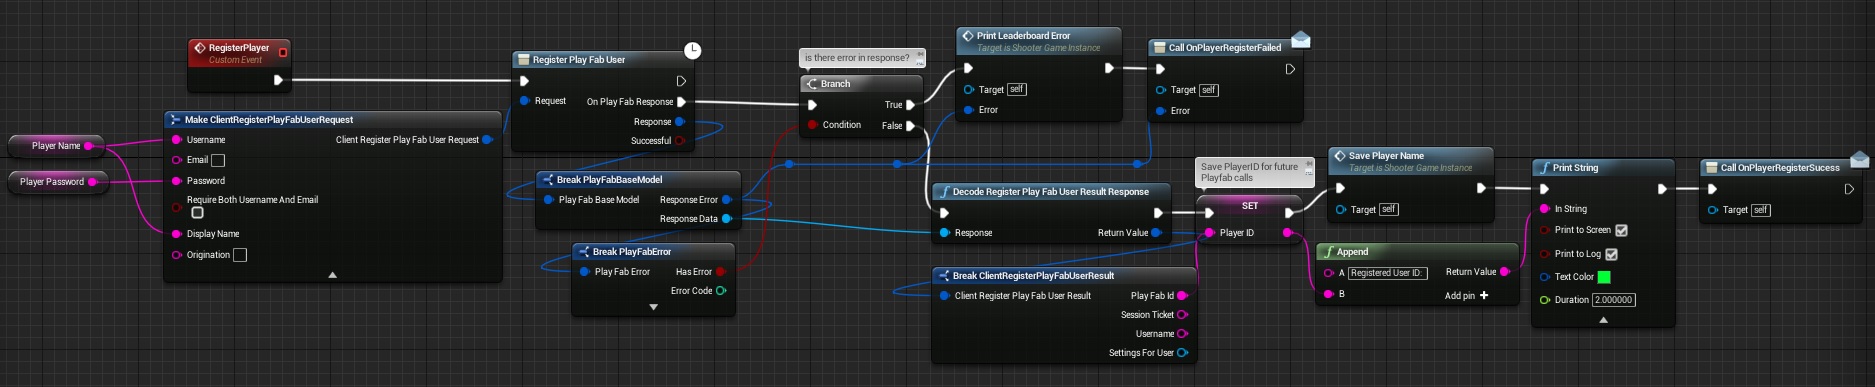
RegisterPlayer:
GetCustomScriptURL:
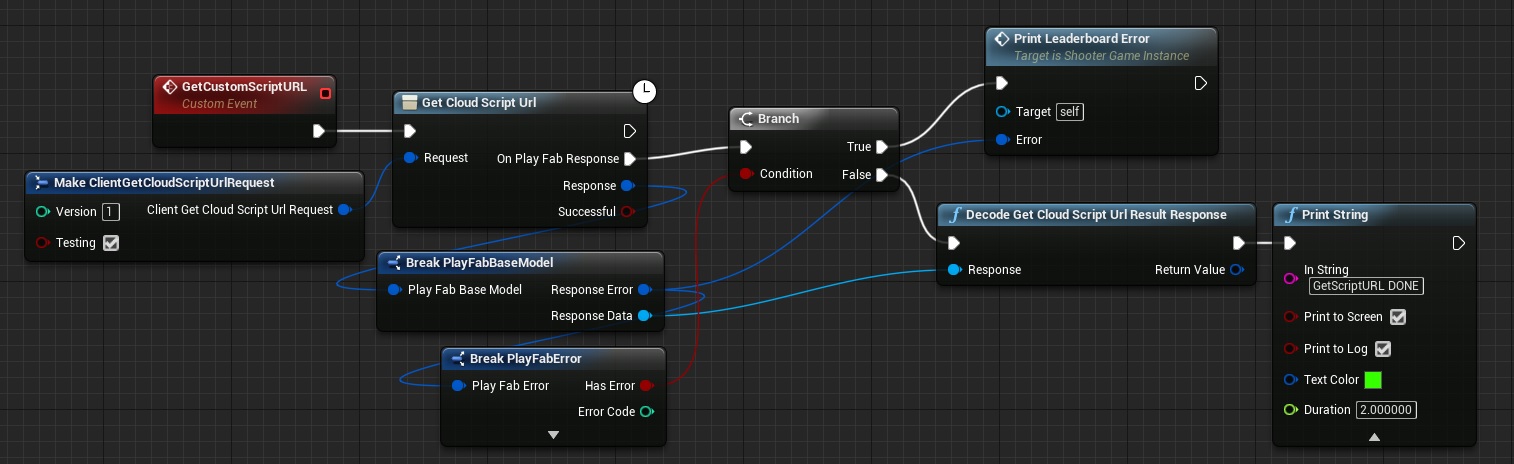
Get Cloud Settings URL need to be called if you want to use Run Cloud Script node.
Login:

GetHiScoresArroundPlayer:

Basically I’m getting stats using Select node and saving leaderboard results in array using Insert node as it update value that’s already in that index.
GetBestHiScores:

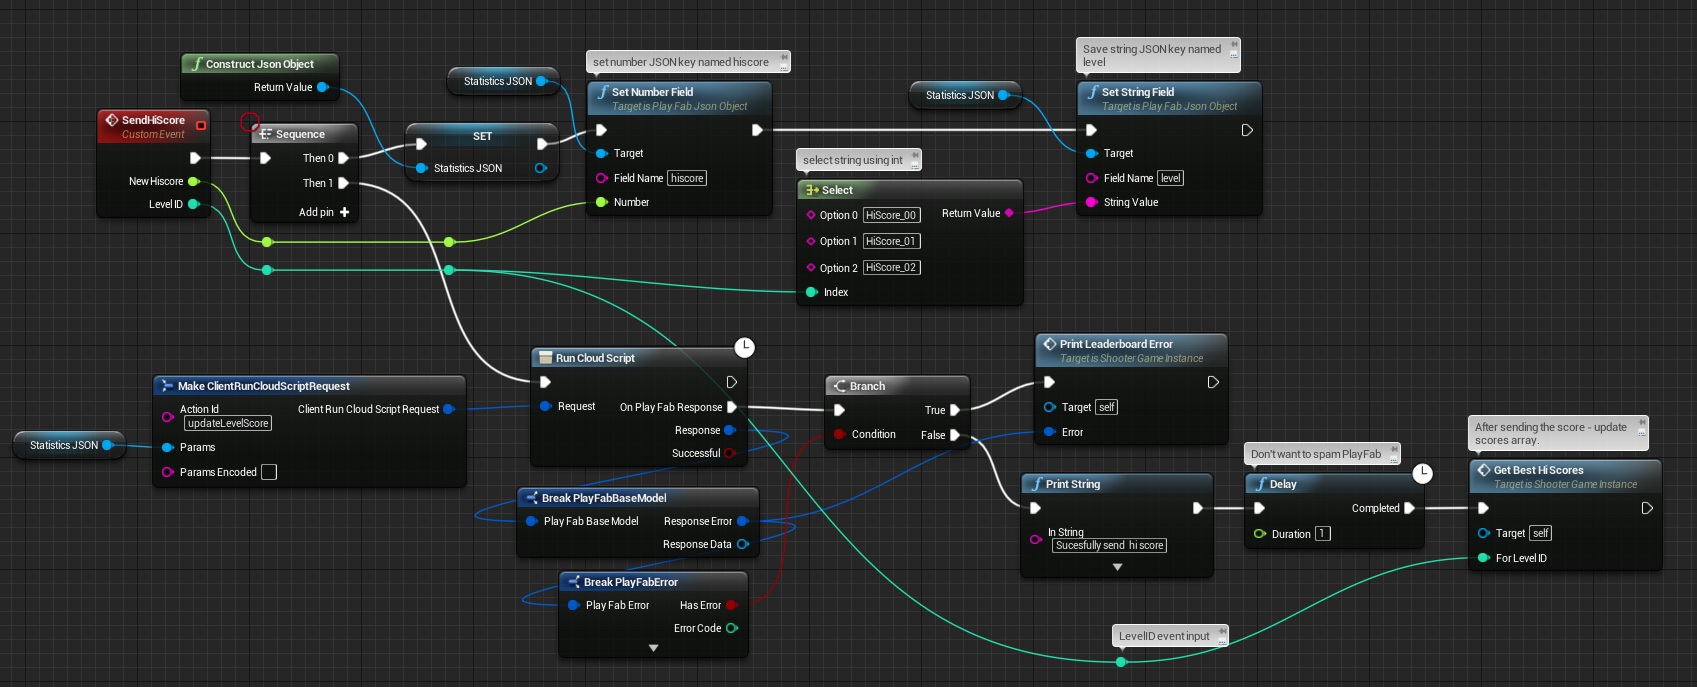
SendHiScore:
Updating Set Hi Score Function
In earlier tutorials I have created SubmitHiScore function in ShooterGameInstance which now need to be updated to call SendHiScore event:
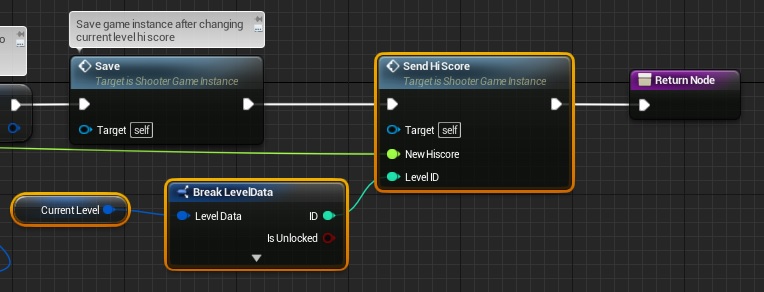
Make sure to update this as well. Basically when changing new hi score locally we want to change it on the Playfab server as well.
There is one thing left. SubmitHiScore uses float as input and you can’t send float in PlayFab it need to be int. You need to floor the float and then convert it to float again. Normally you will have your score and hi score as int but I wasn’t prepared for that.
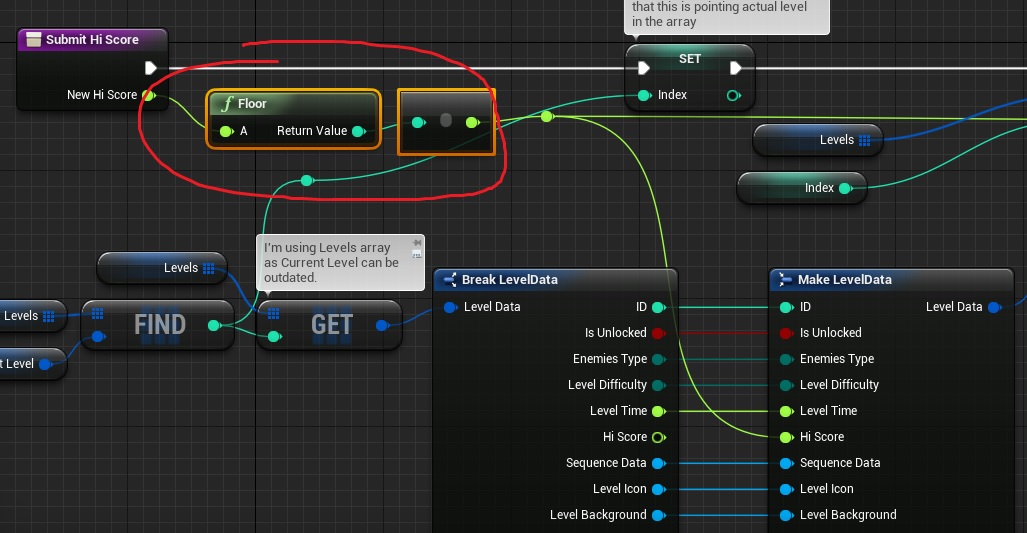
When calling SendHiScore make sure you used this floored float.
Next thing is to prepare playfab on game launch. In Game Instance there is an event called Init. This is starting point for your game and here you can prepare playfab for login.

I’m using Init for load as well.
Creating UMG
Now it’s time to create UI for our leaderboards.
ERROR MESSAGE
First let’s create UMG to show PlayFab errors for example when nick is already taken or there was problem with internet connection.
Create new Widget named UI_PlayFabError. Try to recreate this hierarchy:
Open event graph and add new Play Far Error Structure variable named Error. It should be editable and exposed on spawn. Next let’s get some values from the error and set our Text blocks:
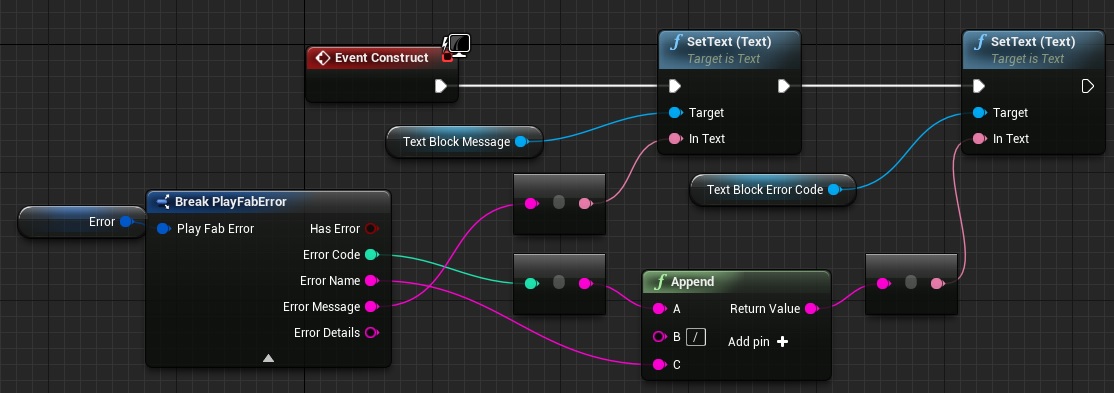
And that’s all here.
REGISTER
Create another Widget named UI_SetPlayerName and try to recreate hierarchy:
Now open Event graph and add one string variable named PlayerName.
Button_Register should have OnClicked event added. It will be used to try to register:
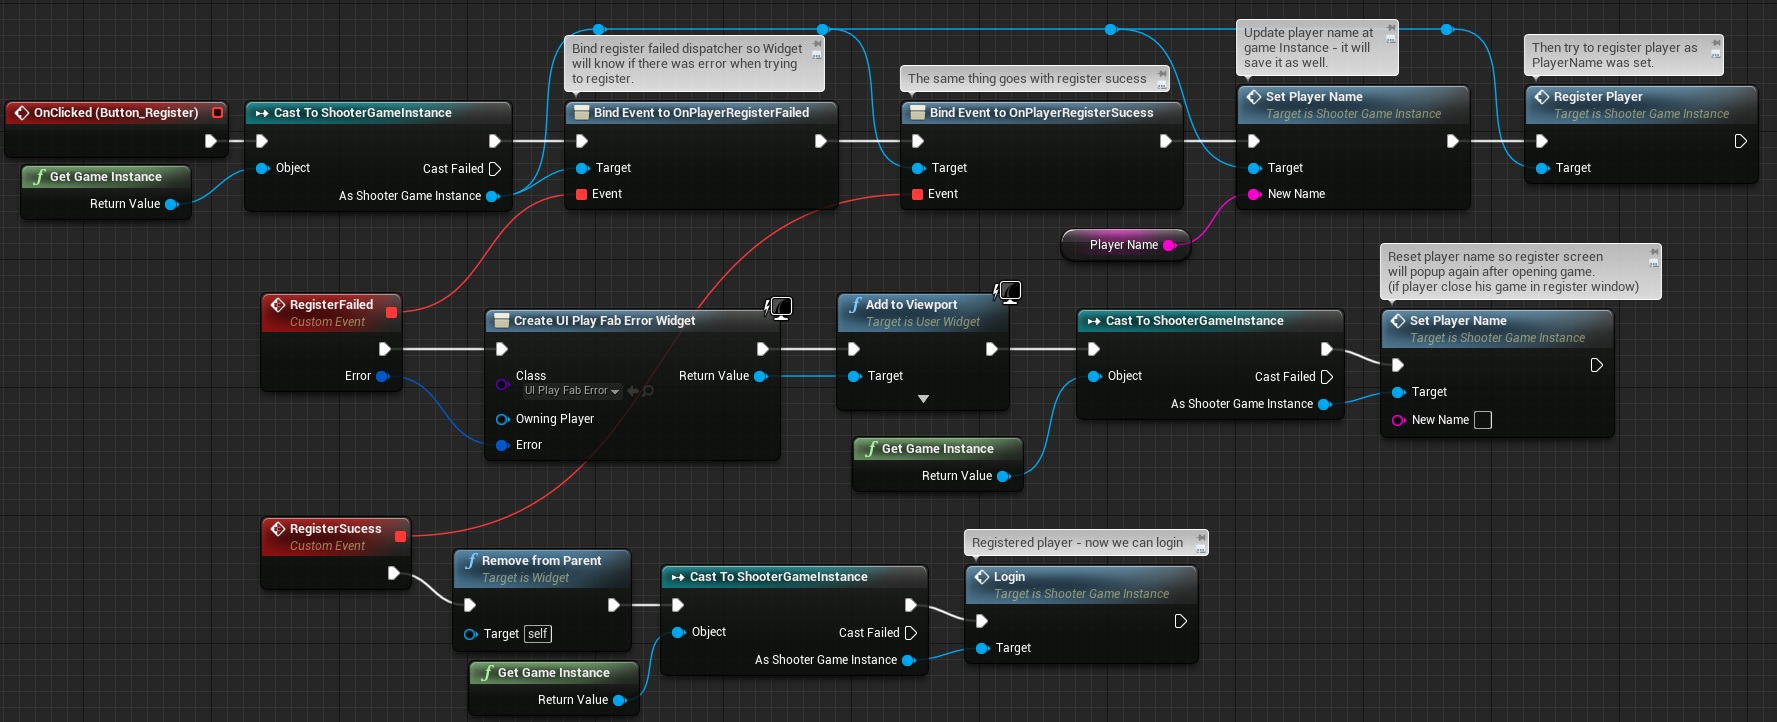
So basically each time player will click register game will try to use the PlayerName value to register with Playfab.
Editable Text should have OnTextCommitted event added. Here we will update PlayerName variable:

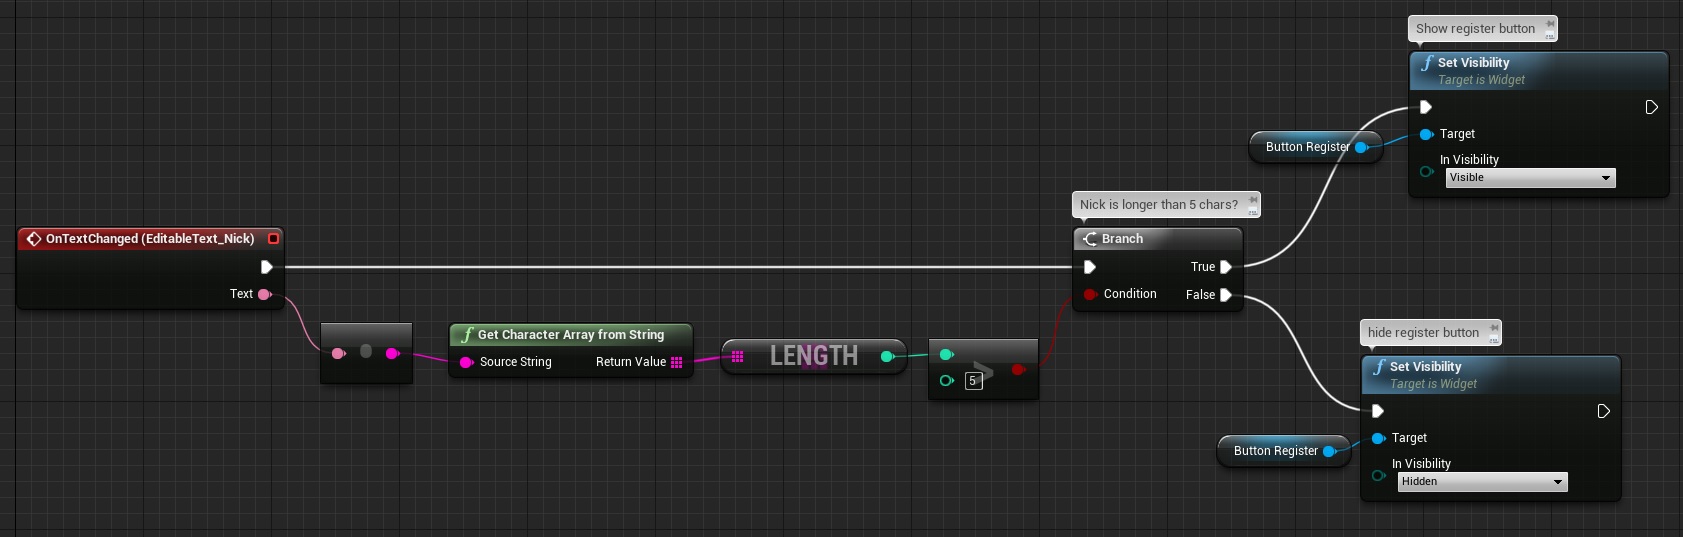
And it should have OnTextChanged event added as well. It will be used to show / hide register button if nick is to short. You can add more checks here if you want. (eg: special characters
That’s almost all. Last thing: I will use this screen to show the mouse:

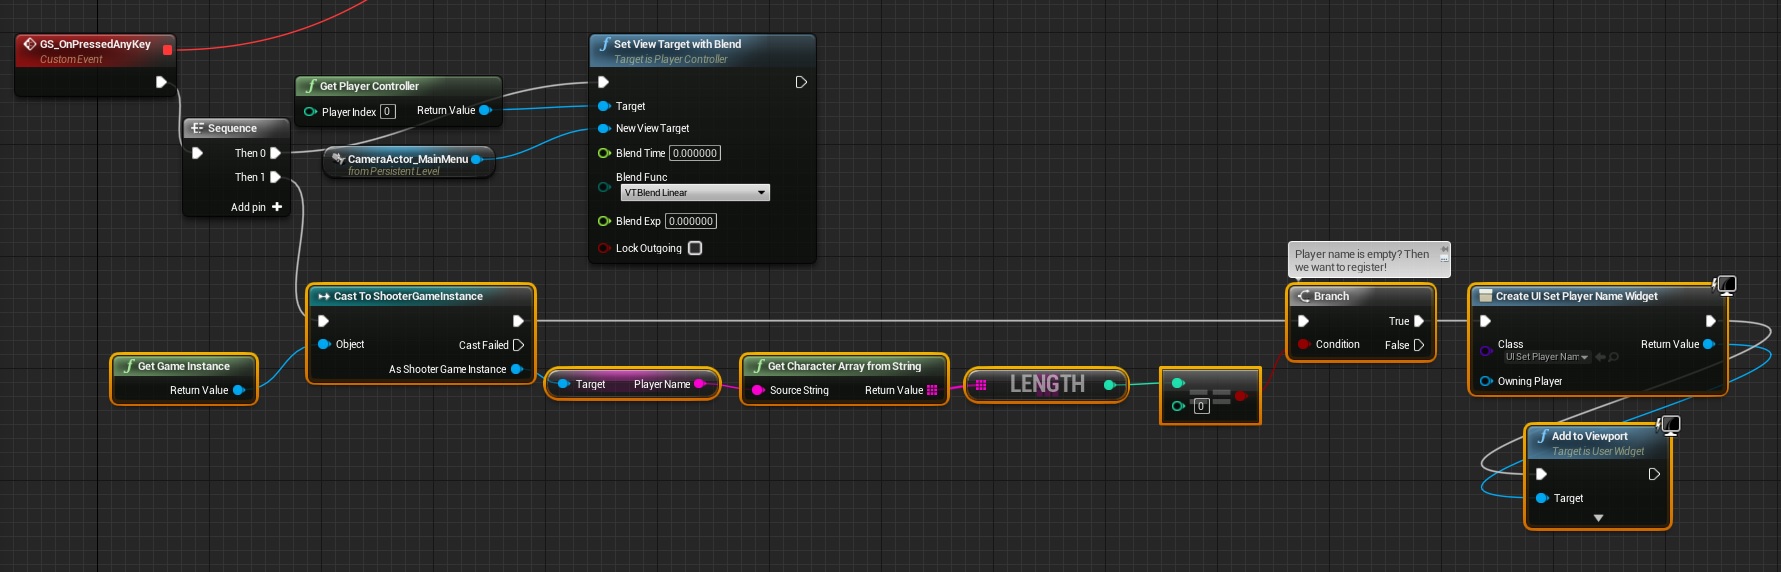
Now you can test this out. In your MainMenu_P level after loading the game :
 ,
,
Simple check if PlayerName is filled. If not – show register screen.
Leaderboard Item Widget
Create another Widget named Widget_LeaderboardItem and try to recreate hierarchy:
This widget will show position, display name and score from PlayFab. Open Event graph and add new custom event named UpdateData with 3 inputs:
- DisplayName (String),
- Position (Float),
- Score (Float),

So basically it’s filling the data to Text Widgets. If DisplayName is PlayerName it means that this data is from player. Will change colors then to make player more visible in leaderboards later.
Leaderboard Widget
Now the most important part – Leaderboard UI which will show top scores and scores around player. Create new widget named UI_Leaderboards and try to recreate the hierarchy:
Open Event Graph and add variables:
| Var Name | Var Type | Description |
| bShowTopScores | bool | Default = True. This will tell us if leaderboards is currently showing top scores or scores around player. |
| LeaderboardLevelID | int | Stores current level ID so leaderboards will know which scores to get. |
Create new functions:
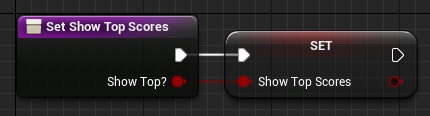
SetShowTopScores:
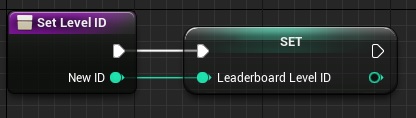
SetLevelID:
If you read previous tutorials you know that you shouldn’t directly change variables from different classes – use functions instead.
FillLeaderboard with one PlayFab JSON Object Reference Array input:

This function will fill vertical box with Leaderboar.
Now let’s create some custom events.
GetTopScores:
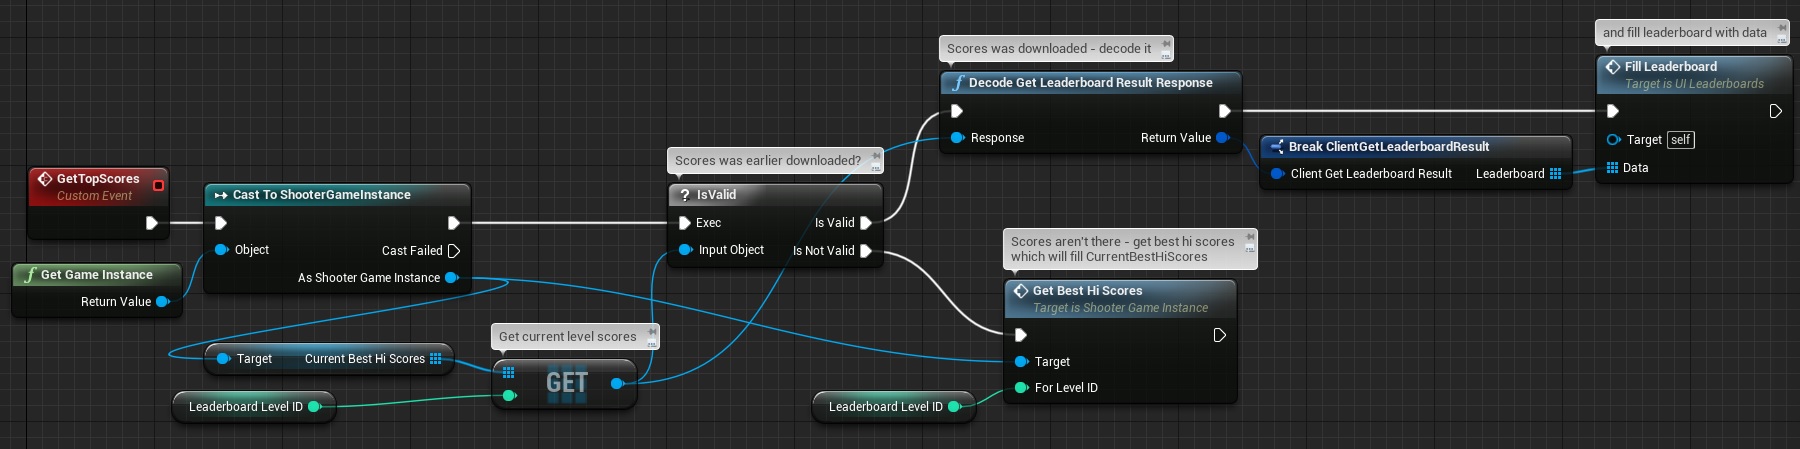
This will basically check if scores was downloaded (array is empty or not) if yes – just pass data to Fill Leaderboard. If array with scores is empty try to download them in ShooterGameInstance.
GetScoresArroundPlayer:
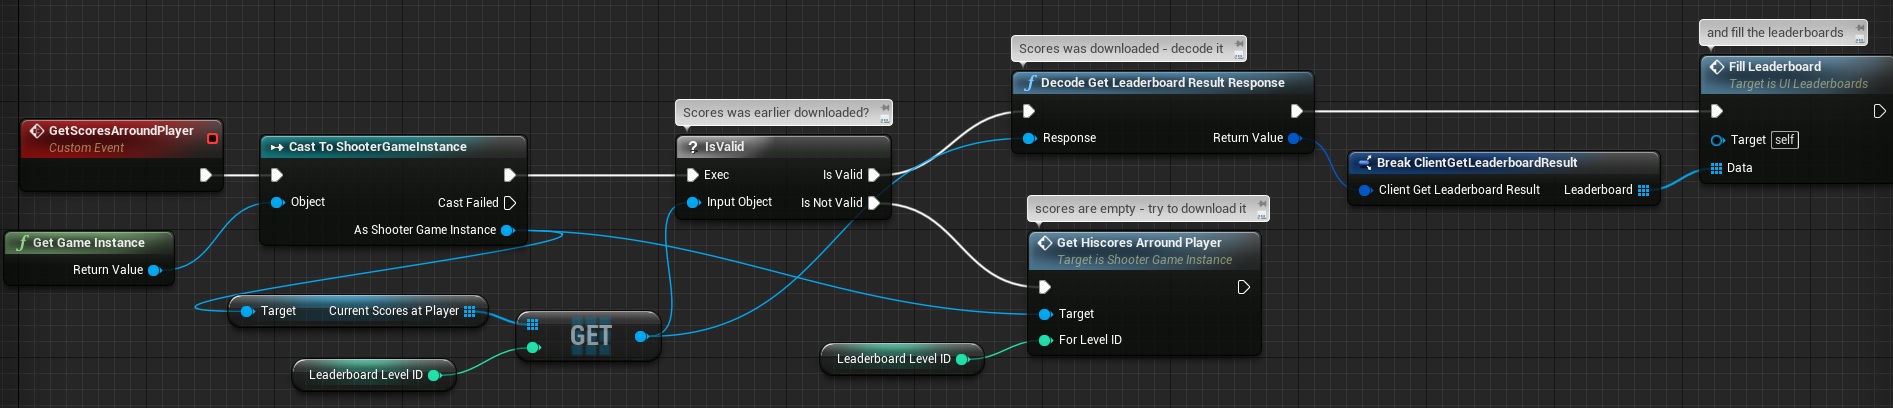
The same thing goes for scores around player.
GetScores:
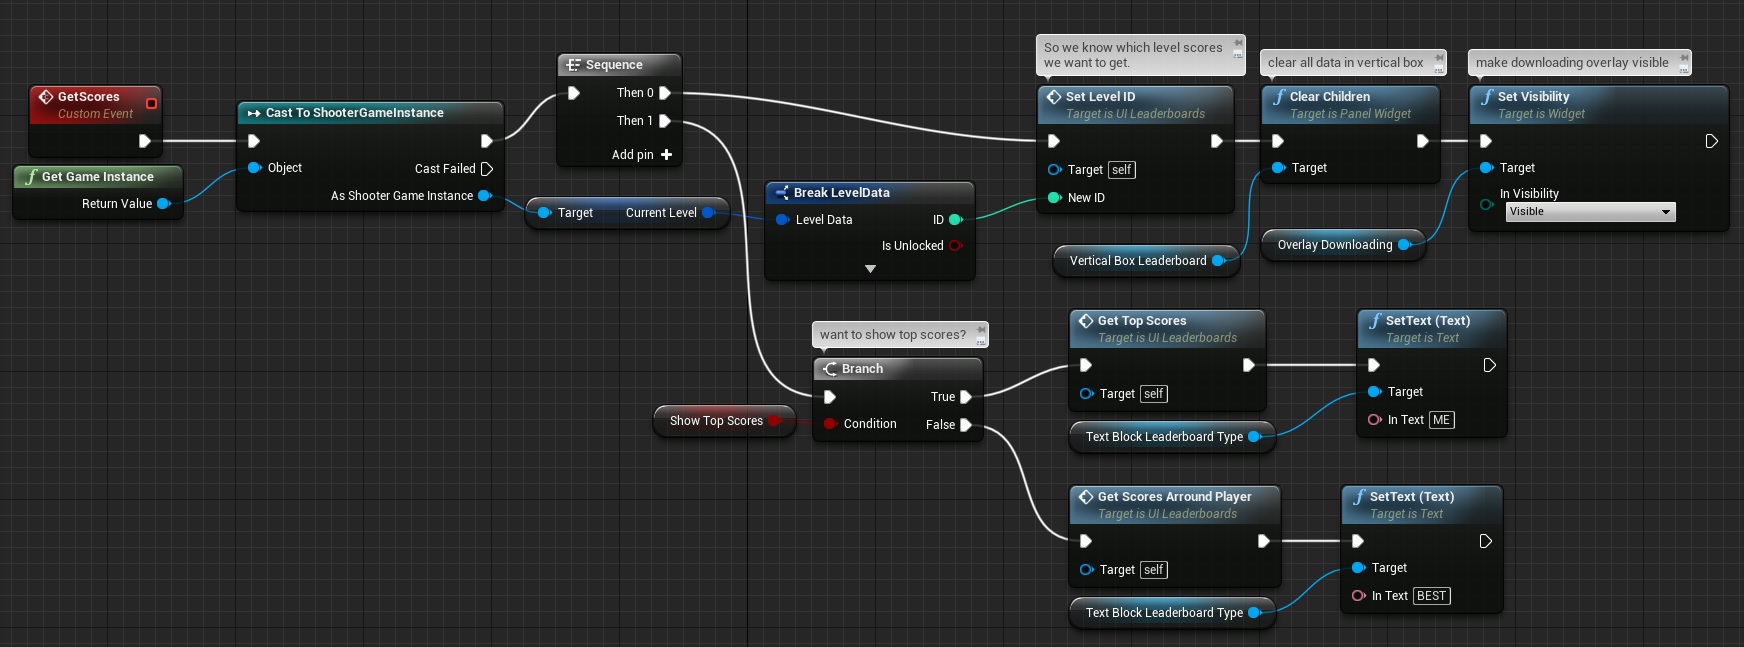
This will check if we want to show top scores or scores around player and call right function.
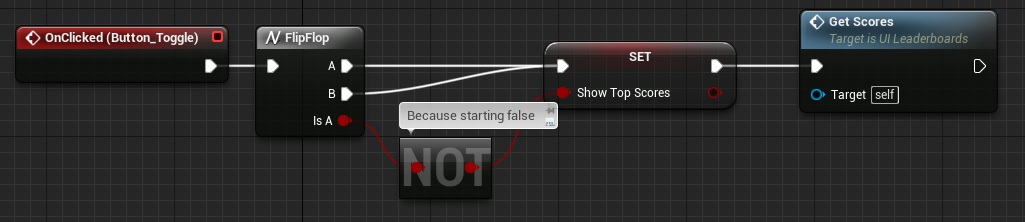
Button_Toggle should have OnClicked function to toggle bShowingTopScores and call GetScores after that:
Last thing is to know when leaderboards scores will be downloaded. We will use dispatcher from ShooterGameInstance in Construct event:
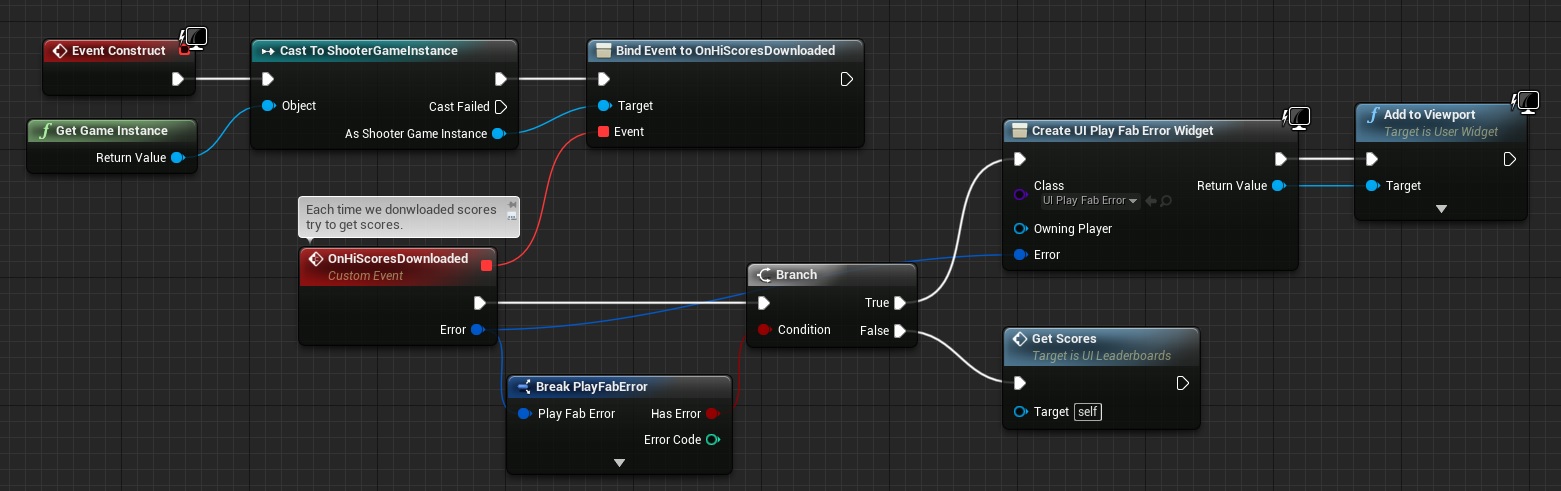
So basically every time ShooterGameinstance downloaded scores this UI will know about it (if visible of course) and will try to update leaderboard vertical box. Easy as that.
That’s all – you can add this UI to viewport to check it out. Remember your player need to be logged in.
Updating Level Selection screen
I will be showing leaderboards in level selection screen and in summary. First let’s update UI_LevelSelection.
Try to recreate this hierarchy. This screen was implemented in earlier tutorials. I will just add UI_Leaderboards widget to designer and make sure I can toggle between level info data and UI_Leaderboards:
Open Event Graph and add one bool variable named bShowingLeaderboards.
Still in Event Graph there are 3 events: OnSelected(UI_LevelIcon_01, 02 and 03) which points to Update Data. I will use those to check if we want to show Leaderboards and if yes – update UI_Leaderboards.
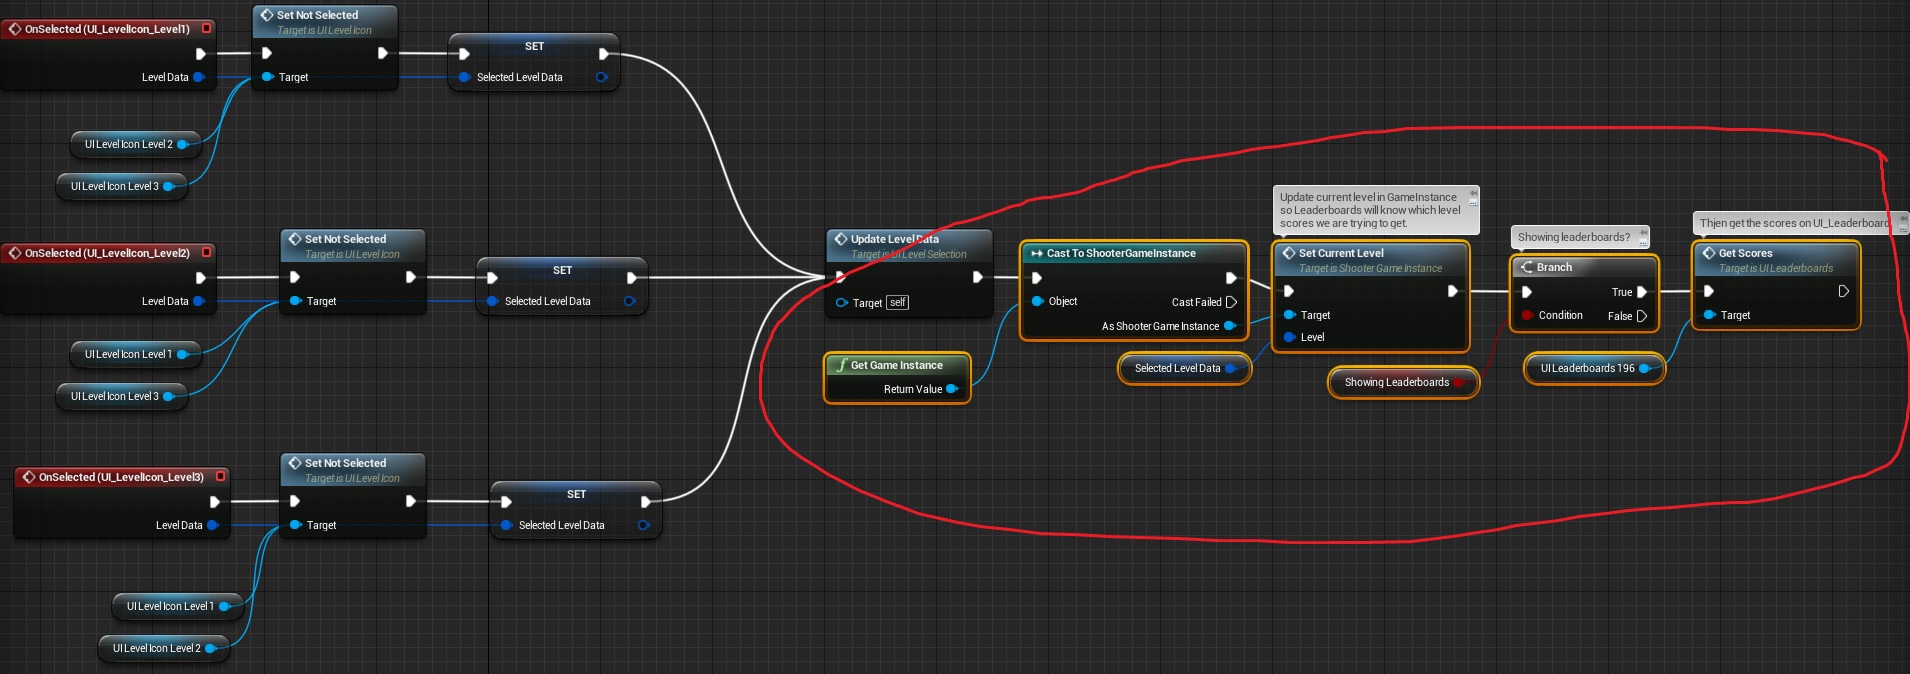
This way each time player will click on level – if we are showing leaderboards UI_Leaderboards will be updated with data form that level.
Button_Leaderboards should have OnClicked added:
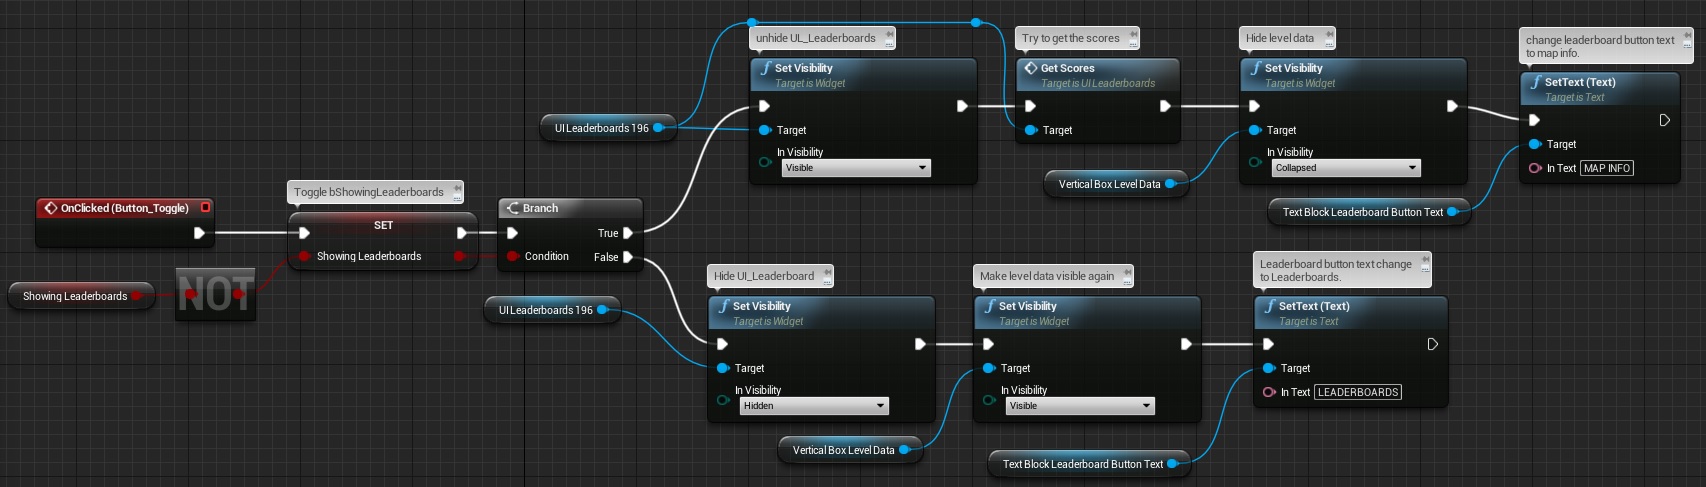
This way I’m toggling leaderboards vs level info data. Just hiding / showing things in UI.
And that’s all! You can check if everything is working by opening MainMenu_P -> register player -> then show leaderboards.
Updating Summary Screen
In UI_LevelSelection I Was hiding / showing widgets. Here I will use WidgetSwitcher to toggle from Leaderboards and player score data.
Open UI_SummaryScreen created in earlier tutorial.
Try to recreate hierarchy. Basically I have added Widget Switcher to the center and switch between two Vertical Boxes. One with UI_Leaderboard and second with score information. I have market isVariable for 3 best players and player position:
Now open Event Graph and add new bool variable named bShowingLeaderboards.
Button_Leaderboards should have OnClicked added:
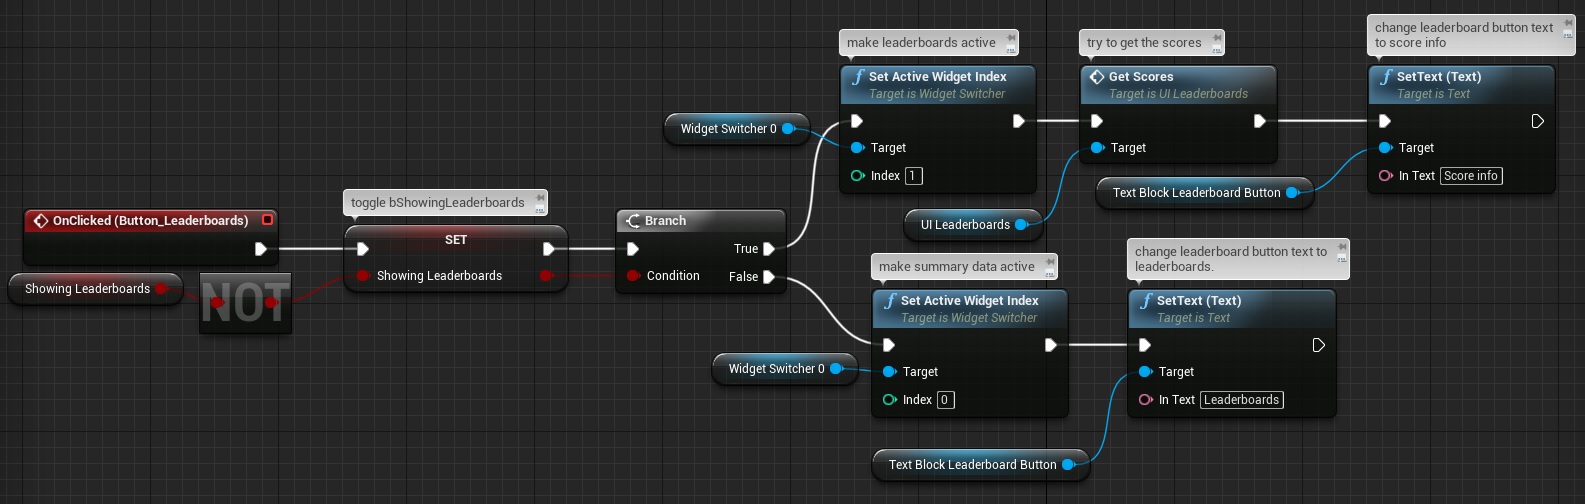
It will toggle WidgetSwitcher to show Leaderboards or score info.
Now create new custom event named GetPlayerPosition:
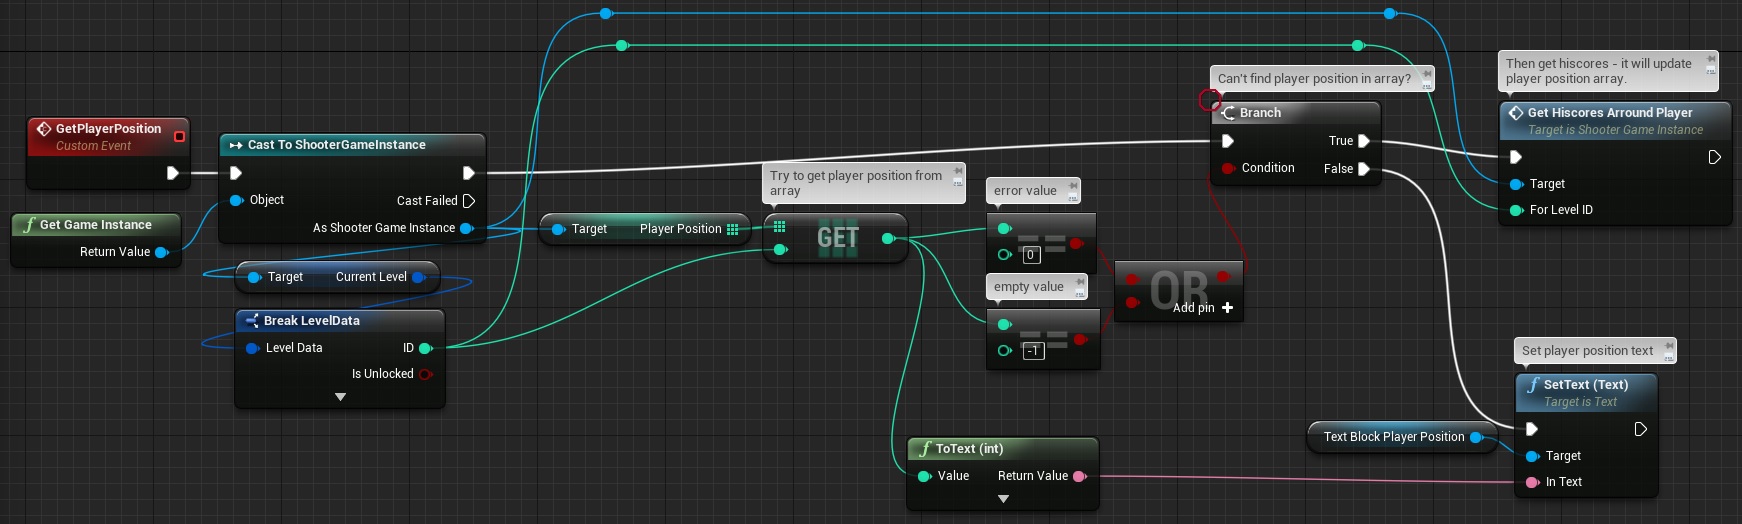
It’s checking if Player Position is there in the array for current level ID. If yes – just change PlayerPosition text. If not – try to get the scores as it will update PlayerPosition array as well.
Create another custom event named GetTop:

It will get us top 3 players. If the score’s aren’t there – try to download it.
Now in your Construct event let’s bind to ShooterGameInstance downloaded dispatcher:
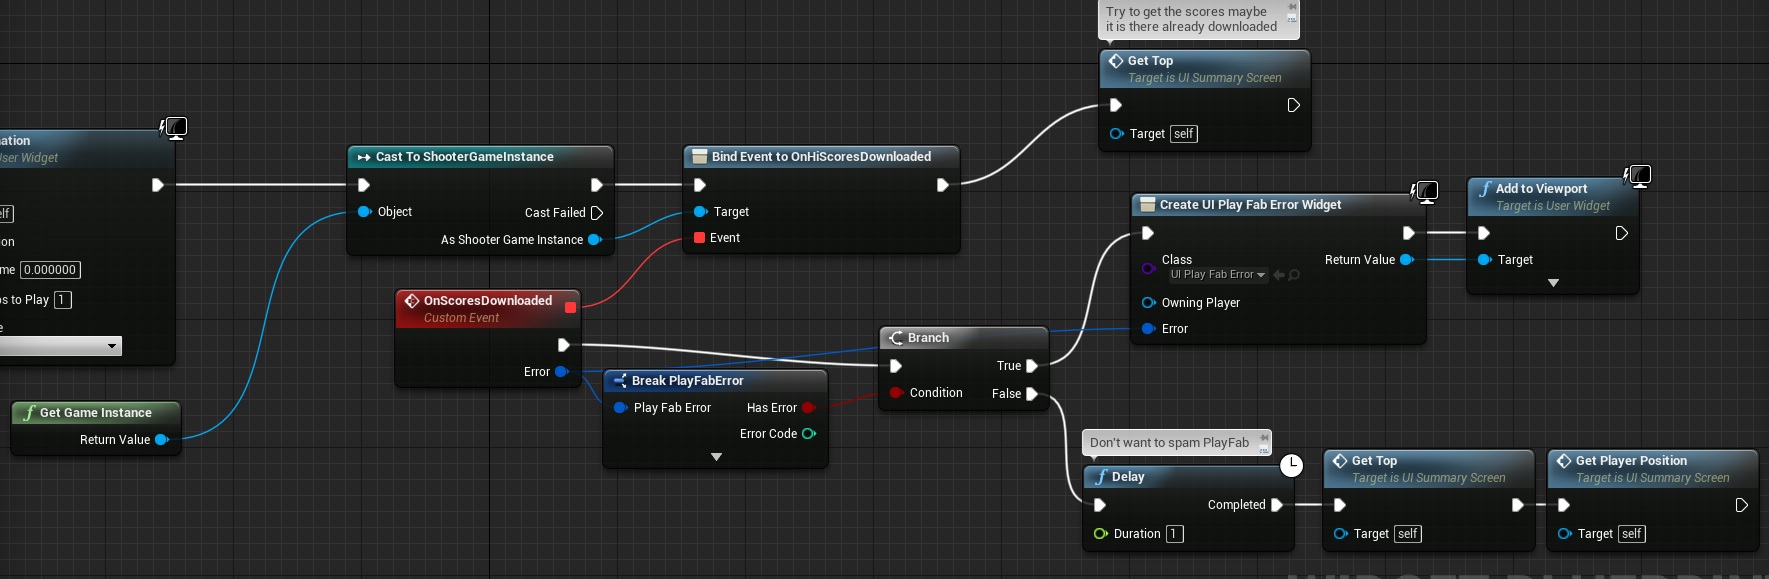
So basically when this screen appears it will try to get Top Scores (maybe it is already downloaded) and it will wait for Game Instance to call OnScoresDownloaded. If so – update Top 3 players and player position.
Simple as that.
Final Result
Creating ShooterTutorial takes a lot of my free time.
If you want you can help me out! I will use your donation to buy better assets packs and you will be added to Credits /Backers page as well. Implementing game is taking time but writing about it is taking much more effort!
Pingback: Online Game Balancing tool #1 – Base Class | Shooter Tutorial
If someone using Unreal 4.11 or above have a problem with the plugin, they should look inside “PlayFab.Build.cs”, there’s some lines that you have to remove:
9 // NOTE: Please remove this section for Unreal 4.11
10 private string ModulePath
11 {
12 get { return Path.GetDirectoryName(RulesCompiler.GetModuleFilename(this.GetType().Name)); }
13 }
14
15 private string ThirdPartyPath
16 {
17 get { return Path.GetFullPath(Path.Combine(ModulePath, “../../ThirdParty/”)); }
18 }
19 // NOTE: Please remove this section for Unreal 4.11
And then it should work !
I actually had to skip this one. I encountered an issue where anytime the “Decode PlayFab…Result” nodes were used, the game would crash (gameplay window vanished). So GetPlayerPosition and GetTopScores broke the game for me. I spent about five or six hours trying to fix, including updating to the latest version of everything, but no dice. It doesn’t help that Playfab SDK has been updated, so I needed to adapt this tutorial to the changes they made, and it’s entirely possible I did that incorrectly. For instance, instead of using branches to determine whether or not to throw an error, they require bindings to “On Success” and “On Failure” pins anytime you use a PlayFab service, like “GetLeaderboard” or “RegisterPlayer”. I simply deleted the branches here and plugged in the “false” options from this tutorial into the “OnFailure” events for each, and plugged anything that was “true” into an “OnSuccess” event. According to the PlayFab documentation, I’ve done this correctly, and the end result seems like it should match what’s shown here. Really, the wall I’ve slammed into is the “decode” nodes crashing the game. I unfortunately can’t find any info or workarounds for that anywhere.
If anyone has any insight into what went wrong here I’m all ears, and I will swing back around to try just about anything you may suggest. In the meantime, I’m moving on to Stats tutorial.
Hello Andrzejkoloska i need some helps for the function GetCustomScriptURL, the folder Playfab was update and there is not the same functions. Do you have some issues please?
Hey can you make a tutorial on uploading a server build to Playfab and How to do basic match making using UE4 and playfab
Pingback: Using Unreal Engine 4 to create Game Jam – Shooter Tutorial