This tutorial contains basic knowledge about AI / Animations . If you are interested in graphics and animation, go to this website and watch more such tutorials. It may be complicated for beginners so please take your time to analyze the stuff before implementing. I will create first basic enemy and it will cover:
- Behavior Tree: simple check where to go and go there if aren’t reloading,
- Animations: blending legs with rest of the body (walking -> standing),
- Animations: Playing Montages (reload animation and shoot animation),
- Animations: Look At – enemy upper body will be always rotated to player,
- Animations: TakeDamage effects without having animations,
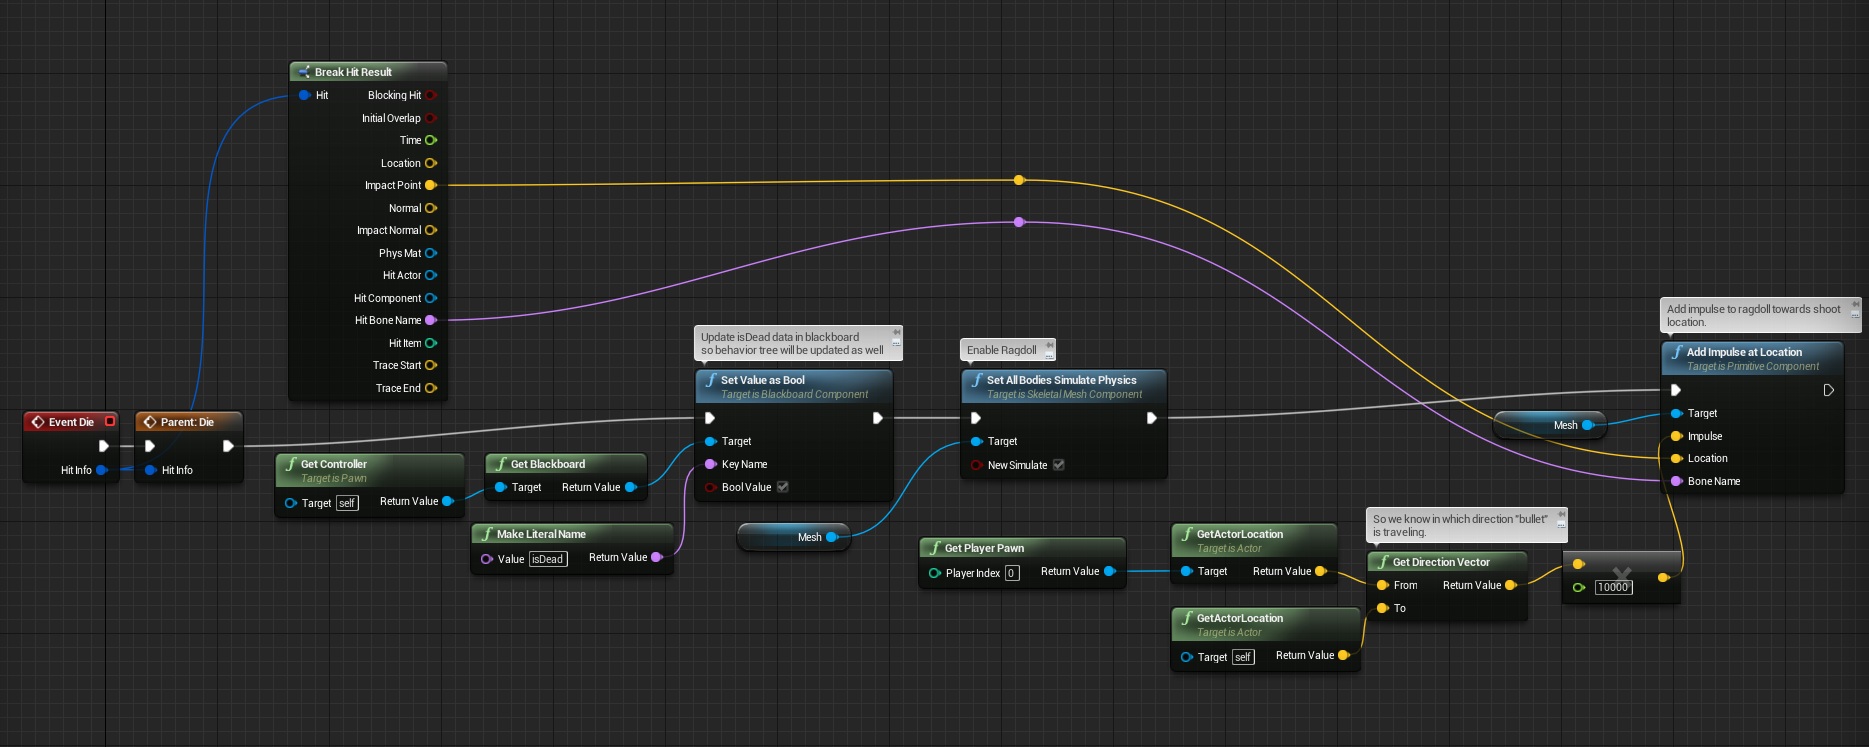
- Animations: Ragdoll,
- AI: Ammo, Fire and Reloading,
So, let’s keep going!
|
1 2 |
<strong>This Tutorial has been created using Unreal Engine 4.8.2</strong>. Make sure you are working on the same version of the engine. |
For this post I have bought SF Trooper form 3dmodels-textures. It’s cheap but as the price quality is low as well. I won’t recommend buying this asset for your game. It’s lacking animations and it’s rigged badly.
It’s a challenge to create procedural generated animations from asset that don’t have enough animations. What I’ve done here you can create in your own custom character. I will let you know about bought assets and if I recommend them for games.
At this point I would like to inform you guys that you can always donate ShooterTutorial (right side of the blog) each donation will be used to buy better assets.
Preparing Animations
When buying characters with animations outside Unreal Engine Marketplace you need to be really careful. Check if there is 7 days turn back guaranty. Current there isn’t any good Sci-Fi characters on Marketplace and I will use different stores.
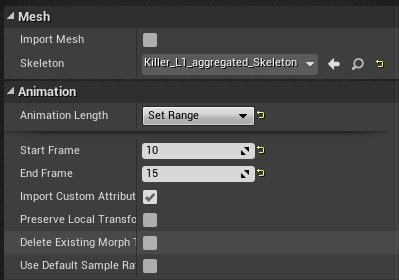
Sometimes you will get one .fbx file with all of the animations and a .txt file with frames list. SF Trooper comes with one fbx and importing pipeline looks like this:
- Import fbx file as skeleton WITHOUT animations and WITH Use T0 As Ref pose,
- Change fbx file name to X_AnimationName for example X_Idle,
- Try to import this fbx again with:
– Only import Animation (Import mesh should be set to false)
– Skeleton (earlier created when imported first FBX file)
– You can set a range for the animation – the same as in .txt file for each sequence:
- Rename the fbx file again to next sequence and do the same thing with all of the animations,
Now if you see that animation isn’t looping correctly there is great option in content browser to add looping frames (thanks Epic!) you can do this couple of times to add more looping interpolation frames.
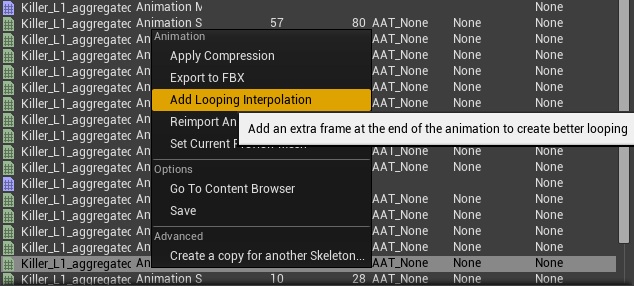
I have this problem on almost every looping animation from SF Trooper.
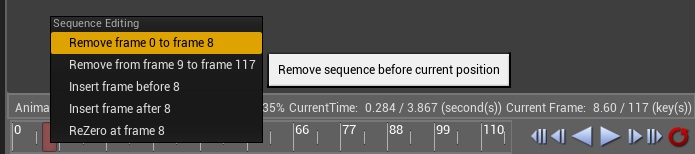
Another useful thing is that you can delete frames. So if you see that on first frame character is lying down and on second frame it’s up you can delete first frame. Again thanks Epic for this feature!
Next really helpful tool is animation record.

SF Trooper don’t have stand with rifle idle so I created stand pose using this feature. Just one frame. You should take your time and learn these tools. They help a lot if you don’t have animation guy in your team and you are buying animations from stocks!
Create Stand->Walk Blend Space
From your skel mesh create blend space 1D:
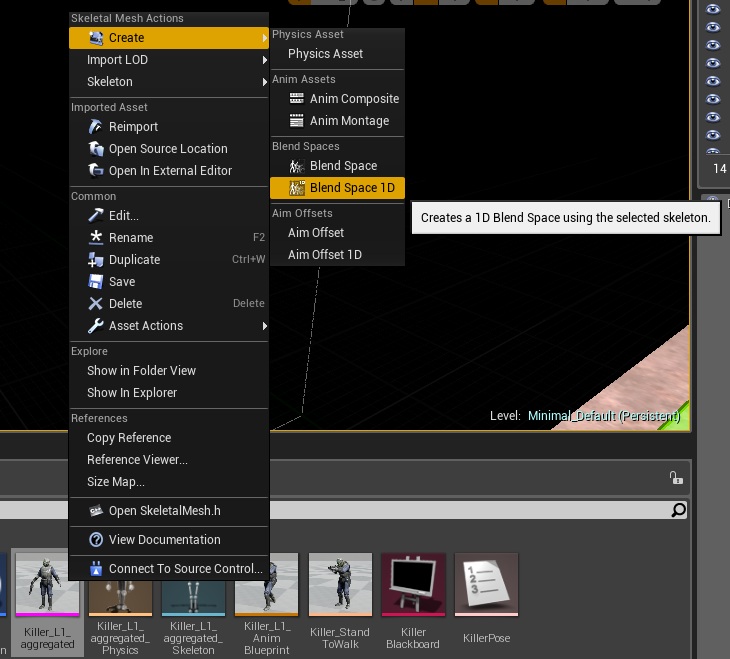
Name it Killer_StandToWalk. Basically Blend Space 1D will blend two animations on given input. You can read about Blend Spaces in my older tutorial blog.
For walk use Walk_Rifle_Shoot – basically walking animation with gun pointed towards. For stand animation I’ve used my stand pose. You can use stand idle animation with gun still pointed towards.
From your skel mesh create animation blueprint and add some variables to it:
- DeltaT (float),
- Speed (float),
- RotationToPlayer (vector),
- Hit_LeftShoulderAlpha (float),
- Hit_RightShoulderAlpha (float),
- Hit_HeadAlpha (float),
- Hit_LeftLegAlpha (float),
- Hit_RightLegAlpha (float),
- Hit_Head (bool),
- Hit_RightShoulder (bool),
- Hit_LeftShoulder (bool),
- Hit_LeftLeg (bool),
- Hit_RightLeg (bool),
Animation blueprint will be used for hit reactions it’s cheaper than using physics and you can check your results directly in editor (easily to tweak them)
You can always use physics like in Physics_Animations map in Content Examples from Marketplace.
Now in event graph let’s take care of speed and hit reactions bools.
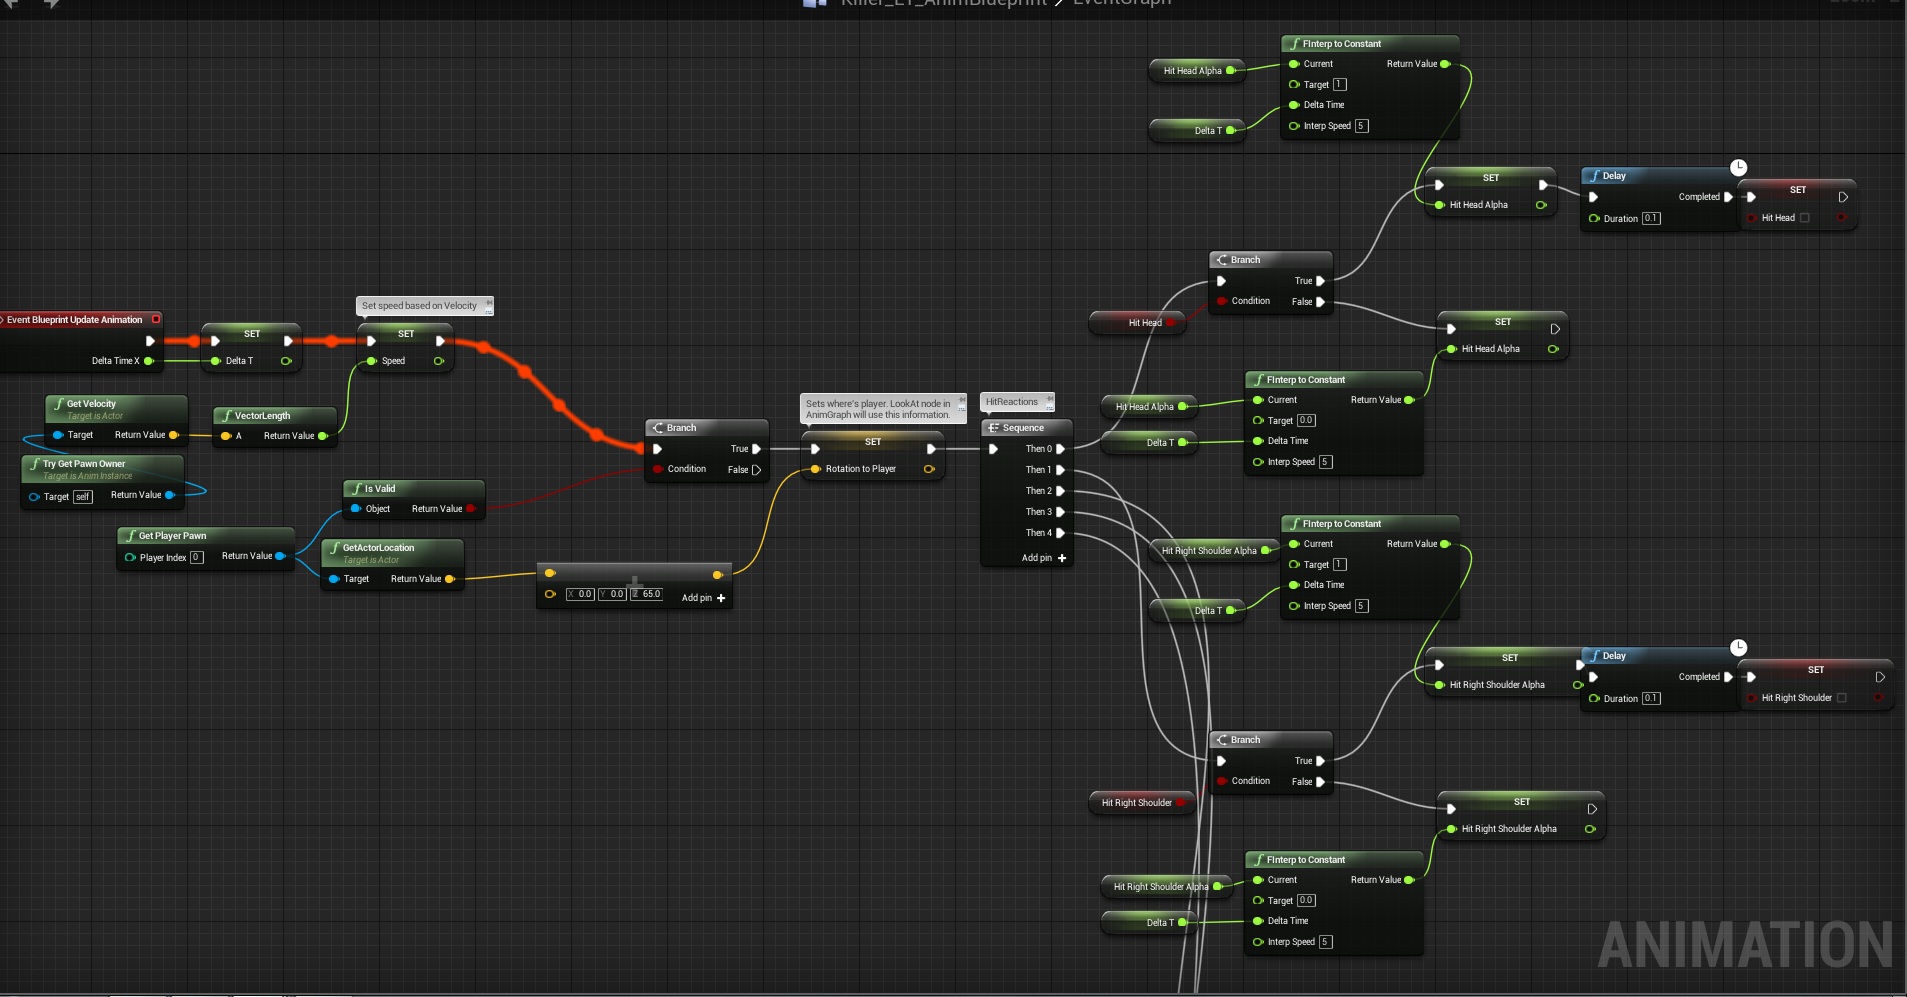
I wasn’t able to print screen of whole Sequence but it’s the same thing as above but with variables for different hit element.
Here’s a screen with rest of it.
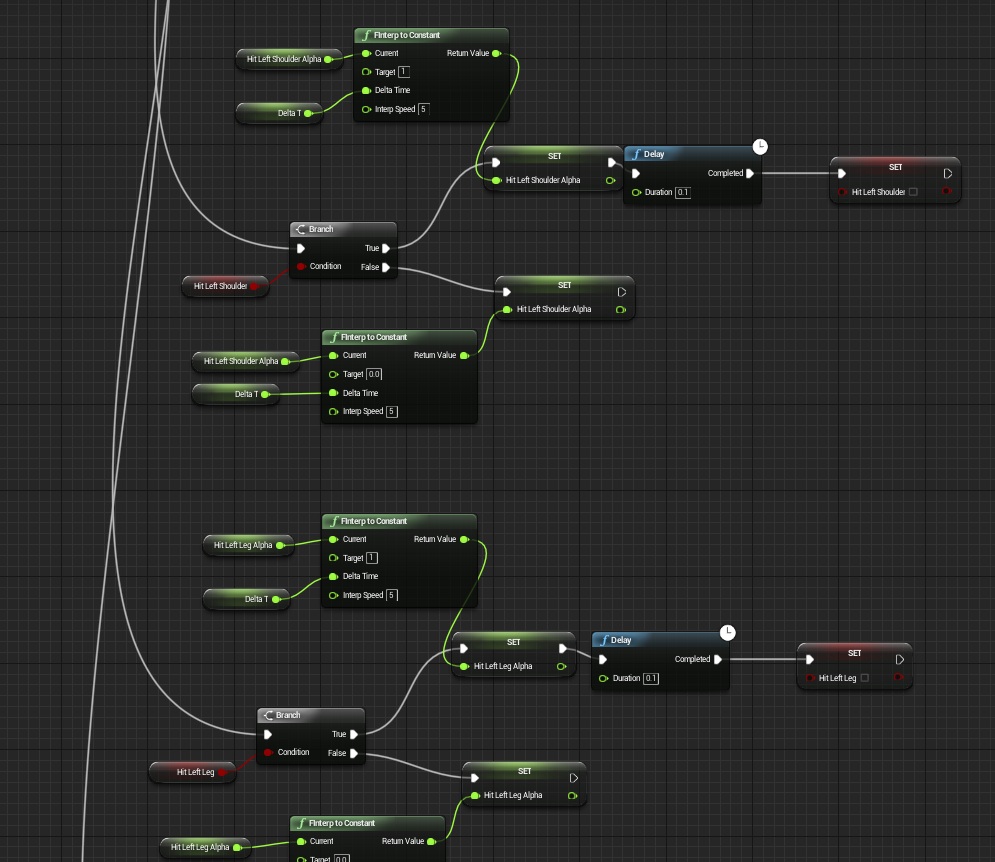
You should get the idea. Now let’s move to Anim Graph.
UpperBodyPose.
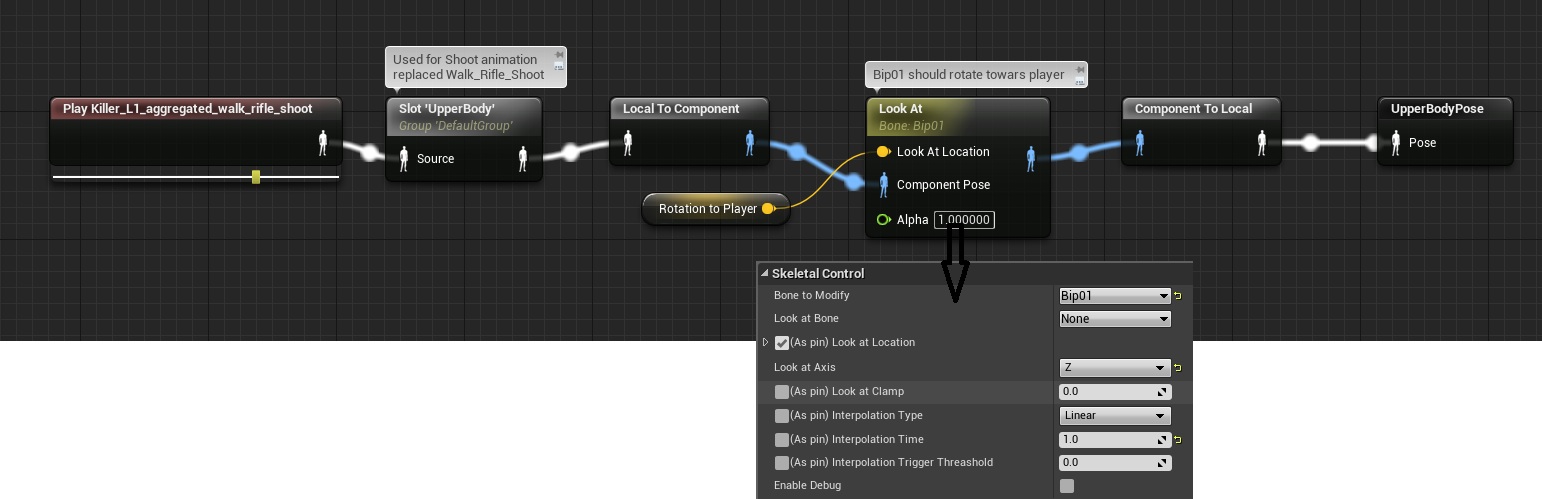
We are using here LookAt node which is really great if you want to rotate heads, arms or whole character toward a point.
Now let’s blend upper body with lower body.
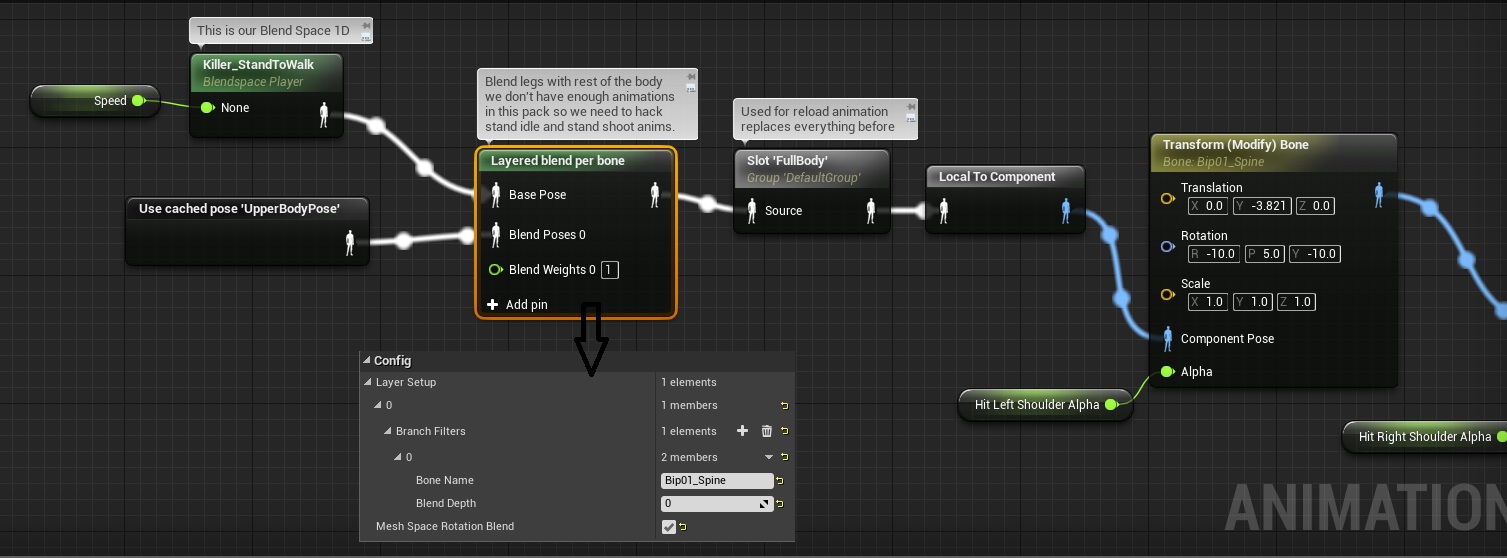
You can see first Transform Modify Bone node for hit reaction. Here’s the rest.

All of them use these settings:
- Translation -> Additive,
- Rotation – Additive,
- Bone name can be read in screen,
Basically if you select this node you will see possibility to change the values in editor. (but they need to be connected to Final Animation Pose! And Alpha should be set to 1!) Using this you are creating additive information for animation.

After hit additive animations it’s going to Final Animation Pose.
You can test it out by switching bools, but make sure you don’t have any “cast to” or “is valid nodes” in your event graph.

Animation blueprint is almost done, we don’t have an event for switching the bools.
Now create two Animation Montages.
- Shoot Animation (I’ve used _shoot_rifle animation ) it should use UpperBody slot,
- Reload Animation (I’ve used _check animation) and it should use FullBody slot,
To create Animation Montage from animation just right-click on the animation -> Create -> AnimMontage.
The best part of AnimMontages is they can be assigned to slot. We are using this to blend upper body with full body.
Now go to BP_BaseEnemy
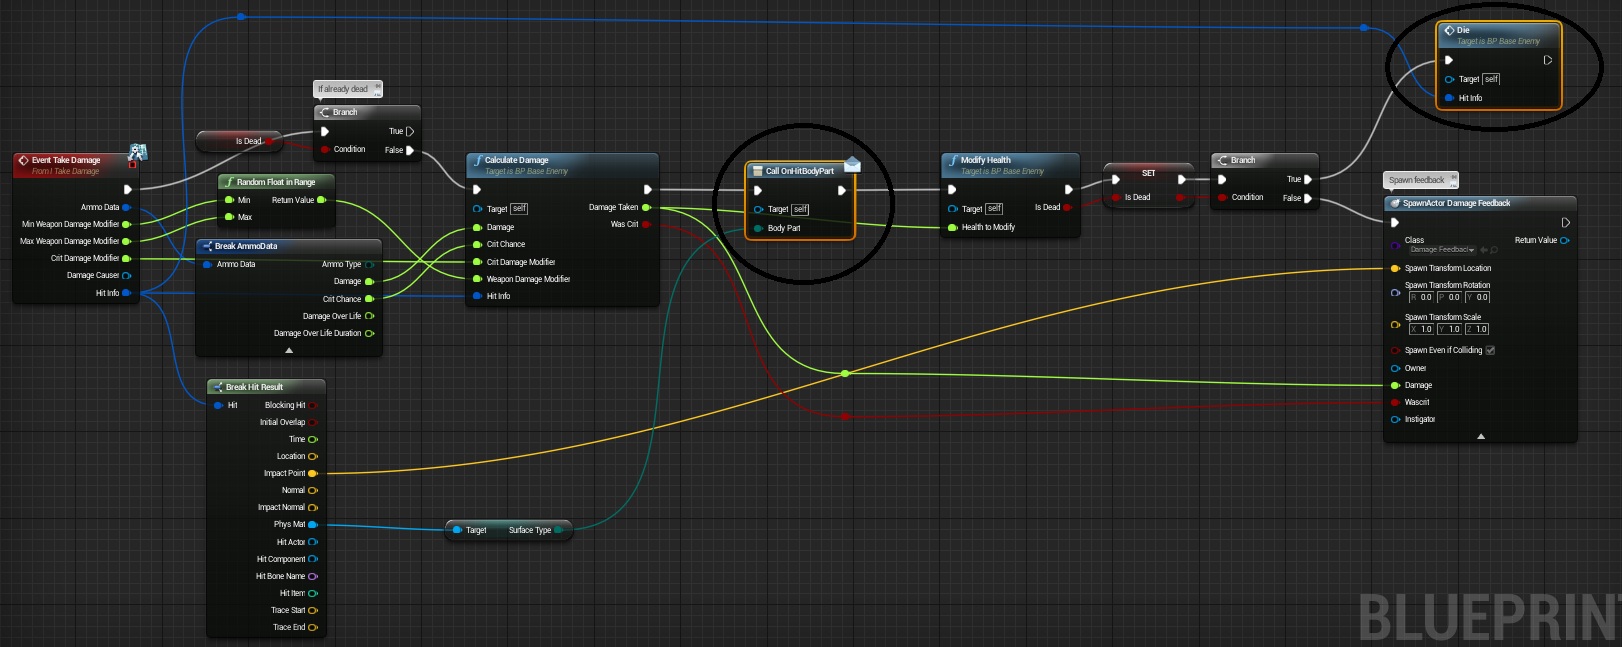
- Create new Event Dispatcher named OnHitBodyPart with one input “BodyType” – type (EPhysicalSurface),
- Create new function named Die with one input “HitInfo” – type (Hit Result),
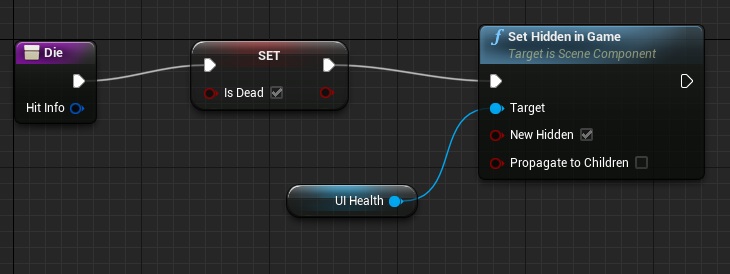
- In earlier created TakeDamage event add dispatcher and die function call,


Now go back to your animation blueprint and let’s bind OnHitBodyPart dispatcher.
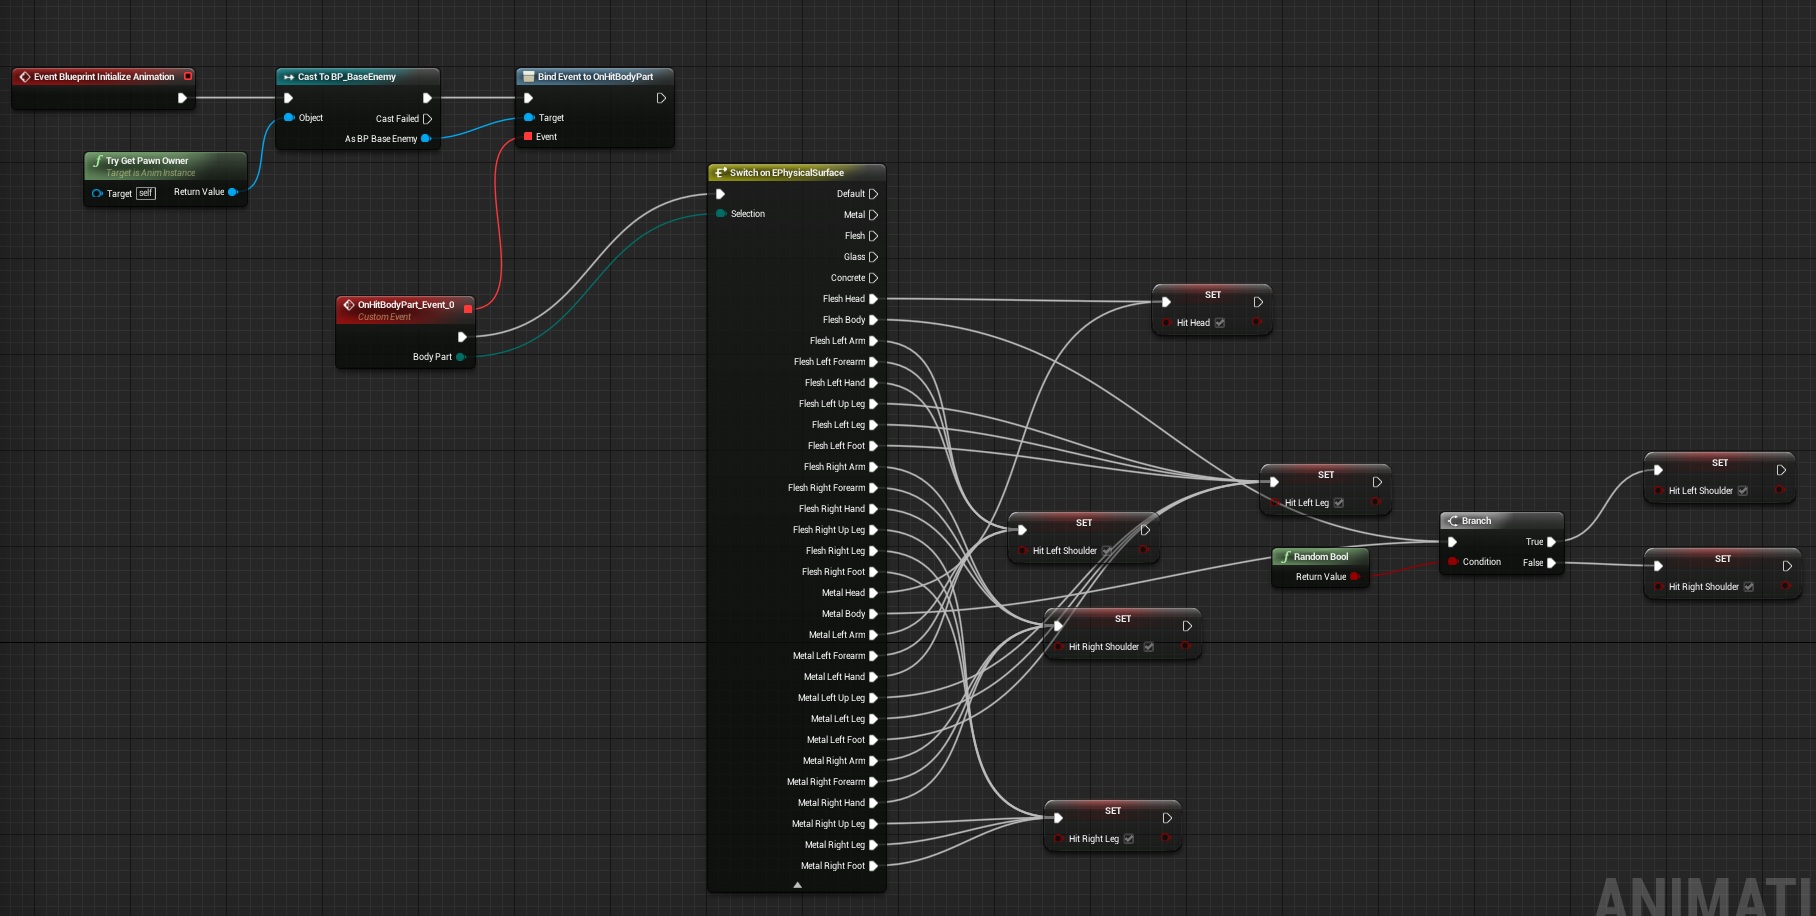
Yea it’s messy. I’m using this big enum because maybe later it will be handy. You could prepare your own enum with smaller amount of body types.
Behavior Tree
Before you start please take your time to watch those awesome tutorials: Behavior Tree documentation Behavior Trees Epic Stream Basics of AI Epic Stream Advanced AI Epic Stream
Create new Blackboard named KillerBlackboard and add those variables:
- isDead (bool),
- MoveLocation (vector),
- isReloading (bool),
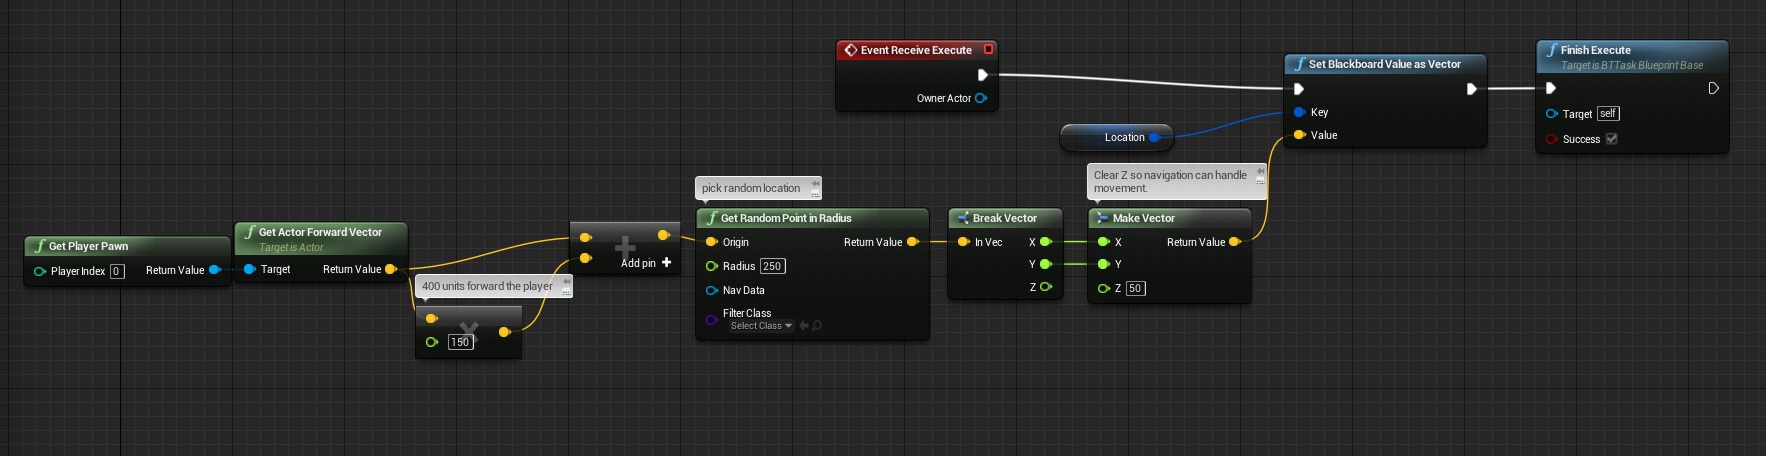
Now create new blueprint extending from BTTask_BlueprintBase named BT_KillerCalculateMoveLocation. Add one variable to it named Location from Blackboard Key Selector and make it Editable. Thanks to this we will be able to choose blackboard data in behavior tree.
Add Event Receive Execute. It will be our task to find location near player.
Now create new Behavior Tree named BT_Killer. It’s hard to explain what’s the setup so here’s a video.
Basically what he is doing:
- Pick location in front of the player,
- Move to the picked location (stop if he is reloading or dead),
To run the behavior tree we need to create AIController. To do this create new blueprint extending from AIController. Name it BP_Enemy_TrooperAI and in Begin Play just add Run Behavior and select your created behavior tree.
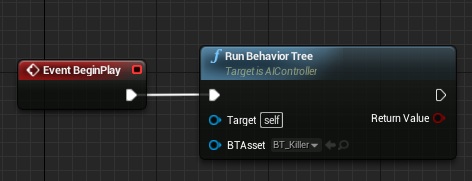
That’s all here!
Enemy
Create new blueprint based on BP_BaseEnemy. Assign your skeletal mesh to mesh and animation blueprint. Assign created earlier AIController in Defaults (AIController Class)
This class will drive everything. Add variables:
- AmmoInMag (int, default: 2),
- MaxAmmoInMag (int, default: 2),
- isReloading (bool),
Add these Events:
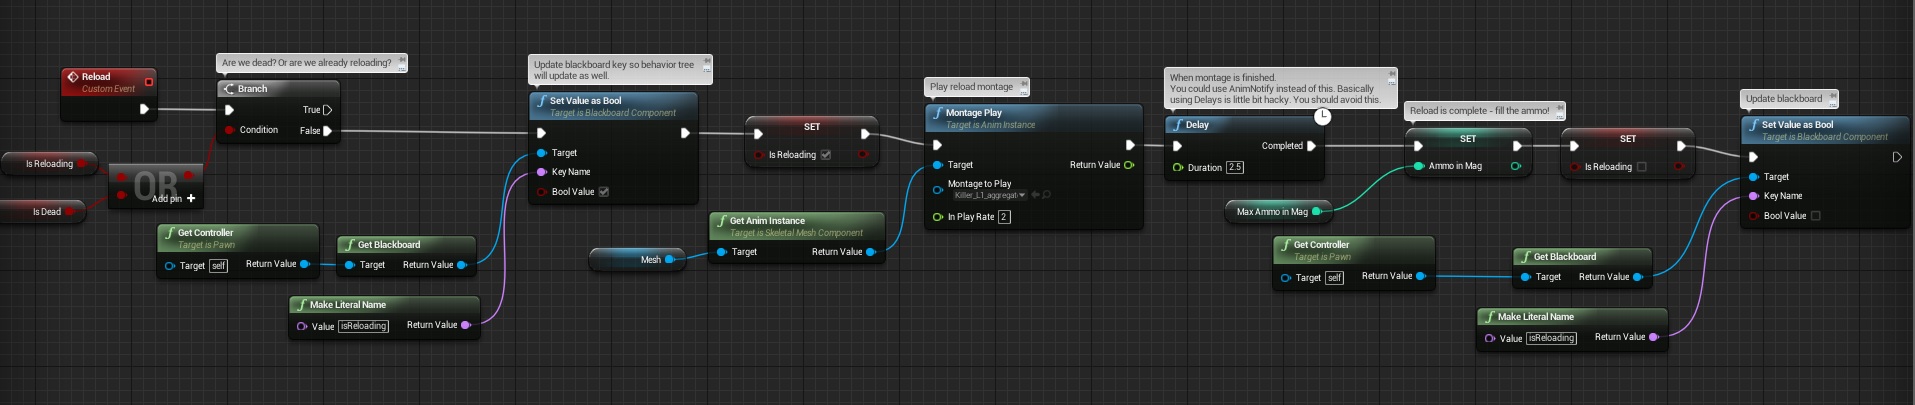
- Reload

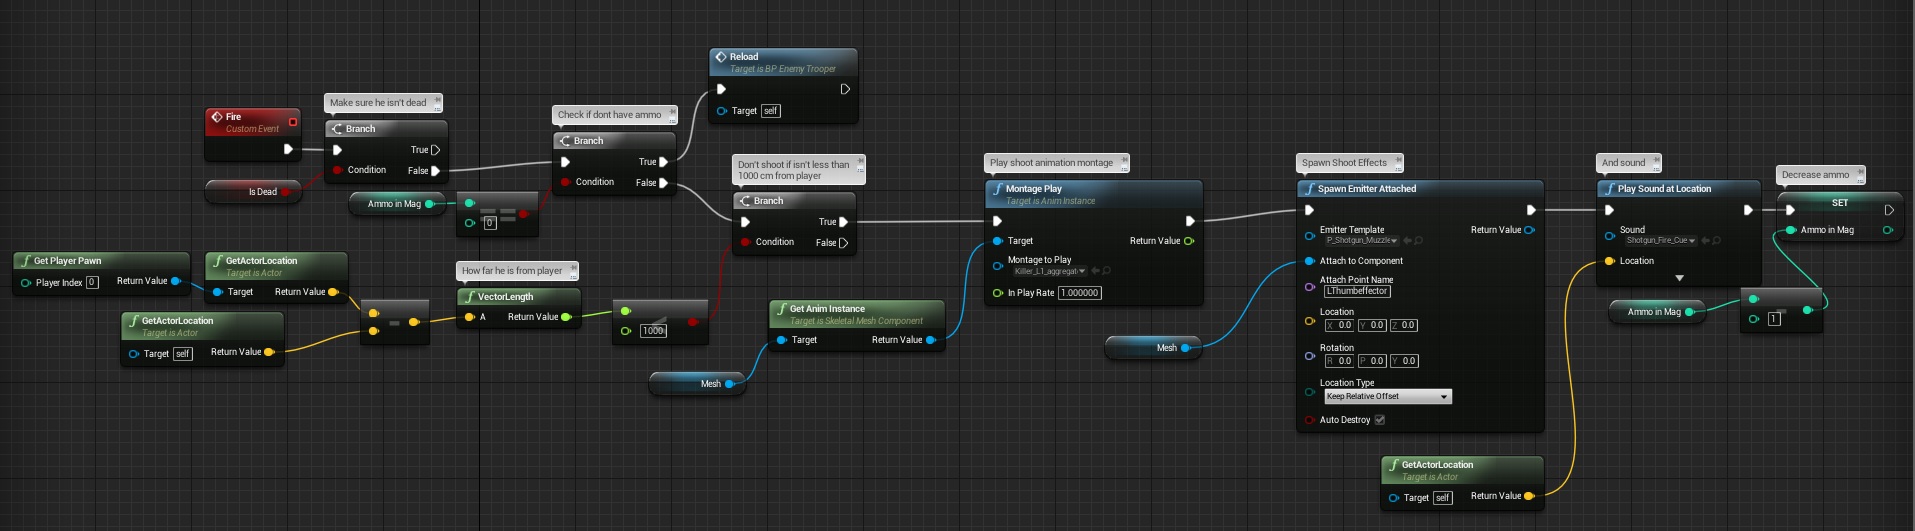
- Fire

- Die (from BP_BaseEnemy)

- BeginPlay
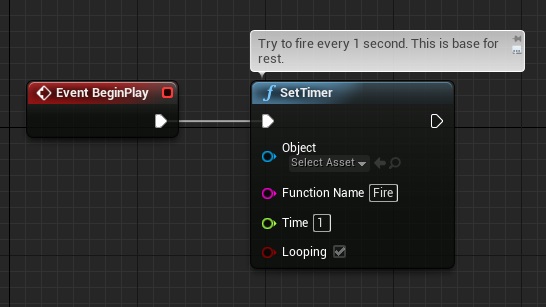

So basically it works like this:
- Every 1 second try to fire,
- Fire if we have ammo,
- Reload if we don’t have ammo,
- If dead run ragdoll,
It’s really simple AI and its great way of teaching AI. Just place this actor to your level and check it out!
Physical Asset
Now if you want to see your ragdoll you need to create Physical Asset from skel mesh. I won’t tell you how to do this but watching tutorial from Epic is the best way to teach how to prepare phys assets for ragdoll. After watching you should be able to create this by yourself!
Final result:
Time Spent on writing this tutorial: 5h.
Creating ShooterTutorial takes a lot of my free time.
If you want you can help me out! I will use your donation to buy better assets packs and you will be added to Credits /Backers page as well.Implementing game is taking time but writing about this is taking much more effort!

Pingback: Futuristic Soldier – Behavior Tree | Shooter Game Tutorial
What about attaching a weapon to the enemy? I may have skipped over it (currently scanning over this and the previous tutorial) and did not see it mentioned.
Thanks!
This enemy have weapon attached in animation. You should read marine tutorial instead.
Pingback: Menu – In-Game Loading Screen | Shooter Game Tutorial
Can you show me how last part should look in 4.9(there is no longer “set timer”)? I do this: http://i.imgur.com/TdqIS2R.png and when I hit play(only on map with that enemy) editor freezes and then stops responding.
Tutorial Was done using 4.8. In 4.9 Epic added new method to use timers I will check that later and let you know here. In the meantime you could check on forums how to use new timers.
How would I possibly go about setting up is a wanted the enemy to shoot a projectile based weapon ?
Pingback: Creating Gameplay Balance System – Part 3 – Supporting all enemies | Shooter Tutorial
I have one problem: Enemy character does not moving anywhere…
i tried to set some values but still nothing… (it once calculate location where to move and looping MoveTo command but it doing nothing).
another problem is node “Get Random Point In Navigable Radius” – it returns 0 0 0 if i enter any value…
could someone help please?
video:
https://www.youtube.com/watch?v=vOvU6l9WTqY
So i fixed it, i placed nav mesh cube into level and AI just moving… damn it was not mentioned in this tutorial… 5 hours lost :/
my enemy is moving because I placed the navmesh but the problem is when I just move the mesh or navmesh and rebuld the navigation mesh from build, my enemies is not moving. I created new project and placed all content from this but the enemies is not moving. the only solusion that I can do is just open backup and lay there with my moving enemies. the problem is i I want to make changes by relacing the staticmesh with landscape or create new level, the problem with navmesh is still there. how can I solve this problem? this issue took so much time of me. I read many solusions from the internet but the solution and the issue is not appropriate in my case. Please help me
Amazing, thank you.
But I found a problem: I can’t rotate a bone with physics collision(body instance) on that. Is this a bug or intended?
Hello, I’m needing help on the moving, I have tried to put this together and using tips i placed a NavMesg but that makes the AI glide full speed towards the camera, spin around then continue to fire,Help please!
Sir…
i have medium skills in Ue4 and beginner in Ai Ue4…
i search enemy fps shooting my player .. so …
is it necessary .. to do all tutorials …frpm the begin
or i can just do the last one for my Game test …or each tutorial indipendant ??
thank you ..
i would like to see a tutorial with a custom death animation and a melee attack on the base enemy.
Is that possible?