This time I would like to implement easy to kill “meat” enemy. Which should:
- Move fast near player,
- Fire using assault rifle with spread when near player,
- Should be dying on head hit,
- Reload his weapon when no ammo,
This will be more advanced tutorial but I think if you did earlier tutorials it shouldn’t be hard for you!
|
1 2 |
<strong>This Tutorial has been created using Unreal Engine 4.8.2</strong>. Make sure you are working on the same version of the engine. |
Preparing Assets
In this post I will use Elite Trooper from 3dmodels-textures. It’s cheap but for this price it’s lacking good skeleton and animations.
I have imported elite_trooper_helmet1_nogun.fbx I will add weapon separately. You could add helmet separately as well if you like – the same way as weapon.
Animations imported without a problems, named correctly.
Animations
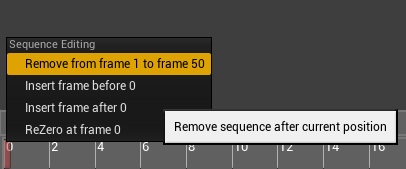
I don’t have standing idle animation in this package, so create duplicate from elite_trooper_helmet1_nogun_Anim_Idle_Shoot named elite_trooper_helmet1_nogun_Anim_Idle and remove all frames beside of the first.
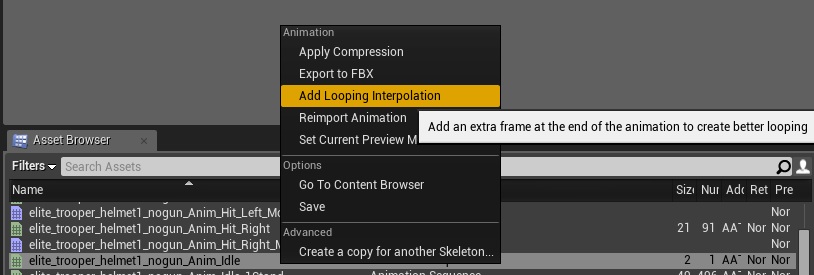
Now add couple of loop frames.
It’s needed because I will be blending this anim with run animation in 1D blend space.
Create new 1D Blend Space named IdleToWalk_Standing. In the top you should have elite_trooper_helmet1_nogun_Anim_Run_Rifle_2N and in the bottom elite_trooper_helmet1_nogun_Anim_Idle created earlier.
If you see your editor horizontally just click on Display Editor Vertically check box.
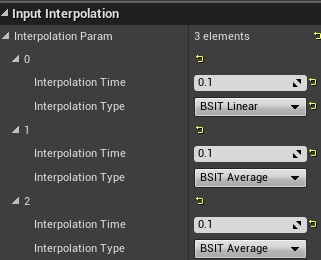
Now on the left panel you should have Input Interpolation. Let’s add some interpolation.
Create another one 1D blend space named IdleToWalk_Crouch.
- Top: elite_trooper_helmet1_nogun_Anim_Walk_Crouch_Rifle
- Bottom: elite_trooper_helmet1_nogun_Anim_Idle_Crouch_Aim
Animation Montages
Now create anim montages from:
- elite_trooper_helmet1_nogun_Anim_Hit_Left,
- elite_trooper_helmet1_nogun_Anim_Hit_Right,
Open those files and:
- Change Blend In Time to 0.1,
- Click on Anim to get Details:
- Change EndTime to 0.15 in Details Panel.
Remember to do that in both Hit animations.
Create another anim montage from elite_trooper_helmet1_nogun_Anim_Idle_Reload. In Details Panel change End Time to 2.666.
And last anim montage from elite_trooper_helmet1_nogun_Anim_Idle_Shoot
- Blend Out Time: 0.1
- End Time in Details Panel: 0.333
You are done preparing animations.
Physical Asset
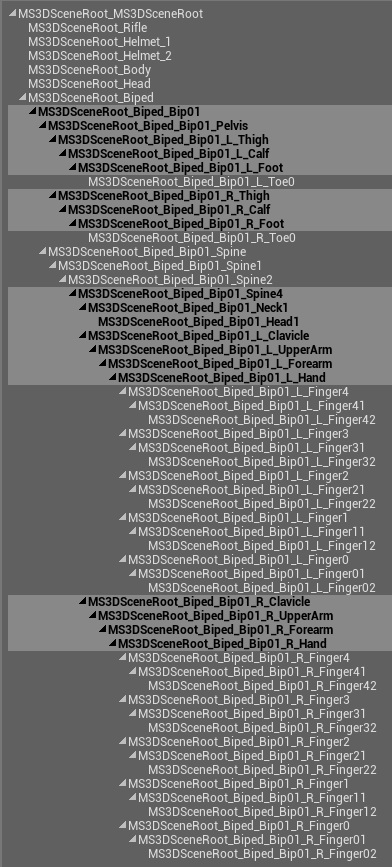
Create physical asset from skeleton. If you don’t know how to prepare physical asset for ragdoll please read earlier post, there is great tutorial here. Creating phys asset takes time – you can spend half of a day with it. To help you out here’s the bones which should have bodies:
Remember to put Physical Materials on all bodies!
Adding sockets
Open skeleton and add socket named S_Weapon from bone MS3DSceneRoot_Biped_Bip01_R_Hand
- Relative Location: (X=8.558509,Y=0.093377,Z=-2.701171)
- Relative Rotation: (Pitch=-8.845123,Yaw=14.241770,Roll=89.626358)
Importing Weapon
Import Gun.fbx file as Static Mesh (Import As Skeletal should be turned off) with Uniform Scale 17.
Open it and add Box Collision (Collision -> Add Box Simplified Collision) then add new socket named MuzzleFlash:
- RelativeLocation: (X=12.966993,Y=-0.000109,Z=0.000000),
- RelativeRotation: (Pitch=0.000000,Yaw=0.000000,Roll=0.000000),
It should be near muzzle.
Creating Enemy Blueprint
Create new blueprint based on BP_BaseEnemy named BP_EnemyMarines.
Components
CapsuleComponent should have Custom collision preset with Block everything instead Projectile. (if you don’t have Projectile preset please read earlier tutorials)
Mesh:
- Should use animation blueprint which will be created later in tutorial – be sure to go back to enemy blueprint and select your animation blueprint,
- Select elite_trooper_helmet1_no_weapon mesh,
- Rotation: Z: -90,
- Scale: 2.7,
- Collision: Custom: No Physics Collision, World Dynamic and should block everything instead Pawn.
- Can Character Step Up On: No,
Add new Static Mesh component from Gun mesh.
Add another component – Particle System from P_AssaultRifle_MF which can be found in Shooter Example game from Epic Games. AutoActivate should be set to False.
CharacterMovement:
- Crouched Half Height: 70,
- Max Walk Speed Crouched: 200,
- Can Crouch: True,
Variables
- New Variable: RandomDistanceFromPlayer(float),
- New Variable: isCrouching (bool, editable, exposed on spawn),
- New Variable: MaxBullets (int, default: 2),
- New Variable: CurrentBullets (int, default: 2),
- New Variable: isReloading (bool),
- CurrentHealth: 25,
- MaxHealth: 25,
- EnemyName: Marine,
Event Graph
Open event graph and.
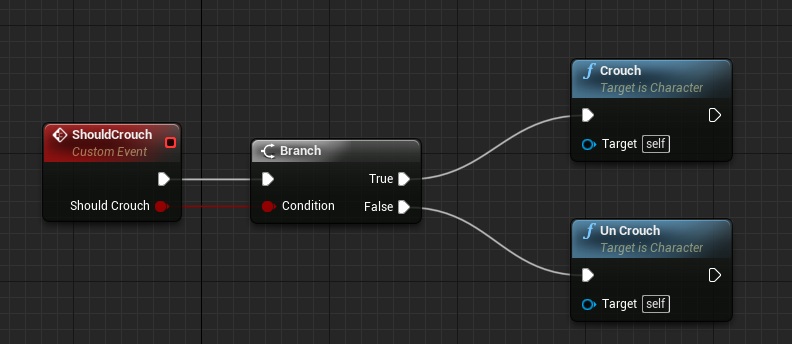
Create custom event named ShouldCrouch with one bool input: Should Crouch.
Add BeginPlay event
Attach weapon to hand and muzzle flash to weapon. Tell enemy if should crouch from start. Animation Blueprint will support crouching to player.
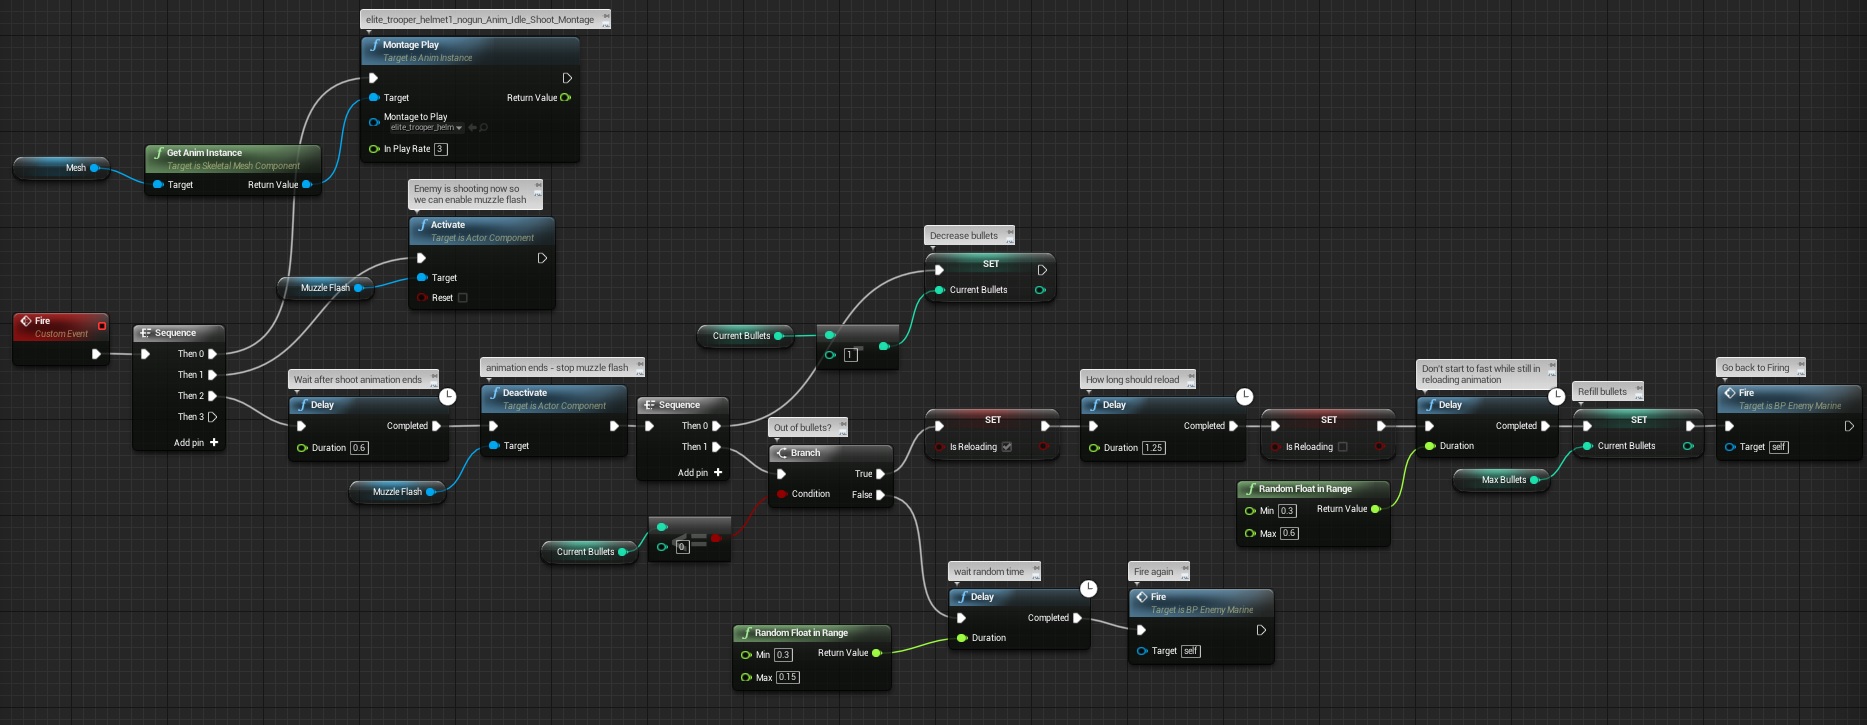
Create new custom event named Fire.
Basically it fire shoot animation and activate muzzle flash. Then it’s waiting for animation to complete – disable muzzle flash. Decrease bullets and check if we still have bullets. If yes – shoot again, if not – reload the weapon.
Add new Custom event named OnNearPlayer.
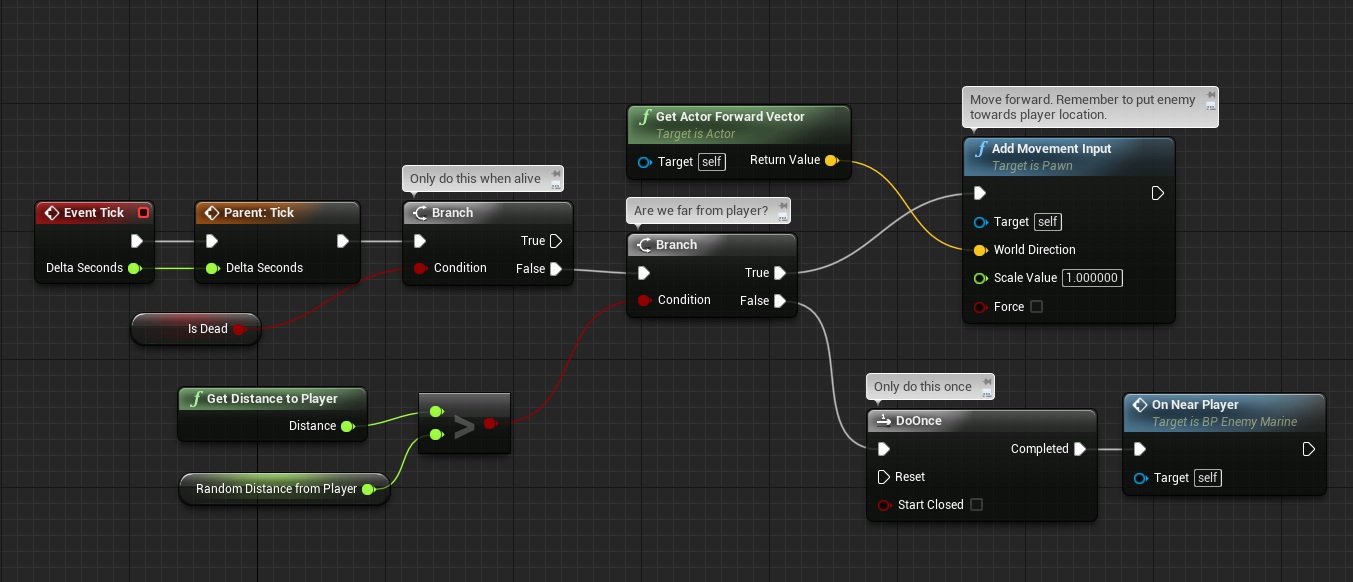
Add Tick event:
Just move near player and if near call OnNearPlayer.
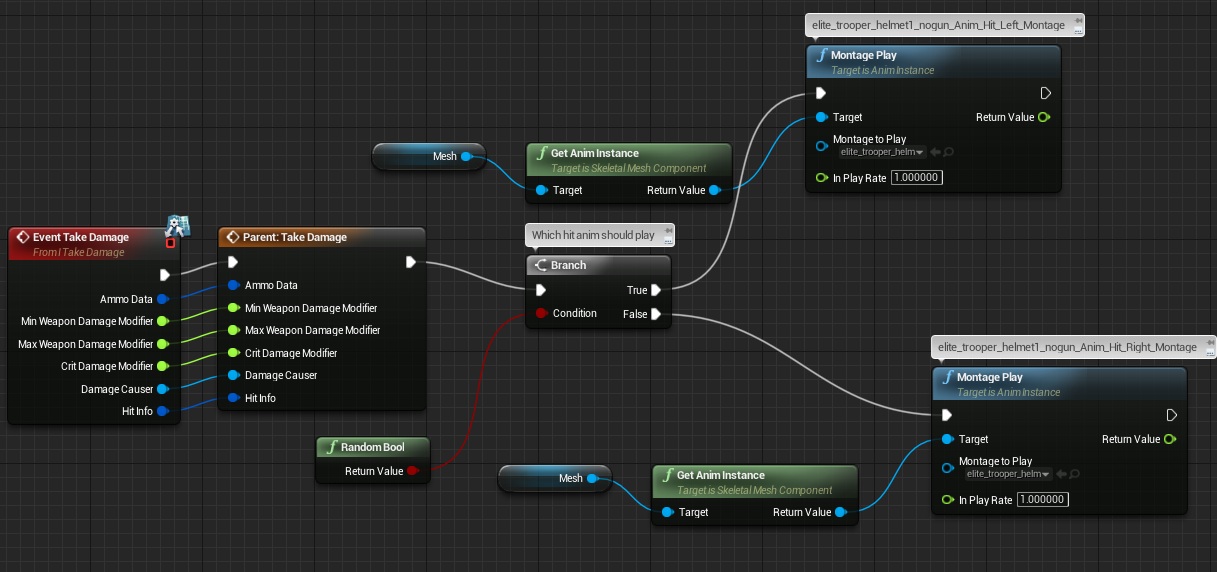
Add Event Take Damage.
It’s really cosmetic only – I’m using Take Damage to randomly play Hit animations.
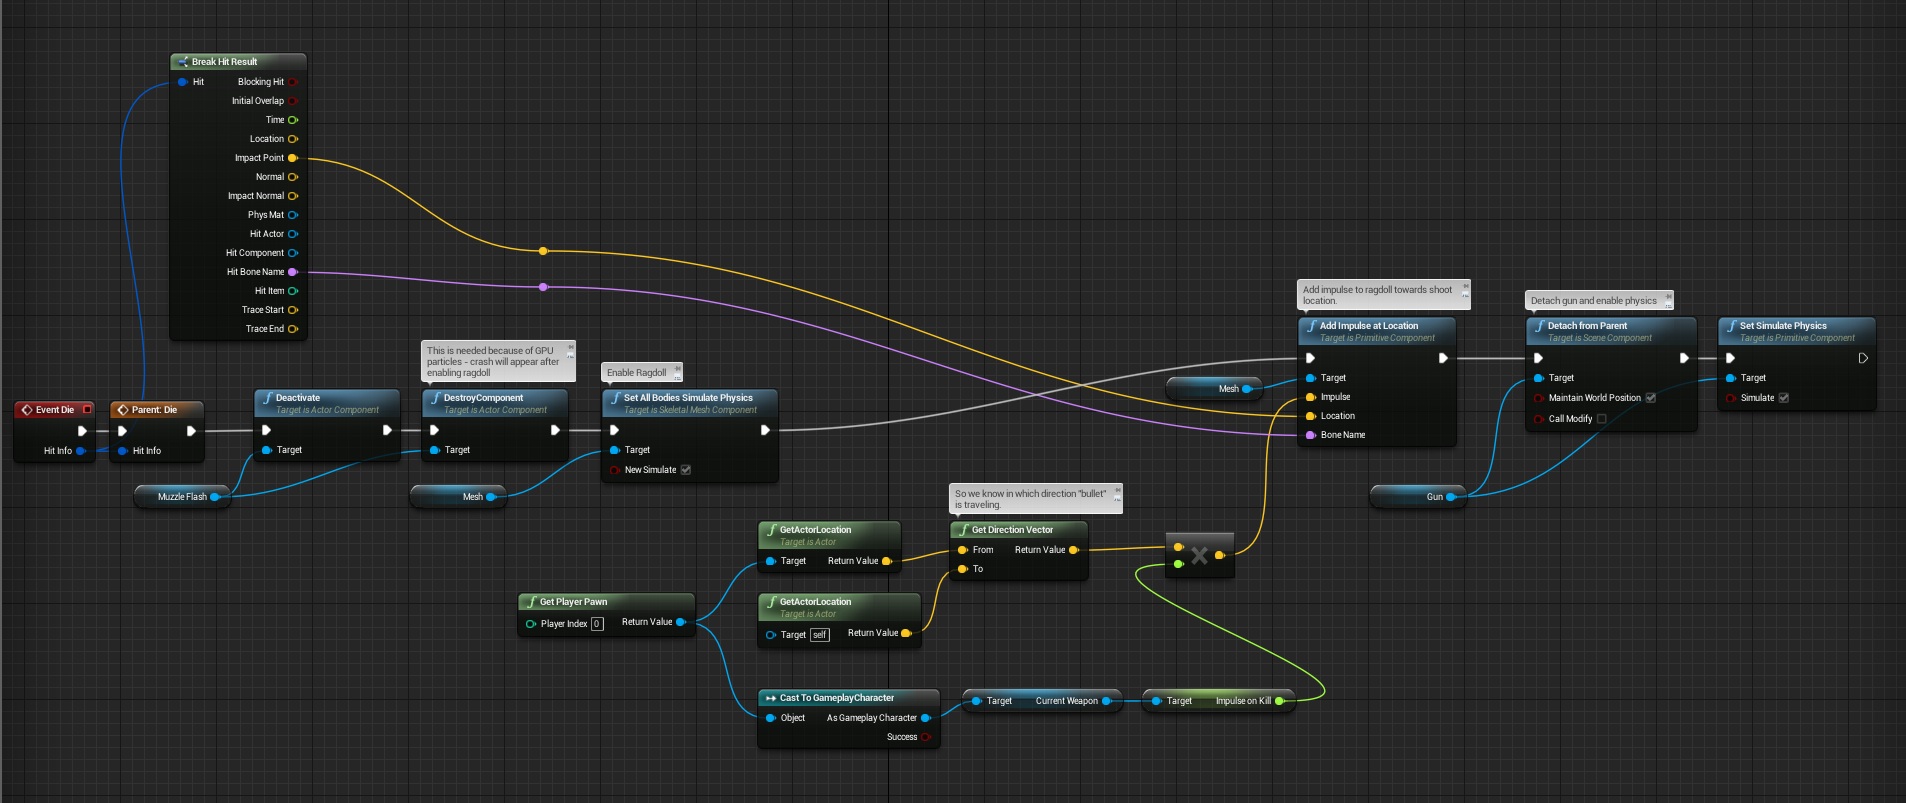
Add Die Event.
I’m using Die event to enable ragdoll.
And that’s all in enemy blueprint!
Preparing Animation Blueprint
We will use a lot of features in Animation Blueprint this time so as always take your time with it.
Create new animation blueprint from the skeleton – remember to go back and select it in enemy blueprint!
Create those variables in animation blueprint:
- isCrouching (bool),
- Speed (float),
- isReloading (bool),
- LookAtLocation (vector),
- LookAtAlpha (float),
- isDead (bool),
Here’s the Update Animation Event. We are just getting information from enemy blueprint and pass them to anim bp.
USEFUL TIP: Character Movement supports Crouching that’s why we can use IsCrouching bool from it. You could implement this by yourself adding new bool to enemy blueprint.
Now the harder and more time consuming part 🙂 Anim Graph!
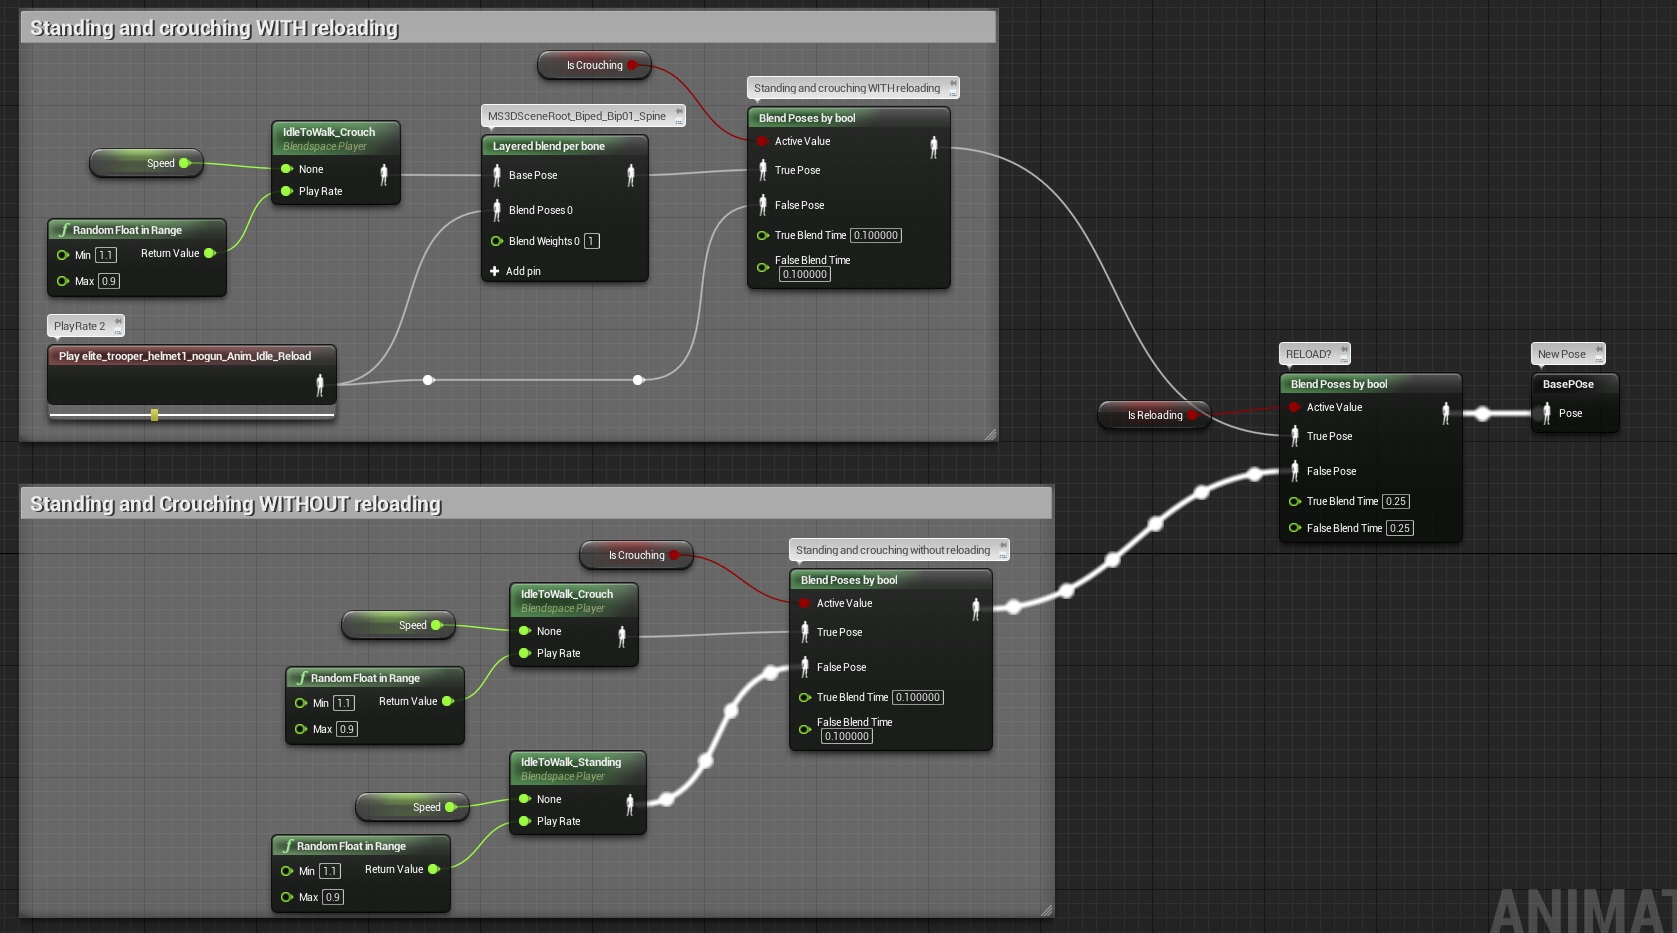
First create BasePose:
It’s deciding if using standing and crouching with reloading animation or without it. I’m using Layered Blend Per Bone node which is only animating top part of the reload animation – because legs in reload animation aren’t crouching. They are standing. When buying assets from stocks you will use this node a lot because most of them are lacking animations.
And here’s the rest part:
It’s using Look At node to be sure enemy is aiming toward player. Trooper skeleton is weird and I haven’t find good method for rotation. That’s why I needed to add some offset to the bone using Transform Modify Bone.
That’s all in animation blueprint! Your enemy should be animating now!
Implementing shooting
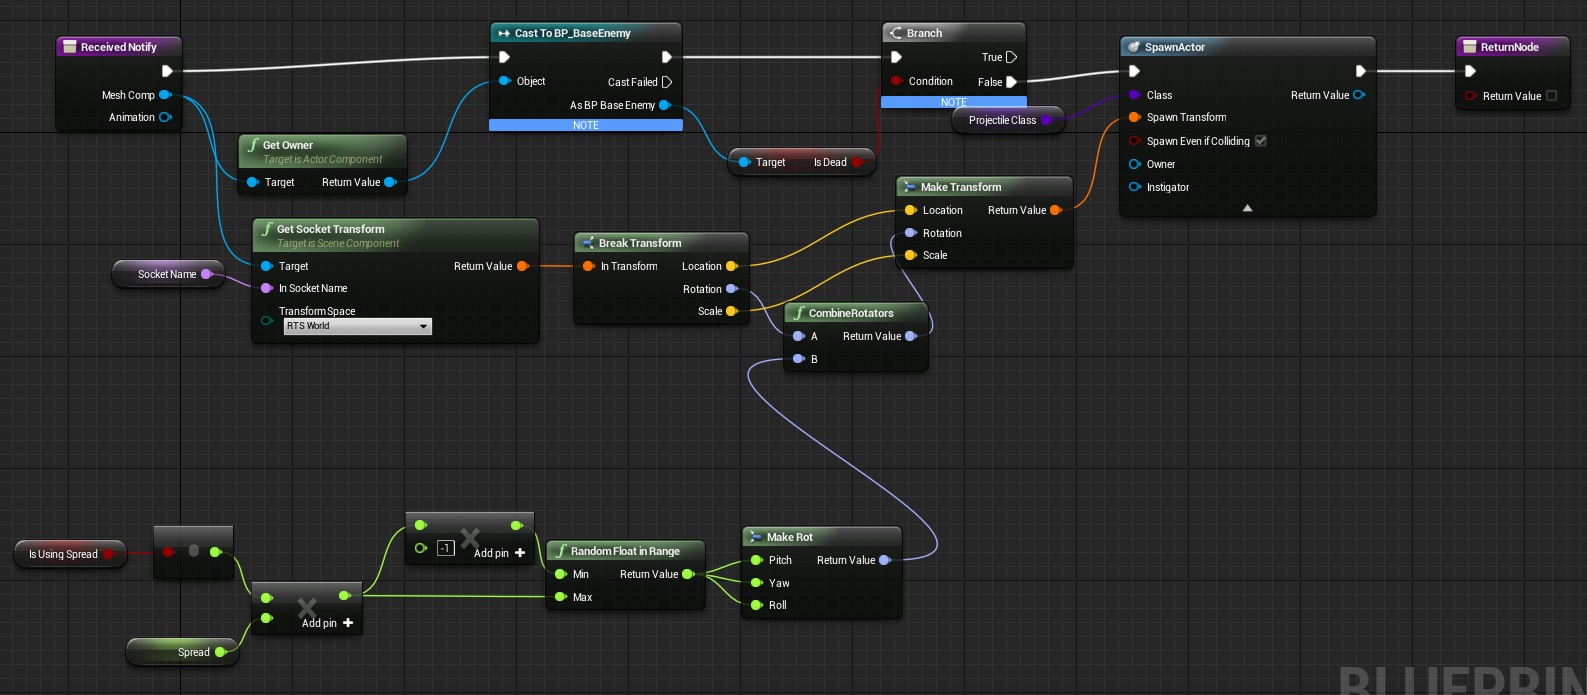
Last thing is to make sure enemy is shooting at player. I will use earlier created Notify_SpawnProjectile blueprint for this.
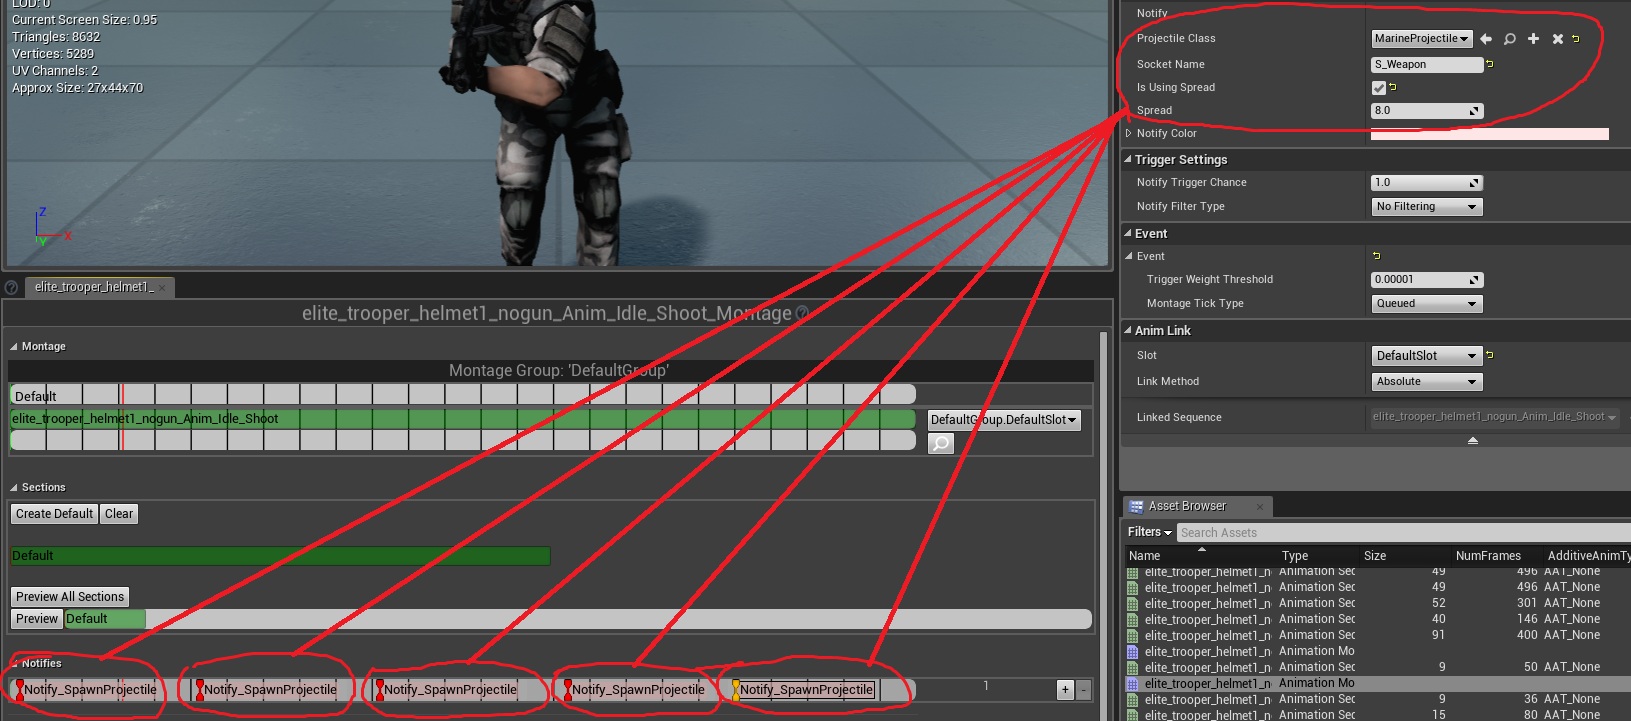
It need to be updated thou. Please open it and add new variables:
- isUsingSpread (bool, editable),
- Spread (float, default: 8, editable),
Here’s the updated graph which will do spread if needed.
Before we could use this notify in Shoot Montage we need to create projectile.
Create new blueprint based on BP_BaseProjectile named MarineProjectile.
Add new Particle System component from P_AssaultRifle_Tracer_01 which can be found in Military Weapons Silver package.
Add two new variables:
- MinDamageToPlayer (float, default: 1),
- MaxDamageToPlayer (float, default: 5),
Overwrite variables:
- MinWeaponDamage: 1,
- MaxWeaponDamage: 1,
- CritDamageModifier: 1,
- AmmoData -> Damage: 5,
- AmmoData -> CritChance: 5,
- ImpactEffect: Impact_Pistol,
I’m doing this because projectile will bounce and can hit other enemies.
Now select ProjectileMovement and change some properties:
- Initial Speed: 4000,
- Max Speed: 4000,
- Rotation Follows Velocity: True,
- Projectile Gravity Scale: 0,
- Should Bounce: True,
- Bounce Velocity Stop: 2,
- Is Homing Projectile: True,
- Homing Acceleration Magnitude: 30,
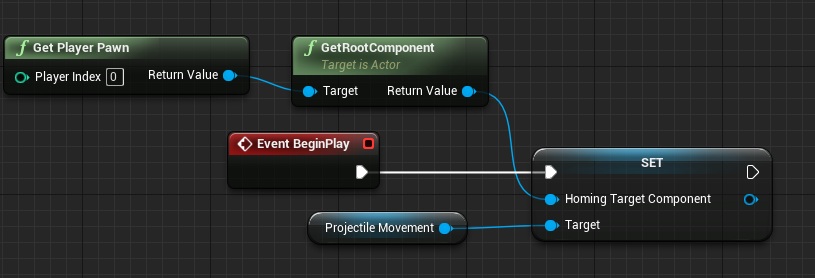
I will use Homing Projectile to be sure projectile will be traveling to player.
Select CollisionSphere and make sure Collision Preset is Custom – ignoring everything instead of Pawn.
Open Event Graph. Add Begin Play event:
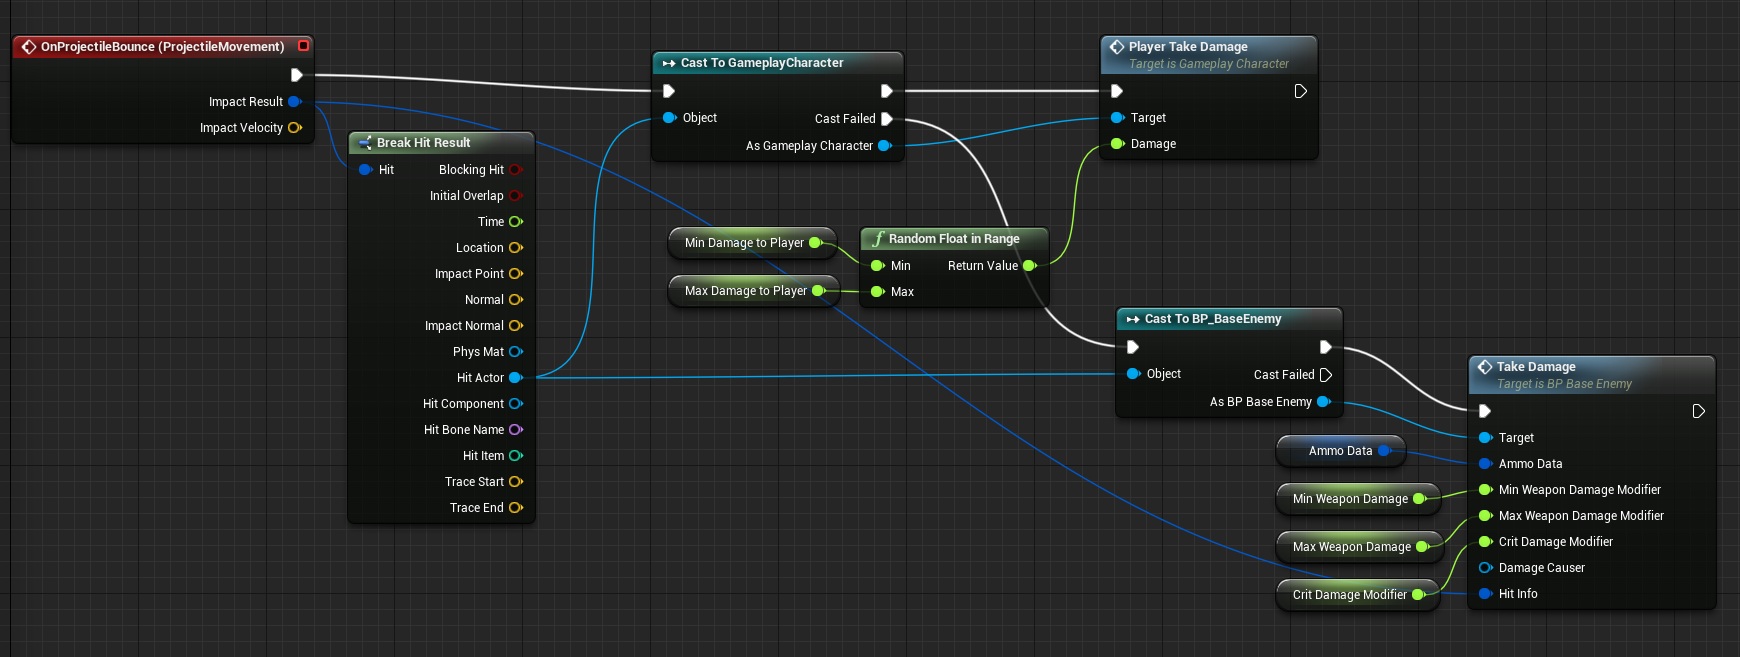
Add OnProjectileBounce event.
It’s checking if projectile hit player or enemy. Your projectile is ready!
Now open Animation Montage: elite_trooper_helmet1_nogun_Anim_Idle_Shoot_Montage and each time you see that weapon fired add Notify_SpawnProjectile notify.
And that’s all your enemy is ready!
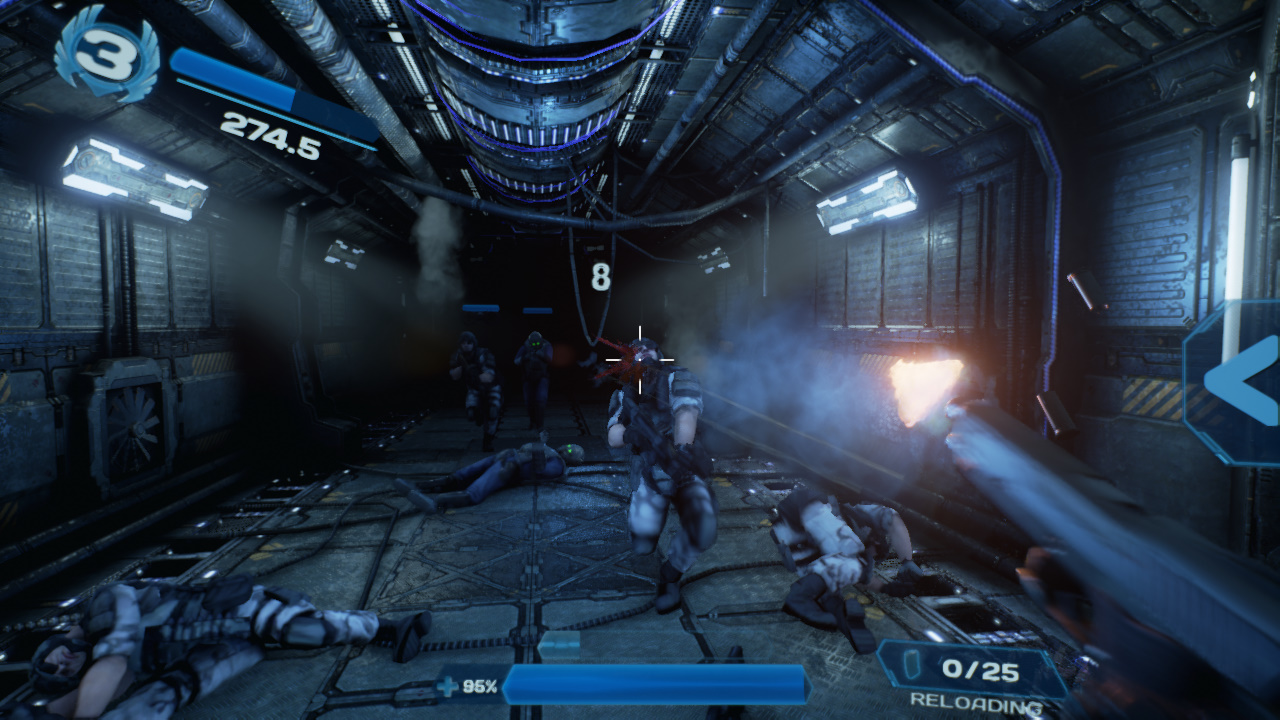
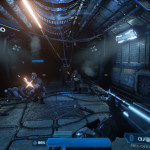
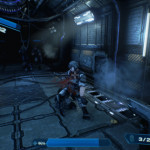
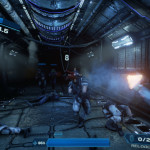
Final effect
Creating ShooterTutorial takes a lot of my free time.
If you want you can help me out! I will use your donation to buy better assets packs and you will be added to Credits /Backers page as well.Implementing game is taking time but writing about it is taking much more effort!







Reblogged this on King Designs.
Pingback: Futuristic Soldier – Behavior Tree | Shooter Game Tutorial
Pingback: Creating Gameplay Balance System – Part 3 – Supporting all enemies | Shooter Tutorial
do you have navmesh problems such as, when you creating navmesh on other level and navigation mesh is not working as my patterns are not moving. however, on level1 everythings is working fine already created. why?