
Before start you should watch this tutorial from Epic. Creating Inventory isn’t so hard but it requires Arrays and Structs to work with.
What I would like to accomplish:
- Player will have his backpack which will be global inventory with all of the weapons collected,
- Player can choose which weapon he would like to use in mission,
- Inventory should be generic. I don’t know yet which weapons I will use and which stats they will have,
- Game should remember which weapons I’ve chosen so I don’t need to choose them again,
|
1 2 |
<strong>This Tutorial has been created using Unreal Engine 4.8.2</strong>. Make sure you are working on the same version of the engine. |
We should start by creating new Structure – WeaponBackpackItem. It should contain necessary information about our weapon:
 WeaponToSpawn (Actor) It will be reference to actor that should be spawned in Menu or begin play during gameplay,
- BackpackImage (Texture 2D) texture reference which we will use in UMG inventory,
- IsSelected (bool) This will tell us if this weapon was selected in inventory screen,
- InSlot (int) in which slot weapon was selected,
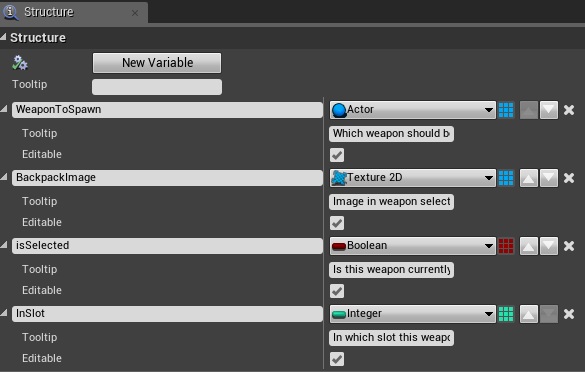
Basically you can add otherdata here like Damage, Price or whatever you like. I’m not doing this right now because I think I will have menu in 3D and detailed data will be directly in WeaponToSpawn Actor.
USEFUL TIP: When working on structures using blueprints you need to be careful. During this tutorial my editor crashed 3 times when adding new variables to structure or updating arrays which are using structure. There are some known issues with structures that are placed in arrays. Be sure you save your work often! Basically I recommend putting structs and all operations on them to C++.
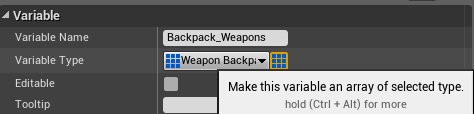
Now go to ShooterGameInstance
- Create new variable from WeaponBackpackItem and name it Backpack_Weapons. It should be array:
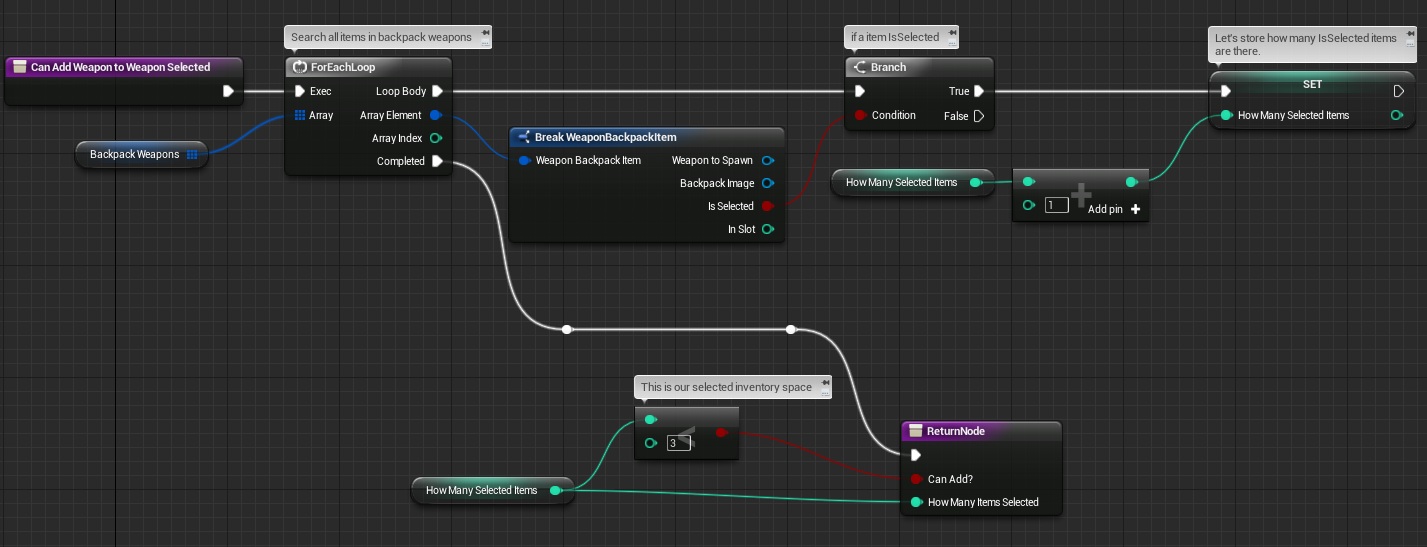
Now let’s fill our array. Create couple of elements (I’ve created 5) and assign different textures. I’m using icons placeholders from here. Just for test. Make sure you have different textures assigned to each elements. - Create new function: CanAddWeaponToWeaponSelected
– it should have one local variable: HowManySelectedItems.

– And it should return CanAdd (bool), HowManyItemsSelected (int)
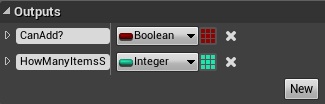
– This function will tell us if there is a space in player inventory to select another weapon.

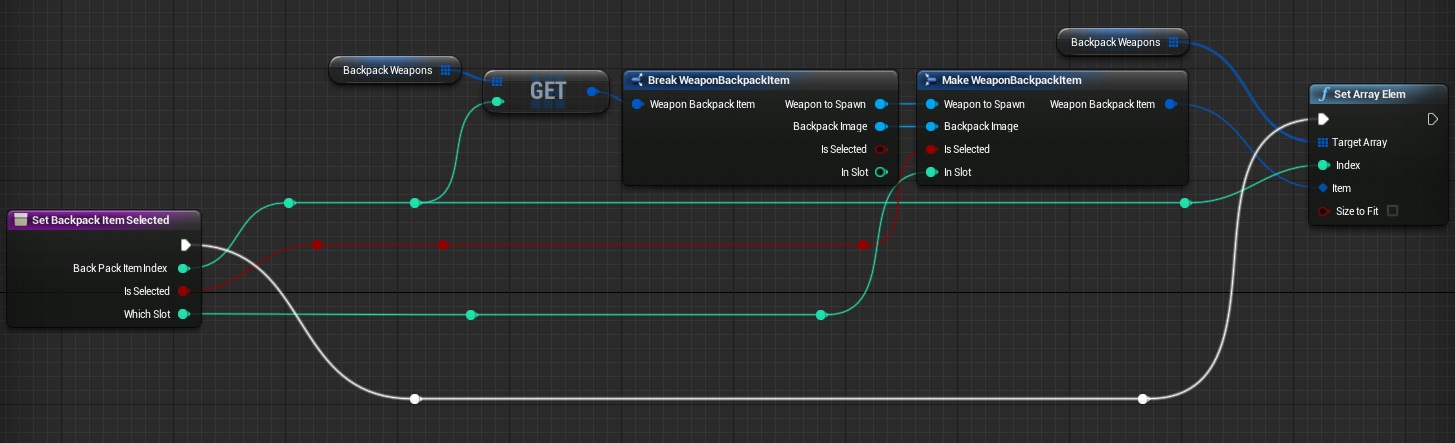
- Create another function: SetBackpackItemSelected
– It should have 3 variables in Input:
BackPackItemIndex (int)
IsSelected (bool)
WhichSlot (int)
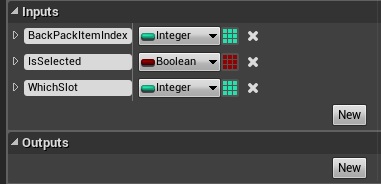
This function will update data in Backpack_Weapons. For now it’s setting only InSlot and IsSelected but it can be modified later. Basically you could just pass WeaponBackpackItem as input but for this tutorial I wanted to break this.

This is all in ShooterGameInstance. It will store our backpack weapons information so everyone can assign / or modify the data.
Now create new User Interface -> Widget Blueprint and name it UI_Debug_WeaponInventoryItem
Explaining UMG using text is difficult but I will try it 🙂 |This UMG widget will be our inventory icon. Let’s start by creating Hierarchy.
- Delete CanvasPanel. We will be adding this widget to other widgets.
USEFUL TIP: When doing that you should’t have CanvasPanel. CanvasPanel have information about anchors and our base widget will have those. Duplicating them can affect weird behavior in different resolutions.
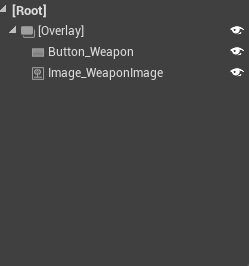
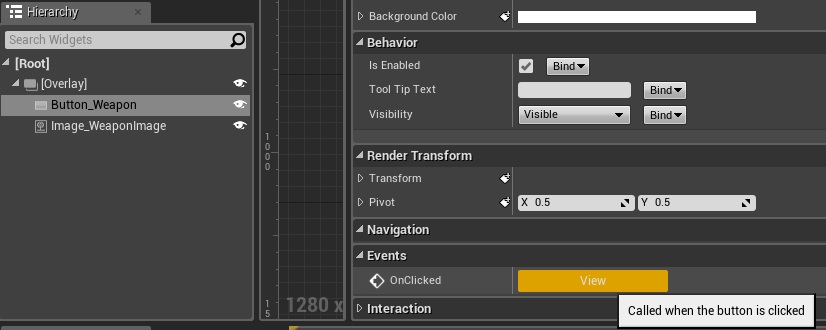
- Add Overlay on top,
- Add Button with Horizontal and Vertical Alignment set to center. Go to Style and change Image Size for all of the Brushes to 150×150. Remember to change the Size for all of them! (Normal, Hovered, Pressed etc)
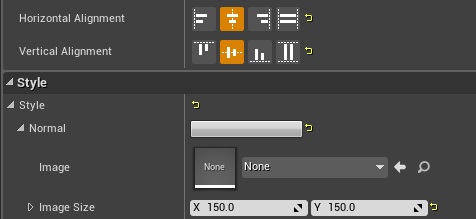
- Add Image which should have center alignment as well and size 130×130.
– Remember to set it as variable so we will have access in blueprint graph,

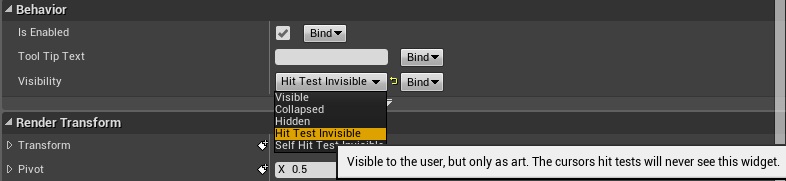
– Set visibility to HitTestInvisible,

We are making sure that our mouse events will go behind the Image and hit our Button.

Now let’s go to Graph.
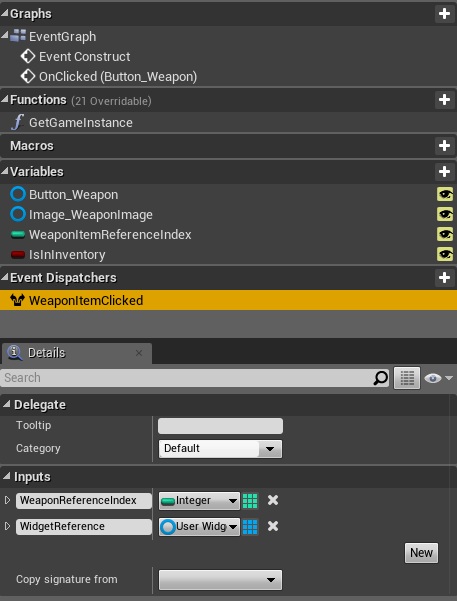
 Create new Event Dispatcher: WeaponItemClicked which should have two inputs: WeaponReferenceIndex (int) and WidgetReference (User Widget)
WeaponReferenceIndex will be just an link to our Backpack_Weapons array index.- Create new variable: WeaponItemReferenceIndex (int) which should have ExposeOnSpawn and Editable selected. Thanks to that we will be able to assign something to this variable when spawning Widget!
- Create another variable: IsInInventory (bool) and set ExposeOnSpawn / Editable as variable above,
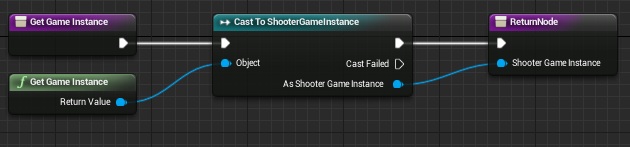
- Create new Function: GetGameInstance which will return ShooterGameInstance and will be a pure function.

Being in graph create new event – Event Construct (it should be there already) and let’s do something with variables that we have set Expose On Spawn.

We are changing Image texture and we are disabling button if it’s selected. Simple enough.
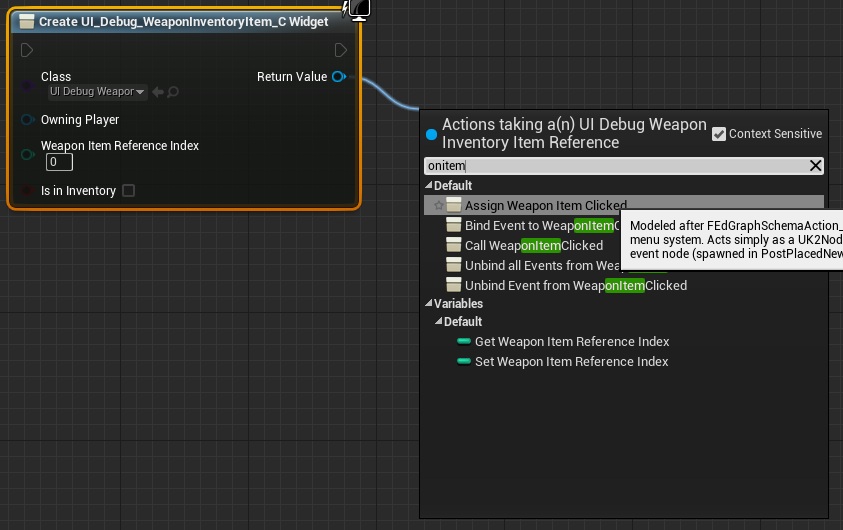
Now select Button in Designer view and add OnClicked event.
In graph let’s call our WeaponItemClicked dispatcher.
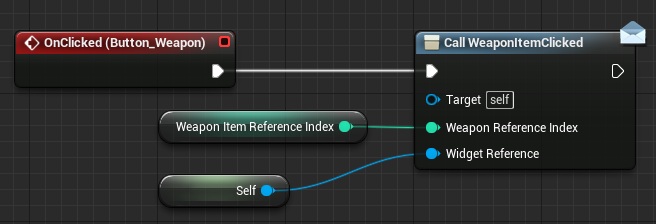
Thanks to this dispatcher we will know in our base Widget that this button was clicked. This is all in this Widget Blueprint.
Now let’s move to the hardest part. We need to create an UI with all of our inventory items and items that we have selected. We need to implement selection functionality as well.
Create new User Interface Widget Blueprint and name it UI_Debug_WeaponSelection.
I’ve created short video demonstrating Designer Hierarchy, you can watch it here, but I’ll try to explain this by text as well.
- Add Overlay panel. We will show inventory items here so it should be big,
- Add Border and insert it to Overlay.
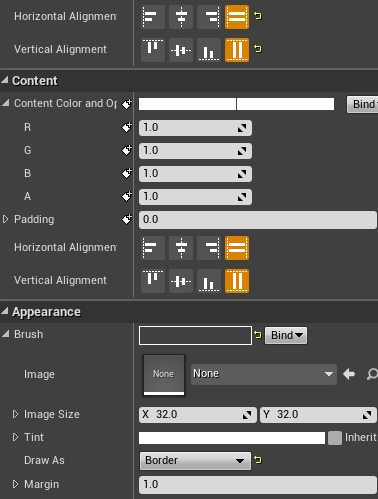 – Horizontal and Vertical alignment should be set to FILL.
– Brush draw as should be set to Border,
– If border is selected Margin should be set to 1!Thanks to this border we will see where is our inventory.

- Add ScrollBox and insert it to Border
– Horizontal and Vertical alignment should be set to FILL as Border, - Add UniformGridPanel and name it UniformGridPanel_Backpack. It should be set to FILL as well,
That’s all for this overlay. Let’s move to another one.
Create another overlay and put it on the screen somewhere in bottom.
- Insert border to the Overlay like we did earlier,
- Insert Horizontal Box to Overlay and set alignments as FILL,
- Insert 3 Overlays to Horizontal Box and name them: Overlay_Slot_1, Overlay_Slot_2 and Overlay_Slot_3.
– Size should be set to FILL,
– Alignments should be set to FILL,
– They should have “Is Variable” so we can mess with them in Blueprint Graph.
That’s all here in designer.
Now let’s move to Blueprint Graph and add some variables and functions.
- Create three bool variables: FirstSlotTaken, SecondSlotTaken and ThirdSlotTaken – they all should be set to false by default,
- Create new function GetShooterGameInstance which should return ShooterGameInstance and should be pure, we have done this earlier so I won’t post screen here,
- Create new function FindFirstFreeSlot which should have one OUTPUT – Slot (int) and one local variable CurrentFreeSlot (int),
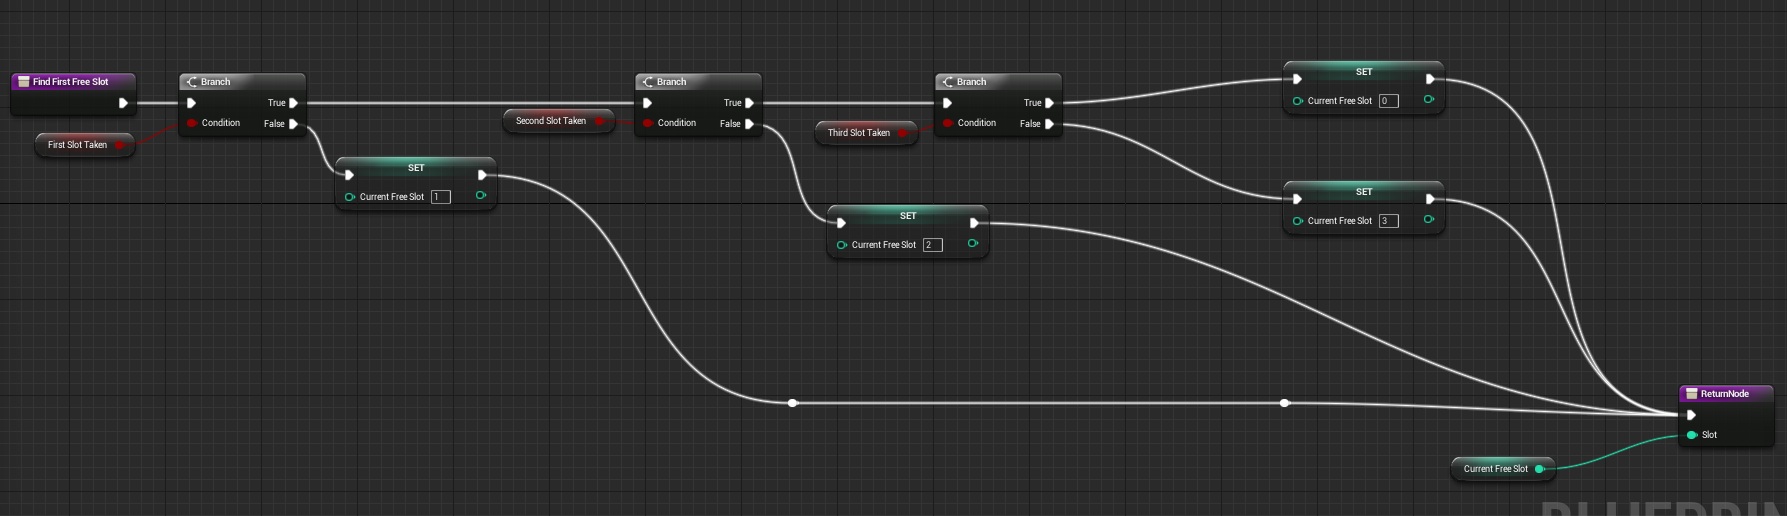
This function will return first free slot that we can use when selecting a weapon.

Event graph is to big for one screen. Let’s move step by step.
Create Custom Event – CreateBackpack with one input: WithoutSelectedWeapons (bool) try to copy this:
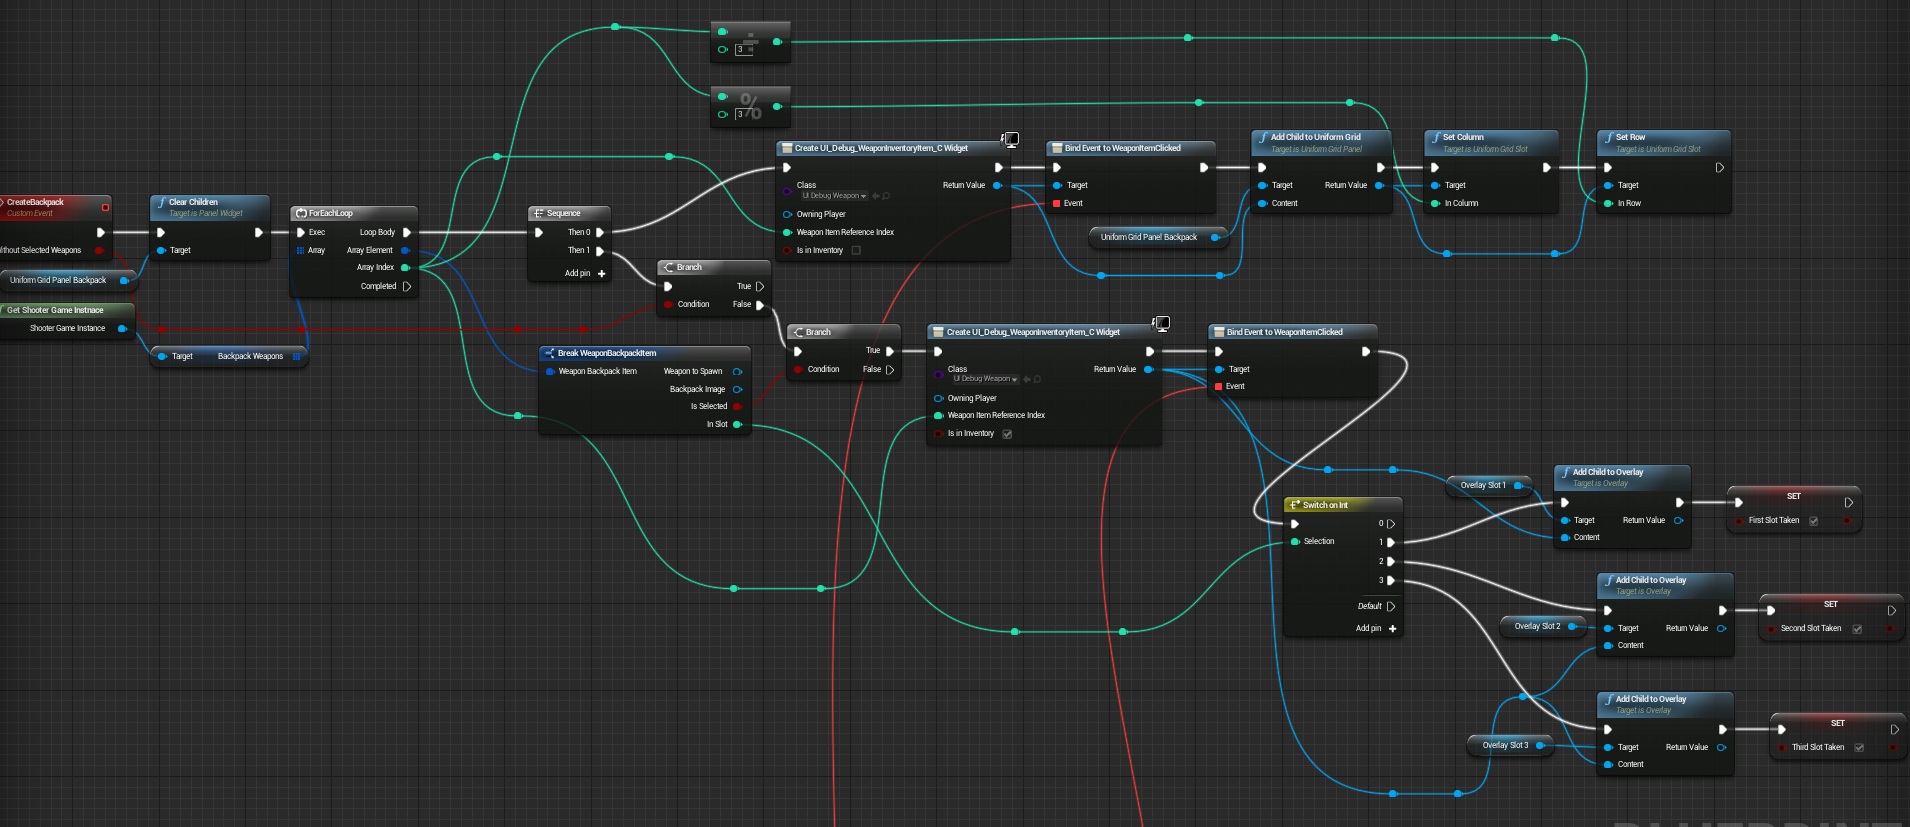
What this is doing:
- It’s iterating for all inventory items in Backpack_Weapons,
- Then it’s creating new widget “UI_Debug_InventoryItem” which we have created earlier. It’s passing data to the widget,
- We are connecting our WeaponItemClicked dispatcher.
- After that it’s adding new widgets to Grid Panel,
- And it’s setting column and row,
- Then it’s checking if the IsSelected true,
- If yes create another widget and place it to the Panels,

This should run only in the beginning of the widget. Here’s Construction Event which is firing CreateBackpack and letting us to select something using mouse.
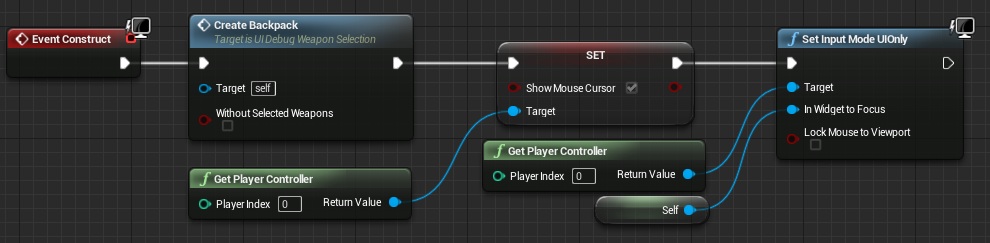
USEFUL TIP: Event Construct will fire every time the widget will be added to viewport!
Now let’s focus on first dispatcher which was in Sequence 0 of the CreateBackpack function.

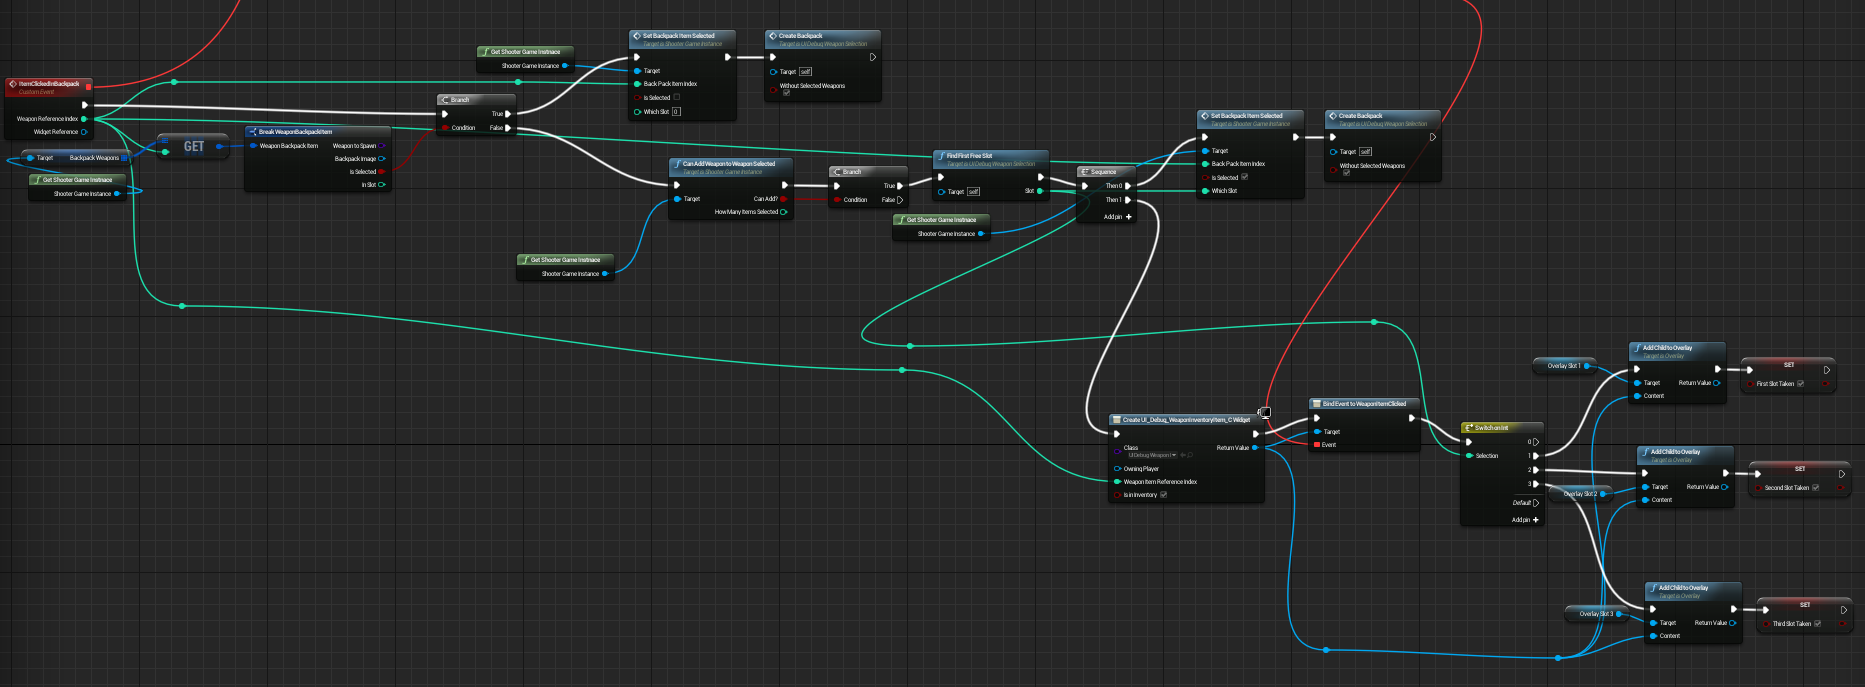
It’s setting IsSelected and putting IventoryItem to panel.
The last two dispatchers are connected to the same custom event: ItemClickedInBackpack
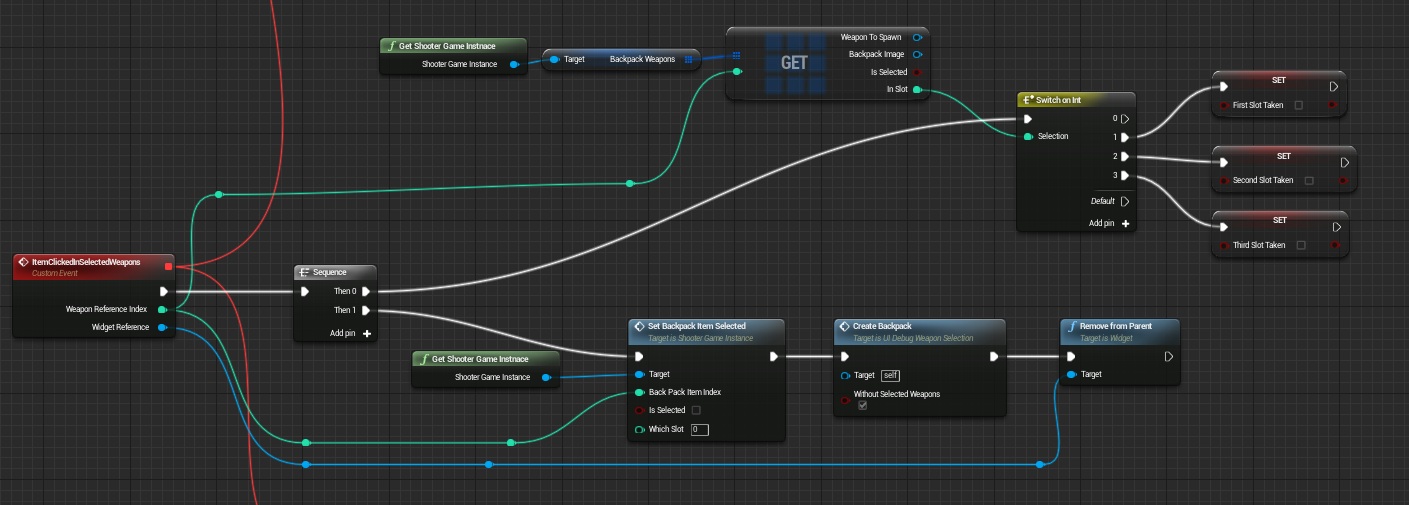
Which is removing items from selected weapons panel. It’s really hard to describe those using screenshots so here you can download my Blueprints folder. If you want to test this out just create widget UI_Debug_WeaponSelection.
Creating ShooterTutorial takes a lot of my free time.
If you want you can help me out! I will use your donation to buy better assets packs and you will be added to Credits /Backers page as well.Implementing game is taking time but writing about this is taking much more effort!

Pingback: How to add weapons – basics + equipping | Shooter Game Tutorial
I have done everything here but my selection is not working. When I click on weapons in inventory nothing happens.
Same here
same here…
same here
ok so, after 2 weeks!!!!! i solved it, but i dont know how… i just did this tutorial from start.. There are some steps which are not written (like where to fill border or changing some buttons to variables etc…)… i think this tutorial is not for new users, its a bit hard but great tutorial
I some people still have this problem, open ShooterGameInstance, on variables click on “Backpack_Weapon”. “In the defaut value” add Element (the number of weapons you have) like on the picture https://answers.unrealengine.com/storage/temp/79345-actorarray.jpg and you have to add a weapon for each element
It works for me now, just some little bugs to fix and good to go !
im having trouble getting ShooterGameInstance into my project i tried migrating it from the shootergame to my project and it wont let me its like its lock in the shootergame
Hi Alexander as far I can know there is some issue with changing Game Instance in 8.1 – I am able to change Game Instance in 8.2 without a problem. Can you please send me screens or video what issue do you have? It’s hard to say what’s wrong.
Hey this for anyone here? With blueprint download file are we allowed to use that for our projects? The one we can download thorough dropbox?
also i cant seem to locate or create the variables button_weapon and image_weaponImage
Can you please send me screenshot or video of what kind of issue do you have? It will help me navigate what’s the problem!
hey Im having a slight problem when its comes to the zsection in the UMG blueprint It wont allow me to cast to the game instance or at least will however I can return it. I keep getting the note
Info The execution path doesn’t end with a return node. Cast Failed
So then in the event graph Im not able to get the BackpackWeapons
many thanks In advance
Lewis
hey For some reason It wont to the cast to the ShooterInstance in the UMG function getgameInstance Keep getting the Error “the Execution path doesnt End with a Return Node”
Even though its connected to one, is there any settings I may of missed ?
Thanks In advance
More people are having this issue – its working for me in 8.1 and for my friends maybe its good time to post it on AH
Hello,
I have a problem with the game instance : http://prntscr.com/7w39j7
Could you help me, please ?
You need to cast it to shootergameinstance to get variables from it. Let me know if you figure this out if not I will post screenshot.
Hi,
Its already done but don’t work :s (ArmeInstance is shootergameinstance with an other name ;))
http://prntscr.com/7w7x3n
Make sure your ShooterGameInstance is added to GameInstance in Project Settings.
Have the Same Problem! shooter instance is in projekt setting! what i can make now?
You have to right click, type “get game instance” and choose the “Call function” category one, you don’t want the one in “Game” category.
I have an error : “Accessed None ‘CallFunc_GetShooterGameInstance_NewParam, from node ForEachLoop in EventGraph in blueprint UI_Debug_weaponSelection “
Make sure ShooterGameInstance class is GameInstance class in Project Settings.
ok here is my problem i create the game instance like you ssaid to do in a previous tutorial but it give me a warning say that its not inherit from gamemode… i also cant get the get game instance to hook up in ui_debug_weaponinventorysystem
Are you sure you have ShooterGameInstance added to GameInstance in project settings?
You have to right click, type “get game instance” and choose the “Call function” category one, you don’t want the one in “Game” category.
Have done everything correct. But – like the other guys here – i have still issues with the Game Instance. It just dont work, even if i add all the Game Instances in the project setting.
any suggestions?
Others resolved it by disabling “pure” in GetShooterGameInstance function.
Thanks for your fast reply & the supreme tutorial series
Hi,
It is great that you are making tutorials and I am happy for you that you got your first backer.
But I have downoaded your inventory blueprint and it is just not working.
A/ First of all the slots are not assigned correctly: if I select one item it is added to slot 1 like expected. But if I select a second item, the second item is added to slot 1 and the previously added item is moved from slot 1 to slot 2. (the first added item remains visually in overlay 1)
B/ If I select only one item the WeapontoSpawn is correct. As soon as I select a second item, all WeapontoSpawn values are set to “None”
C/ The “selected” boolean of any selected item is never set to “true”
Thanks. My downloaded blueprints are just reference for you! Im using lots of references to assets that you dont have. You should do tutorials step by step and read all links that I provide.
I can help you resolve the issues if you provide whole project. Mail me at shootertutorial@gmail.com
Hi andrzejkoloska,
Thank a lot for your swift reply and offering to help. I am actually following the tutorials step by step and reading all the additional links. I am doing a third person shooter though so I have to adapt a bit your blueprints.
Nevertheless I have managed to debug and fix the problems.
The main cause was that the “WeapontoSpawn” pins between the node “BreakWeaponBackPackItem” and the node “MakeWeaponBackPackItem” in the “setbackpackitemselected” function of “ShooterGameInstance” were disconnected. This was due to changing the type of the “WeapontoSpawn” variable from “Actor” to “BP_BaseWeapon” as asked at the beginning of Chapter 5 “How to add weapons – basics + equipping”.
You have added a tip to advise us to verify the connections but you might want to add some additional information pointing to that specific issue.
Thanks again.
Laurent
As I have emailed you my project and had no reply, I thought I would post this on here.
I have created a second project and gone through it all again from start to finish, and again the inventory buttons are not disabled when you select an item, thus allowing you to select it again in another slot, which breaks the slots.
It is either something wrong with 4.8.3 or something wrong with your blueprints, as, as I mentioned, this has now happened to two separate projects that I have created using these tutorials.
I think there is an error in his blueprints it should not be toggling “IsSelected” every time you click the item in the backpack as i don’t think you want the same item added to selected weapons twice. here is an easy fix:
In the event graph for “UI_Debug_WeaponSelection” find the branch node connected to the customevent “ItemClickedInBackpack” and break the true pin so it does not execute the “SetBackpackItemSelected” node. recompile and test it should work as i think it was intended.
Hello andrzejkoloska:
“Ui_Debug_WeaponInventoryItem: Compiler Results 1 Warning:
‘NewParam’ is already a ‘Shooter Game Instance’, you don’t need “CastToShooterGameInstance.
The execution path doesn’t end with a return node. Cast Failed”
Any idea?
Cmon man… The last few steps I have to download your blueprints? They aren’t that much more complex then the first picture but I can’t follow them since half of the stuff is broken.
Can you please update this and actually finish the tutorial?
Its really hard to describe more complex blueprints. Its working please read Laurent comment and try to debug it yourself. There are problems when copying downloaded blueprints. Pins will broke and game instance isnt reconized.
The main thing here which Im trying to learn is take your time, try to figure it by yourself only then you will learn.
You dont have do download the BPs. Just follow the Tutorial Step by Step and you ll finish up.
What the author ment is, that the BP network is hard to explain. you need some experience to understand.
I suggest you just do it and come back later to fully understand. The other Tutorials are waaay easier. 🙂
good luck
Alright, this time the tutorial is pretty straightforward. The only problem you will probably find is lefting something to do while doing the big ass blueprints. If something isn’t right, check both the images and the blueprints given by andrzejkoloska.
Some tips I can give:
-If you are getting “‘CallFunc_GetShooterGameInstance_NewParam, from node ForEachLoop in EventGraph in blueprint UI_Debug_weaponSelection”, don’t make GetShooterGameInstance not pure. Instead, first make sure you are using ShootingGameInstance at GameInstance, then check at UI_Debug_WeaponInventoryItem the GetGameInstance function to see if it looks like this: http://i.imgur.com/78T6ivT.png
-If you can’t click on your selected weapons to make them return to the backpack, check if the overlay and the rest of the “Select weapons” elements visibility are set to “Self Hit Test Invisible”.
-andrzejkoloska forgot to finish the tutorial: This is the blueprint of the button to close the window (put it at UI_Debug_WeaponSelection) http://i.imgur.com/6GpLVpC.png and the following is to make the window pop-up (put it at GameplayPlayerController) http://i.imgur.com/jVsYh3D.png
I think I didn’t forgot anything else. This, next to the tutorial, should be enough to make the inventory work.
Thanks Mate!!
Hero ! Thanks man!
You made a mistake at the end:
“The last two dispatchers are connected to the same custom event: ItemClickedInBackpack”
It’s not ItemClickedInBackpack but ItemClickedInSelectedWeapons.
I’ve no error but I don’t know what to do. When I press “I” to see the iventory, I’ve the Epic Inventory Tutorial, not this one, I don’t know how to get this one. What key I’ve to press or what I’ve missed to have the same thing you have in the Gif ?
Ps: sry for english I’m french 🙂
Maestro Fénix’s tip helped me ! Thanks to him. Everything works fine now ! Sorry for last comments.
I have the issue when equipping my character. If I select 3 weapon, it work fine but for the first time. When you want to change weapon you selected any of them, the first slot weapon staticmesh is never gone from the view. I am shooting pistol but Shotgun staticmesh is assigned over even pistol is shooting correctly, for instance.
Help me! I cant find: Set Brush from Texture.
I find: Set Brush resource to Texture. But ERROR! (Image: http://imgur.com/R9vW3vE)
Thank for read comment
Sorry my bad English!
Hi ! Andrzejkoloska. Thank for tutorial, it useful to learn UE4.
I complete How to create Inventory tutorial, but nothing show when i debug level.
That i forgot something ? Connect HUD, checking ShooterGameInstance…
Thank you !
A not for people whose inventory items may be “flickering while you hover your mouse over them. Be sure to adjust the image sizes under UI_DEBUG_WeaponInventoryItem in the: Hovered, Pressed and Disabled categories. It solved my problem (working in 4.9.2)
how do i call UI_DEBUG_WeaponInventoryItem in weapon select widget?
Pingback: Weapon Selection Screen | Shooter Tutorial
Special thank for ANDRZEJKOLOSKA. So useful tip
Hi Andrzejkoloska,
I’m very happy about this tutorial and see my dreams coming true.
After putting everything in right place(i hope) i get following errors and here my screenshots too:
https://drive.google.com/drive/folders/0B7ICq8XrKYT4cWQ1VXJpYnNSUTQ
And please tell me what this circles on the screen are?
Why the Loop in UI_Debug_WeaponSelection is infinite? Mustn’t there come something out of the pin Completed? Please Help
Sorry the link was broken :-/
the real one:
https://drive.google.com/open?id=0B7ICq8XrKYT4cWQ1VXJpYnNSUTQ
What should the variable pin type be in GetShooterGameInstance and GameInstance? And I get following Errors. Here with my screenshots:
https://drive.google.com/open?id=0B7ICq8XrKYT4cWQ1VXJpYnNSUTQ
Help please .
https://onedrive.live.com/redir?resid=EB7F3E890D808393!1598&authkey=!AGX8stdWWA0UVTg&ithint=folder%2cuproject
This is link to the project .
In debug mode i figure that weaponSelected index is always 0 .
And buttons events have a bug…
Hi! First of all thank you very much for this collection of tutorials! 😀
I’d like to know how to resolve a few problems, but i think they all are because of this step:
* Create new Function: GetGameInstance which will return ShooterGameInstance and will be a pure function.
i try to make exactly the same BP, but unreal keeps telling me that there’s no return node.
How can i solve this? Thank you very much again 🙂
Hi, did you read previous tutorials? You need to create ShooterGameInstance blueprint and connect it in your project settings as GameInstance class.
The problem i had is that i linked the return node against GameInstance not ShooterGameInstance
thanks for the assistance
Hi !
First of all, thanks for the tuts, they cover pretty much everything but still, I’m facing difficulties to create a working inventory…
I checked twice and I don’t understand why it’s still not working nor where to look.
My main problem is that my Items are never saved. I can put them in the “Selected Items” frame (actually I can put 3 times the same one), I can take them off the frame but I can’t add them back, and then if I close the “window” they are not saved but put back in the “Backpack Weapons” frame.
I also looked at the blueprints that Andrzejkoloska posted but found nothing.
Plus, when does the CanAddWeaponToWeaponSelected is supposed to be used ?
So it’s quite frustrating 😀
Can anybody try to help me ?
I can add pictures of my blueprints (actually I can’t right now lol), just tell me which one and I’ll do it when I can.
Thanks guys 😀
You should read How To Create Skyrim Inventory and Weapon Selection tutorials. This on is very old and I don’t think it will work on new engine version.
Thanks for your answer!
Right, I forgot to mention the version of the editor I’m using (4.10.2)!
I didn’t had time to read the two tutorials you mentionned but meanwhile, I tried to debug my inventory and I found that there were contradictions in what you said in the tutorial and the screenshots of your blueprints so I fixed some bugs basing myself on what you said( I don’t exactly remember where so if you want i’ll upload my blueprints when I’ll first have time to clean them – they’re a bit messy :D).
So my backpack is almost fixed, it works pretty well (selecting, disabling button and saving when closing) except for the first item of the “unselected” ones. I can add it to the “selected” ones but after I can’t add any other (I can also remove it and add others after).
I don’t know if it’s crystal clear so I’ll give examples.
Adding items in this order works :
– 3-1-2
But adding them in those ones doesn’t :
– 2-0 – impossible to add third one
– 0- impossible to add second
– 2-4-0 works but CanAddWeapon[…] in ShooterGameInstance doesn’t return no space available.
Any idea ?
This is driving me crazy! 😀
Once again thanks. I know it’s an old tutorial but as I’m still learning I think it’s better for me to try to understand the easy ones before starting to follow the advanced and hardest !
Hi,
i need really help there… i can open UI widged, but its with empty white squares which i cant click…
http://i.imgur.com/28v8GkJ.jpg
could someone help me please?
Well i almost fixed it, it showing weapons and borders but when i want click to weapon to add it, it doing nothing…
Where can be a problem?
Hey Name368 Im having the same problem you are, how did you get past the empty boxes point? 🙂
ok ive figured that out too, now Im exactly where Name368 is, can anyone help? Im moving on to the Armory tutorial in the meantime but if im doing something wrong now, that prolly wont work either 🙁
You should read Skyrim Like inventory and Uncharted like equip. They will give you much more information about inventories than this debug tutorial.
Andrzejkoloska could you help us please?
I tried breakpoints in blueprint and i figured out that button not running… where can be problem?
Hi, im still stucked, checked it step by step for 5. time but still cant select that “weapons” 🙂 but if i find solution, i will post it here
Cool, thanks, I’ve done the Uncharted Equip tutorial , that works, but I cant get the Inventory to update.
Hi man, i solved it but i dont know how 🙂 (too many steps in this tutorial) i just did this tutorial step by step from start… (in this tutorials, some steps are not written, like filling another border, or getting controller at ui and setting some buttons to editable variables or what it is and so on.. so its a bit hard to complete this but its running 🙂 )
this tutorial suck!
Nothing work!
Hey I’ve followed your tutorial from start but i’m stuck at the end of this one because I can’t connect the custom events such as create backpack or is item clicked with binding events as the custom events output is delegate type but bind event takes delegates as ref type. Help please thankyou.
You have to make the event off of the bind event blueprint in which you want it connected to, after that rename it and hook it back up correctly and you can hook it up to the other ones.
I’m Stuck, where is the ” Get ” with multiple input ?
I am stuck on this as well
I cant find the Get where is?
had that issue to, but this is how you do it:
create that simple “get” array note & click on the right blue pin (right mouse click) & hit “Split Struct Pin”
This is all there is to it.
Can someone pleas help me I got up to the part where I’m susposed to have shooter game instance returned to game instance but everytime I re do it (another note I’m using 4.10) but when I complie it says it work but the cast to shooter game instance comes up with note saying that it dose not end with a return node. Even though in the function I gave that output so it had the return node to shooter game instance can some please tell me what I’m doing wrong?
Look up in the comments thread about halfway through Maestro Fenix has some images showing how to fix it.
I can’t seem to find clear childreen when I make the event create backpack can some pleas help?
Ooooh, i’v cried then i made this. Working flawlessly. Thank you!
Engine ver 4.11
When I press P it opens up the inventory but it’s completely empty except for my button to exit. How do I make the images appear. Also not my biggest concern but does anyone know how to make it that I don’t have to click before it switches mouse control over to the UI. It’s making me press the close button twice.
If you have empty inventory box, check function GetShooterGameInstance in UI_Debug_WeaponSelection blueprint it should be like GetGameInstance in UI_Debug_WeaponInventoryItem blueprint.
BTW all working fine in engine version 4.10.4.
What button do you press do open the inventory. PLEASE HELPPPPPPPPPP
Hello I’ve got problem, can you help me?
I can equip my Item but when I click on item in selected weapon the BackpackImage work and go to backpack but in game the weapon does not disappear and when I click on item in backpack this one
gets over itself.
thank you for your attention and sorry for my english I’m french.
bye
Hey, doing ur tutorial or pieces of it in 4.12. And must say, having fun fixing what I can (not everything works that well anymore). Anyways, I have some experience in Unreal & wasted almost 6 months on UMG work. Im curious as to why you do an Array in the ShooterInstance. Since you have a DataStruct, why not use a DataTable, those are way more accessable by anyone that does not know the blueprint constructions.
Anyways, keep it up!
Kind Regardz.
Hi, someone know how to add more buttons in the “WeaponInventoryItem” widget to allocate the weapons? Because I want to use a gamepad or keyboard to navigate the menu, and with one button for every weapon is not possible, I tried to do it by myself but didn’t find a way, thanks to anyone who can explain this for me and anyone who want to use a gamepad to navigate the menu.
Thank you
the hell? confusing tutorial AND without testing
method? How do I open the inventory?
What button opens inventorey
You have to set your own for testing purposes you can set a letter and the add node create widget (select the weapons debug one also set to Get player controller … on return of node pass to add to viewport…
im still not sure what im supposed to be seeing as some of the event binding fails in 4.9.2 also that section on gameinstance i had to cast more then one time to get my version. only on the UI weapon item widget.. odd…
Well I finally got it working with a bit of using his downloaded files and alot of transforming to make sure errors died and now i have working inventory in and out of backpack…
not sure this doesnt hit the areas of pickup nor drop..
Were we supposed to complete UE4 inventory then modify it to suit yours?..
or that come later..
also had to set a key to inventory… is there a missing step or this INFORMATION
just as i knew your supposed to know..
Well i manage to use your blueprints and 45 mins later of recoonecting things i have a working 100% as of now per my last post above.. woop
@Mogamerz how you get it to work? i am stuck where i can click the icons/weapons in inventory but they just indent then nothing
So, everything is good and working except that when i click something on the inventory, it doesn’t add to the selected weapons widget (http://i.imgur.com/VAvcOA6.png), in the image you can see there are 3 weapons selected yet they aren’t showing on the lower widget. I don’t know if it’s because of that Get node on the last image (http://i2.wp.com/shootertutorial.com/wp-content/uploads/2015/06/itemclickedinselectedweapons.jpg), this is how i have it, don’t know if it works the same way (http://i.imgur.com/RpY3lfB.png). It also may be this (http://i.imgur.com/C9qsbOl.png) in the GetSHooterGameInstance function in the Ui_WeaponSelection widget bp, the same function in Ui_WeaponInventory bp works just fine.
For those trying to recreate “Get”
simply create the normal “get” array & right click on the blue pin (right side). Hit “Split Struct Pin” and voila.
It took a while to get this right, but I can confirm that this works in v 4.14! You need to finish off with Maestro Fénix’s comments. I found that a lot of my problem was forgetting to tick certain tick boxes, like for IsSelected in “Set Backpack Item” and little things like this. This is a pretty good tutorial, I’m learning a lot following these! Thanks go to the author :).
I was running back through this and came across what I had problems with before which was a trivial matter regarding the images at the end. I was confused at where each binding went and in the end I put the images together like a jigsaw and spotted the error that I was having.
What a complete waste of time , tutorials are meant to teach and for the end user to learn,
not to be more confused after doing 90% of the lesson to only be not told where certain nodes go where, and certain things left out from showing in your tutorial….but to be told download the Rar file,,, Please never do any more tutorials unless you fully explain what goes where and why, too many jokers online teaching nothing.