In this tutorial I will show you how to create weapon selection screen. I did debug version of it earlier. This time I will use:
- 3d UMG widget to show weapon selection screen,
- UMG toggle widget usage,
- Protection to not be able to equip the same weapon twice,
- Icons created earlier,
|
1 2 |
<strong>This Tutorial has been created using Unreal Engine 4.10</strong> Make sure you are working on the same version of the engine. |
Icons Materials Preparation
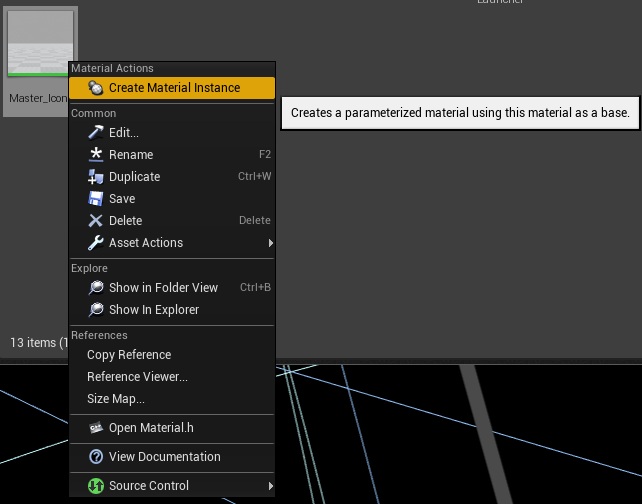
In earlier Tutorial I have created icons for my weapons. There is one important thing that need to be done. I will use material instance for each icon. To do this in your material convert texture to parameter:

Name it as you wish. Then right-click on the material and create material instance:
Open the instance and you can change the texture. Create separated instance for each of your weapons.
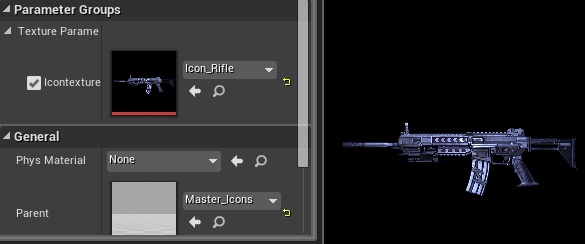
You can read more about material instances here, here and here.
USEFUL TIP: Why should I use instance instead of normal material? The answer is simple. Each material need to be compiled, but instances don’t need to. Using instances will make your game load faster – especial on mobile devices. You should create a couple of master materials and then use instances!
Fixing WeaponBackpackItem
Remember creating debug inventory? WeaponBackpackItem structure need to be changed. BackpackImage should be Material Instance Reference not Texture2D Reference.
| Variable name | Type | New Type |
| BackpackImage | Texture2D Reference | Material Instance Reference |
USEFUL TIP: Each time you change something in your structure you will lose connections to this variable in Blueprints!
Now go to Shooter Game Instance and make sure your BackpackImage is connected in function SetBackpackItemSelected. Be sure that you have linked your material instances in Backpack_Weapons variable as well!
Adding Save
I need to save all of our weapons as I did earlier here.
Create new blueprint extending from SaveGame named Save_Instance. Create one new variable:
- Backpack_Weapons (WeaponBackpackItem, array)
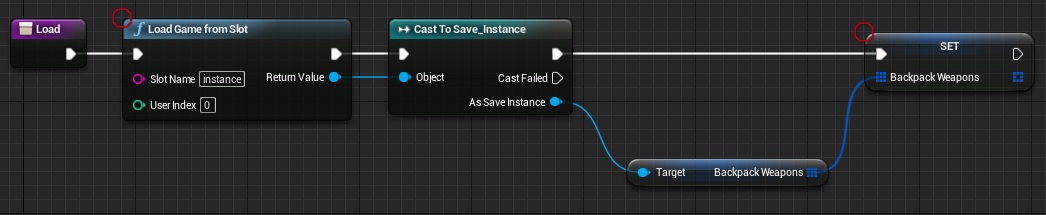
Now in your ShooterGameInstance. Create Save function:

And Load function:
Managing Inventory Functions
Still in your ShooterGameInstance. Create new function named ClearWeaponInSlot it should have one output: ClearedWeapon (WeaponBackpackItem)
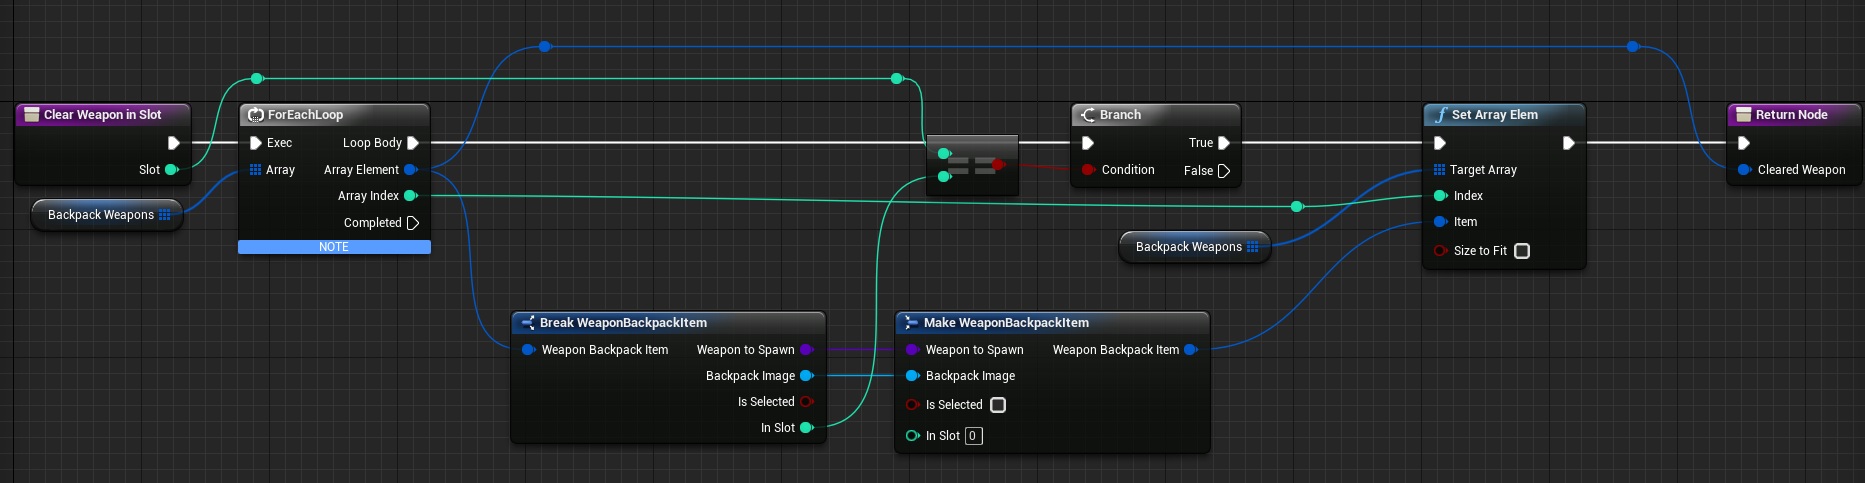
This is taking slot number (from 1 to 3) and making sure it won’t be selected.
Add another function named SetWeaponToSlot with two local variables:
- LocalToSlot (int) – to which slot weapon should be assigned,
- PendingWeapon (WeaponBackpackItem) – this is the weapon we want to assign to slot,
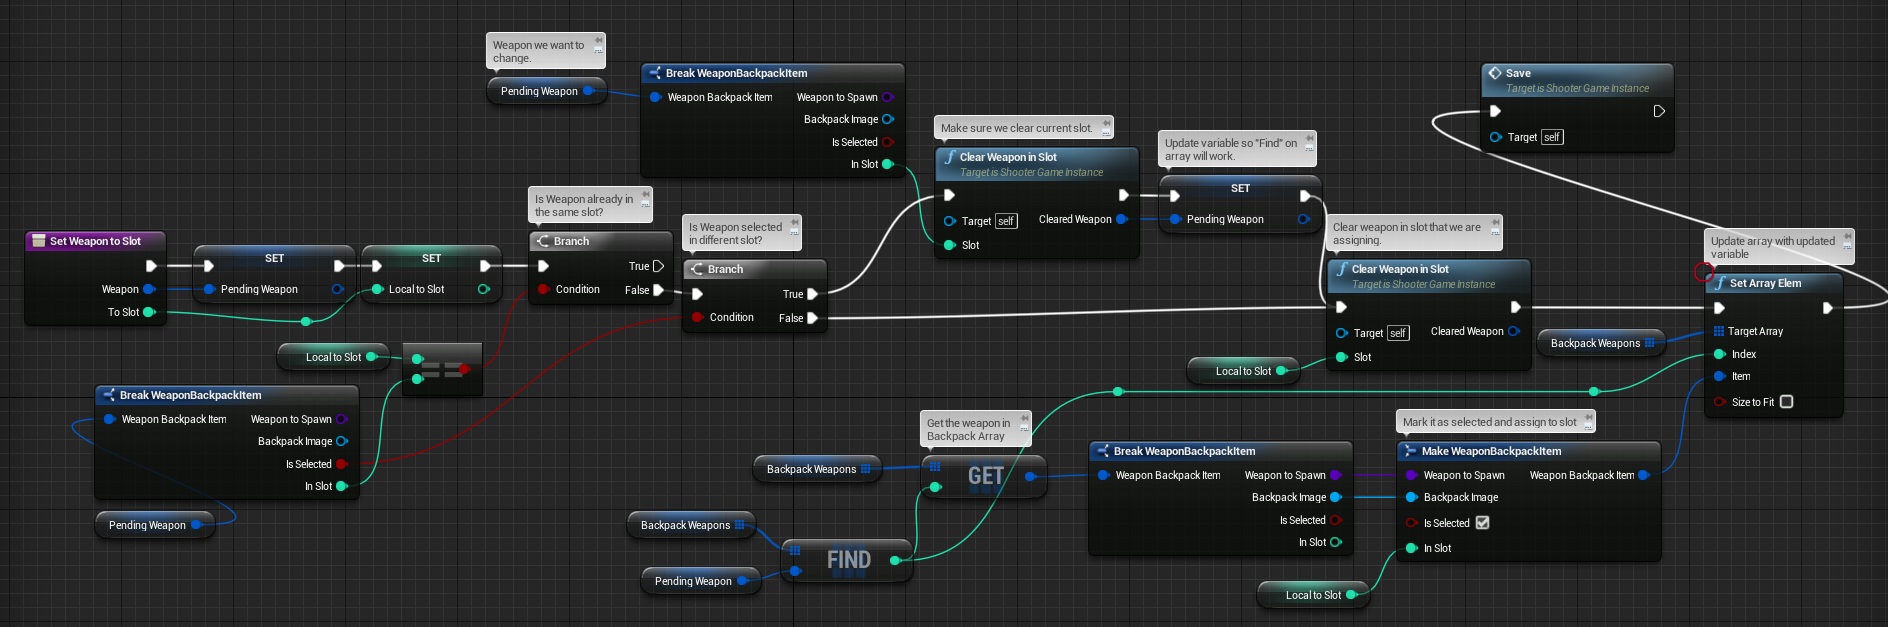
This is responsible for setting slots in weapons.
Preparing UMG weapon widget
Create new Widget named Widget_Weapon.
Here’s the hierarchy:
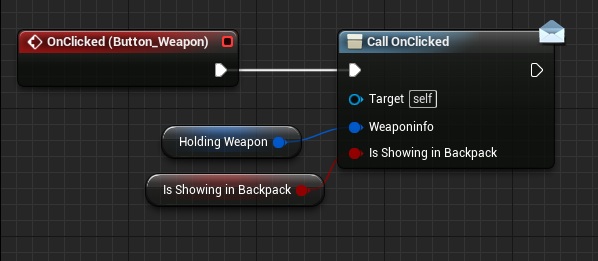
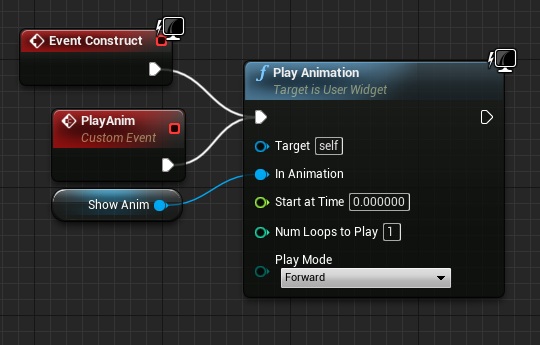
Remember to add clicked event on Button_Weapon. I have added simple scale animation named ShowAnim.
Now in Event Graph create those variables:
- HoldingWeapon (WeaponBackpackItem),
- isShowingInBackpack (bool),
And one dispatcher OnClicked with inputs:
- WeaponInfo (WeaponBackpackItem),
- isShowingInBackpack (bool),
And now some custom events to manage how widget will look like according to his state:

Somehow I need to update the widget and assign icons from other classes. Here’s how I did it:
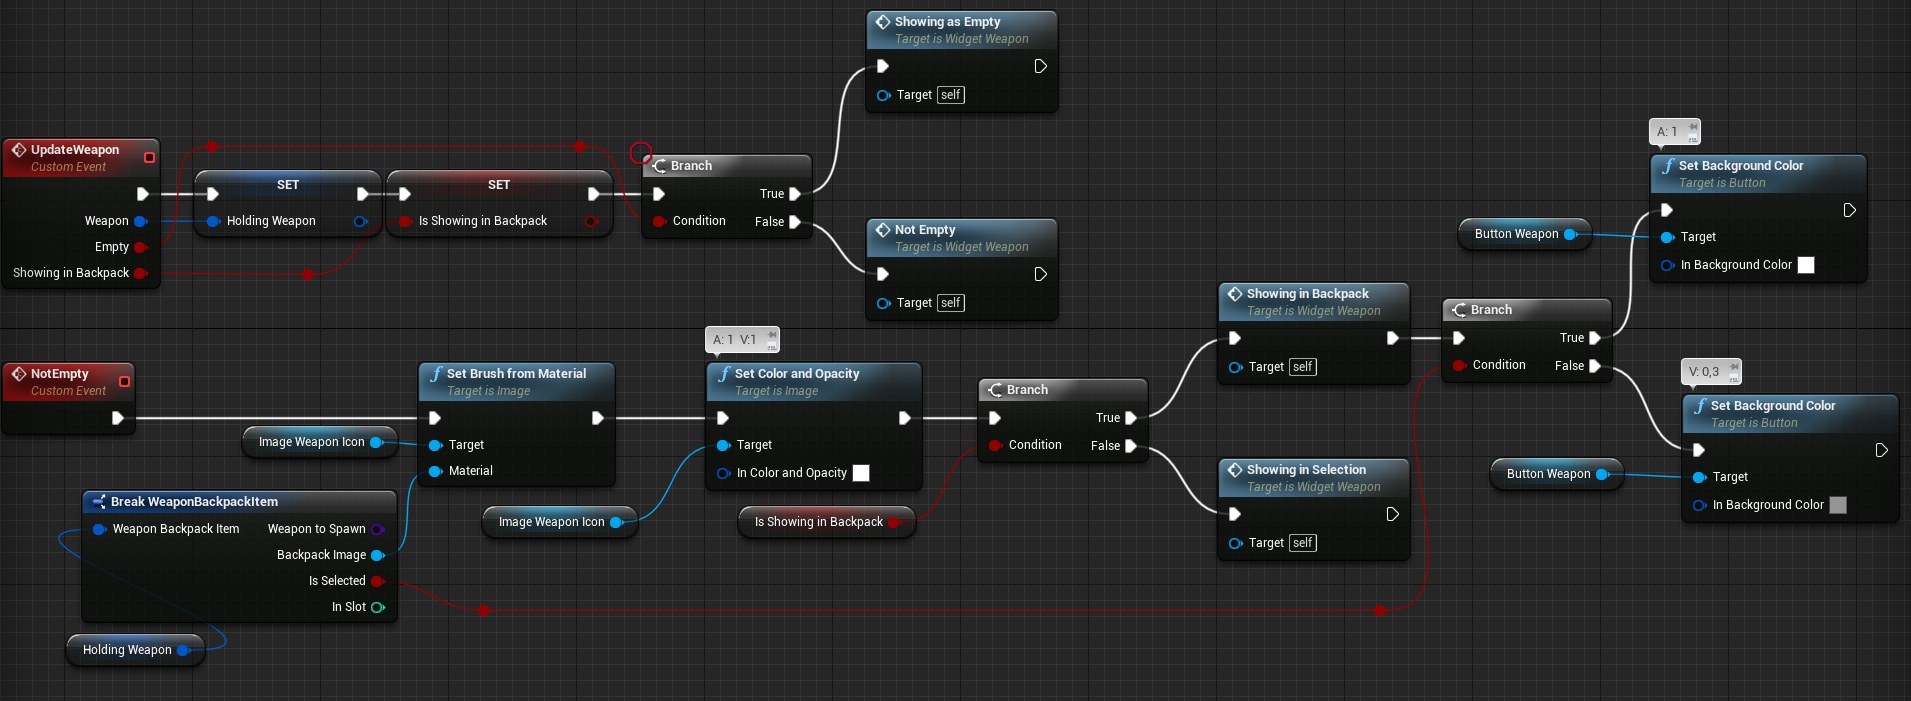
UpdateWeapon is making sure widget will correspond to provided data.
Rest custom events:
We will bind to this dispatcher from different widget.
This is self-explanatory.
Preparing UMG backpack
This UMG will show us all available weapons. Create new widget named UI_WeaponBackpack.
Hierarchy is simple:
- Delete canvas panel,
- Add Scroll Box on top,
- Add Uniform Grid Panel to Scroll Box, (IsVariable: True!, slot padding: 10, Horizontal Alignment: Left, MinWidth: 200, MinHeight: 200)
Create new variable:
- WeaponSlot (int),
And one new function named SetWeaponSlot:
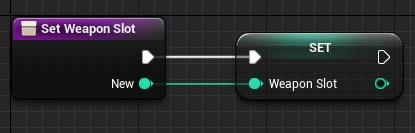
USEFUL TIP: I will be telling you this again and again and again: If you know that some variable will be changed from different class than owner: make function for changing the value!
Add one Dispatcher as well:
- OnWeaponClicked: Inputs: Weapon (WeaponBackpackItem), Slot (int),
Now in event graph create new custom event named CreateBackpack:

This is getting all weapons and adding them to grid. I’m using Widget_Weapon as new grid elements. Dispatcher is critical here – thanks to it I will know which weapon was clicked in different widgets.
Preparing Weapon Selection
Create new Widget named UI_WeaponSelection.
This is complicated widget and you should focus on hierarchy. Please take your time and try to recreate what I have done.
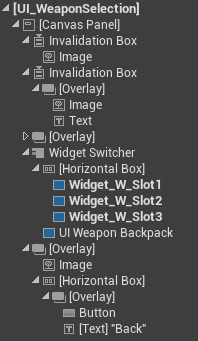
Here’s the video:
I’m using Widget Switcher here. Optional: Add Open animation that is scaling canvas panel.
Now create variables:
- SelectedWeapons (array, WeaponBackpackItem),
And one dispatcher:
- OnClickedBack,
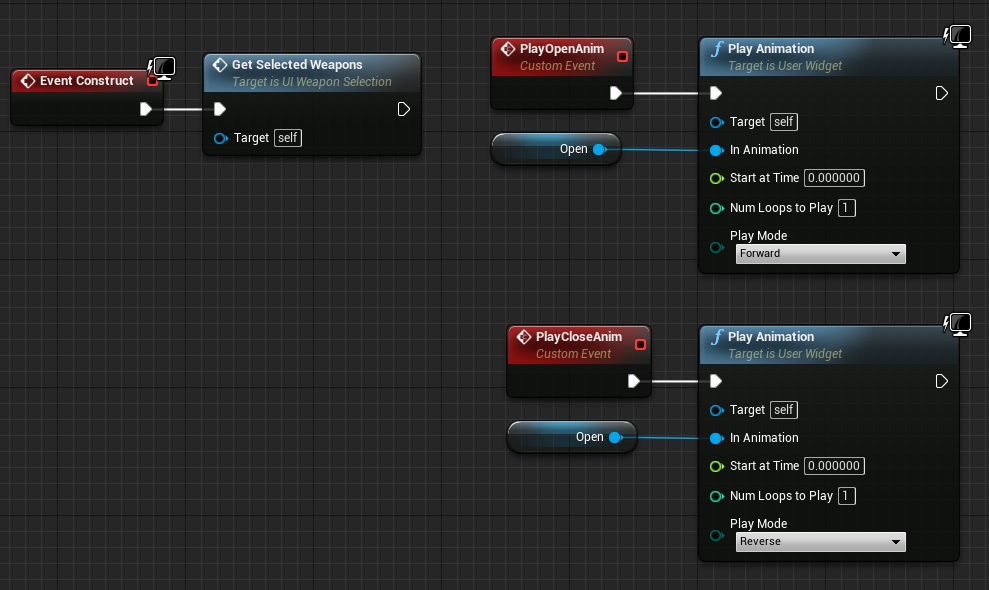
Now in event graph create new custom event named UpdateSelectedWeapons:
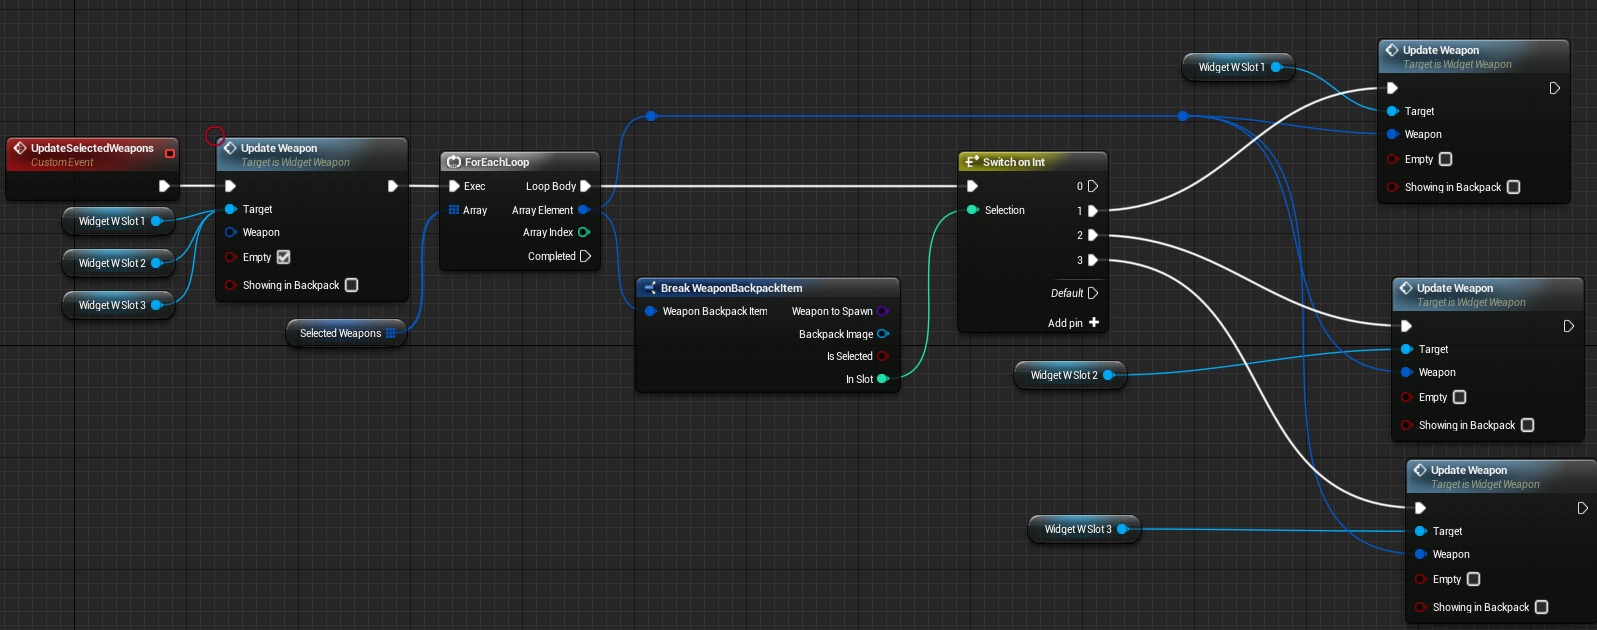
This is getting all selected weapons in the array and making sure our slot buttons will update their data.
Add another custom event named GetSelectedWeapons:
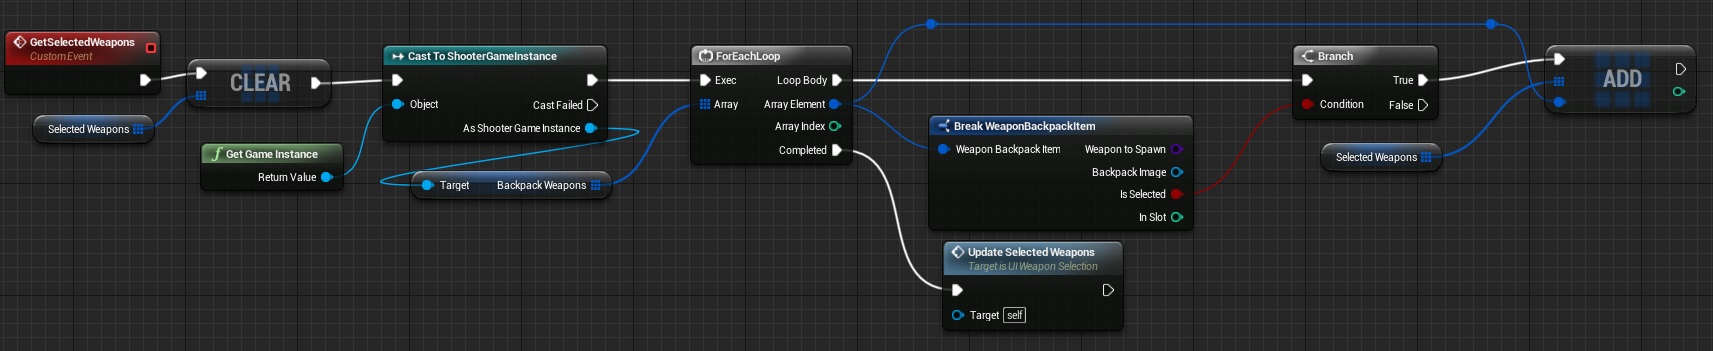
Event adds selected weapons to the array.
Add another custom event named PlaySelectedAnim:
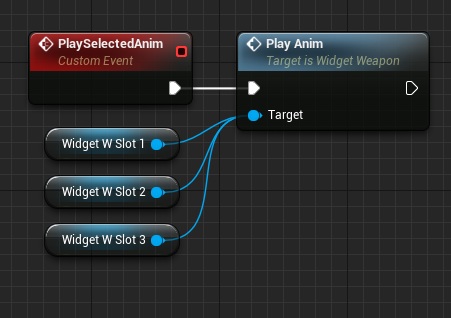
This is just playing the scale animation created earlier in Widget_Weapon.
Another thing is back button OnClick event:

I’m checking on which state is widget switcher when we click on Back.
Now clicking on selected weapons:
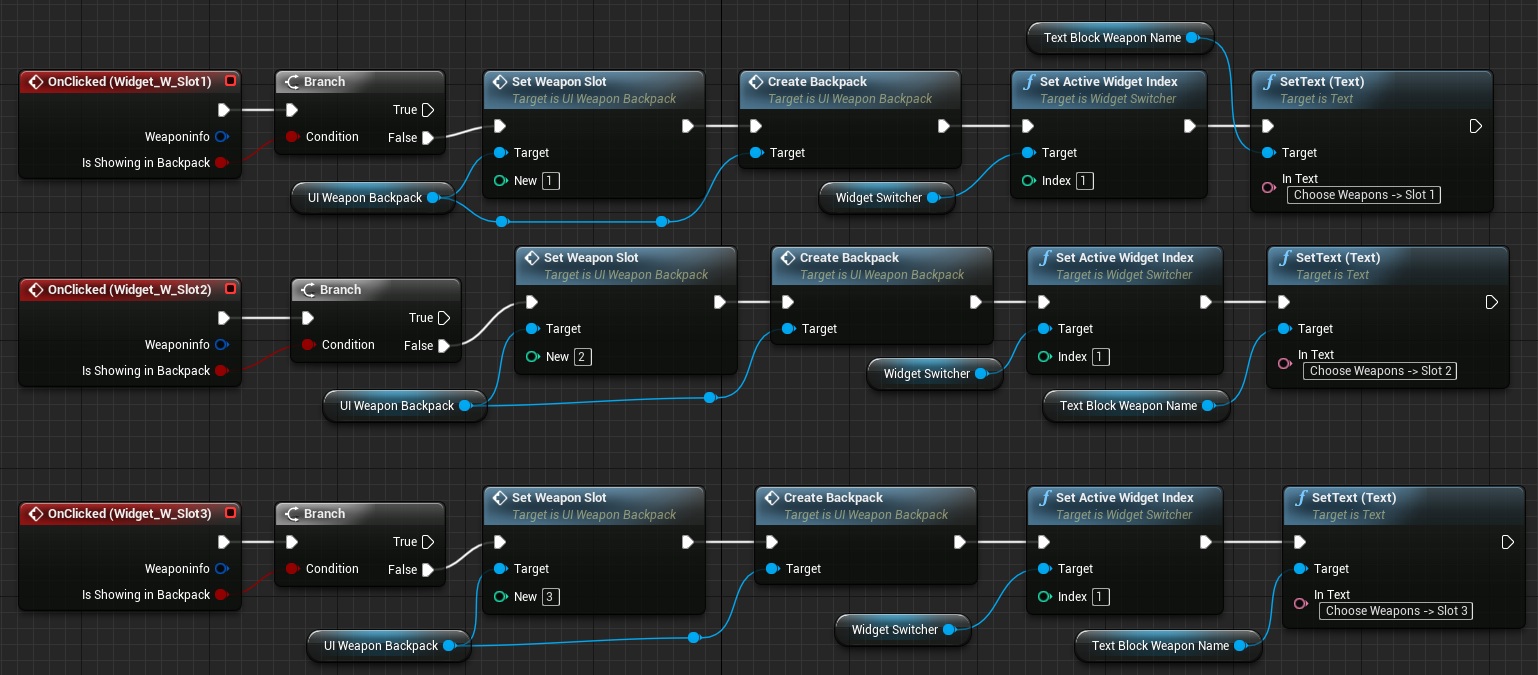
This is simple.
- I’m setting weapon slot so I will know to which slot assign the weapon,
- Update backpack,
- Set active widget to backpack (index 1),
- Cosmetic: change text,
In Backpack I have created dispatcher OnWeaponClicked now it’s time to bind it. Just select Backpack in Designer and add this event.

This is letting know ShooterGameInstance to update weapon slot.
Here’s last self-explanatory events:
Updating Level Selection
Earlier I have created Level Selection screen. Now it’s time to use it!
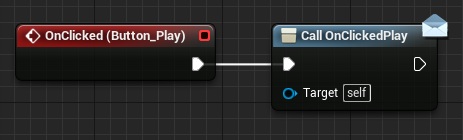
Open UI_LevelSelection and add OnClickedPlay dispatcher. Call it OnPlayButton clicked:
That’s all here in UMG. Now move to UI_LevelSelectionActor Actor.
Duplicate UI_LevelSelection component and name it: UI_WeaponSelection. Here’s options:
- Widget Class: UI_WeaponSelection,
- Hidden In Game: True, (make sure UI_LevelSelection is hidden as well),
Now in event graphs Begin Play bind to events from UMG:
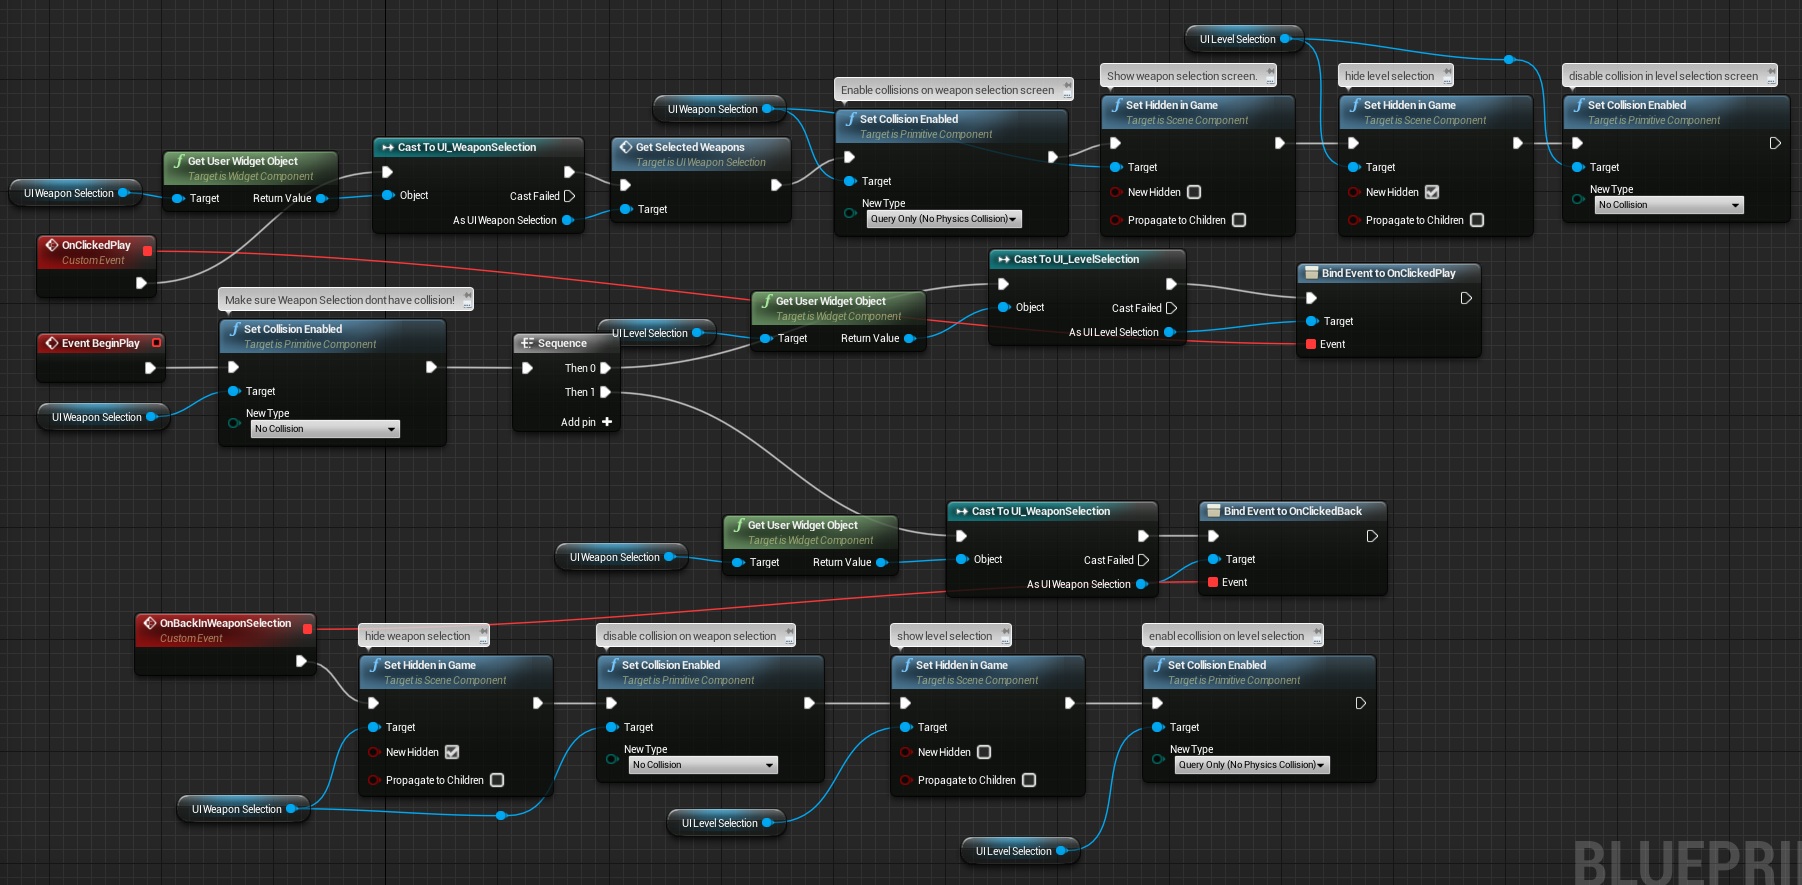
This is basically managing Level Selection vs Weapon Selection screens.
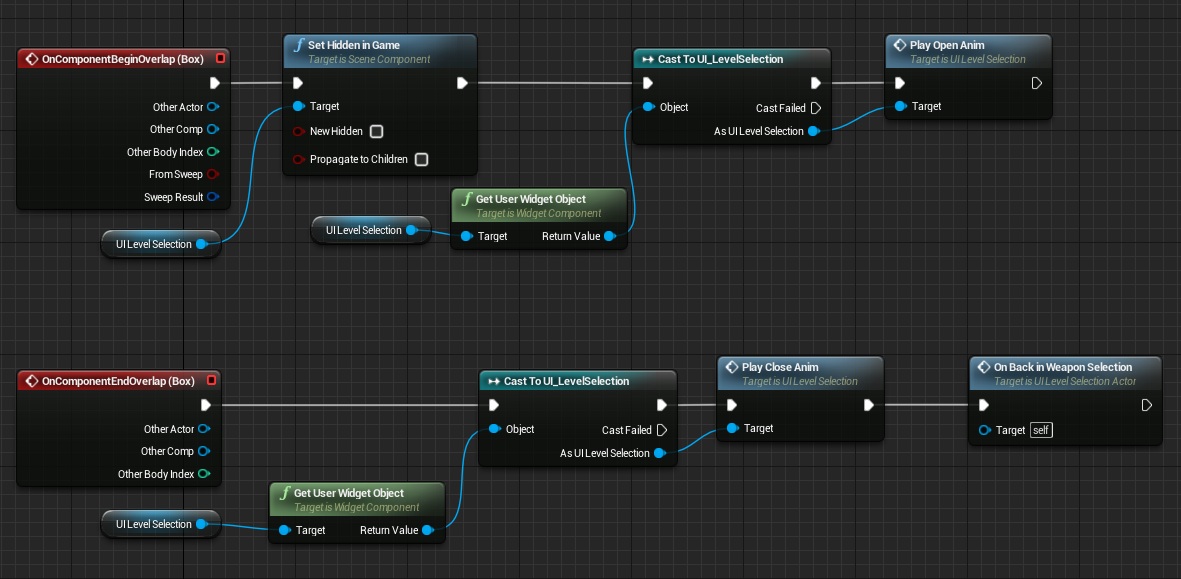
Overlaps need to be updated as well:
And that’s all! If you want to use save/load system in your level blueprint call Load from ShooterGameInstance.
Final Result:
Creating ShooterTutorial takes a lot of my free time.
If you want you can help me out! I will use your donation to buy better assets packs and you will be added to Credits /Backers page as well. Implementing game is taking time but writing about it is taking much more effort!
Great Tutorial, Thanks!
I have a question. I want to take this further and add Texts to describe the weapons. What do you think is the best way to store the different Text information? I am thinking of a massive Struct with Text Arrays inside. But that seems overcomplicating the thing. Can you help me? Thank you and keep up the great work!
Currently I’m doing Skyrim Like Inventory Tutorial which should be finished over Weekend. It will be start for you doing the descriptions etc because it is more object oriented.
Everything is working fine here except the the case that when you choosing the weapons and loading the level, anyway I need to press “I” for weapon selection. the weapons are already selected in the menu as here but the weapons are not set. I need to press “I” and dont select weapons because weapons are selected there and press select AFTER that i can choose between weapon. I hope that I explained my issue. What should I do?
solved by colling SpawnWeaponsAndAssignToSlots function in Beginlay in GameplayCharacter
Have you tested it on pobile device? When I want to open a level using the function created in shooterGameInstanse, namely, OpenGamePlayLevel everything goes right in PC. Although, my mobile mhone, namely, Note2, is not loading needed level but loading again main menu. Could you suggest where my problem is?
Currently ShooterTutorial is only for PC, but I will support Mobiles as well – but first I’m focusing on PC only.
SO my game has a basic weapon equip system already, how would I carry over the equipped weapons from selection screen to my gameplay?
Nevermind, got it all working. Thanks for the great tutorials
Just leaving this here – maybe someone knows the answer? For reasons I don’t fully understand yet, the last part of this doesn’t function when playing in a “Standalone Game” window. Specifically, in beginplay2.jpg under ‘Updating Level Selection’, the “Bind Event to OnClickedPlay” never fires the custom event “OnClickedPlay” in Standalone mode, no matter how many times you click ‘Play’ in confusion. After doing a deep dive for a few hours on dispatchers and custom events, I decided to change play modes in the Editor to “Selected Viewport (PIE)” instead of my usual “Standalone Game”, and everything worked. Seems to work in a “New Editor Window” as well. Are there some things that are known to not work in Standalone mode that I just was not aware of? Shouldn’t it not matter which preview mode I’m in?