This will be last enemy for the demo, rest of the characters will be implemented after different environments will be added. I’m listening you guys and this time I will use Behaviour Tree instead of Blueprints. Some goals:
- Three types of behaviour: standing, crouching and melee,
- Can shoot while running to player,
After last enemies you should have enough knowledge to create simple AI by yourself using Blueprints. This time I will focus on Behavior Tree.
|
1 2 |
<strong>This Tutorial has been created using Unreal Engine 4.8.2</strong>. Make sure you are working on the same version of the engine. |
Theory
If you made all enemies tutorials you should have enough knowledge about AI to move into Behavior Trees. There were long way from first enemy tutorial and now I know which features should I use, and how.
Why you should use Behavior Trees instead Blueprints for AI?
- They run faster than Blueprints,
- They were designed for AI and will be improved during UE4 development process,
- It’s easier to debug AI,
- It’s more generic – you can create tools to speed up AI creation, (tasks, services, decorators)
I’m not the specialist about AI and BT but I really encourage you guys to learn this topic if you want to create games with AI.
Future Soldier Import

For this tutorial I will use Futuristic Soldier. The pack isn’t so bad, but it’s lacking animations. There is an issue with UE4 about uniform scale and Physical Asset. (btw if you can please vote for this issue maybe Epic will resolve it faster) so you won’t get ragdoll from this character. I will use death animation instead which isn’t looking good.
I have imported soldier_anims_separated_LOD0 and they are with gun. You could import mesh without a gun as I did in Marine Tutorial. Thanks to that Futuristic Soldier can lose his weapon on death.
Make sure you are importing the file with:
- Animated Time,
- Uniform Scale: 20,
You should get all animations imported separately.
Preparing needed assets
Montages
Create animation montages form those animations – leave name by default:
- soldier_anims_separated_LOD0_Anim_death_Montage
- soldier_anims_separated_LOD0_Anim_melee_Montage
- soldier_anims_separated_LOD0_Anim_rapidShooting_Montage
- soldier_anims_separated_LOD0_Anim_reload_Montage
Blend Spaces
Create 1D Blend Space named CrouchWalkToIdle. It should go from soldier_anims_separated_LOD0_Anim_crouch to soldier_anims_separated_LOD0_Anim_crouchWalk.
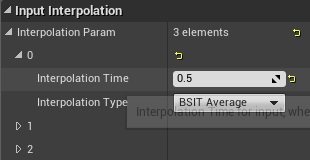
As always in Blend Spaces add some interpolation:
Do this every time doing blend space.
Create another 1D Blend Space named RunToIdle. It should go from soldier_anims_separated_LOD0_Anim_idleWgun to soldier_anims_separated_LOD0_Anim_run.
And last 1D Blend Space named StandWalkToIdle. From soldier_anims_separated_LOD0_Anim_idleWgun to soldier_anims_separated_LOD0_Anim_walk.
Soldier Type
Create new Enumeration named FutureSoldierType. It should have 3 values:
- Crouching,
- Standing,
- Melee,
Using this enum will decide which type of AI / movement enemy should have.
Socket
Open skeleton and add new socket to Bind_RightHand bone. Name it S_MuzzleFlash. Here’s the properties:
- Relative Location: (X=0.742060,Y=-3.080815,Z=0.147336)
- Relative Rotation: (Pitch=0.000000,Yaw=-90.000000,Roll=-90.000000)
- Scale: (X=0.100000,Y=0.100000,Z=0.100000) (yes this is another issue with Uniform Scale, sockets will be big – I haven’t posted it on AH yet)
Material
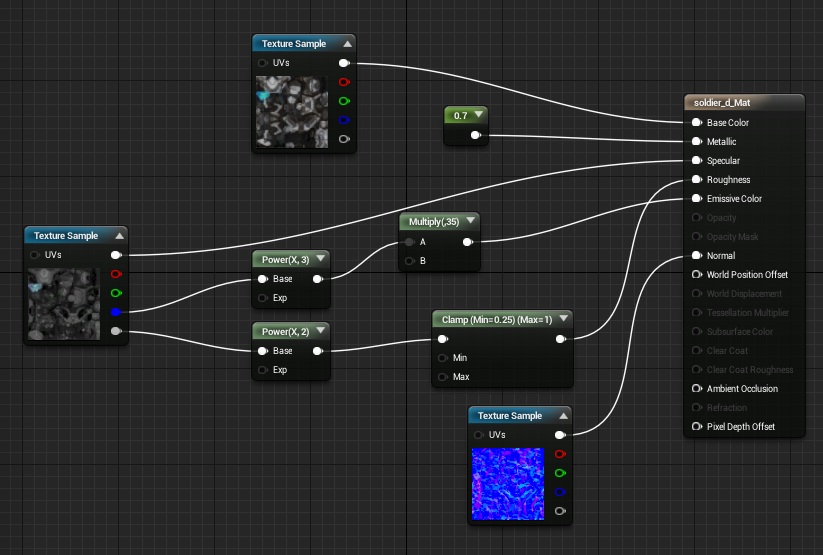
You could create black and white mask for Emissive using Gimp, I have done this different way, but it’s always better to create masks. I don’t want to use Gimp or Photoshop at this stage 🙂
Creating enemy Blueprint
Create new blueprint based on BP_BaseEnemy named BP_Enemy_FutureSoldier. Create new Animation Blueprint from skeleton named FutureSoldier_AnimBP.
Open Character Blueprint and add one ENUM variable (from FutureSoldierType) named SoldierType. It should be editable.
Assign mesh with animation blueprint created couple words earlier 😉 Open event graph and add Die event.
It’s just playing death animation and make sure mesh will be on ground.
Creating animation blueprint
Open animation blueprint and add those variables:
- Speed (float),
- Type (ENUM: FutureSoldierType),
- LookAtRotation (Rotator),
- isDead (bool),
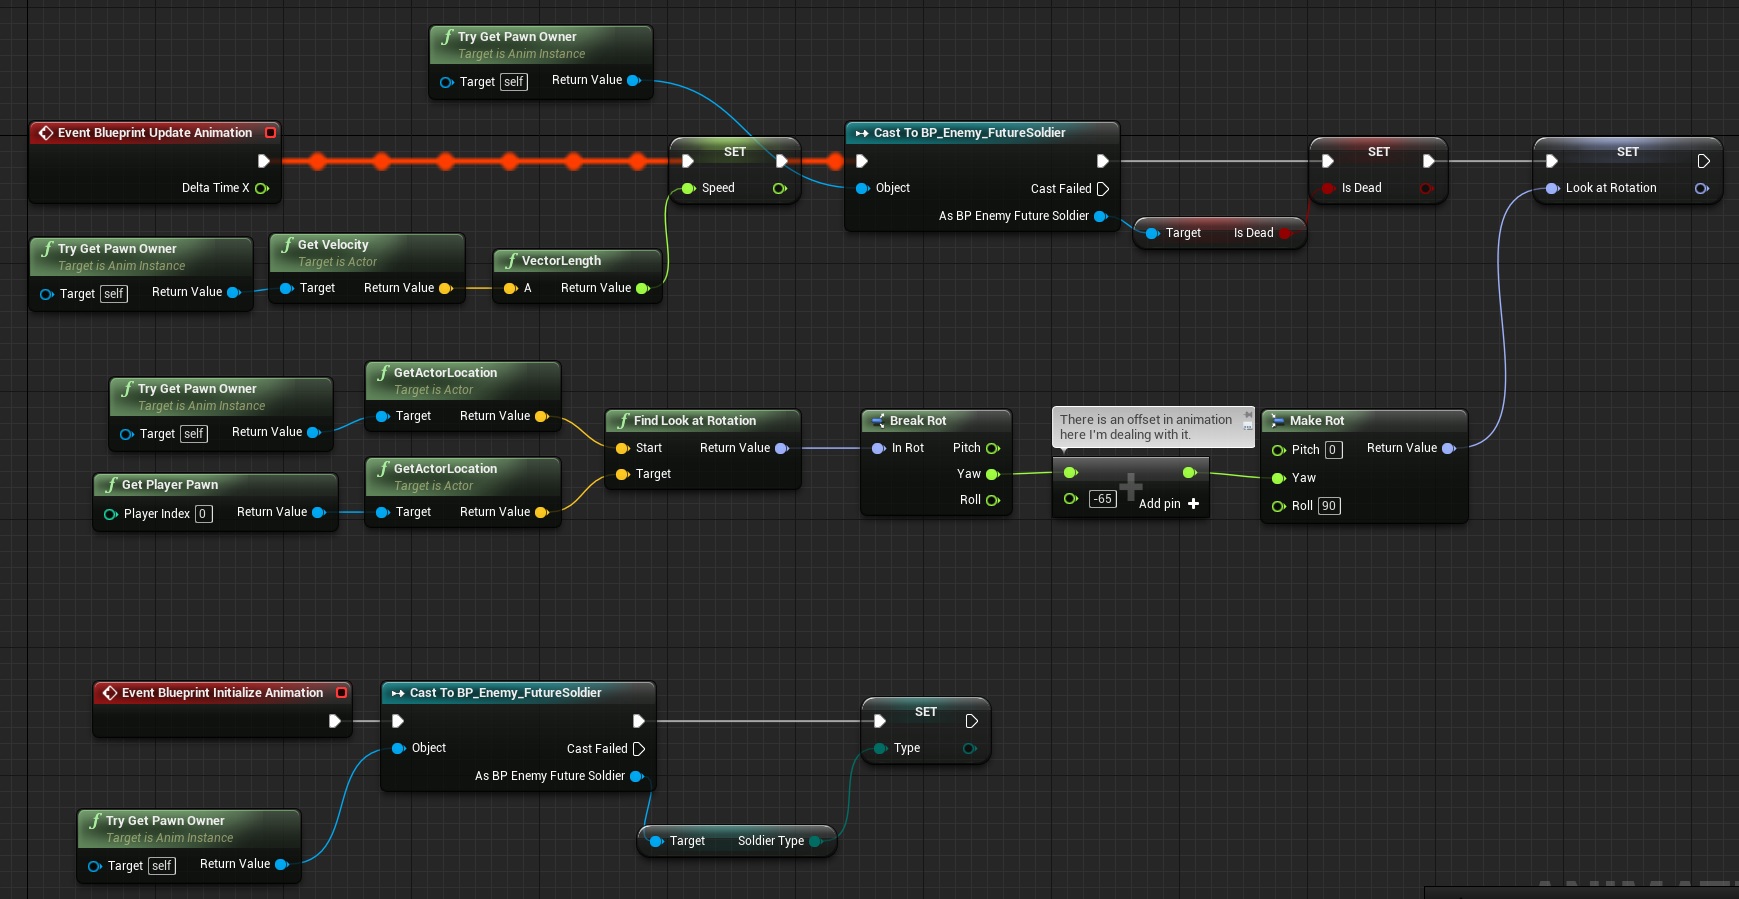
Here’s the graph:
As you can see this is just filling the data. I’m using LookAtRotation instead of LookAtLocation this time because of weird skeleton. In 4.9 there will be possibility to do to LookAtLocation with local/world space, it will help a lot!
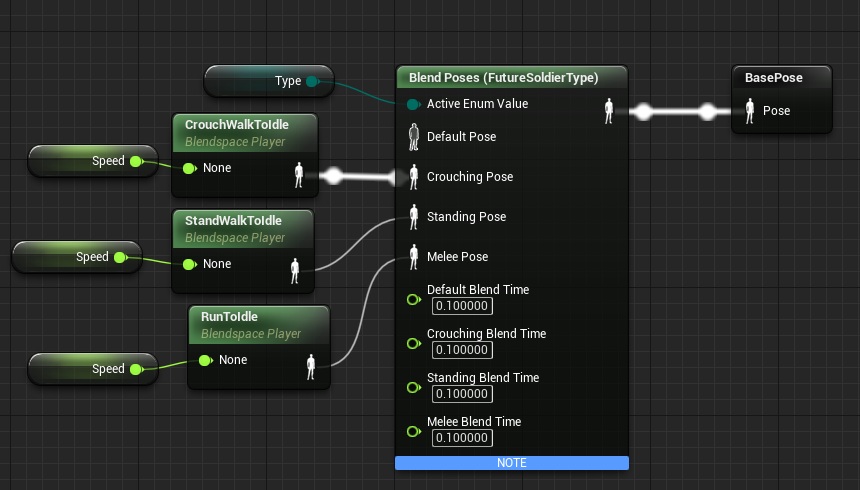
Now Animation Graph. Create BasePose from your Blend Spaces:
And here’s the rest of the graph:
Should be straightforward for you guys at this stage. That’s all in animation blueprint.
Creating Behavior
Create new blueprint extending from AIController named BP_FutureSoldierController. Open BP_Enemy_FutureSoldier and in defaults panel there is AIControllerClass – assing BP_FutureSoldierController.
This is telling Pawn to be possessed by AIControllerClass. If you want to use BT you need to have AIController assigned to your Character/Pawn.
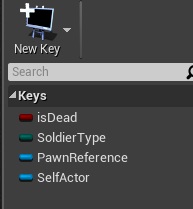
Now create new Blackboard named SoldierBlackboard. It should contain those variables:
- isDead (bool),
- SoldierType (ENUM, FutureSoldierType)
- PawnReference (Object),
Now create new Behavior Tree named FutureSoldier_Standing. Open it and assign Blackboard.
Before we move into creating Tree we need to create some helper Blueprints.
GetPlayerPawn
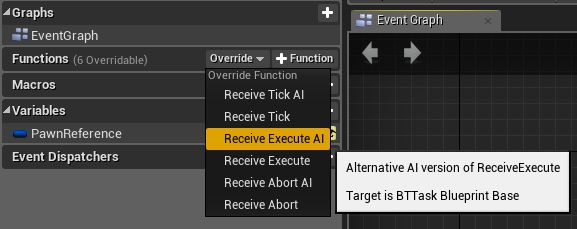
Create new blueprint extending from BTTask_BlueprintBase named GetPlayerPawn. Open it and add one variable named PawnReference (need to be Editable!) with Blackboard Key Selector type.
Override Receive Execute AI function.
When you deal with Tasks/Services or Decorators you will be Overriding functions.
We will use this task in Tree to get the player pawn and assign it to Blackboard. MoveTo will use this data later.
IsEnemyDead
Create new blueprint extending from BTDecorator_BlueprintBase named IsEnemyDead. Open it.
Override function Perform Condition Check AI.
This is helpful decorator. For example we should stop moving the AI if it’s dead 😉 Will be used in Behavior Tree.
MoveForwardToPlayer
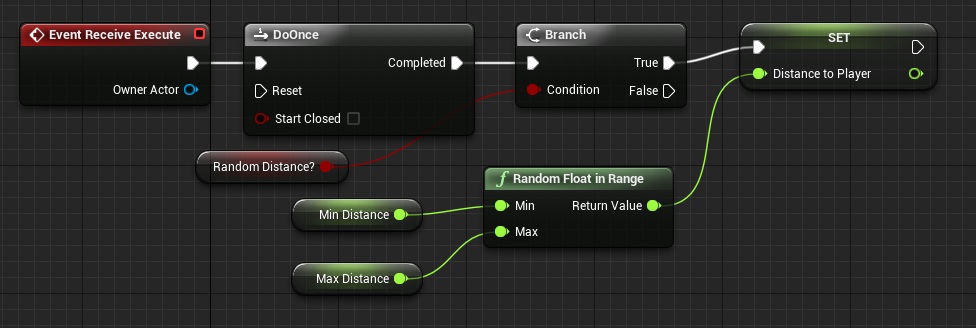
Create new blueprint extending from BTTask_BlueprintBase named MoveForwardToPlayer. Open it and add these variables (all need to be Editable!)
- DistanceToPlayer (float, default: 300),
- RandomDistance? (bool),
- MinDistance (float, default: 250),
- MaxDistance (float, default: 700),
Override Receive Execute:
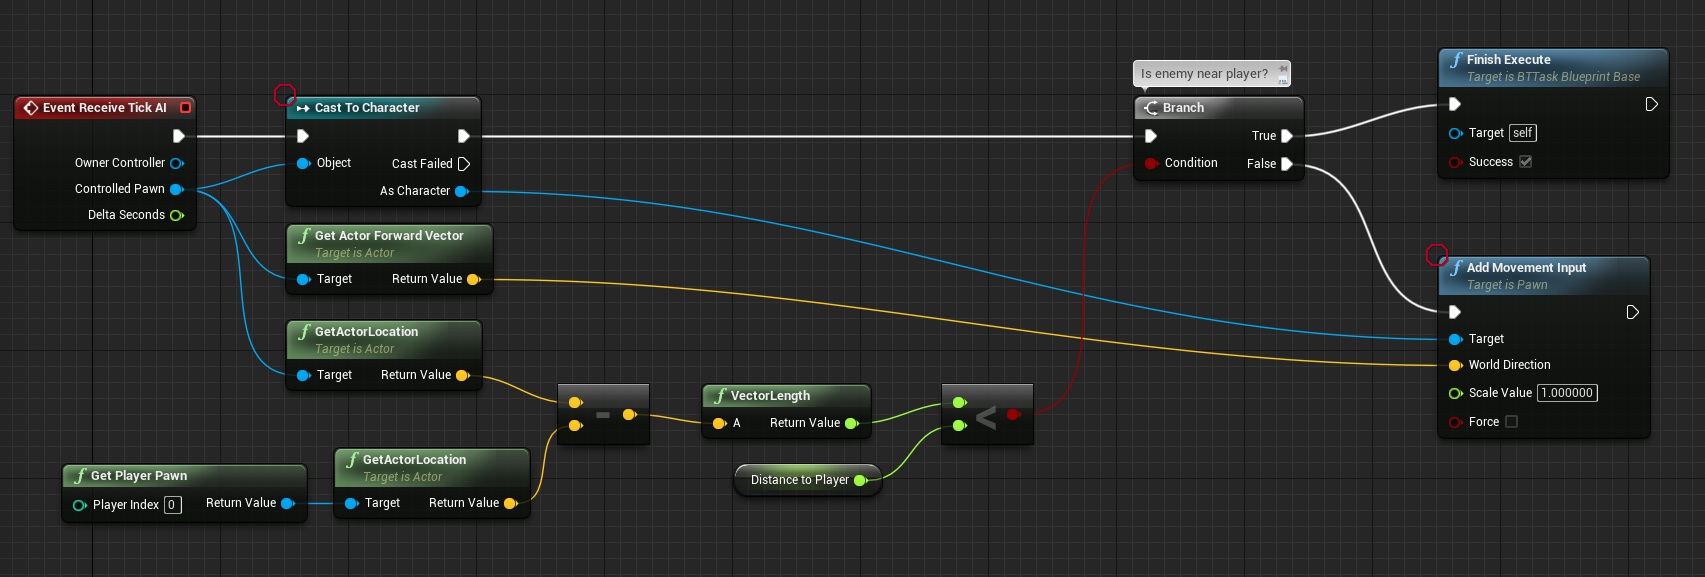
Override Receive Tick AI:
This is exactly the same thing I were doing in blueprints in earlier tutorials, but now I can use it on every character – don’t need to recreate this again. That’s power of behavior trees.
PlayInstanceAnimation
Create new blueprint extending from BTTask_BlueprintBase named PlayInstanceAnimation. Open it and create these variables (as always they need to be Editable!)
- Animation ( Anim Montage),
- PlayRate (float, default: 1),
- MinDistanceToPlayer (float, default: 1000),
Override Receive Execute AI:
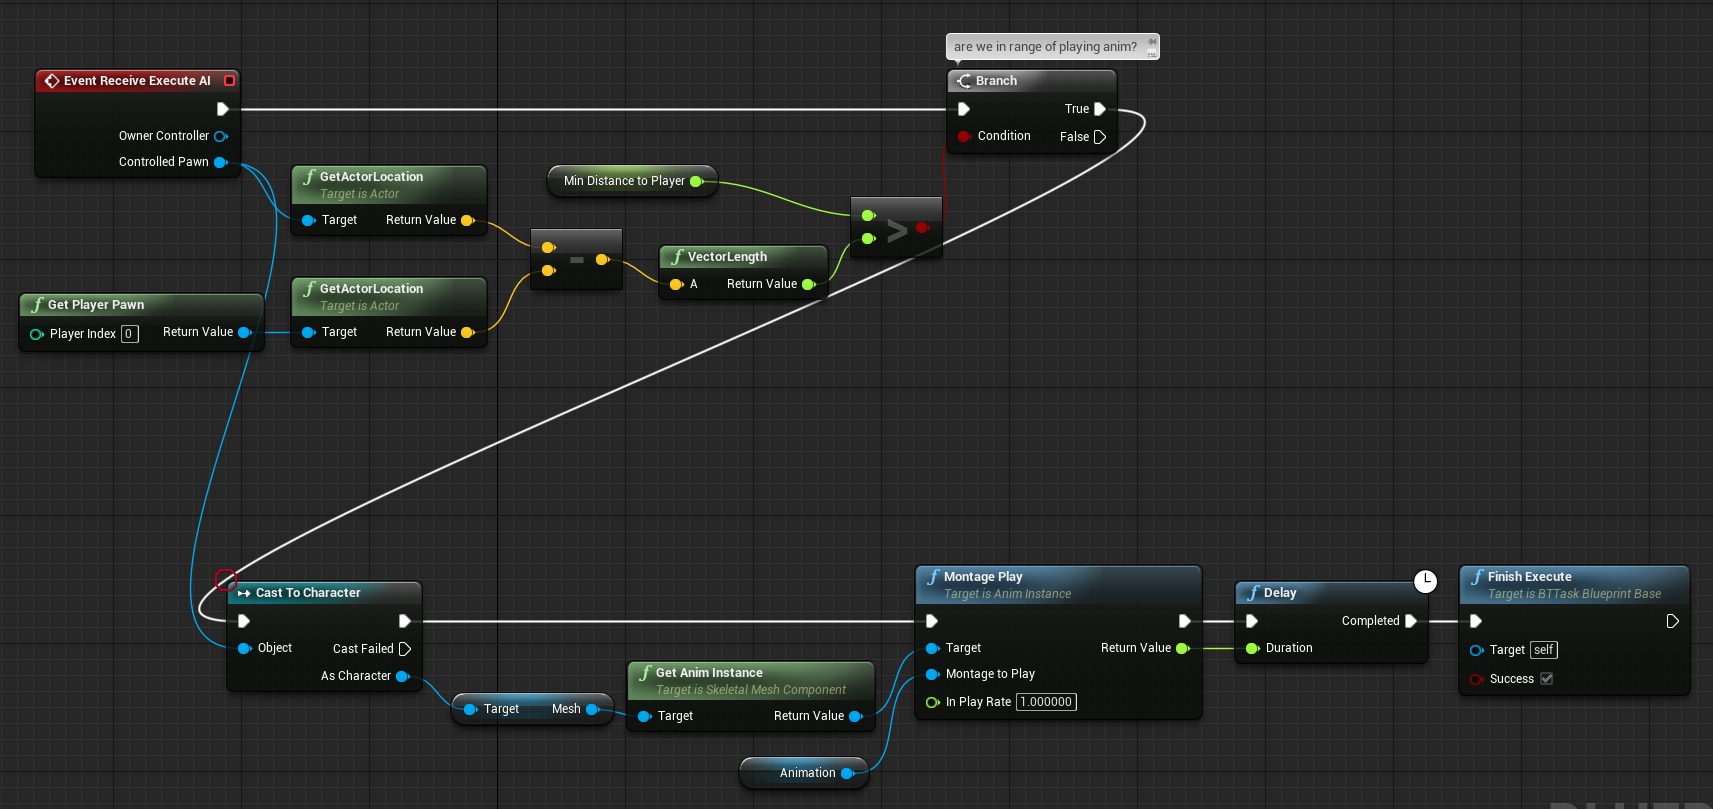
This task is simple – it is checking if we are in distance to play animation, if yes just play animation as a montage. We will use animations to shoot and deal melee damage. Again this Task can be used on every Character.
PlayAnimSequenceService
This don’t need to be service but I would like to show how they work.
Create new blueprint extending from BTService_BlueprintBase named PlayAnimSequenceService. This will be almost the same node as earlier but it can play couple of animations in sequence.
Open it and create those variables:
- Animations (Anim Montage, ARRAY, Editable),
- CurrentIndex (int, NOT EDITABLE),
- AnimInstance (Anim Instance, NOT EDITABLE),
- isPlayingAnim (bool), NOT EDITABLE),
- AnimRate (float, ARRAY, Editable),
- IsDeadBBData (Blackboard Key Selector, Editable),
- MinDistanceToPlayer (float, default: 1000, Editable),
Create new custom event named PlayAnim.
This is something like loop – passing all Animations and making sure they have been played.
Override Receive Activation AI:
It’s just storing AnimInstance variable for later use. We don’t need to cast it in Tick.
Now override Receive Tick AI. Services can tick by time:
It’s just calling PlayAnim if can. So basically this service is checking if all animations was played – if yes – play them again. It will be used in Behavior Tree.
GetFutureSoldierData
This is the last helper – it’s strictly connected with Future Soldier enemy. We need to pass rest data to Blackboard.
Create new blueprint extending from BTService_BlueprintBase named GetFutureSoldierData. Add those variables:
- isDead (Blackboard key selector, editable),
- SoldierType (Blackboard key selector, editable),
Override Receive Tick AI:
Just set blackboard data.
Creating Standing Behavior Tree
Open earlier created FutureSoldier_Standing.
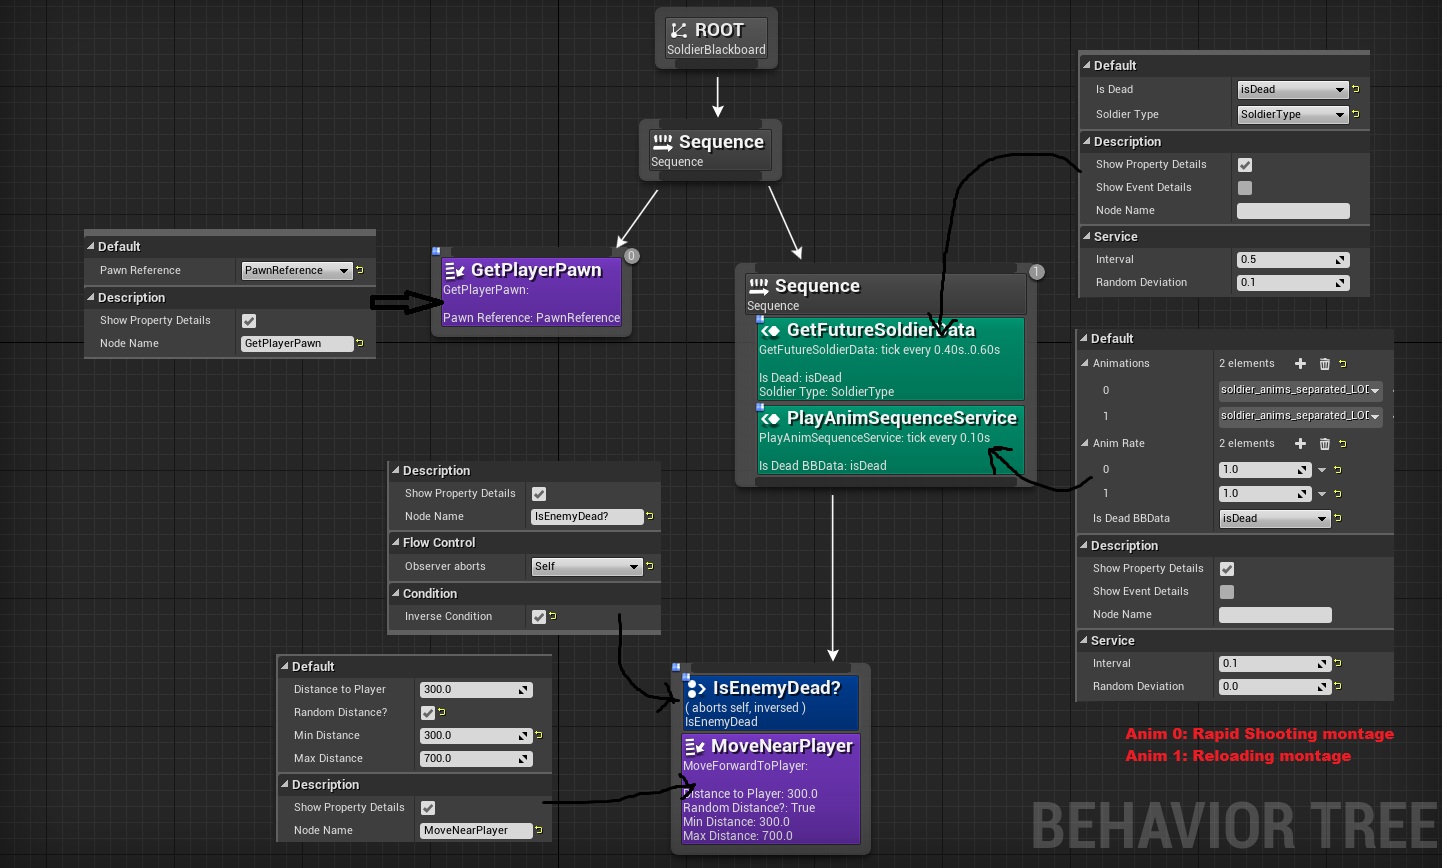
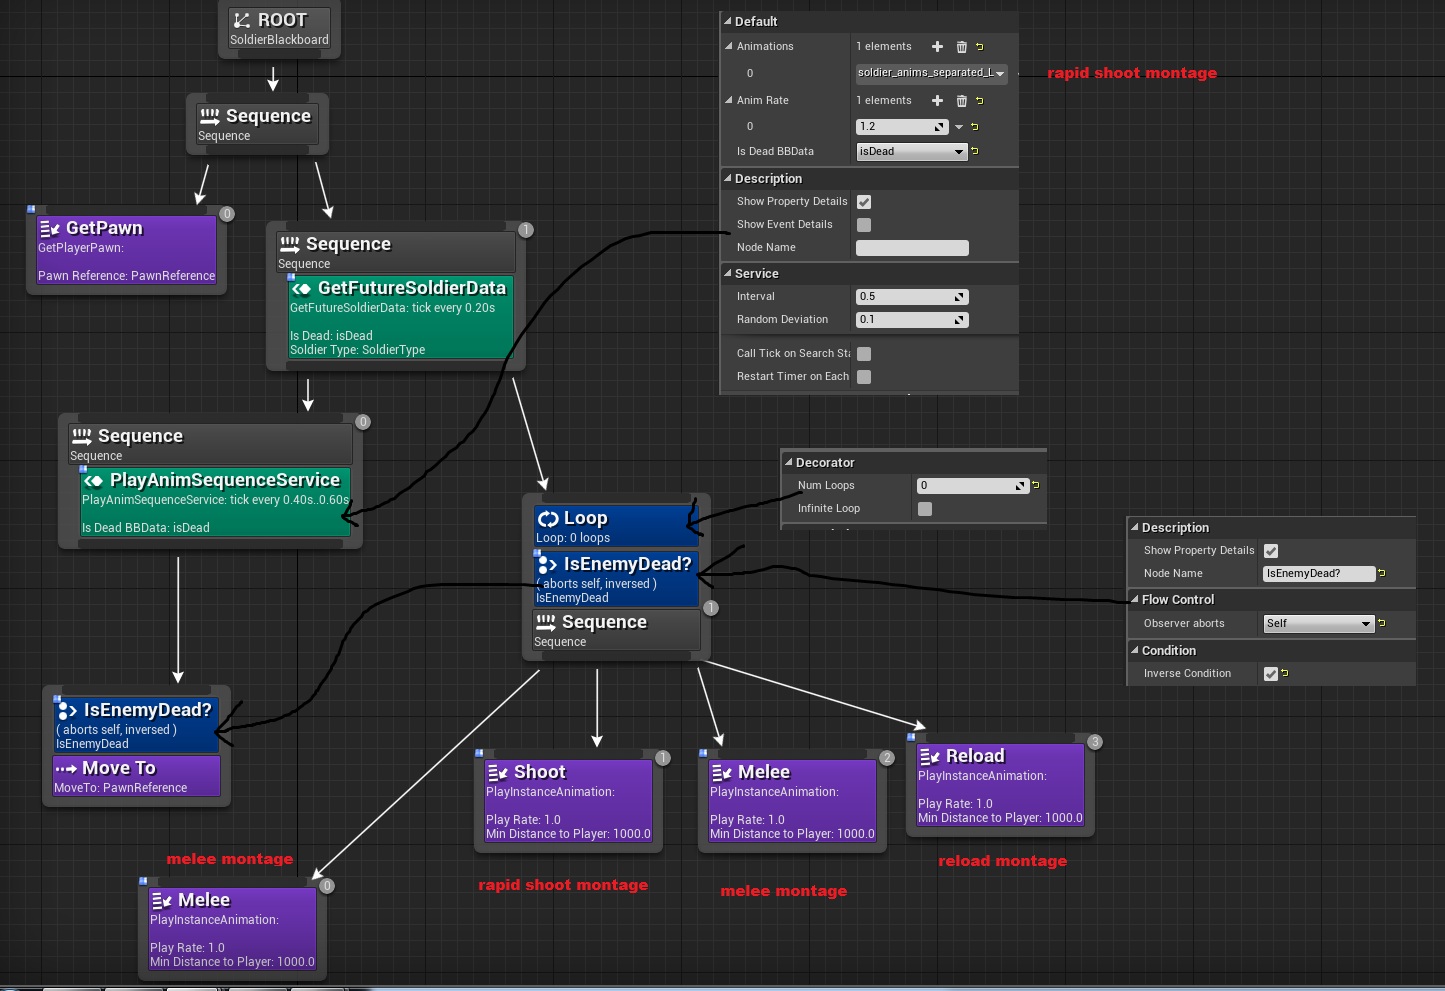
So what’s this doing:
- Getting Pawn reference on start,
- Updating Future Soldier Blackboard in tick,
- Trying to play Animation Sequence in tick,
- Is Moving Near Player while alive,
It’s really simple AI but you should take your time to debug it and try to make changes. For example you can use Wait node and make him shoot while standing, then walk again.
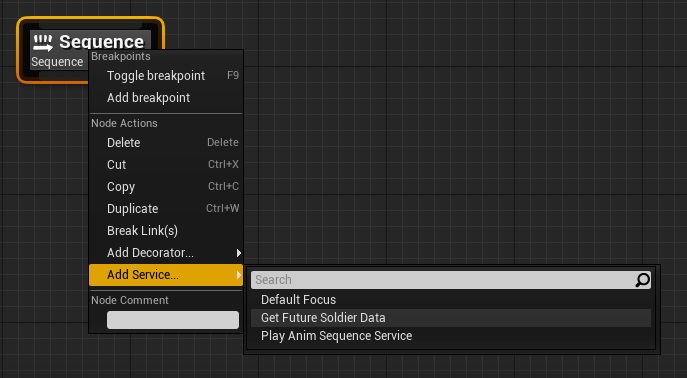
How to add services and decorators?
Decorators can be add on top of Task, and as can you see I have one isEnemyDead on top MoveTo with Observer Aborts: Self – which means if false will be returned Move task won’t be fired.
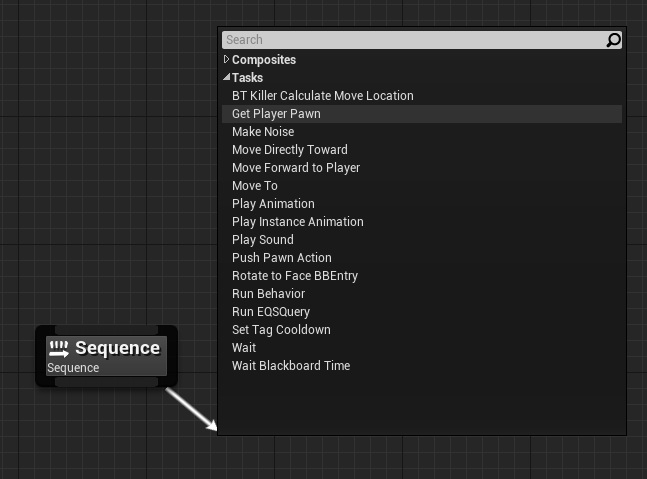
How to add tasks?
Drag pin from Sequence or Selector.
What’s the difference between Sequence and Selector? It’s simple Sequence will stop if ANY node return False and Selector will stop if ANY node return True. Always over your mouse on nodes and check tooltip!
Creating Melee Behavior Tree
Create new Behavior Tree named FutureSoldier_Melee, assign earlier created Blackboard.
This is different:
- Move Directly to Player, (using MoveTo Task from Unreal Engine 4),
- If near player play anims: Melee -> Shoot -> Melee -> Reload,
Again it’s really simple AI but you can learn a lot from it! Take your time.
Implementing Shooting
Your AI is playing shooting animation, but he doesn’t spawn any projectile.
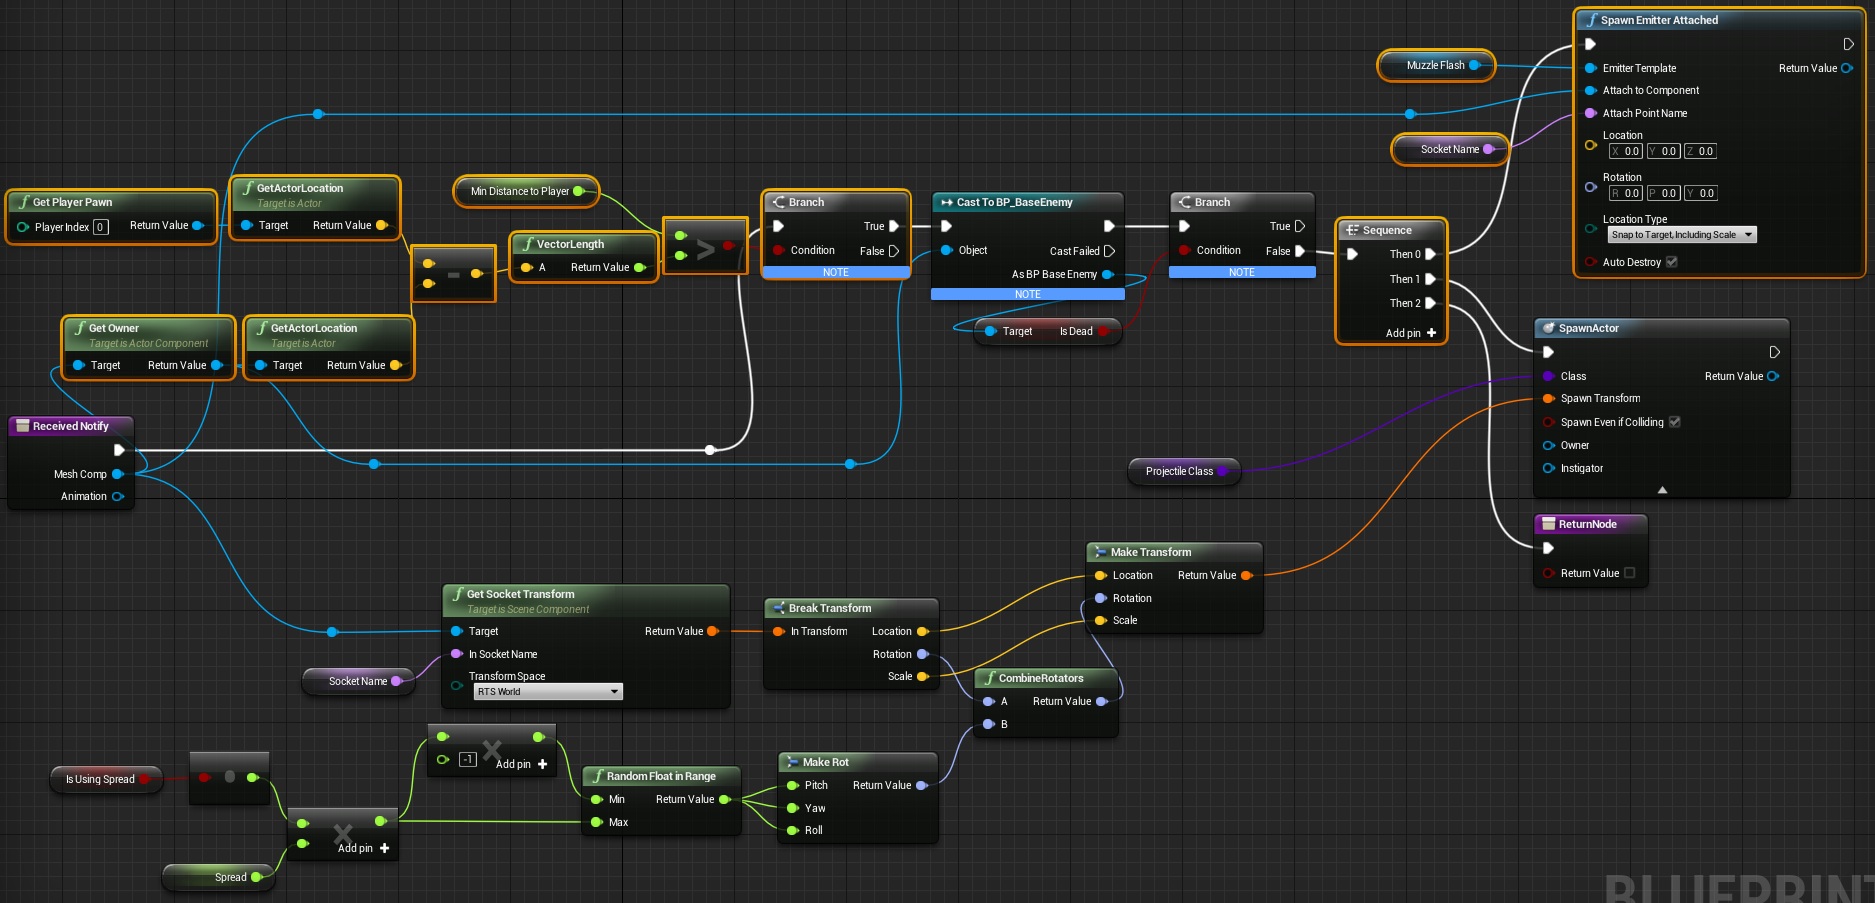
I will update earlier created Nofity – Notify_SpawnProjectile to use Distance To Player and spawn muzzle flash effect.
Open it and add these variables:
- MinDistanceToPlayer (float, default: 1000, editable)
- MuzzleFlash (Particle System)
And here’s updated graph – just check if Enemy is in range of MinDistanceToPlayer before spawning projectile. Spawn Muzzle Flash particle Attached to SocketName.
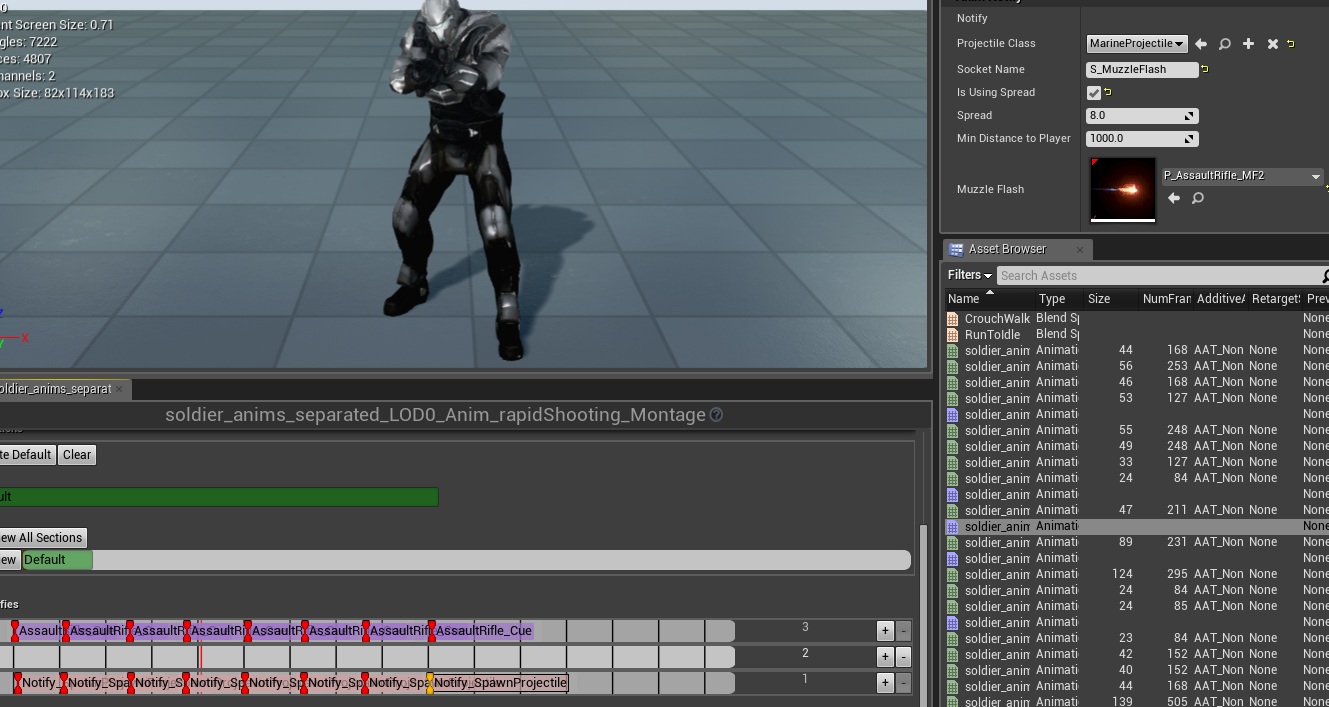
Now in your shooting montages add this notify couple of times, making sure MuzzleFlash projectile is selected and using S_MuzzleFlash socket.
I’m using earlier created MarineProjectile as Projectile Class.
This takes lot of time – but thanks to Behavior Tree Tools I will be able to create new enemies much more faster than in Blueprints.
That’s last enemy for environment that I have! Next ones will be implemented for new environment. Now I will focus on main menu and levels system.
Creating ShooterTutorial takes a lot of my free time.
If you want you can help me out! I will use your donation to buy better assets packs and you will be added to Credits /Backers page as well.Implementing game is taking time but writing about it is taking much more effort!









You surely rock pal 🙂 .This ShooterTutorial as it is, will mobiles be able to run it? on pc it has good performance but on mobile? how many frames will your NEW 🙂 Nexus 5 will get or a SamS6?
Yes, it’s running on Mobile (testing on iPad Air) there is lot of things that need to be changed to get 40-50fps on Air (currently 20 fps but I haven’t done any optimizations yet) – it can be achieved. I will be posting about this after creating demo level – lot of tips coming! I’m targeting only hi-end devices so it won’t work on iPad2 or iPad3.
I’m not sure about Nexus thou. Will check it in couple of weeks. Basically there are still issues on Android deeply in the Engine (shipped one UE4 game and finishing another one), and I don’t want to mess with C++ code here. Tutorials will be always fully done in Blueprints and Binary version of the Engine.
Is there a conversation thread somewhere that convinced you to use Behavior Trees? I’d like to see the context.
I have a question:
What happens when we are executing the left most “Move To” task, but the enemy dies while still executing it? Wouldn’t the ai move to a actor that is dead?
Pingback: Dissolve Dying Effect | Shooter Tutorial
when adding Move to, I cant change isDead to pawnreference. why?
how and where create Nofity – Notify_SpawnProjectile?
Hey Farrux, the reason you can’t pick Pawn Reference in the MoveTo task in the Melee BT is because you need to go to the SoldierBlackboard and make sure the Base Class for “PawnReference” is Actor. By default it goes to Object. The Key Type SHOULD be Object. But you want to change Base Class to Actor.
Actually scratch that, it shouldn’t be Actor either. I’ve reviewed everything a couple times but at the moment my guy just stands there. He aims at me and he’s playing the idle but he doesn’t seem to act out any of the behaviors from the behavior tree, in any mode (stand, crouch or melee). No shooting, nothing. I need to dig into this a bit more so ignore my comment above, and I’ll return with the fix when I’ve figured it out.
OK I figured it out. You can look at the very first AI enemy you made for reference – in the FutureSoldier AI Controller blueprint, you need to go into the Event Graph and on Event Begin Play, connect a “Run Behavior Tree” node.
OK for anyone else having an issue with this one, specifically, montages not playing on your guy – I spent a few hours looking into this and the solution that worked for me was to put a slot node in between the “Blend poses by Bool” and “Final Pose” nodes in the anim BP. Set that node to match whichever slot the melee, reload, and shoot montages use.
I added some debug text/print string in my project that showed the montages “playing” as expected, except the guy wasn’t doing the movements. It’s because montages depend on being assigned a slot to work. Only thing I have left to fix is a long blend when the guy runs in (he slides to a stop).
Don’t want to belabor the point but just to clarify for anyone still struggling (because I did) – In the anim graph, instead of putting the slot reference just before the FinalPose node (which will override the torso aiming at the player), you could put it right at the beginning, between “Use cached pose ‘BasePose'” and the top connection of Layered Blend Per Bone. What this will do is preserve the torso aiming at the player while he runs through the montages. For example I made a slot called “UpperBody”, set all my montages to use that slot, then made this new node I’m referring to a Slot ‘UpperBody’ node.
This does not solve the issue of the shoot auto loop causing him to pop to stand as he runs in, when using the Melee version. So I just made a run n gun anim montage with a bunch of shooting notifies in it, gives the same effect. Some slight foot skipping since it’s overriding the blendspace but for now it serves my purposes.
Remaining to do – creating an enum selector in the AI controller so that it will respect which soldier you set – Crouching, Melee, or Standing. Also will implement the melee damage using the boss implementation as reference.