I’m getting a lot of request to create Skyrim like inventory Tutorial. I have found you guys have a problems with ShooterTutorial inventory implementation as well. ShooterTutorial inventory is about choosing weapons before starting gameplay. That’s why I have decided to create complete Skyrim like inventory tutorial which will:
- be object oriented,
- starting from first person template,
- have 3d preview in UMG,
- support item dropping, using,
- support categories,
- support moving items,
This tutorial is long and not so easy. As always take your time!
|
1 2 |
<strong>This Tutorial has been created using Unreal Engine 4.10</strong> Make sure you are working on the same version of the engine. |
Other helpful tutorials
There is couple of great tutorials over the internet which you can try before this.
Feature request for Epic
I have created couple of feature request for Epic so it will be simpler to create such inventory.
- Viewport widget that’s creating new UWorld and we can place meshes there. It would be much more easier to draw 3d content in UMG, (as far I can know Epic is working on this)
- On Mouse Enter / Leave events on Buttons,
- Get Component Bounds issue fix,
- Blueprintable XML parser,
- Possibility to create new assets from blueprints, (the goal is to have XML which will create objects and then automatically create world actors from those actors that can be placed in level),
- Update content browser thumbnail after construction script, (or add a possibility to capture thumbnail in current component mode seen in editor)
First Person Template
Open your 4.10 Editor and create new blank project from First Person Blueprint Template.
Architecture
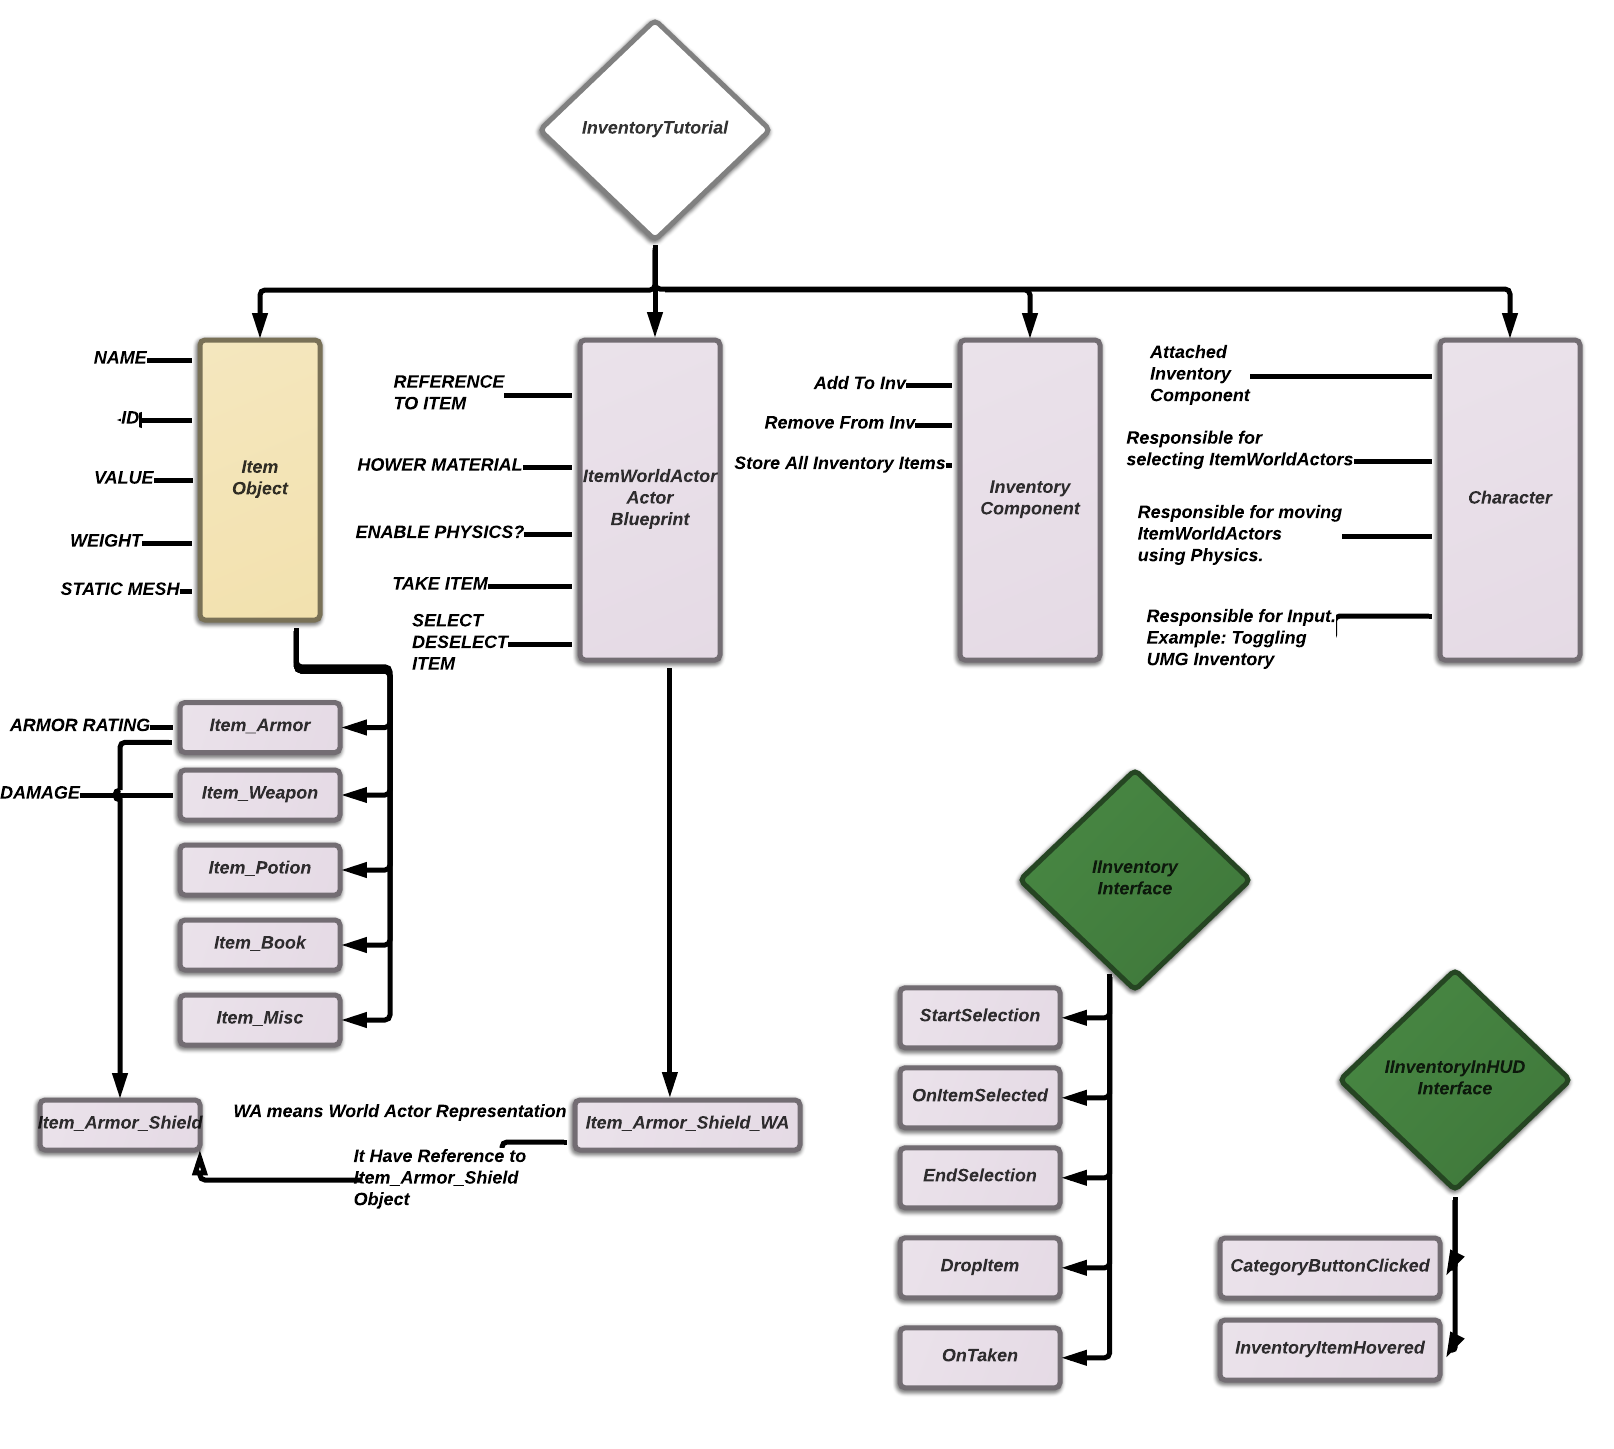
Let me drive you trough basic architecture.
Object Oriented
Items will be object oriented and will use Objects instead of Actors. Let’s create first base Object for items.
Base Item Object Class
Create new blueprint named Item extending from Object. Open it and add those variables:
| Var Name | Var Type | Default Value | Description |
| ID | Text | Especial ID for the item. It is text to be able to better search later. There shouldn’t be two the same items with the same ID! | |
| Name | Text | Name of the Item – it can be “Shield” or “Dagger” whatever you like. This will be showed in UI. | |
| Value | int | Value of the item. | |
| Weight | float | Weight of the item. | |
| WorldMesh | StaticMesh Reference | Reference to the static mesh that will be graphics representation of the item. Thanks to that we will know which static mesh should be assigned later. |
And that’s all for now. It will be base class for all of the items. It doesn’t have any damage, armor rating variables.
Armor Item Object Class
In Skyrim some types of items have dedicated variables such as damage, armor rating or special effects. To have the system more generic each new item category (armor, weapon, misc, ingredient etc) will extend from Item class.
Create new Blueprint named Item_Armor extending from Item created earlier. Open it and add one new variable:
| Var Name | Var Type | Default Value | Description |
| ArmorRating | float | This will be armor rating for armor type item. |
USEFUL TIP: This is the place where you can add equip type, mount type to the object . I won’t do this because it’s not in the scope of this tutorial. I won’t be equipping items to hands or body.
Weapon Item Object Class
Create another Blueprint extending from item named Item_Weapon.
| Var Name | Var Type | Default Value | Description |
| Damage | float | Damage for the weapon. |
This is the place where you can add equip type, mount type to the object . I won’t do this because it’s not in the scope of this tutorial. I won’t be equipping items to hands or body.
Rest Items Object Classes
Now create rest of the item types classes. Create new Blueprint extending from Item:
- Item_Book,
- Item_Ingredient,
- Item_Potion,
- Item_Misc,
They do not have any custom variables.
If Item is Object how to add it to level?
Yes, Objects can’t be placed into world. They are just data blueprints which aren’t generating any draw calls.
That’s why I will create an Actor that will have reference to Item object.
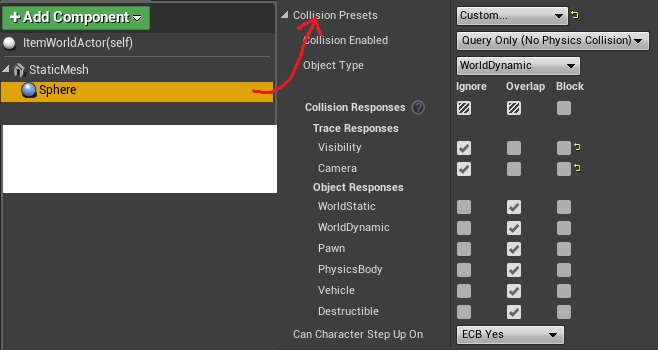
Create new Blueprint extending from Actor named ItemWorldActor. Open it and those components:
- Static Mesh Component named StaticMesh. This should be root of the Actor as well,
- Sphere Collision Component named Sphere. Attached to Root.
And those variables:
| Var Name | Var Type | Default Value | Description |
| Item | Item Object Class | Storing link to the Item object. Used to create object. Expose on Spawn: True! Editable: True! | |
| ItemReference | Item Object Reference | This will be referencing to created object from Item. Reference here means specific created Item. | |
| bEnablePhysics | bool | Expose On Spawn: True! Editable: True! |
Now here’s the trick how to show Item’s static mesh in editor without spawning it. Open Construction Script and add this:
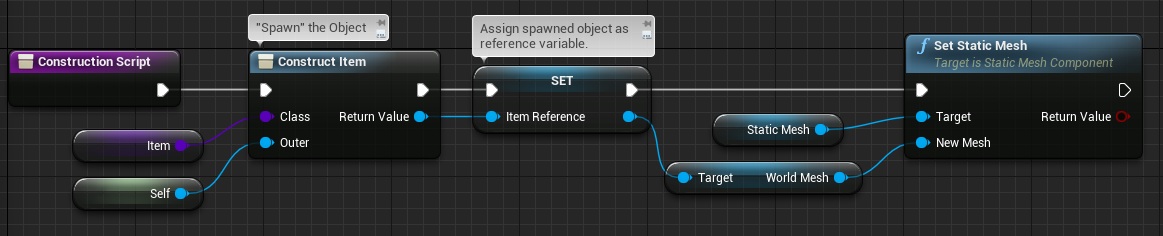
So basically each item will have an Object and Actor interpretation. Quick example:
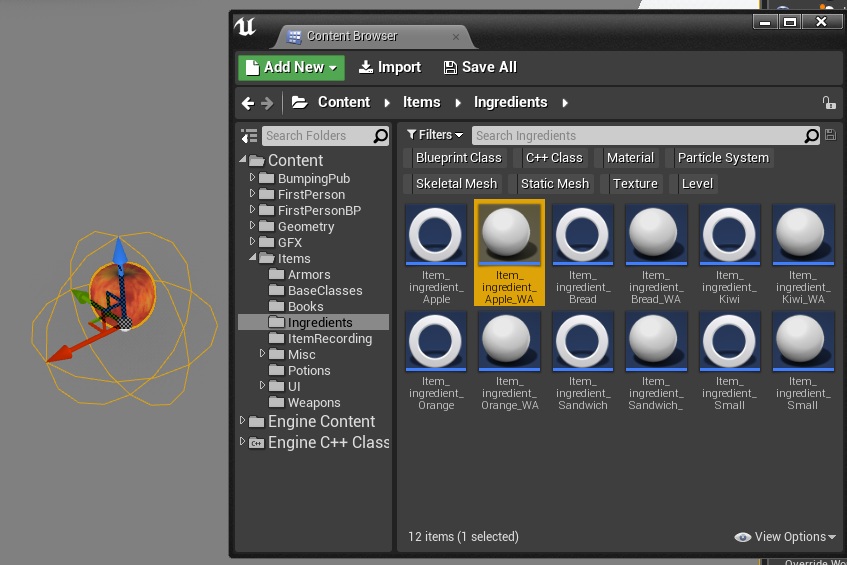
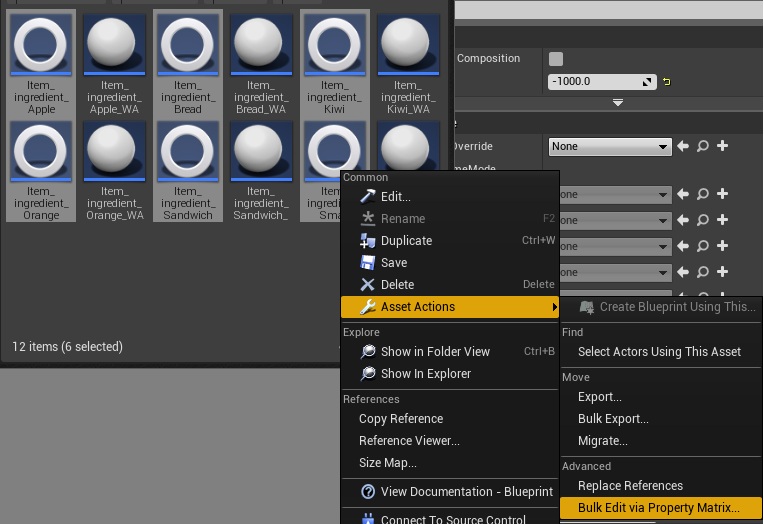
Find some Apple mesh. Create new blueprint extending from Item_Ingredient named Item_Ingredient_Apple make sure you have assigned WorldMesh to your Apple mesh. Then create new blueprint extending from ItemWorldActor named Item_Ingredient_Apple_WA. (WA here means World Actor) Open it and assign Item_Ingredient_Apple object to Item variable. Place the Actor in level and you should see Apple.
At this point nothing will happen with the item but you should get the idea here. It would be much more simpler to generate those WA actors from Objects, but we don’t have possibility to create new data types in content browser from Blueprints. Another thing are thumbnails – UE4 is missing simple “Capture Thumbnail” in current component stage (after changing something in Construction Script) – without thumbnails it’s hard to find the items.
btw there is great way to change variables for more than one content browser item. Select more than one Item and choose “Bulk edit”

Inventory
We need a place to store inventory items somewhere. I will use Actor Components for this at it can be attached to any actor.
But first I would need some structure that will store Items with their count in the inventory (example. have 2 the same items in inventory). Create new structure named InventoryItem:
| Var Name | Var Type | Default Value | Description |
| Count | Int | How many Items do we have. | |
| Item | Item Object Reference | Reference to the item. |
Now create new blueprint extending from Actor Component named Inventory.
That’s all for now.
Communication
So you have the idea how the basics classes will work but what about communication? I will be using Interfaces to communicate from one blueprint to another. There will be two Interfaces one for UI (UMG) communication and one for in-game communication.
Before start create new ENUM named ItemCategory. It should contains:
- All,
- Weapon,
- Armor,
- Potion,
- Ingredient,
- Book,
- Misc.
This ENUM will be used for UI only. You could try implementing UI without it but it will require more work.
Now create new Interface named IInventoryInHud and open it. It will contain 2 functions:
CategoryButtonClicked function:
- Input Name: Type. Input Type: ItemCategory,
InventoryItemHovered function:
- Input Name: Inventory. Input Type: Inventory Item structure,
Create another Interface named IInventory with those functions:
StartSelection (doesn’t have inputs)
EndSelection (doesn’t have inputs)
OnTaken:
- Input Name: InventoryRef. Input Type: Inventory Component Reference,
OnItemSelected:
- Input Name: ItemRef. Input Type: Item Object Reference,
DropItem:
- Input Name: ItemRef. Input Type: Item Object Reference,
- Input Name: OptionalDropCount. Input Type: int,
We will try to use only those interfaces to communicate within whole system.
Inventory Management
Base classes are done now let’s move into some Inventory management. Open your Inventory Blueprint and add those variables:
| Var Name | Var Type | Default Value | Description |
| InventoryItems | InventoryItem Strcture (Array) | It will store all Items that are in Inventory. |
Inventory should implement IInventory interface!
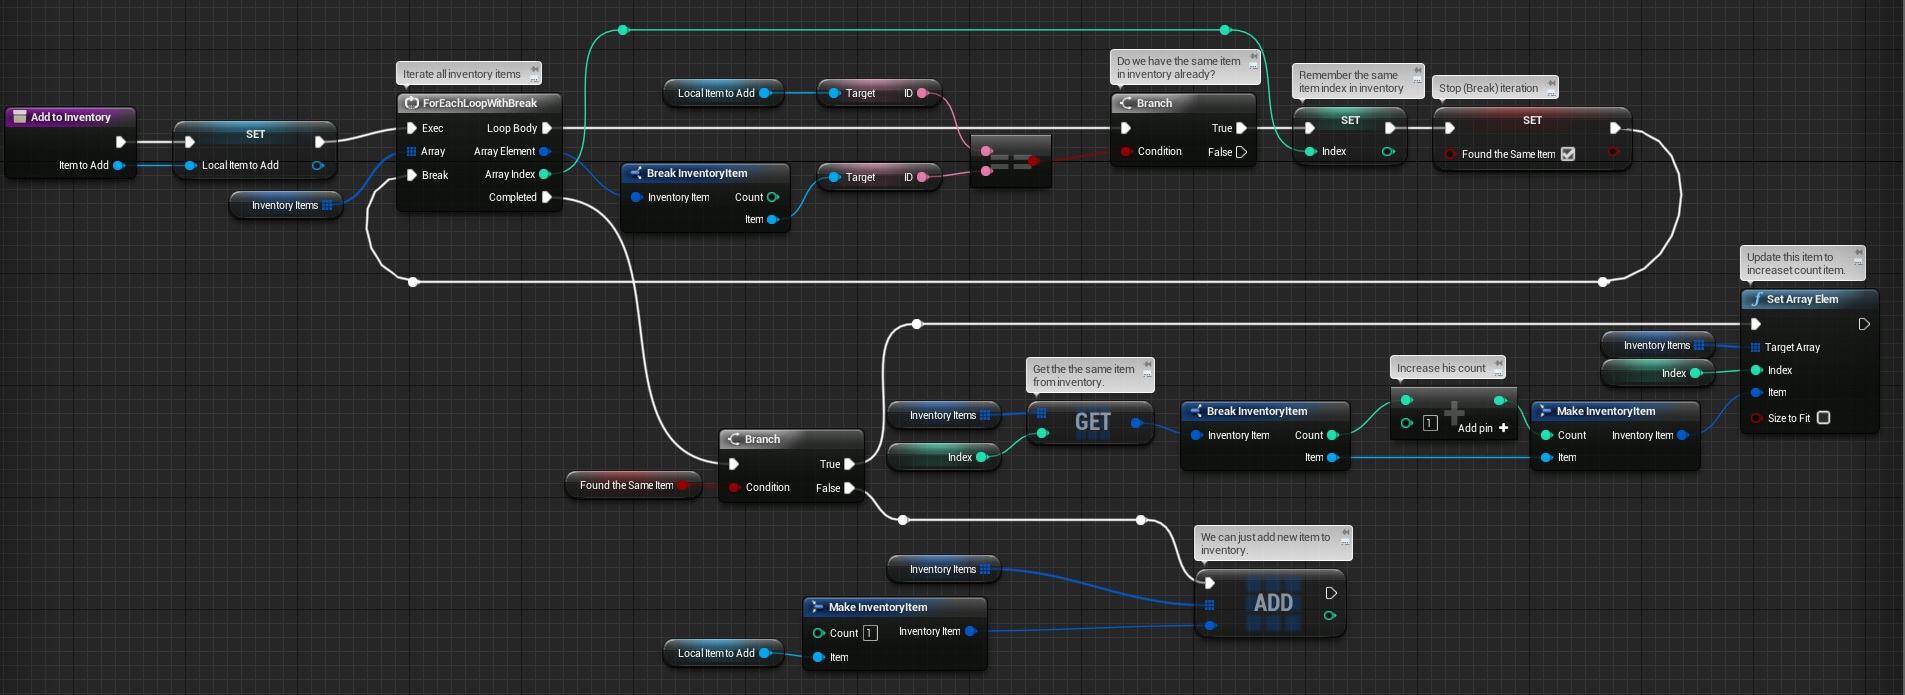
First lets add basics add and remove items from inventory functionalities. Create new function AddToInventory.
AddToInventory Function:
Inputs:
- Input Name: ItemToAdd. Input Type: Item Object Reference.
| Local Var Name | Var Type | Default Value | Description |
| Index | Int | It will store the index of the item in InventoryItems array if found the same item. | |
| FoundTheSameItem | bool | Used to determine if we found the same item in inventory. | |
| LocalItemToAdd | Item Object Reference | Just storing the input so it will easier to view the blueprint. |
RemoveFromInventory Function:
Inputs:
- Input Name: ItemToRemove. Input Type: Item Object Reference.
| Local Var Name | Var Type | Default Value | Description |
| Index | Int | It will store the index of the item in InventoryItems for ItemToRemove reference. |
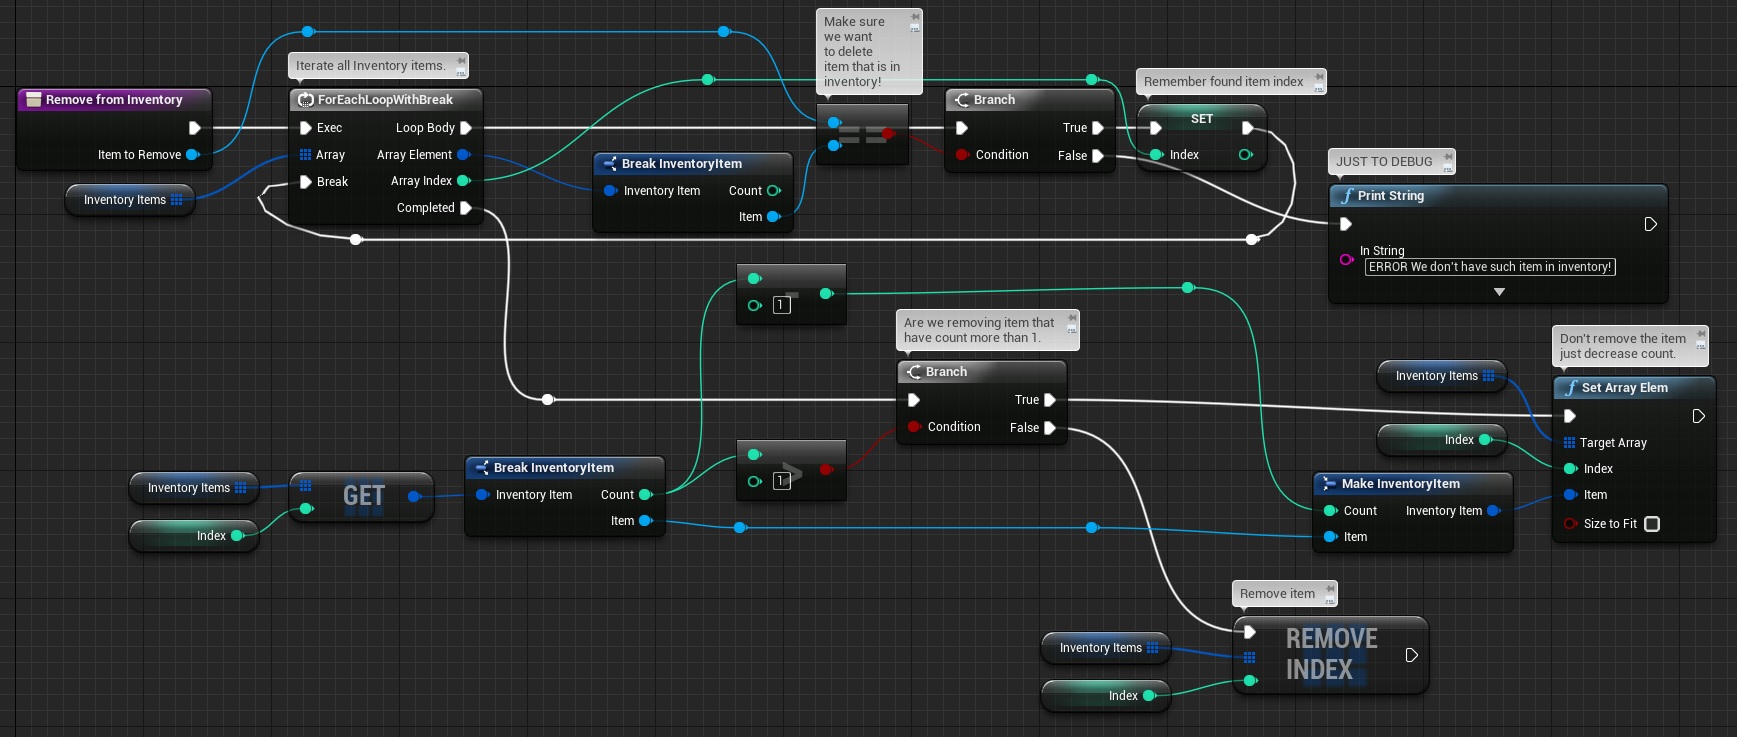
Comments in screen should be enough. So this is basic Add / Remove functionality.
Drop Item IInventory (Interface) Event.
Now create new function named GetRotatedFrontPlayerLocation with:
- Input: Int, Name: Optional Rotation Phase,
- Output: Vector, Name: Location,
- Function should be pure,
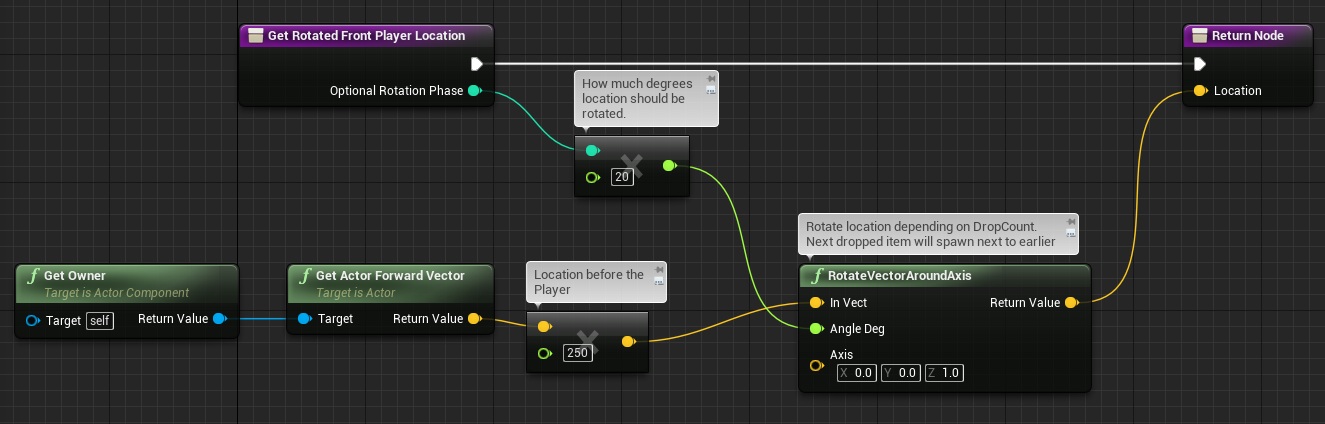
What this does is basically picking a location in front of the player (Owner, because Inventory will be attached to Player as component) and rotate it based on Rotation Phase. Rotation Phase will be increasing when dropping items from inventory.
Now go to your event graph and add event from IInventory: Event Drop Item.
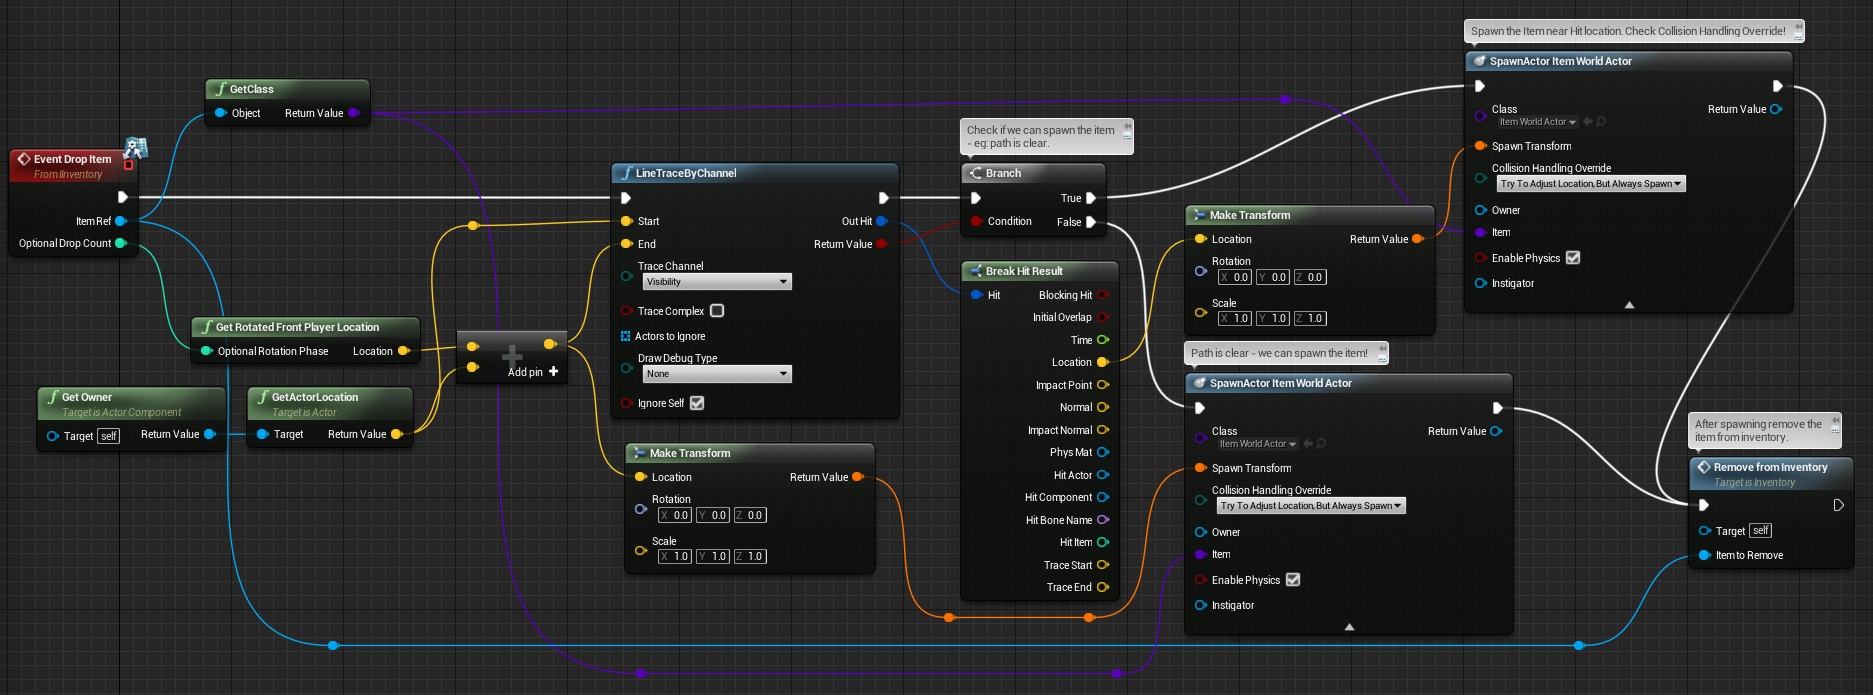
It’s simple. When dropping item from inventory we need to create again World version of the item. That’s why I’m spawning ItemWorldActor with specific Item reference. Sequence is simple:
- Pick location in front of the player,
- Check if we can spawn something there,
- If yes: Just spawn the item,
- If no: get collision location and spawn near,
- After spawning – remove the item from inventory,
That’s all in Inventory Blueprint for now!
Adding Items Picking and Moving
Next step is to add possibility to select an item in world and add it to inventory.
Create new Widget named UI_OnItemSelected and Open it. Here’s the hierarchy:
Open Event Graph and add those variables:
| Var Name | Var Type | Default Value | Description |
| ItemRef | Item Object Reference | Editable: Yes, Expose On Spawn: Yes | |
| DisplayedInInventory? | bool | Editable: Yes. Expose On Spawn: Yes |
And one function: SetItemRef with one Item Object Reference as Input:
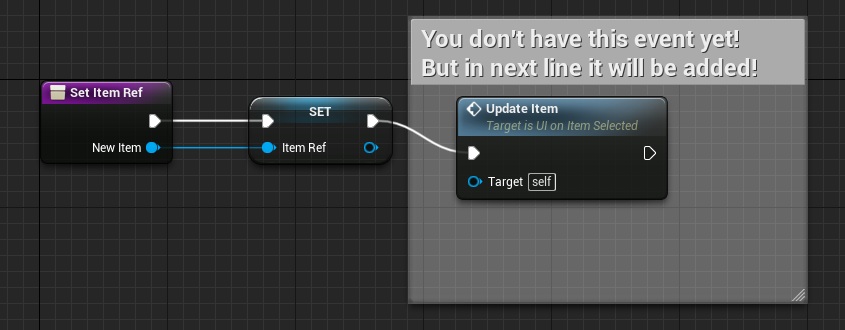
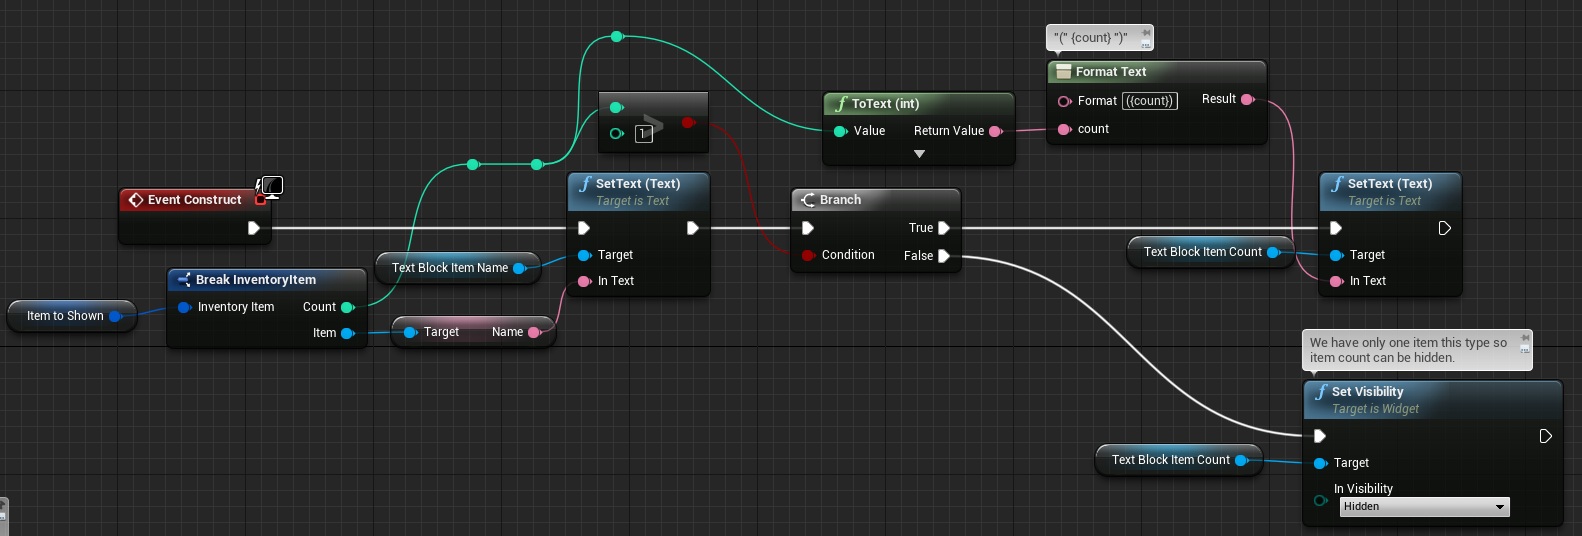
Now in Event Grap create new Custom Event named UpdateItem (update your SetItemRef to call this event!) and add Construct Event:
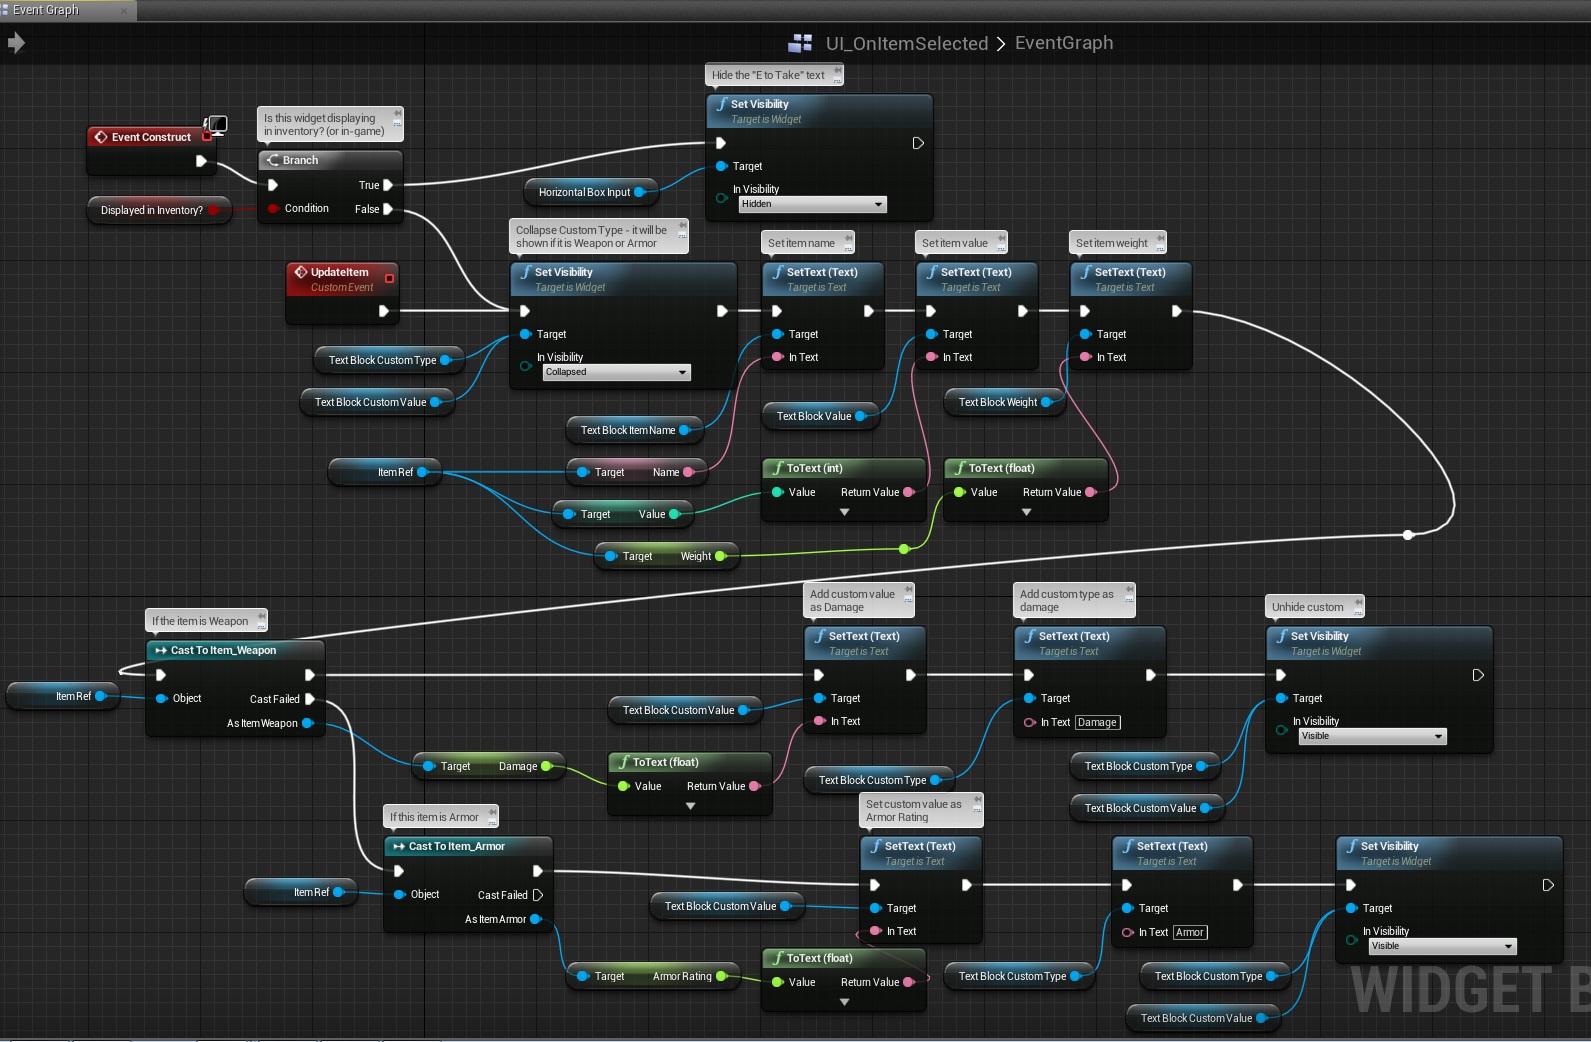
It looks complicated but it isn’t. It’s just updating Text Values from the Item information, and checking if it’s Armor or Weapon to decide how custom text should look like. The first bool is used to determine if this widget is shown in Inventory UI (which we don’t have yet!) or game.
That’s all here!
WorldItemActor Update
Open WorldItemActor and implement IInventory interface. Add those variables as well:
| Var Name | Var Type | Default Value | Description |
| HoverMaterial | Material Reference | Your custom Material. | Reference to the Hover material. Just create some material and add reference here! |
| NonHoverMaterial | Material Reference | This will store original item material. | |
| bEnablePhysics | bool | ||
| PhysicsInfluenceRadius | float | 15 | Remember the Sphere component we have added earlier? This will determine the size of the Sphere. |
Go to Construction Script and update it:
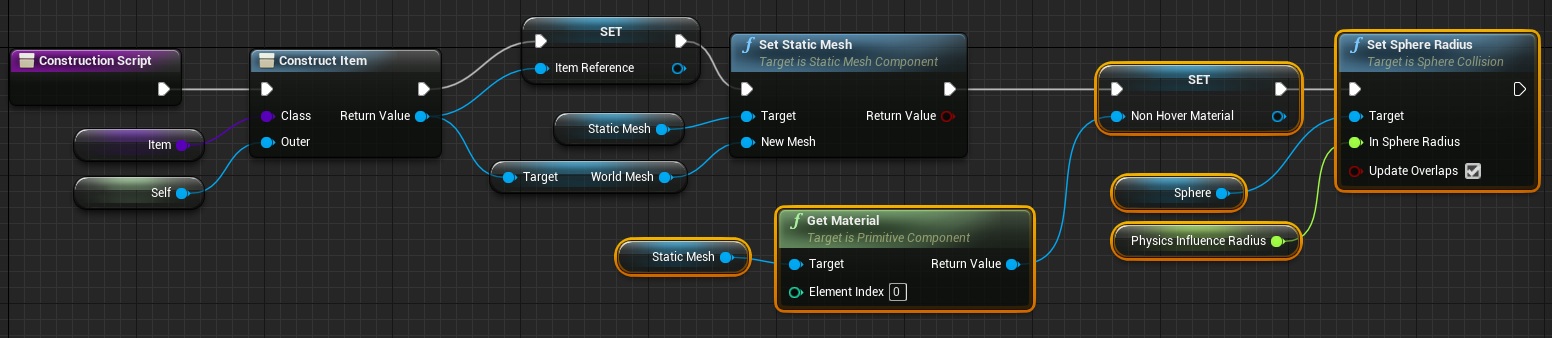
I’m saving original material and changing size of the Sphere. Simple as that.
Add Begin Play Event:
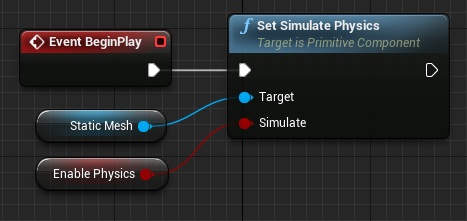
Now IInventory Interface events:
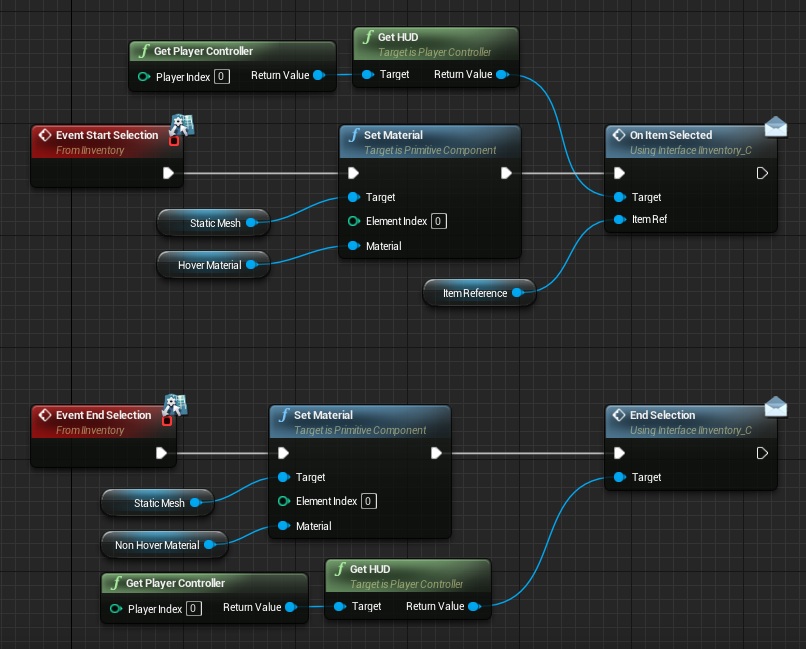
It is changing the material and letting HUD know about the selection. (I haven’t touched HUD yet!) Last part here is to implement OnTaken event from IInventory interface:

Simple as that – add selected item to inventory ping all item actors about physics and destroy item actor.
FirstPersonHUD
First person example comes with HUD blueprint named FirstPersonHUD. Open it and add one variable:
| Var Name | Var Type | Default Value | Description |
| UI_OnItemSelected | UI_OnItemSelected Widget Reference | Store reference of actually selected item. |
Implement IInventory Interface on the HUD and add those events:
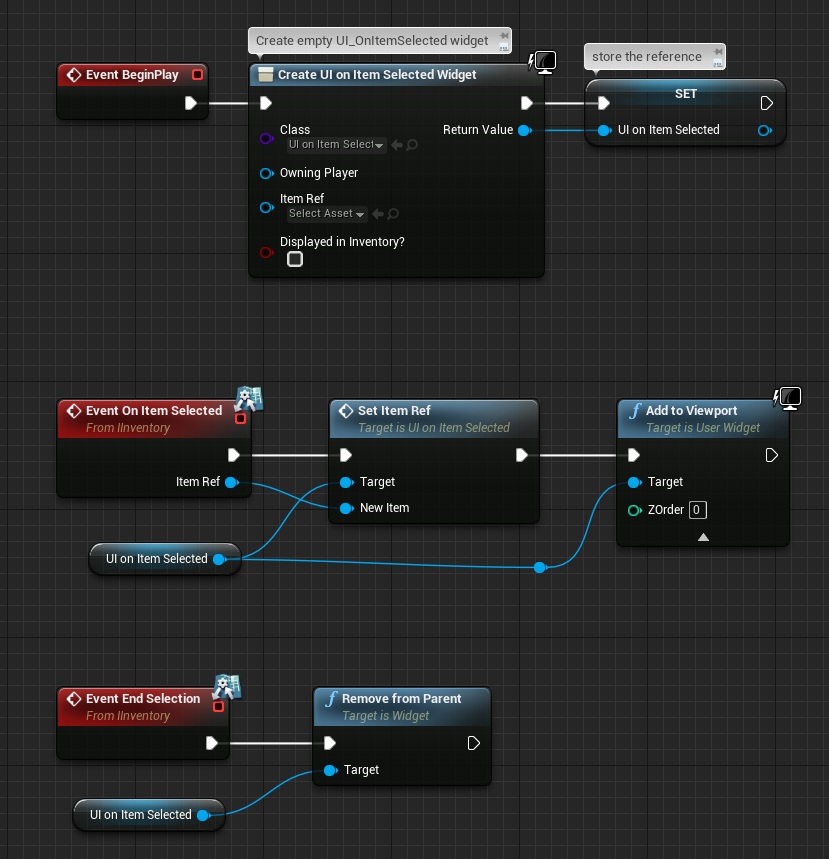
It should be selfexplainatory.
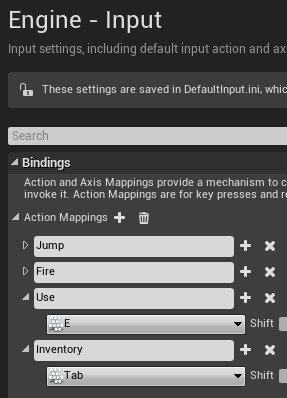
FirstPersonCharacter – Take / Move Item
This will be most critical part. Character is responsible for communicating with inventory and items. Before you start make sure you go to Project Settings -> Input and add those inputs:
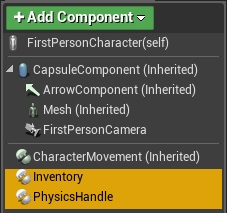
Let’s start from components:
Add Inventory component and PhysicsHandle component. You can remove the hands mesh as it’s just cover the screen unnecessary.
Now new variables:
| Var Name | Var Type | Default Value | Description |
| LastSelectedActor | Actor Reference | It will store selected actor in last frame. | |
| NewSelection | bool | Determine if there was new selection or not. | |
| MaxSelectionDistance | float | 250 | Distance for picking up objects. |
| WantToGrabItem | bool | Stores if we want to grab an item instead of adding it to inventory. | |
| ItemGrabbed | bool | Items is currently grabbed by player? | |
| DeltaTime | float | Current delta time. | |
| GrabbingAccumulatedDelta | float | It will determine if we are holding ‘E’ key special amount of time. (eg. after 0.5 s we want to grab the item) | |
| HitResult | HitResult | Stores hit result of our crosshair. |
And one function named GetItemOverCrosshair with:
- Local Variable: LocalSelectedActor (Actor Reference),
- Output Name: Result, Output Type: Actor Reference,
- Output Name: Hit Result, Output Type: Hit Result,
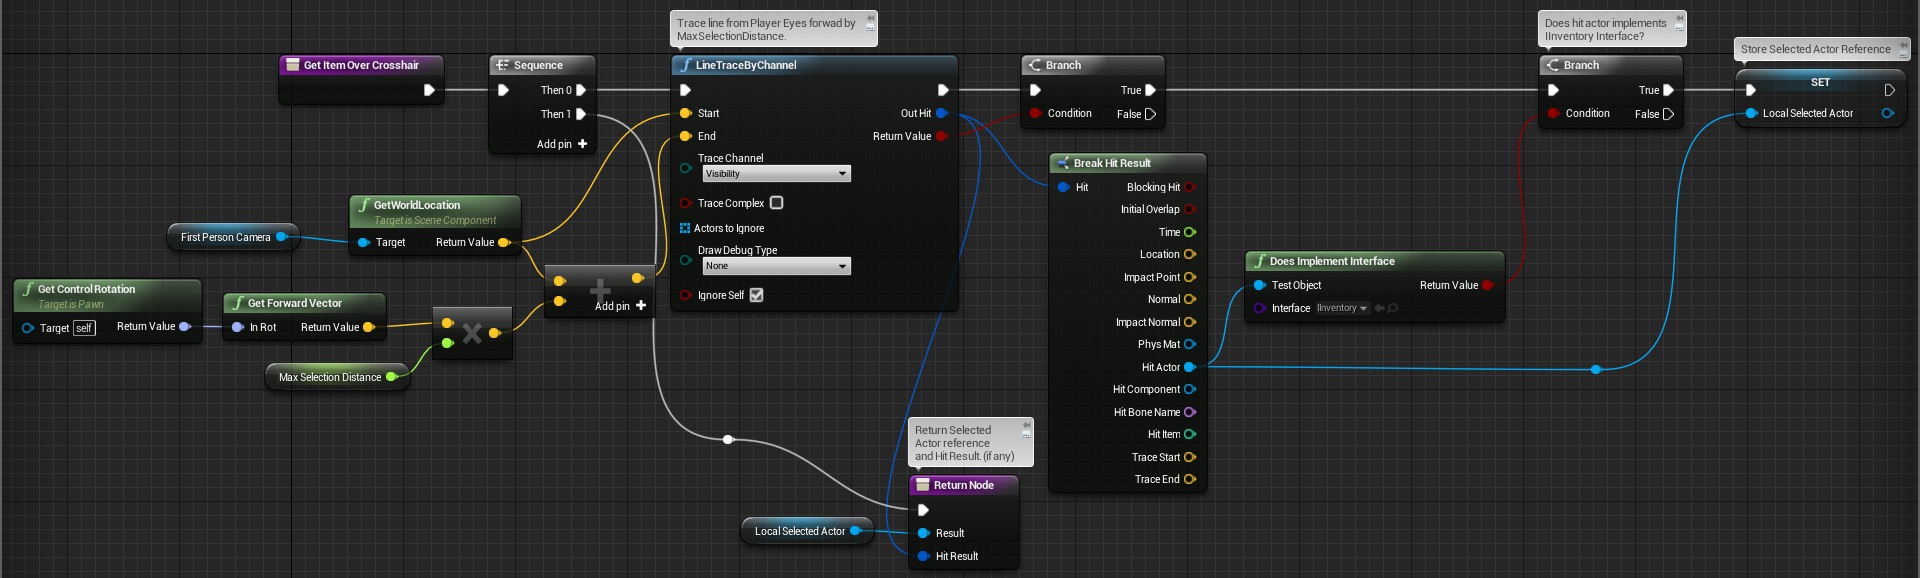
It’s searching for IInventory items over the crosshair.
Now custom events. Create new Custom Event named GrabItem:
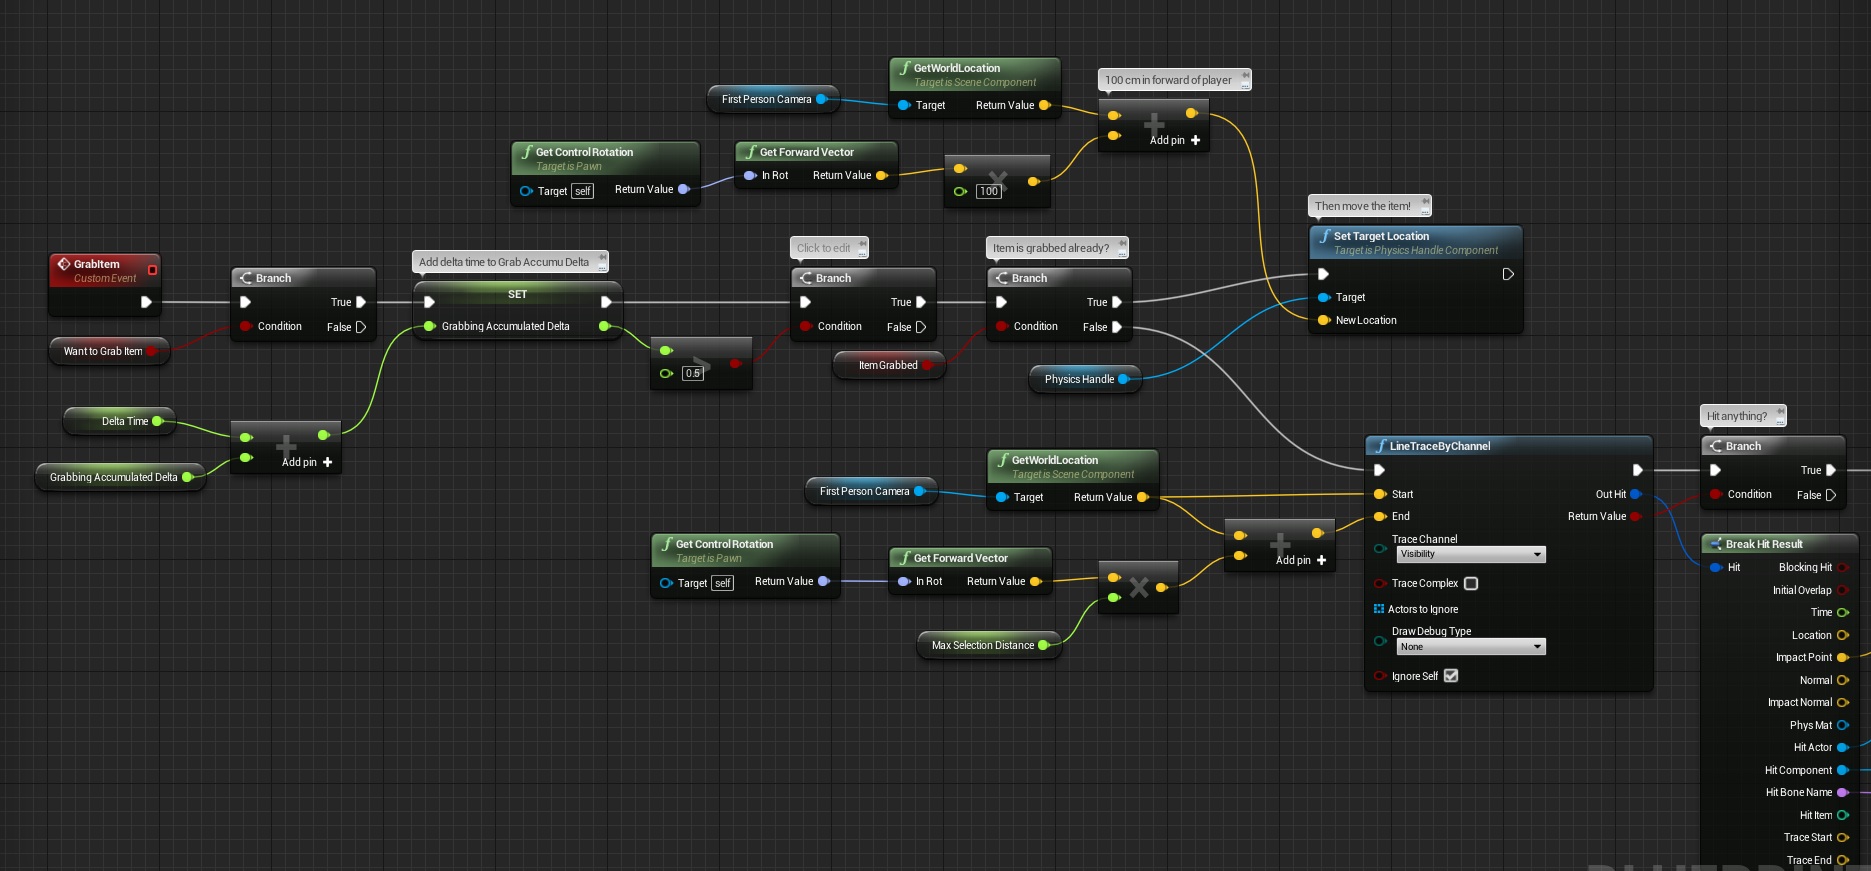
It’s looking complicated but just read the comments and variable names! This function is responsible for grabbing the item. (to move the item you would need to change PhysicsHandler location when item is grabbed – which will be done in couple of sec in Tick function!)
Create another custom event named ReleaseItem:

Simple as that. I’m resetting the variables just in case here!
Add Tick Event:
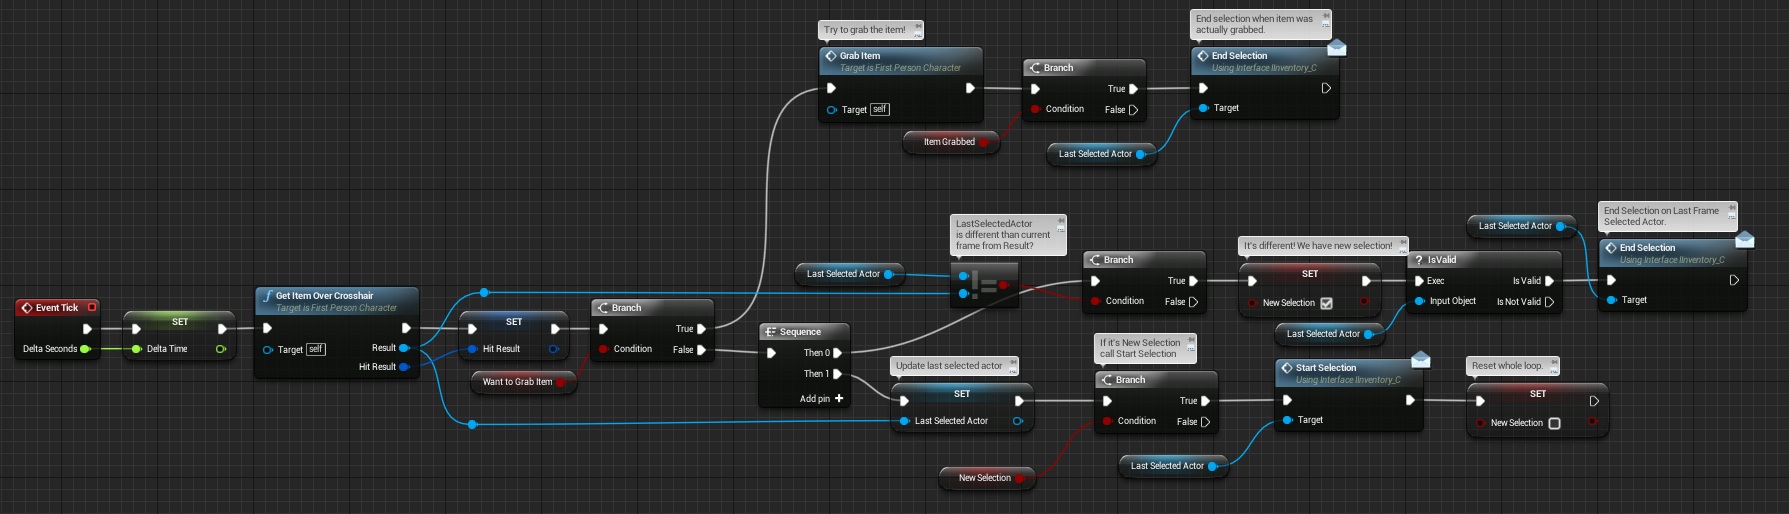
Here’s where the magic comes. It’s searching for IInventory Actors and calling StartSelection / EndSelection if found new IInventory Actor. It will try to grab the item as well but we are missing one important part from the input.
Add Use Input Event:
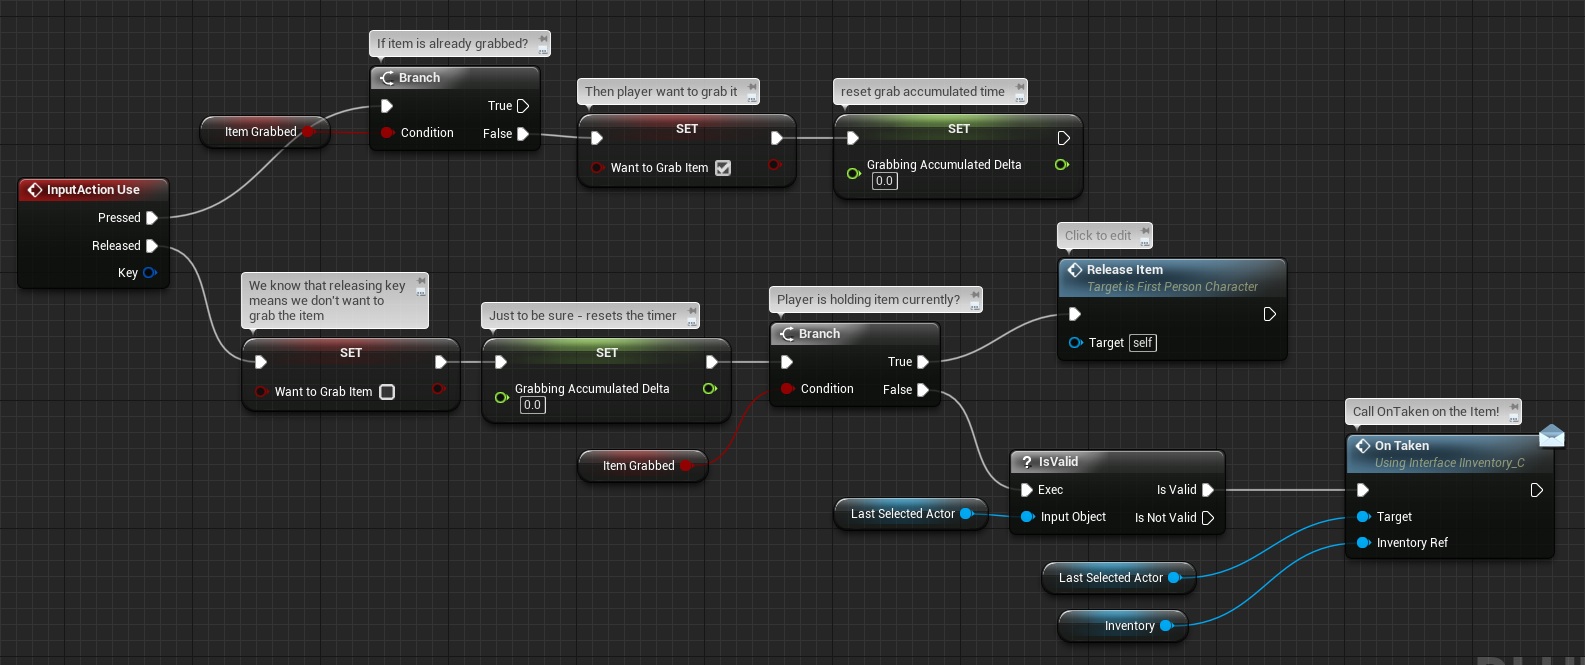
At this point you should be able to add the item to inventory and grab it when holding ‘E’ key.
Adding 3d item view
Next thing I would like to achieve before starting to create UMG Inventory is to create a way to render 3d object in UMG. Currently there is no simple way to achieve this. I will use Render Target but with some “hacks”
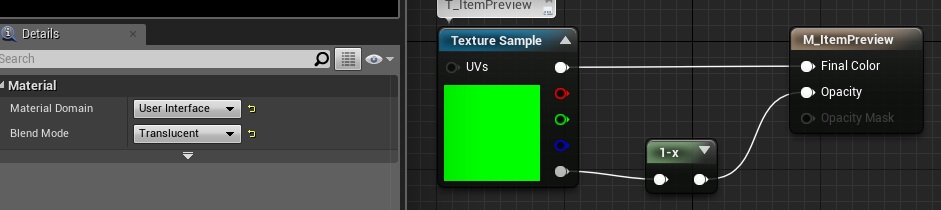
First create new Render Target Texture named: T_ItemPreview (resolution 1024×1024) and M_ItemPreview Material:
Now create new blueprint extending Actor named BP_ItemRecordingActor. Open it.
Components:
SceneCaptureComponent2D:
- Location :(X=-50.000000,Y=0.000000,Z=0.000000)
- Field of View: 60
- Texture Target: T_ItemPreview
Point Light:
- Location: (X=-80.000000,Y=-60.000000,Z=110.000000)
- Intensity: 1
- Attenuation Radius: 500
- Light Color: (B=255,G=220,R=238,A=255)
- Use Inverse Squared Falloff: False,
Scene Component named MeshRoot and Static Mesh Component named Mesh attached to MeshRoot.

Open Event Graph and add those variables:
| Var Name | Var Type | Default Value | Description |
| DesiredExtend | Vector | 18,18,18 | Desired size of the object on screen. |
| CurrentMeshExtend | Vector | Current size of the object on screen. I would like to scale it do desired size. | |
| bRotateEnabled | bool | Is object currently rotated in inventory? | |
| OnStartRotateLocation | Vector2D | It will store 2D coordinates of the mouse when started to rotate the item from inventory. |
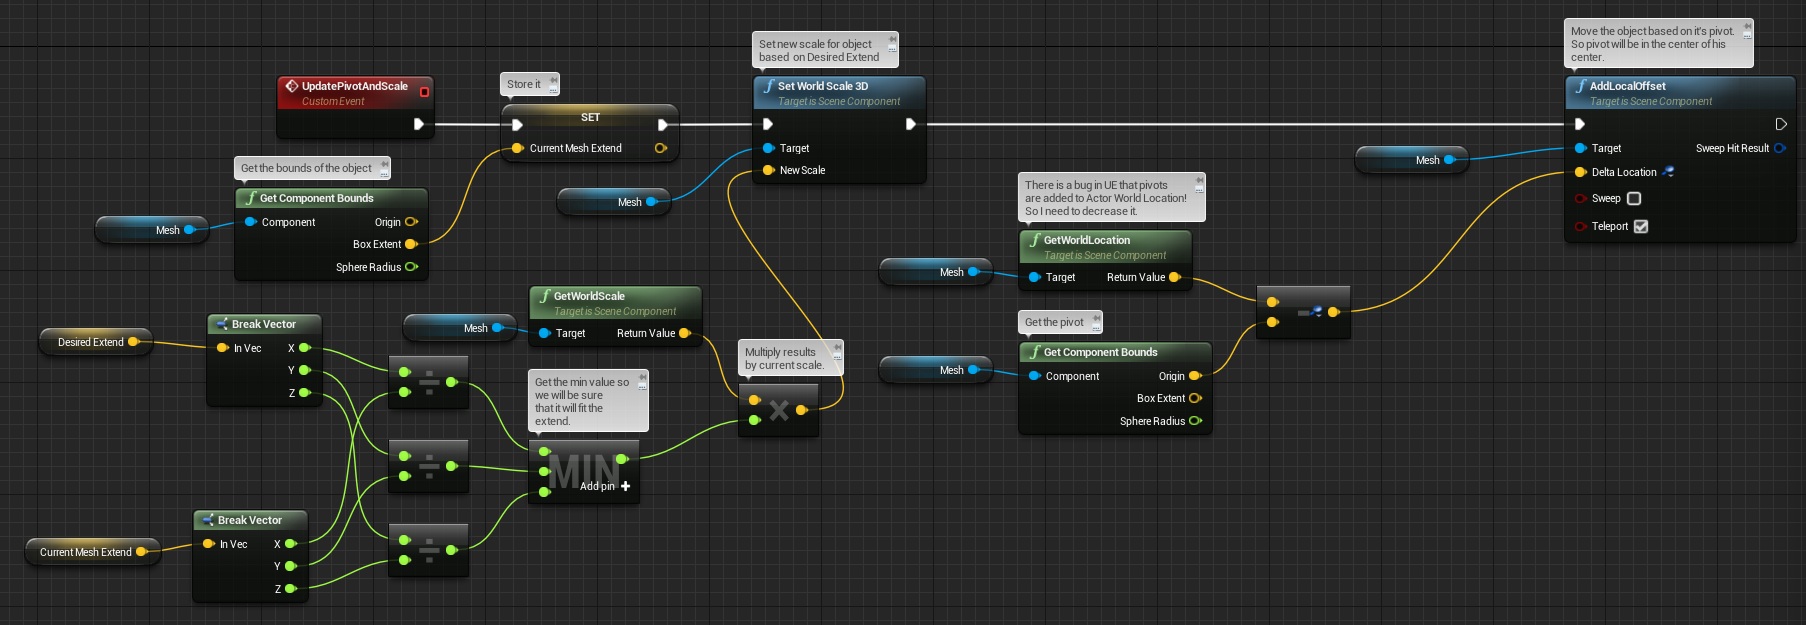
What I would like to accomplish here is to have a render target which will render my object to 2d texture. The problem is with assets different scale and pivots.
Basically if you will be in pro game development your graphics team will create specific 3d items for your inventory. With the same pivot and scale – to fit the screen (Screen = Texture in this example) as good as possible. I’m not a graphics artist and I’m using meshes from packs. They have different scale and different pivots. My goal here is to have a system that will scale the items and move the pivot so I can render any object without thinking of the scale or pivot. Unreal is able to do that.
This event will be responsible for that. Create new Custom Event named UpdatePivotAndScale:
Now add new Function named SetNewMesh with one Static Mesh input:
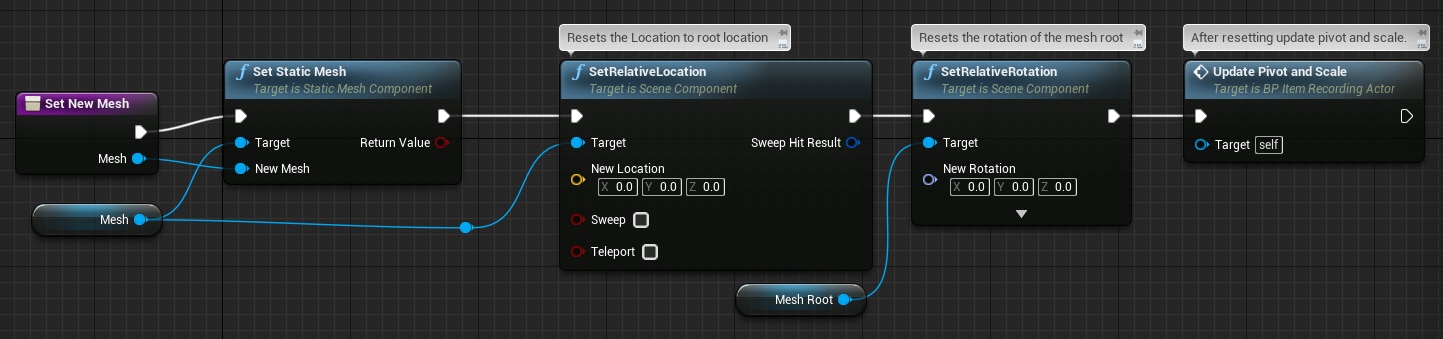
It will be used when selecting items in inventory.
Now add custom events responsible for rotating the actor. They will be called from UMG Inventory:
And that’s all here. Now we need to spawn the actor somewhere.
Open Inventory Component and add those variables:
| Var Name | Var Type | Default Value | Description |
| RecordingActorLocation | Vector | (X=0,Y=2000000,Z=0) | This will be spawn location for Recording Actor |
| RecordingActorRef | BP_ItemRecordingActor Reference | It will store reference to the recording actor. |
Now add Begin Play and spawn recording actor:
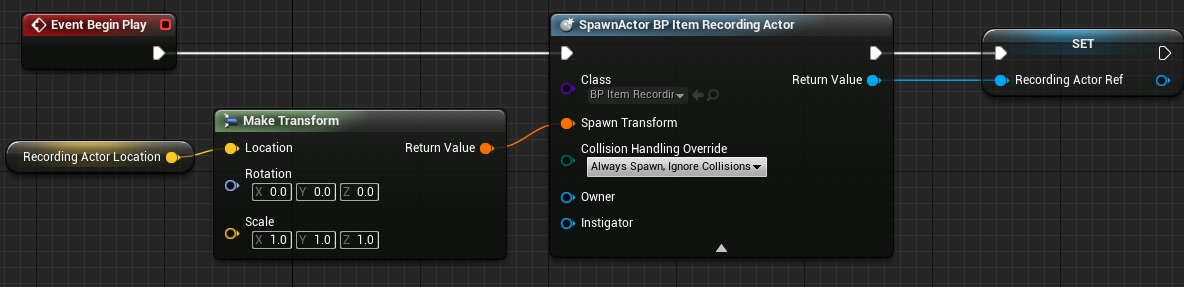
Why I’m spawning it that far away? It need to be outside the sky sphere so we will get alpha in Render Texture.
Adding Inventory UMG
At this point functionality is there. Now we would need to implement Inventory UMG to show the inventory. It won’t be so easy as Skyrim Inventory is advanced.
Base Inventory UMG
Create new Widget named UI_Inventory. Implement IInventoryInHUD Interface. For now leave it as it.
Category Button
Create new Widget named Widget_CategoryButton and go to Designer:
- Delete Canvas Panel,
- Add Button named Button_Category, (isVariable is True)
- Add Text named Text_Type and add it to Button_Category, (is Variable is True, is Focusable: False)
Go to Event Graph and add those variables:
| Var Name | Var Type | Default Value | Description |
| CategoryType | Item Category ENUM | All | Editable, Expose On Spawn. |
| InventoryRef | UI_Inventory Reference | Editable, Expose On Spawn, |
Add OnClicked event to Button_Category:

This will let know Inventory UI that category button was clicked.
Now in Construct let’s change Text_Type text depending of the type:
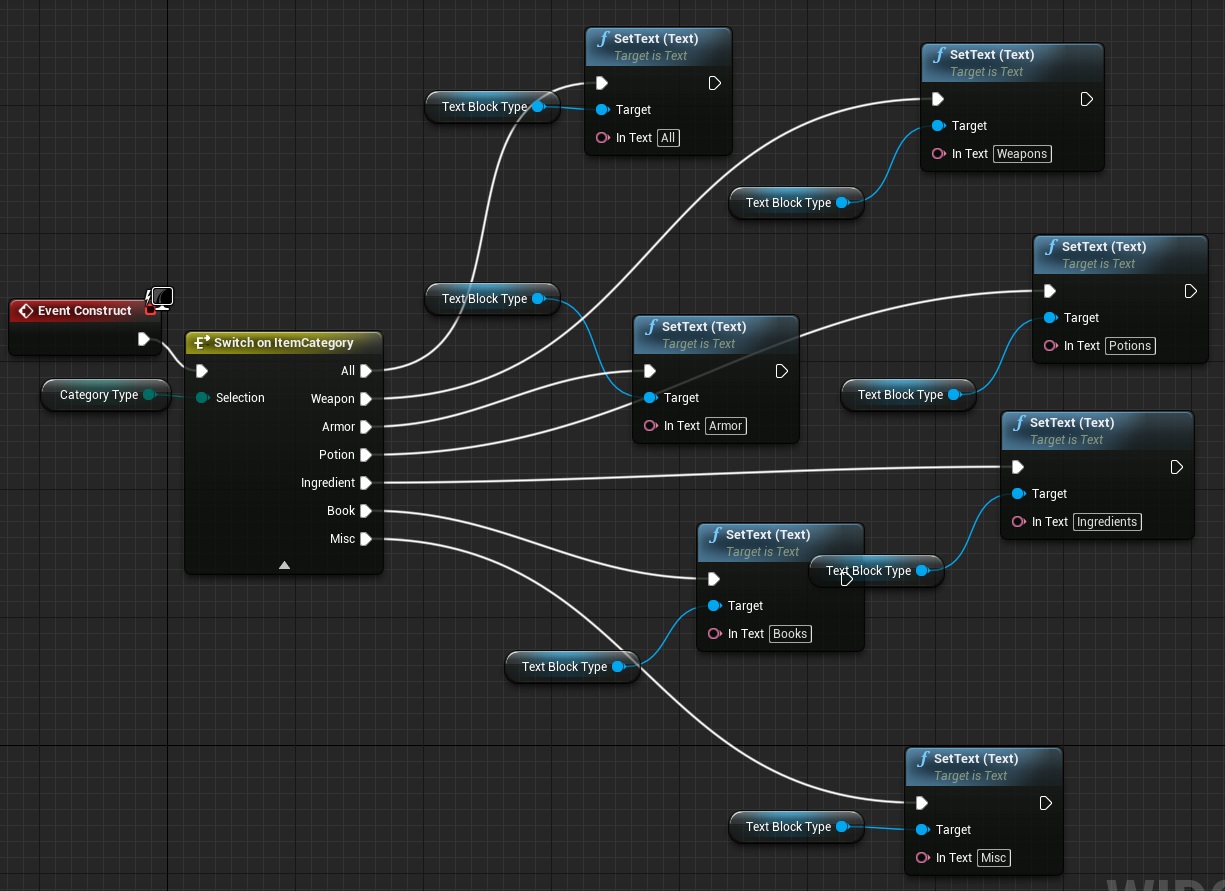
That’s all here.
Item in List
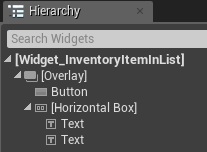
Create another Widget named Widget_InventoryItemInList. Open it and delete Canvas Panel from Designer. Add:
- Overlay on top,
- Button named Button_Item (Align: Fill – both)
- Horizontal Box,
- Text named TextBlock_ItemName added to Horizontal Box, (Fill – both) Is Variable = true,
- Text named TextBlock_ItemCount added to Horizontal Box, (Fill – both) Is Variable = true,
Open Event Graph and add those variables:
| Var Name | Var Type | Default Value | Description |
| ItemToShown | Inventory Item Struct | Editable, Expose On Spawn. | |
| InventoryRef | UI_Inventory Reference | Editable, Expose On Spawn, | |
| bIsHovered | bool |
Add Construct Event:
It will check how many of the same item do we have.
Now add Tick event which will be responsible for hovering the item in list:
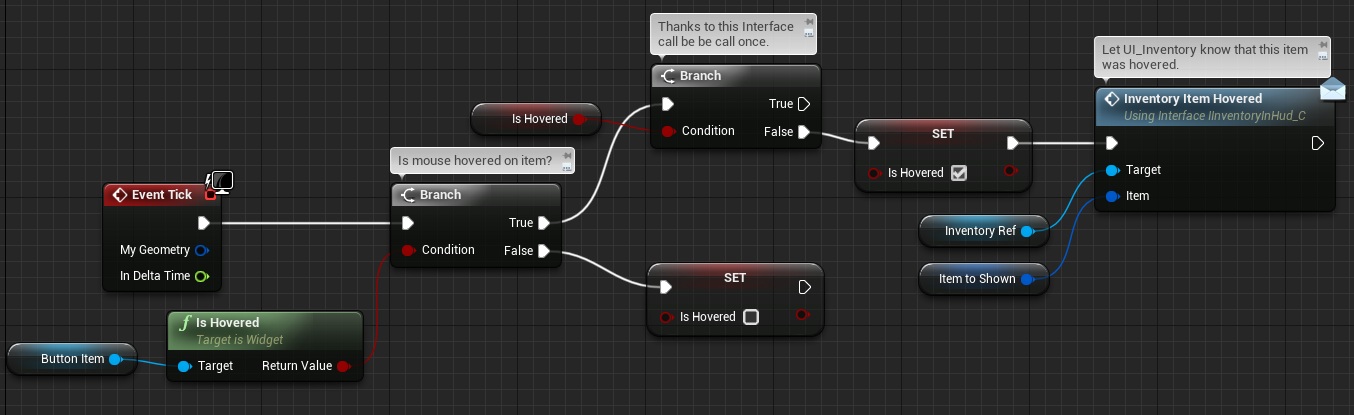
It would be simpler to have OnHover event in Buttons. I have requested this feature on the Unreal Engine 4 Forums. For now we need to use Tick to determine that.
Item Preview Widget
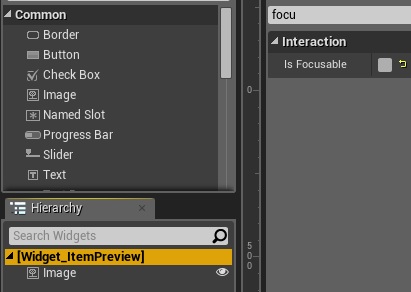
Create new Widget named Widget_ItemPreview. Delete Canvas Panel and add Image named Image_ImagePreview (Is Variable = True, Brush = M_ItemPreview material created earlier)
Make sure Is Focusable is set to False. Just click on Root of the Hierarchy. It’s needed as I will use TAB key to open and close inventory. TAB is used to control UMG widgets as well. Setting this to false will disable TAB to focus.
Add those variables:
| Var Name | Var Type | Default Value | Description |
| OnClickMousePos | Vector2d | It will store mouse position when clicked on Widget. | |
| ItemPreviewActorRef | BP_ItemRecordingActor Reference | Storing reference to Item Recording Actor. | |
| bIsHovered | bool | Store if Item is hovered currently. |
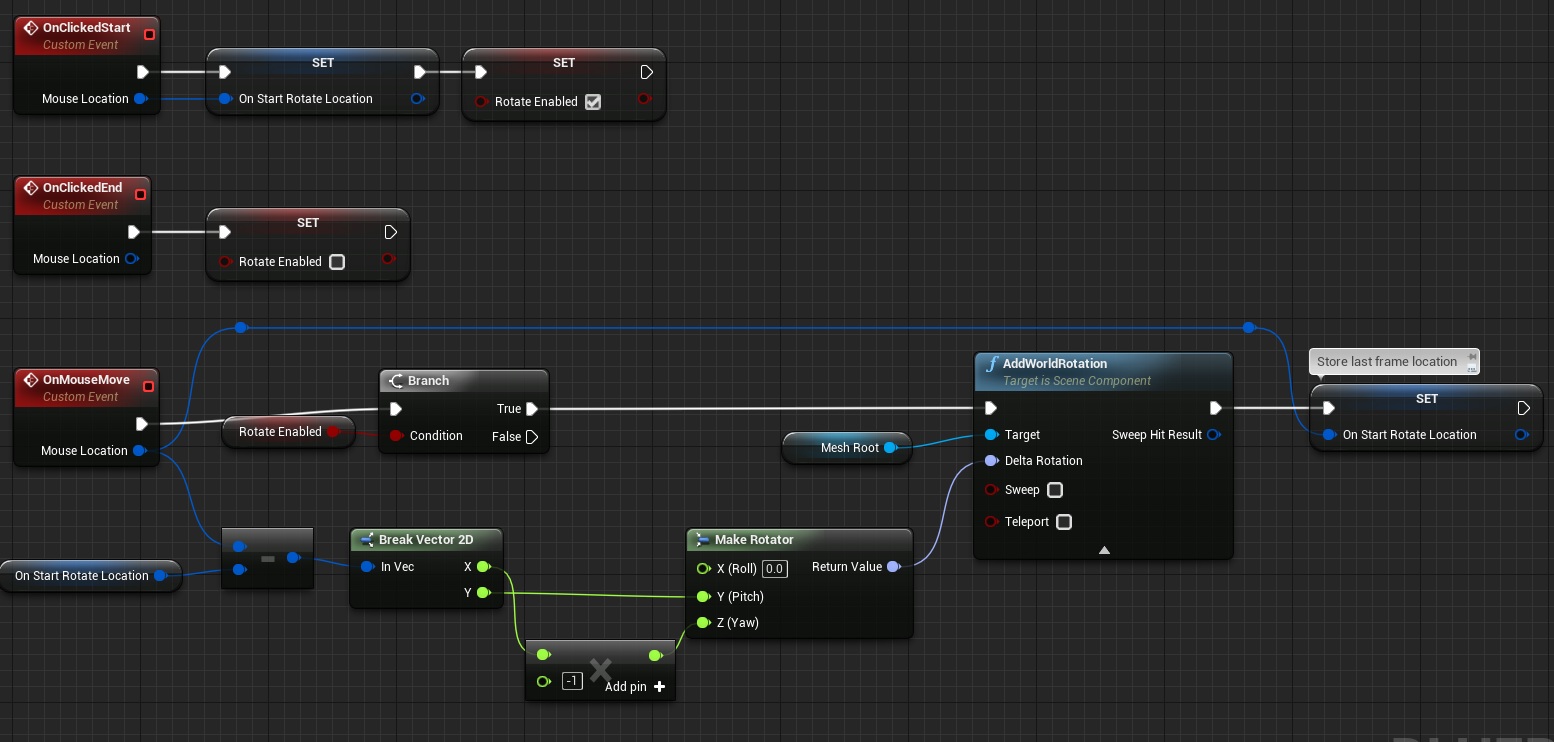
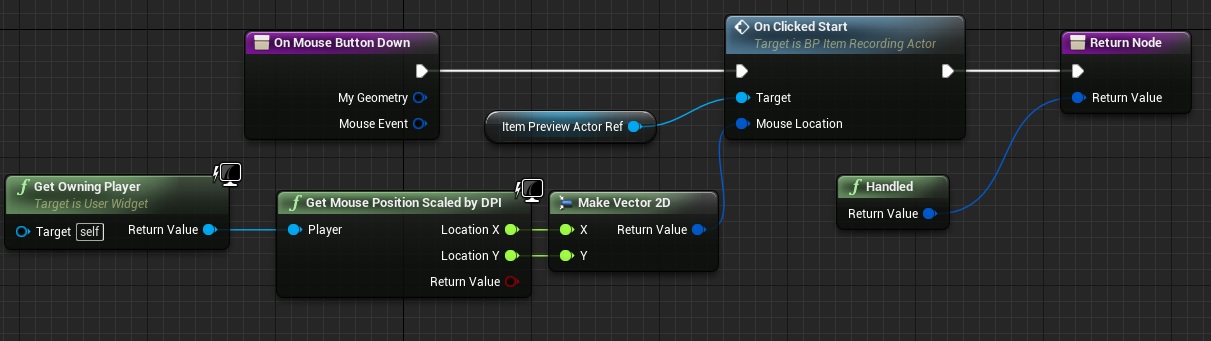
Now in event graph go to functions and click Overwrite On Mouse Move Function:
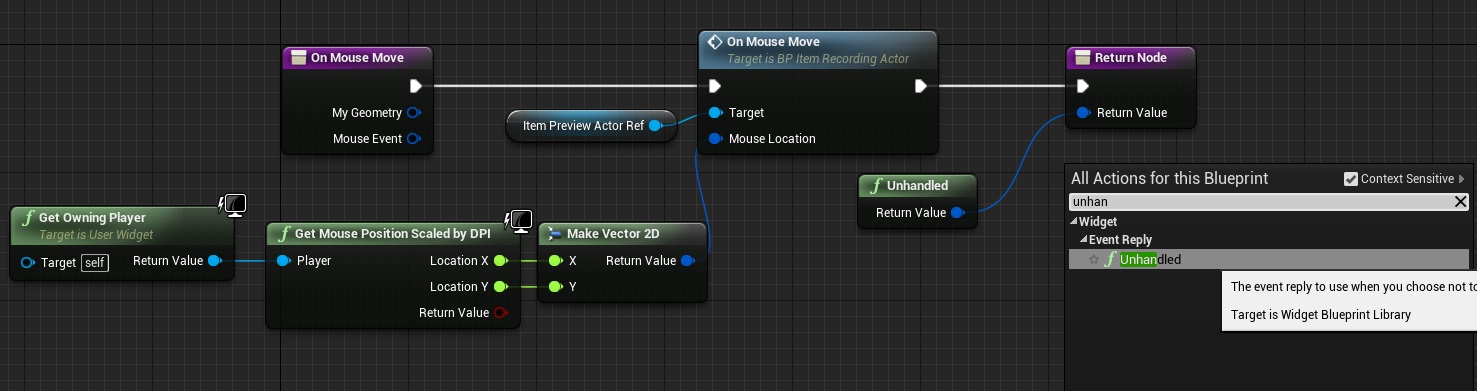
This is how I’m communicating with Recording Actor to rotate the Actor.
Overwrite On Mouse Button Down:
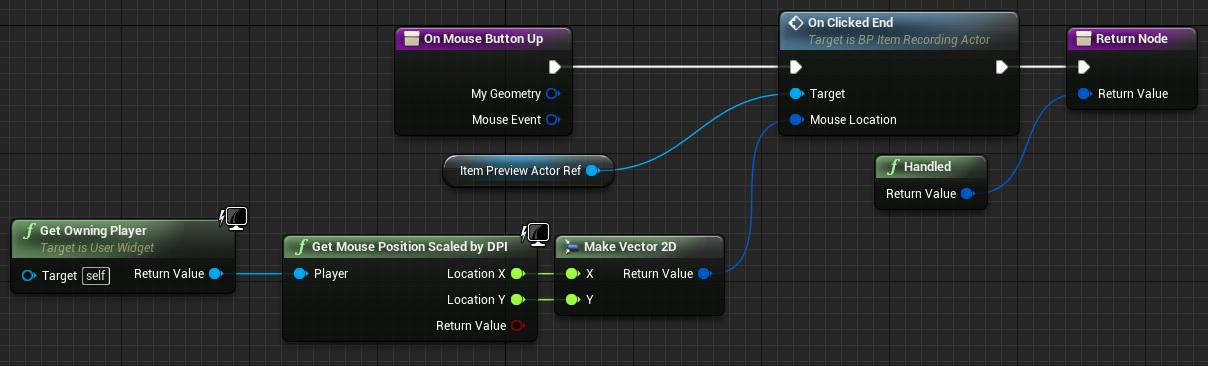
Overwrite On Mouse Button Up:
Now in Event Graph add On Mouse Leave event:
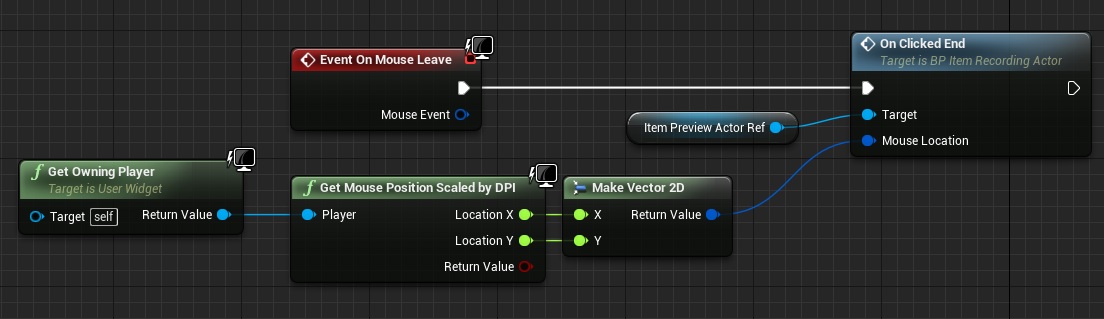
This will be called when our mouse will leave whole widget. That’s all here!
UI_Inventory Preparation
Now go back to UI_Inventory and try to recreate my hierarchy:
Go to Event Graph and add those variables:
| Var Name | Var Type | Default Value | Description |
| bHasItem_Weapon | bool | ||
| bHasItem_Armor | bool | ||
| bHasItem_Potion | bool | ||
| bHasItem_Ingredient | bool | ||
| bHasItem_Book | bool | ||
| bHasItem_Misc | bool | ||
| InventoryItems | Inventory Item Struct ARRAY | Storing all inventory items. | |
| ActualSelectedItem | Inventory Item Struct | Storing currently hovered item. | |
| CurrentOpenedCategory | Item Category ENUM | Storing currently opened category. | |
| ItemDropCount | int | Storing how much items did we drop when in inventory. | |
| Inventory Reference | Inventory Component Reference |
Open Event Graph and add Category Button Clicked from IInventoryInHUD interface event:
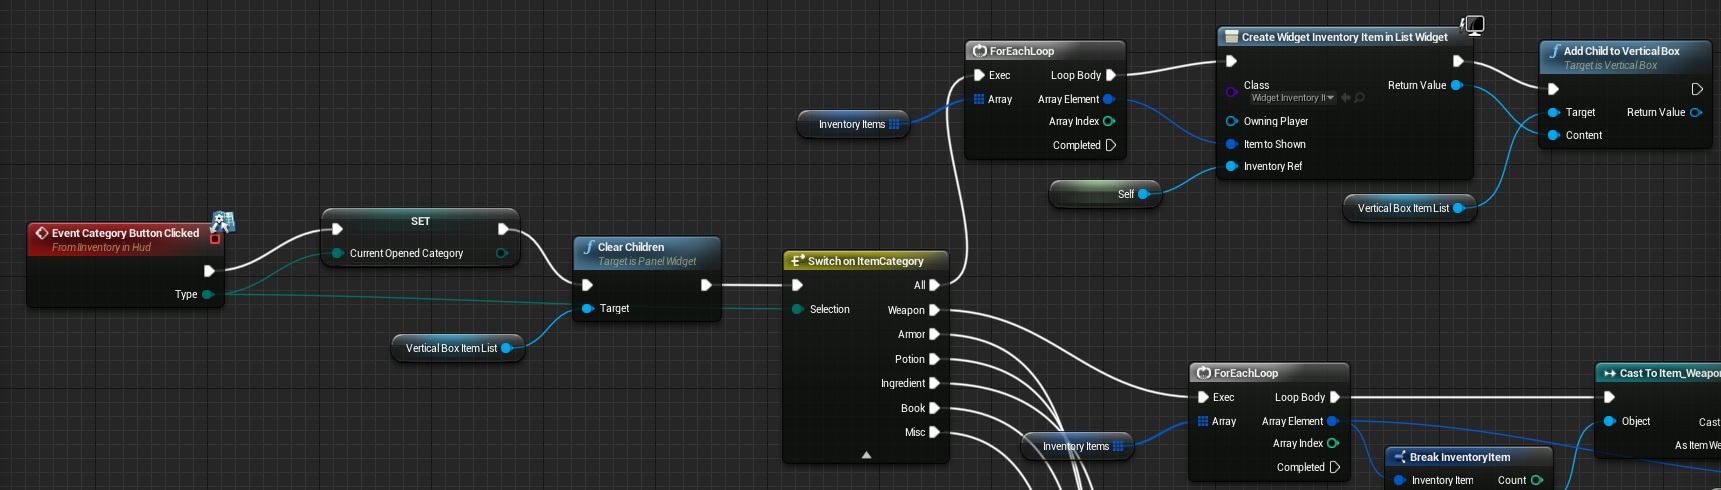
This will be responsible for showing items depending on which category we have clicked. The first one is All. Here’s next:
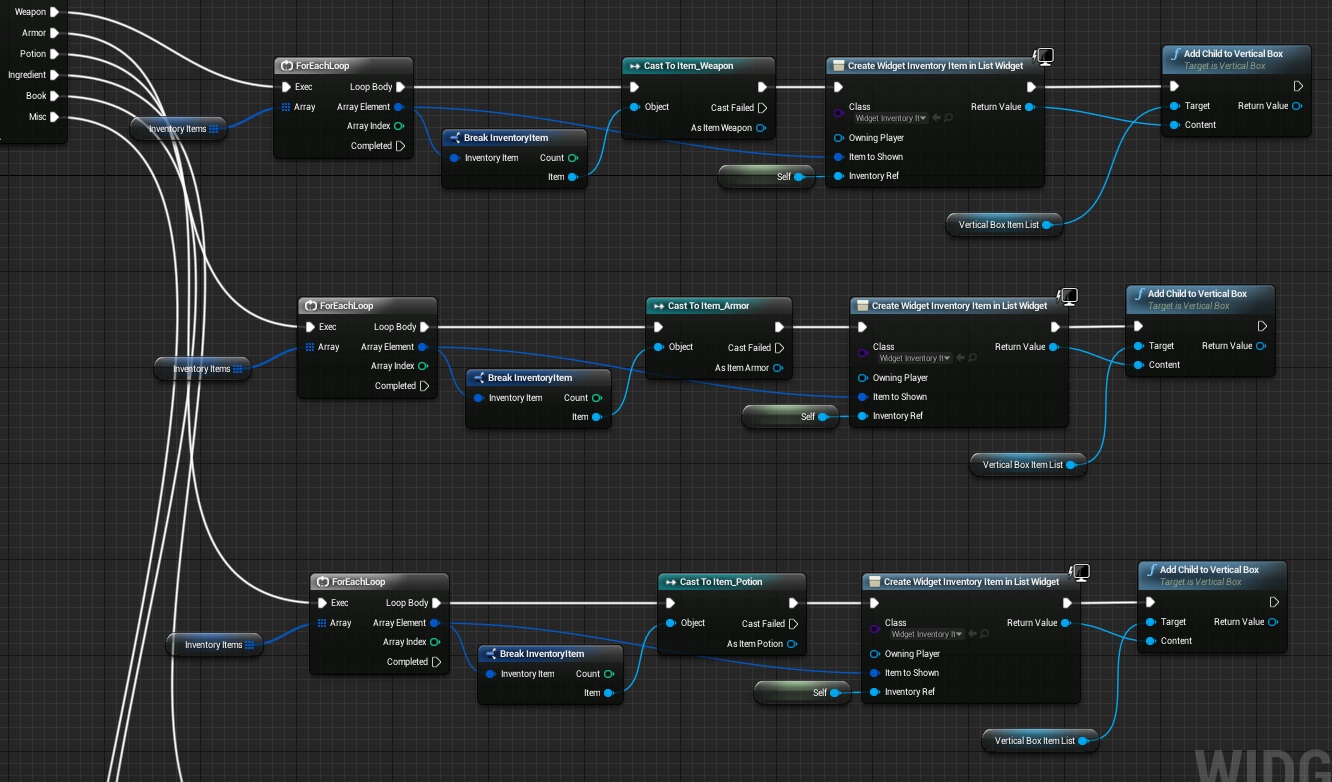
I won’t be showing rest as it’s only changing Cast To – Specific Type. Try to fill the rest switch.
Now add new Custom Event named AddCategoryButtons:
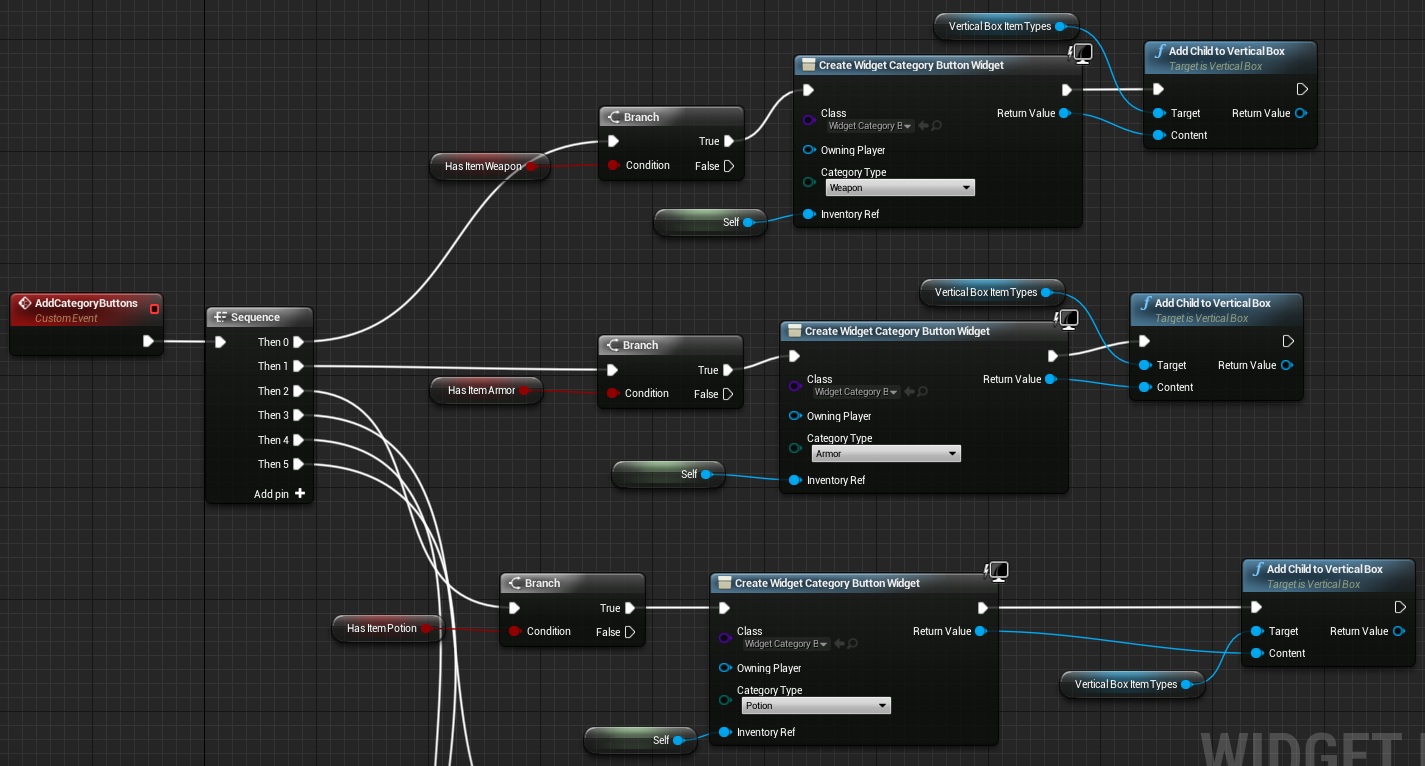
I won’t be showing rest as it’s only changing the bool type and category type. You should figure this out.
Add another Custom Event named Clear Data:
![]()
And another one named AddAllCategoryButton:

This will add “ALL” category button.
Add another one named UpdateCategoryItems:
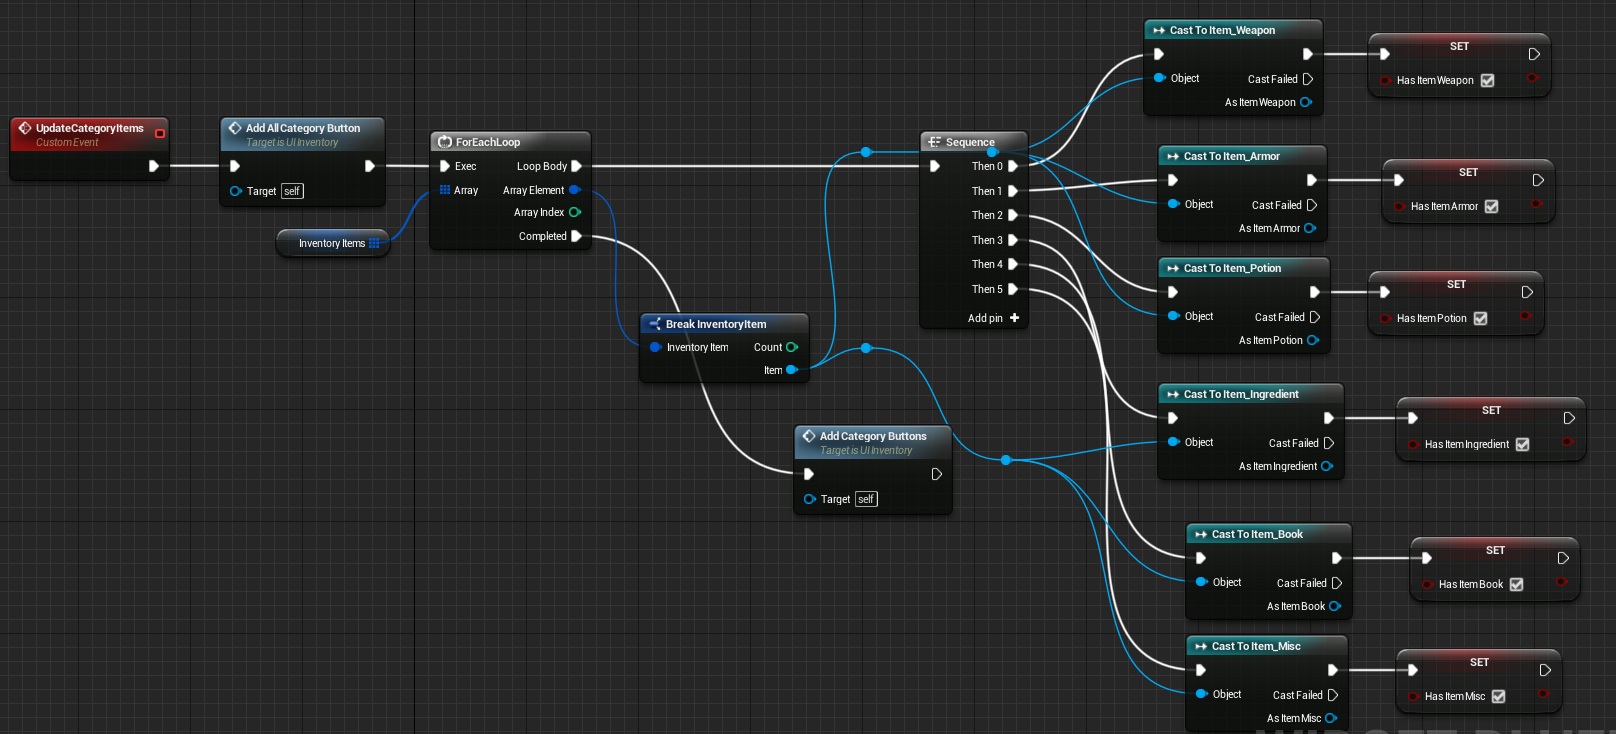
It will search for all items and select if we have Weapon, Armor etc.
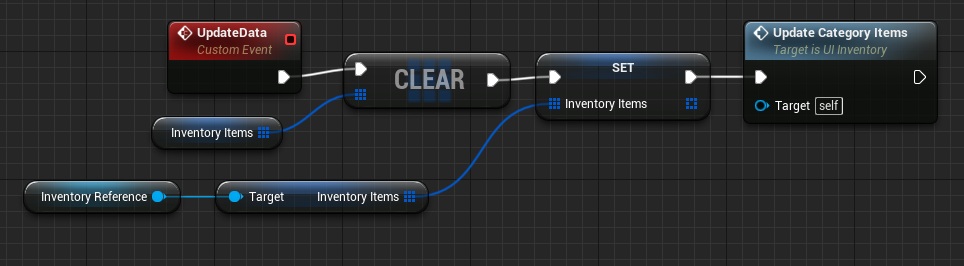
Add another one named UpdateData:
In Construct:

I have directly set variable in Widget_ItemPreview you should use Function for that!
Add another one Custom Event named TABInput:
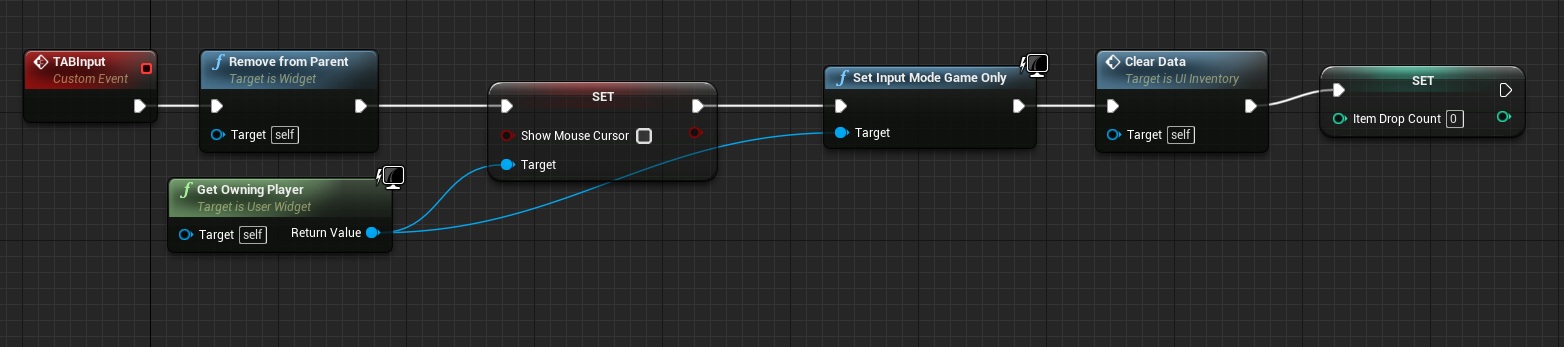
And another named DropInput:

Now add Event from IInventoryInHUD Interface named Inventory Item Hovered:
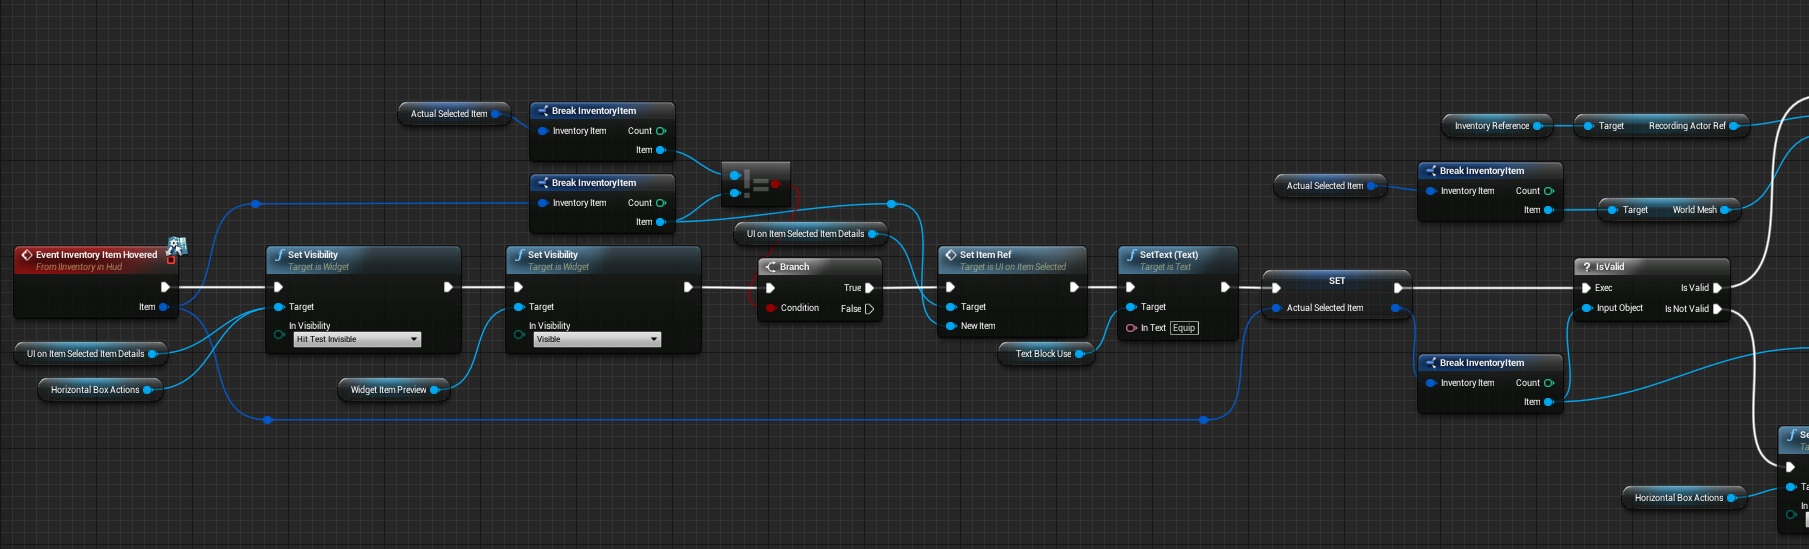

I have separated it for 2 parts.
Yes – managing UMG in Blueprints is really hard.You can spend days to improve your Blueprints visibility. I assure you that this can be done much more easier. Just understand how it works and try to create it by yourself!
Last thing here is to get “E” and “TAB” events. Currently UMG doesn’t support Inputs from Project Settings so you need to Overwrite On Key Down Function:
Add one local variable named LocalKeyEvent extending from Key.
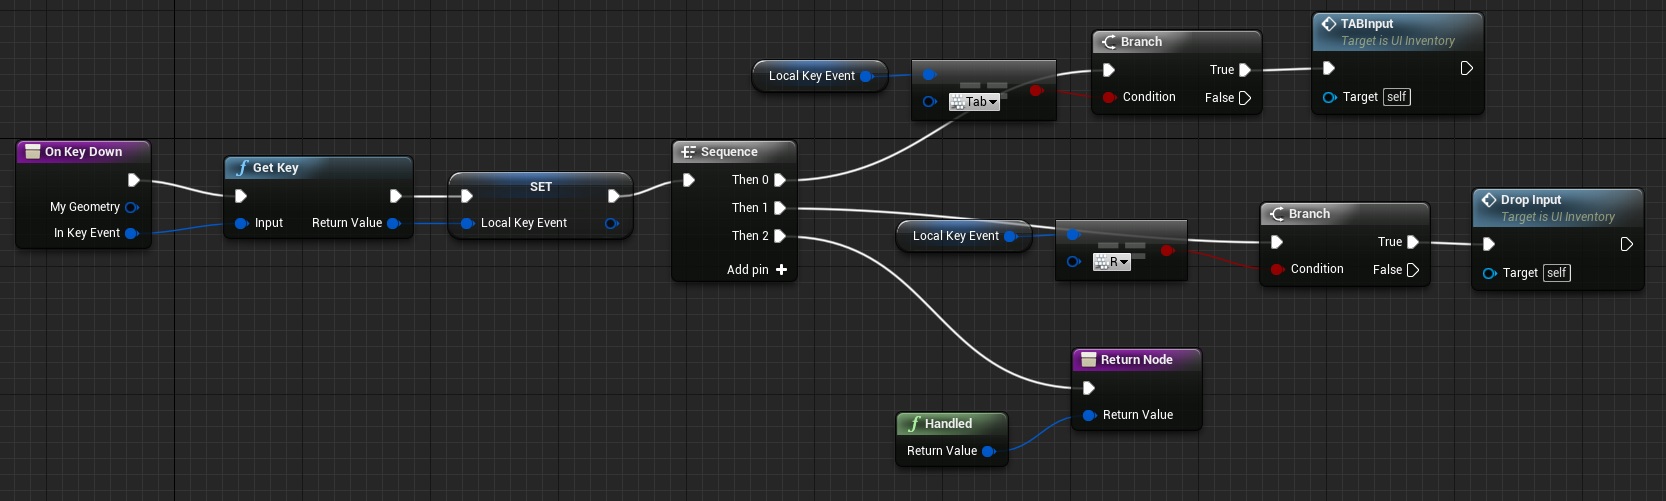
And that’s all here!
Triggering Inventory UMG
Now we need to somehow open inventory. Open FirstPersonCharacter Blueprint and add UI_Inventory variable extending from UI_Inventory Reference.
Add Input Action Inventory:
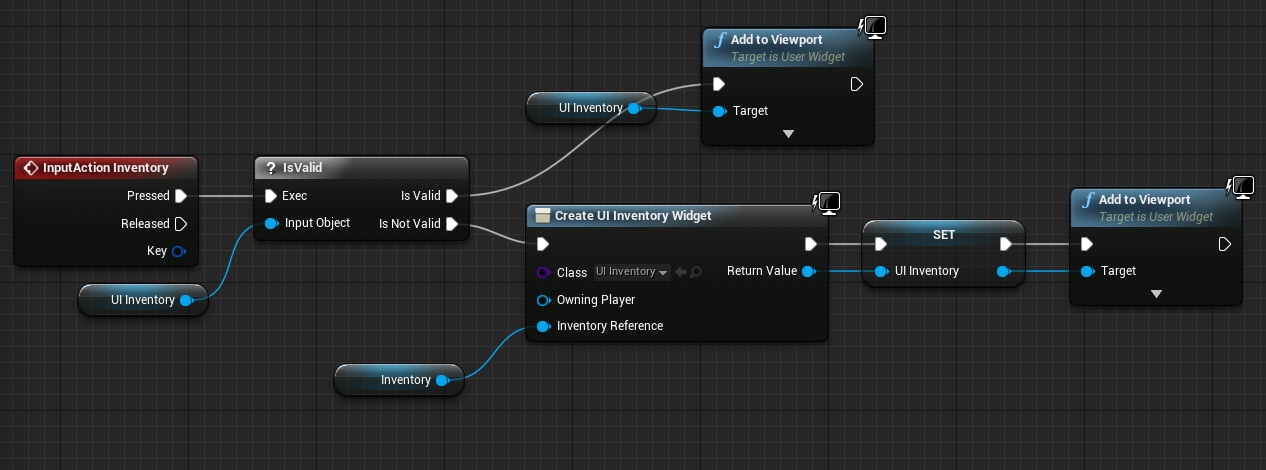
And that’s all. You have Skyrim like inventory completed!
Assets
I have used Bumping Pub for showcase. The pack isn’t modular but it’s great for showcasing things! Shield has been found here and weapon here.
You can found ready to use Inventory in Marketplace as well. I have done this for you for free and hope you will learn from it!
Final Result
Creating ShooterTutorial takes a lot of my free time.
If you want you can help me out! I will use your donation to buy better assets packs and you will be added to Credits /Backers page as well. Implementing game is taking time but writing about it is taking much more effort!
this tutorial is amazing! Thanks a a lot for sharing this with us dude
Love the tutorial, but can you make a video tutorial? I get messed a bit since my native language aint english
Please Video I would love to follow I am a visual learner
Pingback: Tutorial Spotlight: Full Skyrim-Style Inventory for UE4 | Storyteller VR
Can someone please help me in the right direction here, im stuck at this point.
I’ve spent hours on google to find a the right way. But everybody else have another way to make this referenge blueprint ;(
This one –> “make sure you have assigned WorldMesh to your Apple mesh.”
And the one below:
(“Then create new blueprint extending from ItemWorldActor named Item_Ingredient_Apple_WA. (WA here means World Actor)
This one –> “Open it and assign Item_Ingredient_Apple object to Item variable. Place the Actor in level and you should see Apple.”)
Best regards
“make sure you have assigned WorldMesh to your Apple mesh.” – WorldMesh is a Static Mesh Reference – you need to assing some mesh into it (Apple in this example 🙂 )
Then create new blueprint extending from ItemWorldActor named Item_Ingredient_Apple_WA. (WA here means World Actor)
— Just right click on ItemWorldActor and select “Create Blueprint Based on This Class” – this will create new blueprint for you based on ItemWorldActor. Just name it Item_Ingredient_Apple_WA.
Open it and assign Item_Ingredient_Apple object to Item variable. Place the Actor in level and you should see Apple.”)
– When you open Item_Ingredient_Apple_WA you need to assign Item variable – this means your apple item object reference.
I just figured out that i forgot to make the variables public!
But thanks alot for your help Andrezej 🙂
Keep up your awesome work!
Big thumbs up!
Thanks! We really appreciate your hard work! Your tutorials have helped me numerous times. Seeing someone else work on a project by them self really influences my friend and I when we are working on ours.
In the ItemWorldActor in the construction script how do you link the Set ItemReference (Object Reference) with the Set Static Mesh… at the New Mesh Pin (Static Mesh Reference)… how does the (Target — World Mesh) appear?
See image here. http://imgur.com/jRvgUXg
I think I got it but please explain just to be clear.
Also how do you add an Inventory Component to the First Person Character?
Great Tutorial – Wish you a happy New Year.
Never mind I got that too 😉
Awesome but very tricky tutorial. I made some adjustment that I hope you will find helpful.
First of all when you open the inventory while looking at an item you get the widget UI_OnItemSelected twice, as shown in the image below.
http://i.imgur.com/Lp2xBOe.png
What I did to overcome this is the following.
Go to your First Person Character blueprint and add the following variable.
Title – bIsInventoryOpen / Type Boolean
Go to the event InputActionInventory and update it to the picture below.
http://i.imgur.com/lHENjOU.png
Since the Player Controller always creates widgets, I felt there was no need to check if it was valid or not, plus it bugged out some other things I implemented. All in all it makes for some cleaner blueprint. Don’t forget to set the bIsInventoryOpen to TRUE at the end.
Then go to the EventTick and update it as shown in the images.
Part 01 – http://i.imgur.com/VCw9n6b.png
Part 02 – http://i.imgur.com/8GnSZGt.png
What we actually do is check if the inventory is open. As soon as it is open, we remove the widget UI_OnItemSelected that was spawned when we looked at an object and we bring it back as soon as we close the Inventory by resetting the doOnce node. But for all this to work we have to do one last thing.
Go to the UI_Inventory widget and update the Event InventoryKeyInput, by adding nodes as shown in the image.
http://i.imgur.com/2FWj45L.png
What we do here is basically setting the bIsInventoryOpen (from the FirstPersonCharacter) as FALSE, we state that whatever you trace is a new selection NewSelection TRUE (from the FirstPersonCharacter) in effect resetting the loop of the event GetItemOverCrosshair and finally we call the event GetItemOverCrosshair.
Hope this helps 😉
Please! Tell me how you’ve figured the Inventory Component out! Please!
Hello, can anybody help me out? When I add my “inventory Component” to the first person character it only comes up as child actor and wont link to Inventory reference in “OnTaken” in the Inventory Interface.
You created the inventory actor blueprint. There’s a blueprint called” Actor Component”.
How did you end up doing this. I can’t figure it out.
How did you do this?
Thanks a lot for the tutorial!
I am having some difficulties with picking up objects however and I have no idea what is going on, but I think it has to do with the PhysicsHandle. Whenever I pick up an object, it shoots away and is located much further away than it actually should and doesn’t really stay in the center as I would like it to. Do you happen to know why this is happening?
Thanks again for the tutorial and keep up the good work!
Try to check your mesh collision – maybe it’s to big or to complicated. In the first part of the tutorial I have linked great PhysicsHandle tutorial which can be used if you have issues!
The Event InventoryKeyInput is the TabInput function. I renamed it since not everyone uses Tab to open the inventory..
Hi there, great tutorial!
I am having some trouble with the Inventory component reference. I have added one to the character blueprint using the add new blueprint script component (I am not sure if this is correct?). I then set the input of the IInterface ‘ontake’ to the same component (again unsure if this is correct). However, there is then a problem with the ontake event function described for the worldactor as the ‘add to inventory’ function is a separate blueprint (not the component).
My main question is should my Inventory blueprint and the Inventory component be the same thing? And if so how is this done? I have tried adding the inventory blueprint as a component to the character but this does not seem to work properly. I hope this makes sense and that you can help!
You need to add Inventory Component to Character. (In components view just add earlier created Inventory Component)
Add To inventory is function IN Inventory Component. Inventory Manager is Inventory component.
Just what I needed to know! Thanks man and keep up the good work.
I have another question! In the UI_Inventory event ‘UpdateData’ how do you connect the inventory reference to the set inventory with what looks like a get (but with a target)? When I try and connect the Inventory Reference (Component) and the InventoryItems (Inventory Item Struct Array) the two are not compatible, so it doesn’t work… Any ideas?
Pingback: [UE4] Skyrim Like Inventory Tutorial - :::::..... Gaming Resources .....:::::
Me again! I completed your tutorial and it works brilliantly (almost). Currently when I am opening my inventory the buttons come up correctly, including the category names etc. as do the names of the items. The widget preview also gets displayed, however, for some reason 1) the preview does not always show the object, 2) when the object is shown it experiences a weird distortion and 3) it shows the skylight as well as the object. After doing some debugging I’m still unsure as to why this is happening. The hover buttons are definitely working but there seem to be some cases where the cast (in order to write the correct text for the use/drop/etc.) doesn’t work. I discovered this by setting the final cast’s fail node to a “Cast Failed” and this appears several times.
I also thought that perhaps the reason the widget is not showing the item is due to it falling as soon as it has spawned but I don’t think that this is the case (I tried setting simulate physics to off) but I may have missed something. Hopefully you may be able to answer me.
Thanks again.
1. You need to check your scale of objects and pivots – my calculations for scaling / changing pivot are placeholder. Normally you would need to have your items in the same scale and with the same pivot. (as in Skyrim)
2. Can you show a screen? As far I know RenderTarget texture isn’t adding postprocess,
3. I can’t remember now correctly but I remember putting the camera so it will point outside skysphere,
4. Make sure when spawning you have checked “Spawn Always” (or something like that) in your spawn actor options.
I have recreated this from tutorial using clear project and it’s working. Debugging is really important part in game creation – place print strings and invest time to figure this out. I know that this isn’t any help from me but I can assure you you will learn much more without my help.
So I managed to get mostly everything working, thought I would post my answers in case anyone makes silly mistakes (like I have). Firstly the object was not showing because I hadn’t unticked ‘Enable Gravity’. This meant the object was falling as soon as I spawned it. Secondly I changed the pivots, scales and field of view of the scenecapture component. I suggest to anybody having problems that you spawn the inventory actor within your level (so you can actually see it as a player) and then mess around with things (at least that’s what worked for me)
However, I’m still having a problem with using the alpha of my render target texture. The actual texture has no alpha channel (well its a block white/black) and after doing some research it seems that the SceneCapture2D component doesn’t create an alpha channel? How have you done this?
Create new level and put your RenderTarget to empty level – you will have alpha then :> Just test it out. When you have skybox you need to place your render target outside the skybox to get the alpha.
Hay thank you so much however I am stuck at the grab item 02 picture as it is too low resolution to copy.
http://i2.wp.com/shootertutorial.com/wp-content/uploads/2015/12/grabitem_02.jpg
Thank you so much! I love your tutorials so much
Now go to your event graph and add event from IInventory: Event Drop Item.
I apologize in advance, I am still new to Blueprints. I am stuck on this part. I double checked, and I did everything up to this point correctly, but I assume that you are adding that event, to the event graph in the Inventory Blueprint? Problem is, I have searched high and low and I have no idea how to add an event from one blueprint to another.
Just figured it out. Had to add IInventory to the Implemented Interfaces, in the Inventory Class Settings.
Search for UE4 Blueprint Interface at google. You need to add interface to your blueprint first.
Thanks man! I’m adding this to my school assignment, but even doing this is a great learning experience.
The next part though, Cast to Item_Weapon. Adding an interface didn’t help, and I didn’t see anything up to this point, that’d have me create item_weapon. The closest thing that pops up is just cast to Item and cast to Item class. Sorry for being such a noob >.<
So, I am at the World Item Actor Update part of this tutorial. I set Non Hover Material, but when I try to plug in Get Material (Target is Primitive Component, it wont let me. It says, Material Interface Reference not compatible with Material Reference. Any ideas guys?
Yea Same here
And same here too xD
Im stuck here T.T
Because your material is Material Instance and not Material. https://docs.unrealengine.com/latest/INT/Engine/Rendering/Materials/MaterialInstances/index.html
Hi, Thank you for response and the hard work.
I think my material is “Material”, look http://s13.postimg.org/sj6lw4jo7/screenshot.jpg
http://prntscr.com/ahtho4 I’m having same issue without being able to plug ” get material ” into set Non hover material. Also on UI_onitemsselected ” Set item ref, I get a similar issue. Thanks for tutorial, any help on these issues would be grateful http://prntscr.com/ahti5v
Your second problem, is the same, variable type error.
check your variable type, like here:
http://s17.postimg.org/6pe7bb69b/variableerror.jpg
http://prntscr.com/ahtlpz I dunno if ” get base material ” is a solution to my first issue, but maybe… lol
Also when I go to Add component and try to add inventory, my inventory does not show up in list…
I fix the issue.
The problem is the Variable, In the past I put “Material > Reference” in NonHoverMaterial Variable, and HoverMaterial Variable… and this is not correct.
Need to be: “Material Interface > Reference” en both variables. This fix the problem.
Look here: http://s12.postimg.org/4s9ast0fh/Material_Reference.png
In the Inventory Blueprint, the SpawnActor Item World Actor doesn’t have an item pin. Where can i find it? Thanks.
Hi…I finished the tutorial but,
-my widget Item preview accessed none.
-UI Item Selected details accessed none.
these are majority of the errors I am getting
Great tutorial… No matter what distance I use for the screen capture, or if I create the screen capture in another level, there is not a legitimate alpha on the Screen Capture, and the 1-x into the opacity of the material for the 3d screen does not work. It makes the entire image invisible. Any suggestions or is this a 4.10 engine change issue?
I finished this awesome tutorial, but when I press “Tab” for show the inventory, appear two errors:
1- “Infinite Loop detected in UI_Inventory, asserted during ForEachLoop with the following Call Stack”
2- “Accesed None ‘ItemRef’ from node SetText (Text) in graph ‘EventGraph’ in blueprint UI_OnItemSeleted.
Sometimes Unreal Engine crash too and need restart. I dont understand because I have the blueprints exactly as it appears in the images.
the first error, if I break the link “UpdateData Custom event” with “Clear” (in UI_Inventory Blueprint), the error disappears, but the inventory is not displayed, and maintains the second error.
Some idea? =(
Ok, I solved the first problem, was the Update data.. my fault… but I continue seeing the errors in Text
I’m having the same issue, would it not likely be that the item ref doesn’t have a value? It’s just pulling it out off the variable charts and not giving it a “Reference”?
OK. I thought id leave this here incase anyone else is trying to resolve this issue with “ItemRef” not containing anything and not do what I did which was spending 3/4 of a day ensuring I did everything correctly.
My error occured in the Widget_InventoryItemInList so may help, turns out in “UI_Inventory” on event CategoryButtonClicked I did not plug in ArrayElement from “ForEachLoop” to the ItemToBeShown from “CreateWidget”.
Hope this helps and I urge others to read through the tutorial carefully and slowly as the creator has mentioned.
Much Love!
I have The same problem!!
2- “Accesed None ‘ItemRef’ from node SetText (Text) in graph ‘EventGraph’ in blueprint UI_OnItemSeleted.
And I have plugged in ArrayElement from “ForEachLoop” to the ItemToBeShown from “CreateWidget”. But the problem is stil there..
I have the exact same problem and i have plugged the arrayElement.
Did you solve it?
I ran in to a problem at the very end of the tutorial. At the very end, where you do “Input Action Inventory”, when you create a widget, you have an extra node called inventory reference, somehow I don’t. https://i.gyazo.com/4e34f1211fe745d35e5484362c540a48.png
What am I missing? Can’t seem to figure it out..
Never mind. Had to tick “Expose on Spawn” for the Inventory reference variable, in UI_Inventory.
Thank you so much for sharing. I´ll prove it and then I´ll let the result here 🙂 Really, thanks a lot
I am stuck on the Overwrite On Mouse Move. When i drag off the on mouse move node I don’t have the 2nd On Mouse Move node, or an On Clicked End node
Hi I am also seeing the error for the text …….“Accessed None ‘ItemRef’ from node SetText (Text) in graph ‘EventGraph’ in blueprint UI_OnItemSeleted.
I am also getting the exact same issues, I am currently trying to see what I did wrong but it might take a while :/
Hey, did you ever get this resolved? currently scratching my head on this one :/
I have an issue where I cannot set item reference in my apple world actor…. Here are some screenshots:
http://i.imgur.com/dntrtPa.png
I’d also like to point out that no matter what I type in the filter, nothing shows up
Having an issue with getting the static mesh to be assigned to the world actor, doesn’t seam to be doing anything. Yes they are exposed on spawn and editable. Construction script is correct. Only difference I have with your code is putting BP in the name. Suggestions
Hi all, Kashif here… ANDRZE.. ANDRZE… ANDRZE… let me say this to you i followed both your long tutorials of Shooter Inventory and Skyrim inventory to the end.. i have to say is that your working too too hard NOT SMART. by that i mean in your tutorials you not adding TROUBLESHOOTING EVENTS along the way to make sure things actually work..They actually might work for you in the end but it does not work for people in the end.. why because along the way your not troubleshooting to see if things actually work the way they should as you said, so my advice to you is in your next tutorial please please please for the love of God add some troubleshooting events to see of things are working right. your working too too hard not smart. you want to work hard and smart at the same time., i am available at kkamal25@gmail.com to discuss this comment with you further.
How to save this kind of inventory? I mean how to store and load references after re-opening the game?
How do you get the Widget Item preview? its not on my User created
Everytime i press Tab it shows inventory but when i press it again it wont work i get stuck in Inventory
Finished the whole thing in 6 hours xD have a bit experience with blueprint but this took it to aonther level. And idk why it still stuck in Inventory when i TAB i click TAB again and it wont even fire off input action.
you found any solution? got the same problem here. I just can’t keep playing after opening the inventory
Is there any chance that you could post the project files for the project? I followed through the entire tutorial, then there were some problems. I was debugging to try to fix them and now when i press play the editor crashes Even after undoing the changes that I made.
Thank you immensely for the tutorial, it is amazing. I would be greatly appreciative if you could post the files 🙂
Guys, i am in trouble on “If Item is Object how to add it to level?” on the script part, the error says “Error: Wrong class to spawn ‘/Game/FirstPersonBP/InventorySystem/Blueprint/Actors/MasterItems/BP_Item.BP_Item_C’ in Construct Object from Class” what do i do?
I am using UE4.12.5
My problem is pretty self explainitory once you see the picture: http://puu.sh/qdAWD/7b09b53d1b.png I have no idea how to get these two to connect, nor why they aren’t working in the first place. Can I get some help?
Please disreguard my comment, the structure I was using was from another tutorial I was following. It was making an inventory structure, but I wasn’t at all happy with the result.
I can’t get the command “GetHud” to work with the script. I thought at first that it was because I was using a thirdperson blueprint, but even after I switched to a firstperson blueprint with the first person HUD, I still get this Error: https://puu.sh/qdIG5/9c9730a312.jpg Can I get any help with this? And is there anyway to make this work with a Third Person Blueprint?
I have the exact same issue ! Did you find a workaround ?
Thank you so much for this tutorial!!! Works totally fine for me!
I just have one silly question : why should we use Objects instead of Actors? Is it “Object Oriented Design” instead of “Actor Oriented Design”?
I don’t have much coding background so please forgive me for this dummy question..
Thank you in advance!
So to answer your question, object oriented design in terms of coding is not exactly what many may think.
It doesn’t actually refer to an actual object, but rather a section of self-contained code.
Many of the most popular and widely used coding languages are object oriented. Like Java, Python, C#, C++ and many others.
My professor told me a good way to think about it is like if you’re repairing a car.
There are many individual pieces that connect and interact in different ways to form a cohesive and functional unit.
Some pieces serve numerous uses, or bridge several other parts, some can be used in different areas of the vehicle, and some only do one specific task.
UE4 is also object-oriented, hence why blueprint nodes are a thing. this style of programming is what allows devs to reuse the same functions or references many times over.
To answer the other part of your question. An object is simply a coded reference linking it to an actor. And Actors contain the actual 3d assets.
Hopefully this clears it up a little
I’m having this problem where no matter what my crosshair doesn’t interact with the world model. I’ve followed this tutorial through three times and I’m completely at a loss for what to do. There are no error messages, nothing to debug or anything. I place the world model and my cursor never picks it up. Any idea’s for where I might look for errors?
I am having the same exact issue, The item cant be interacted with at all. Went through the tutorial multiple times and still no interaction for picking up items, also noted that if the inventory is empty and you click “all” the game errors out on the hud, No check for a empty inventory is cUsing the problem there.
Would really like to know why the interaction hud isnt coming up on mouseover though, even increased the mouse over max distqnce to 600 and no avail. Object has collision, I turn on physics and it will fall and move around the world. Any help on this would be appreciated, but it looks like this tutorial has been long forgotten. Using ue4 10.4.0
I noticed that i’m not the only one having this particular problem. Everything works fine but i cannot manage to close the inventory after i press tab. The game get stuck and i must restart!
I know this is very old but I would like to get this working for learning material for college. I’m getting error of accessed none on UI_OnitemSelected, also none of my world items are showing up anymore They were when I started the tutorial, but now they only show as the collision sphere. my email is Kohr_Ryan2876@yahoo.com if anyone could help.
Hello, so for now I am stuck when trying to connect the “Get HUD” node to “On Item Selected”-“Target”. It tells me it can only be a “self reference”. What did I miss ?
Please help, thanks ! 🙂
Anyone can help me?
Anyone can help me?
I made the tutorial, but when i finished it and i press TAB, my game frozen, i can’t press another button and i can’t click on my categorys buttons
At the moment I followed the tutorial up to the point where the 3d item view will be added. I am on a Third Person project. For me the GetItemOverCrosshair function does not work. I used the ‘follow camera’ of my character instead of the mentioned one because it’s a third person game. But the result of the LineTraceByChannel is always false even if I’m ‘starring’ at an object that is an ItemWorldActor. Any help please?
Guys, i resolve almost all of my problems with this tutorial, but i still have one:
The image in 3D of the hovered item does not appears, any ideias how i can resolve that?
Pingback: [UE4] Skyrim Like Inventory Tutorial | :::::..... Gaming Resources .....:::::
I can’t get the items to actually add to the inventory. The code stops at the “isValid” block before onTaken. Even bypassing the isValid still doesn’t destroy the actor and add it. onTaken doesn’t start at all with simulation on. What could make the lastselectedactor not valid??
How do you equip weapons and armor to your character? Can anyone help me figure this out?
How do you equip weapons and armor and make them fire?
Well follow the tutorial. But I got an error: the category buttons appear however I can not click on any category, I checked the Event OnClicked but it seems that the button is not really pre-loaded when I charge it as if it was disabled. How do I resolve this error? Follow the prints
http://prntscr.com/dzjyoc
http://prntscr.com/dzjyty
http://prntscr.com/dzk3tf
http://prntscr.com/dzk7a1
Hi. Can you tell me, why you using this: https://i2.wp.com/shootertutorial.com/wp-content/uploads/2015/12/CategoryButtonConstruct.jpg instead of this: http://i.imgur.com/xnW6ViZ.png
I can confirm, as is it can work in UE 4.15.1 I have everything working with item preview on transparent background and rotating, drop etc.
This tutorial is correct, however as tutorial should be better explained with more screens.
You have to check every stage many times for errors and some moves are confusing. For me, key problem was add inventory component to your character, because firstly I add actor inventory, not actor component invenotry – this is big difference of course.
Anyway – it working nice – good work Andrzej! 😀
i cant get it to work using same version as you
At location where you have written “Create new Custom Event named GrabItem:” below that , the second image should be directed to “https://i2.wp.com/shootertutorial.com/wp-content/uploads/2015/12/grabitem_02.jpg” currently its set to 01 image 😛
I cant get the inventory to close and its not showing the 3d perview.
Good tutorial. I have one problem, i’m using 4.18, I can’t add items to my inventory. I can pick items up, but can’t add them to my inventory, my actor doesn’t get destroyed. Anyone who can help?
Does anyone happen to have a working project they could share? I’ve run into quite a few issues and would love to debug..
The get hud into On item selected pin combo is a blue into yellow. Does not connect. It looks like OP stopped supporting this tutorial though, so commenting/requesting help may be pointless. But… If someone DOES come and see this… Send Halp!
Hello!
I know this is old, but i found the solution of two recurrent problems in the comments section. I hope it helps.
– “Accessed None ‘ItemRef’ from node SetText (Text) in graph ‘EventGraph’ in blueprint UI_OnItemSeleted.
In the ” UI_Inventory” go to “UI_OnItemSelected” Component. look for the default category and check the box “DisplayedInventory?”. That variable must be TRUE! It worked for me.
– The TAB input doesn’t close the Inventory and get stuck.
Go to the widgets “Widget CategoryButton” and “InventoryItemIn List” and set the buttons “Is Focusable” to false. Not the widget, the button itself. Also worked for me.
This system works in 4.20!
Bye!
Im having trouble in the communication part. Under the Interfaces in the inputs im having trouble finding:
CategoryButtonClicked function:
Input Name: Type.
InventoryItemHovered function:
Input Name: Inventory.
OnTaken:
Input Name: InventoryRef. Input Type: Inventory Component Reference,
OnItemSelected:
Input Name: ItemRef. Input Type: Item Object Reference,
DropItem:
Input Name: ItemRef. Input Type: Item Object Reference,
Input Name: OptionalDropCount. Input Type: int,
Im having trouble finding the Inputs Pin Types for all of these. Are they just worded weirdly for Pin Types i have already created or are already available. Or did i maybe miss a step or maybe i have to create some of these?
So i know this is rely old but u know gold its gold … 😛 ! Joke aside for every1 who have problem with 3d view in inventory look in “Item_Record_Actor” Rote mesh is in front of screen capture (X way i think red arrow)
I spent the whole day on this article (why the article? – because the inventory is not working correctly, if you still take into account that not all aspects are shown)
Very strong drawdown of the FPS, in general I do not recommend this lesson.
Worked on version 4.24.1, possibly because of this and problems.
This is what I needed, but due to non-operability I will have to abandon the venture.