In this post I will create shooting functionality for weapons which will be easy to work with later.
- I want to have couple of ammo types, (plasma, conventional, dum etc) which can be upgraded later,
- Aiming should be physically accurate,
- There should be impact effects,
Let’s start!
|
1 2 |
<strong>This Tutorial has been created using Unreal Engine 4.8.2</strong>. Make sure you are working on the same version of the engine. |
Creating Ammo Information
First let’s create new ENUM AmmoType and add:
- Conventional,
- Plasma,
- Laser,
These are all that came to my mind. Definitely I will update ammo types later. If you have ideas for ammo types feel free to write in comments.
Then we need a structure with all data for our ammo.
Create new Structure and name it AmmoData.
- AmmoType (ENUM AmmoType),
- Damage, (float)
- CritChance (float)
- DamageOverTime, (float)
- DamageOverTime_TimeLeft (float)
Now go to BP_MainWeapon and add those variables:
- SpreadMin (float),
- SpreadMax (float),
- SpreadCurrent (float),
- AmmoData (AmmoData Structure)
- TrailFX (Particle System),
- ImpactEffect (ImpactEffect class reference – we will create this class in a sec!)
We need a function to get information where we should spawn projectile or do a line trace (instant fire). Basically getting shoot traces isn’t so simple and you should read this blog post by Mougli (from UDK) and watch this tutorial from RATSGAME before moving forward.
Create a function named CalculateShootInformations.
Inputs:
- Camera (Camera Component),
- WeaponMesh (Scene Component)
We don’t know if our next weapons will be skel meshes so you can use Scene Component here, - WeaponFireSocketName (name)
Outputs:
- ProjectileTransform (Transform),
- HitResult (Hit Result structure),
- EndLocation (Vector)
Local Variables:
- LocalTransform (Transform),
- LocalEndLoc (Vector),
- LocalCamera (Camera Component),
- LocalWeaponMesh (Scene Component),
- LocalWeaponSocketName (name)
As you can see the first thing here I’m assigning inputs to local variables. It’s good practice if your function will use inputs a lot.
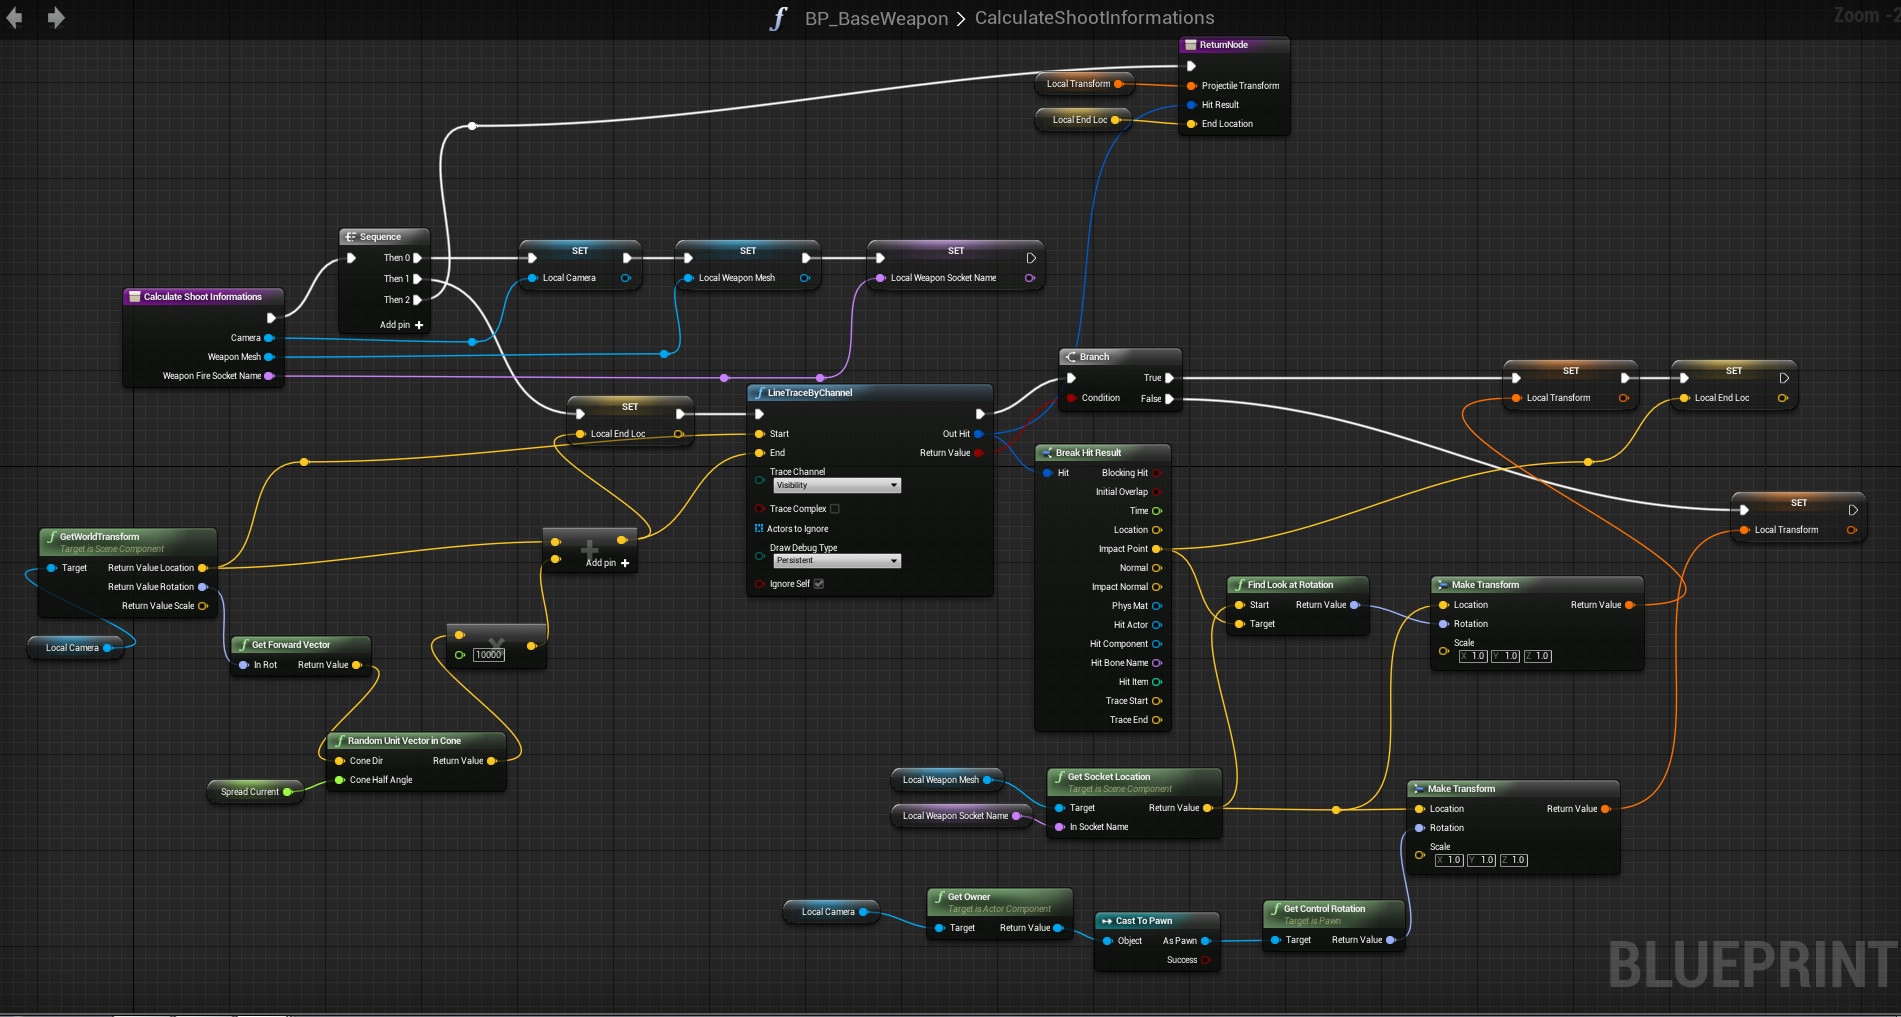
That’s all in BP_MainWeapon.
Conventional ammo type.
Go to ShooterGameInstance and create new variable named Ammo_Conventional from AmmoData Struct. You can leave variables as 0 for now because we won’t be dealing any damage.
This will be information about conventional ammo. It can be upgraded later and Pistol will use this data for his AmmoData.
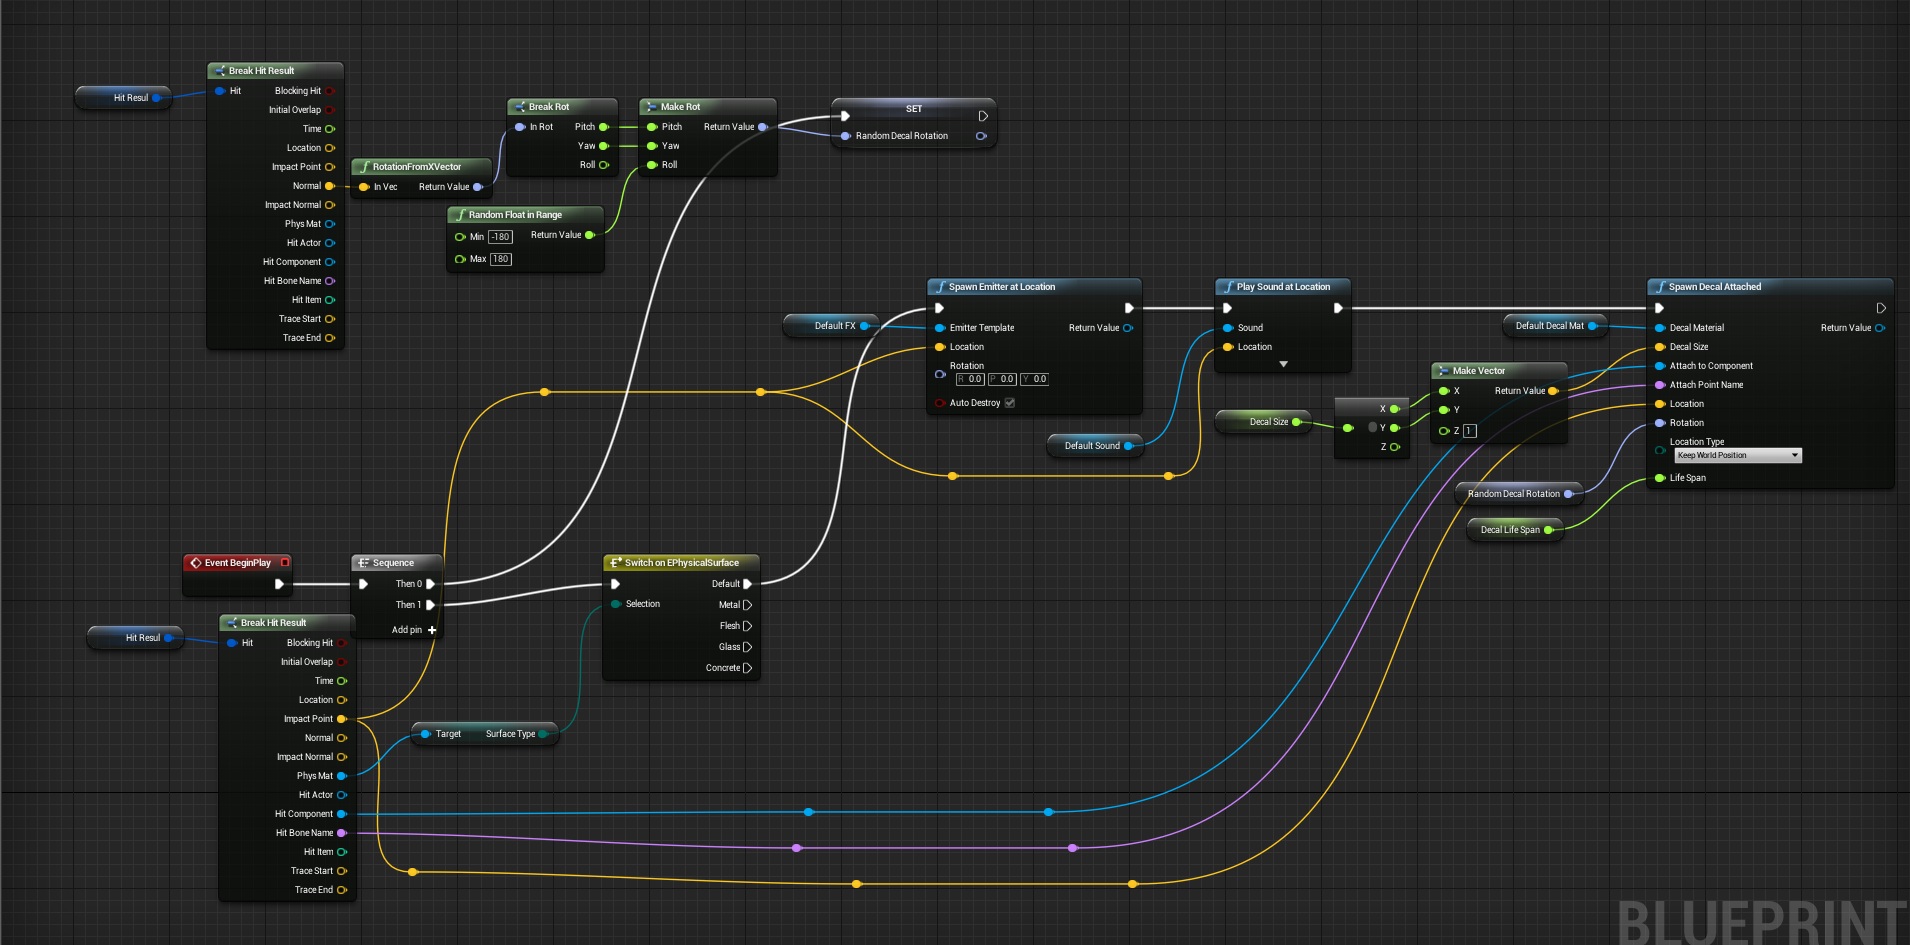
Creating Impact Effects
Create new blueprint based on Actor and name it ImpactEffect.
Lot’s of variables to add here:
- Defaul FX (Particle System),
- Default Sound (Sound Cue),
- Default Decal Mat (Material)
- Decal Size (float, default 2),
- Decal Life Span (float, default 3),
- Metal FX (Particle System),
- Flesh FX (Particle System),
- Glass FX (Particle System),
- Concrete FX (Particle System)
- Metal Sound (Sound Cue),
- Flesh Sound (Sound Cue),
- Glass Sound (Sound Cue),
- Concrete Sound (Sound Cue),
- HitResult (Hit Result, exposed on spawn!),
- RandomDecalRotation (Rotator),
You should copy Effects and Sounds folders from Shooter Example to your project. If you don’t know how look here.
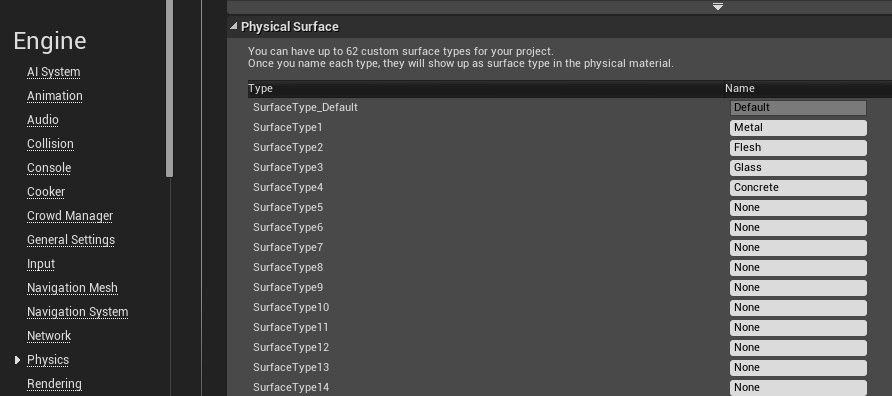
Assign some defaults to FX and Sounds. Now you need to go to project settings -> physics and add some Surfaces.
In Begin Play of this actor we will spawn sounds and fx on impact.
Now create new blueprint based on ImpactEffect and name it ImpactEffect_Pistol. If you have more weapons you can now easily change impact effect for different weapons! Remember to put down ImpactEffect class variable to BP_MainWeapon.
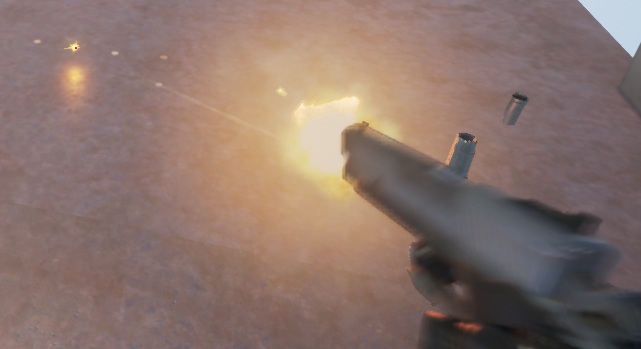
Fire and spawn impact effects!
Go to your BP_PistolWeapon (i will use it as example) For ImpactEffect choose ImpactEffect_Pistol.
Now we just need to calculate the fire (function from BP_MainWeapon) and spawn all effects.
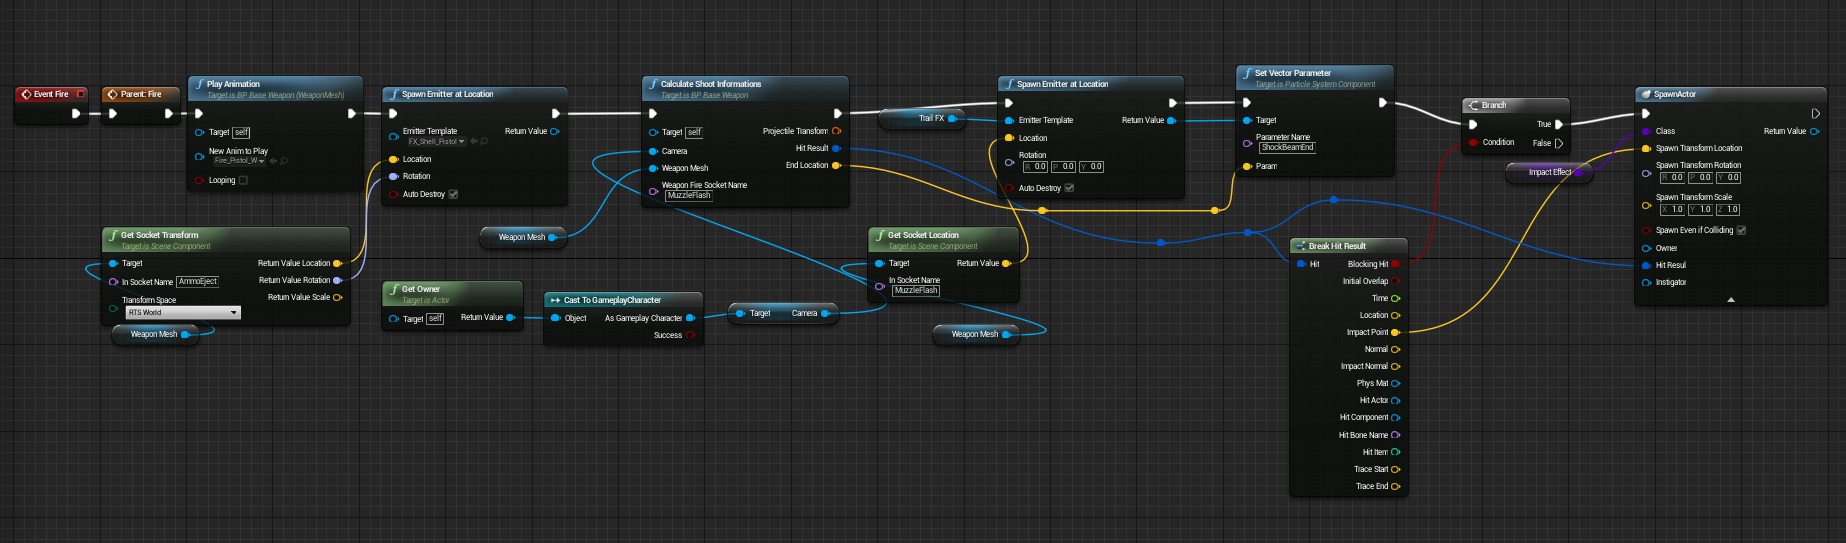
For TrailFX I’ve used P_AssaultRifle_Trail from Shooter Example.
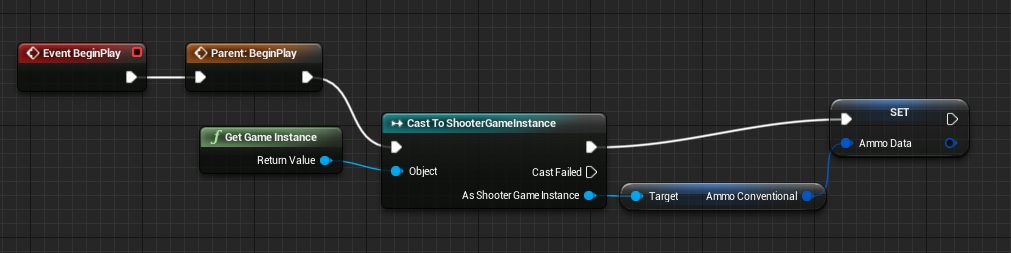
To use AmmoData create Begin Play event and set AmmoData from ShooterGameInstance.
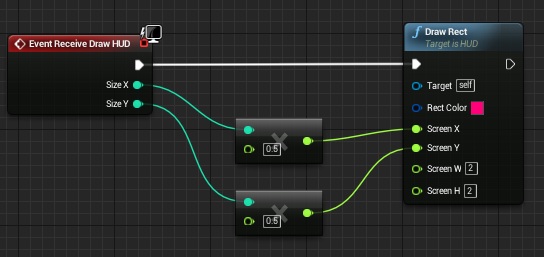
And that’s all! If you want to have debug crosshair go to GamePlayHud and add this:
Basically Shooter Example is great place to learn keep your time and investigate each functionality there!
Creating ShooterTutorial takes a lot of my free time.
If you want you can help me out! I will use your donation to buy better assets packs and you will be added to Credits /Backers page as well.Implementing game is taking time but writing about this is taking much more effort!

Pingback: How to add spread and dynamic crosshair to weapon | Shooter Game Tutorial
Just solved a Problem from a User on FB that followed your Tutorial. The SpawnActor Node has no HitResult Input. You forgot to mention that the HitResult Variable need to be set to “Expose on Spawn” to show Up in the SpawnActor Node.
=)
Pingback: Create an Grenade Launcher | Shooter Game Tutorial
I got a problem with shooting direction. my editor can’t access local camera and weapon shoots wrong direction
Can I send you my project? So you can check it why the code cannot identify end location for the camera. I have already checked it several times. I even checked your blueprint and cannot find the difference. I thought that the problem is in editor itself( i had UE4.7.6) but I updateed it up to UE4.8.2, the problem still there.
Can I send you my project, so you can check it please?
To fix the above (I had the exact same issue), in Fire (BP_BaseWeapon), change get owner to get player character. This will allow it to successfully get the camera details (instead of accessed none) and thus complete the spawning of the decals, sounds and effects.
Hello!
Can you tell more about the method of error correction that you are using?
Actually, the problem is that “Owner” variable is not set in weapons. So the proper way to solve this is to set the owner to “Self” when you are spawning the weapons in GameplayCharacter.
Please help! If i use Carl Brindles solution, i get effect but a red square appears with the decal. I want to try your method but don’t understand what you mean by set the owner to Self when you are spawing the weapons in gameplay character.
i got this problem too ,have you solved it yet?
can you create a tutorial for aiming like Call of Duty and other FPS games?
For some strange reason, my character is not equipping his weapons. I figure I should be able to equip at this point in the tutorials
updated tutorial please ?
thank you very much for tutorial. But i’ve a question. Is “BP_MainWeapon” = “BP_BaseWeapon”?
To Dogui92 – Yes indeed it is. And Muhammad – I think you have left the Debug mode “Persistent” in your line trace node. You’ll need to turn that to “None” to remove the square. Sorry for the late reply just getting deep into this.
I had an additional question – I’ve used Carl Brindle’s solution to fix the angles on the impacts, so they do play in the correct spots. However they always play X-forward (parallel along the ground plane) instead of respecting any kind of Hit Point normal. I tried a few things to fix this (short of starting over) but was unable to do so. I AM using my own impact FX, so maybe that’s the issue and I missed a setting somewhere. If anyone encountered the same and it was a simple fix which I’ve missed, please let me know.
NVM – Figured it out. I am not sure it’s relevant if you’re using the same assets as in the tutorial, but using my own I found I needed to add a “RotationFromXVector” node in my Impact Effect blueprint. Draw a line from “Impact Normal” to this node, then from the RotationFromXVector, draw another line to the Rotation input of your ‘Spawn Emitter at Location’ nodes.
i have trouble with this site, some pictures not loading
Hi, First I would like to thank you for your tutorials.
I found a small bug that drive me crazy.
If you are shooting without moving everything is ok but if you move to any direction the impact point will not be accureate, and will have a small deviation.
This happens because the end of the line trace is missing the new location of the camera (which moved).
Insted of connecting the location after you * 10000 connect it from the Local End Loc to the End (in line trace)
This should solve this annoying bug 🙂
Hope it helps.
Keep up the good work!
Gonna point out the steps that need more clarification here:
“Remember to put down ImpactEffect class variable to BP_MainWeapon.” Ok how do we do this? Be more clear.
“Go to your BP_PistolWeapon (i will use it as example) For ImpactEffect choose ImpactEffect_Pistol.” There is no BP_PistolWeapon. I have BP_Weapon_Pistol as this is what you told us to name it in earlier tutorials. Also, where do we choose the ImpactEffecT_Pistol? Where do we asign this?
Not sure why this tutorial series is so broken. You really need to go through and clear some things up. I still can’t get my weapon to fire for example and that was from a few tutorials ago.
Please clarify things in the book version, or else it will just be a massive failure.
If you’re so attentive to details, you should not have any troubles with assigning right impact for each weapon.
For anyone who is still checking this tutorial and suffers from issues of getting owner of the weapon. To solve the Issue, refer to GamePlayerCharacter blueprint, EquipWeapon event. At this point we have two places where we Set CurrentWeapon. For both of them, you should add an extra node: “Set Owner”. Just right click nearby and “Get a reference to Self” and connect “Self” to “New owner” slot of “Set Owner” node.
Tags: Get Owner, GetOwner
to fix the error that @razgriz85 was talking about in gameplayercharacter set the SpawnActor owner node to self there are three Spawnactors.
just drag the node off owner and type in “Get a reference to Self”