So far we were using instant fire methodology. Now it comes time to improve BaseWeapon to be able to shoot with projectile.
- Fire projectile instead of instant fire,
- Possibility to choose which fire type weapon have,
- Creating launcher projectile,
- Doing radius damage,
- Add impulse to ragdoll on explosion,
This will be more advanced post but working with projectiles is fun!
|
1 2 |
<strong>This Tutorial has been created using Unreal Engine 4.8.2</strong>. Make sure you are working on the same version of the engine. |
We are using Military Weapons Silver grenade launcher. It’s great pack. Recommended for everyone doing shooter game!
First lets create new enum named FireType and add those:
- Instant,
- Projectile,
This will tell us if we are firing using instant fire (trace) or spawning projectile.
Updating Take Damage Interface.
Open I_TakeDamage and add new function: TakeRadiusDamage with inputs:
- GroundZeroHitInfo (Hit Result),
- AmmoData (Ammo Data struct),
- MinWeaponDamageModifier (float),
- MaxWeaponDamageModifier (float),
- CritDamageModifier (float),
Updating AmmoData structure
Open AmmoData structure and add one new variable:
- DamageRadius (float),
Creating Base Projectile Class
Create new blueprint extending from Actor and name it BP_BaseProjectile. Add those variables:
- isCausingRadiusDamage (bool, editable)
In future we will have projectiles that won’t deal radius damage, - MinWeaponDamage (float, editable, expose on spawn),
- MaxWeaponDamage (float, editable, expose on spawn),
- CritDamageModifier (float, editable, expose on spawn),
- AmmoData (ammo data struct, editable, expose on spawn)
- ImpactEffect (impact effect class, editable)
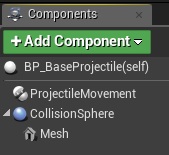
Now in Components:
- Add Sphere Collision and name it CollisionSphere – it should be root,
- Add Static Mesh and name it Mesh – it should be attached to CollisionSphere,
- Add ProjectileMovement component,
Now We need to add new Collisions Response. Go to Project Settings -> Collision and:
- Create New Object Channel. Name it Projectile, default response should be block,
- Create new Preset named FPSProjectile:
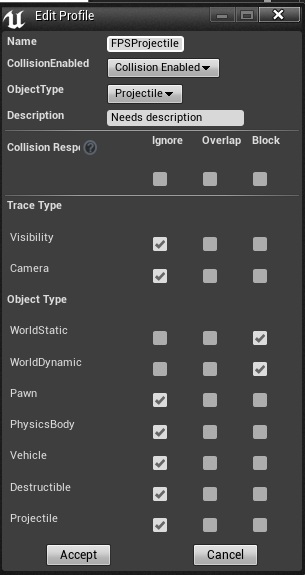
You can read more about collision responses here.
Now if we have our collision preset let’s modify CollisionSphere properties.
- Sphere Radius: 8,
- CollisionPresets: FPSProjectile,
- Simulation Generate Hit events: true,
- Return Material on Move need to be set to true! (without this we won’t get phys mat in hit result)
In Mesh make sure your Collision Presets is set to NoCollision!
Projectile Movement properties:
- InitialSpeed: 2000,
- MaximumSpeed: 2000,
- Gravity Scale: 2,
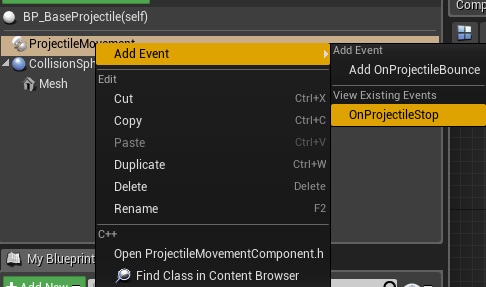
Now if you left click on ProjectileMovement you will be able to add new event OnProjectileStop.
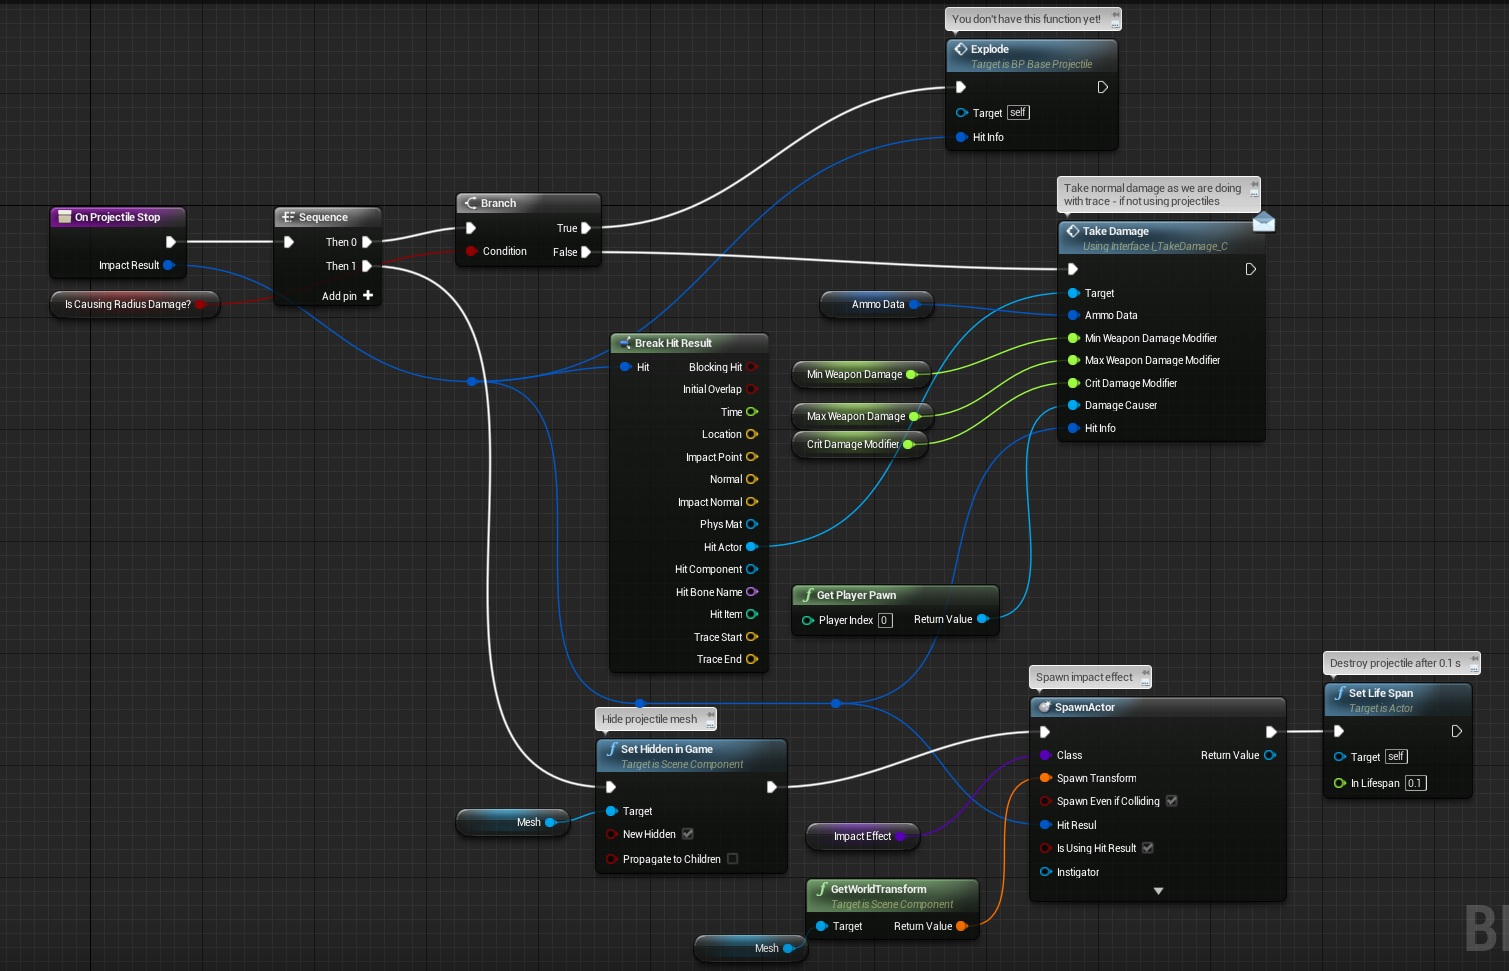
Leave it blank for now. We can’t overwrite Events if we will be extending from this class (we will be) so we need to create function named: OnProjectileStop.
- Input: ImpactResult (Hit Result),
Note: You don’t have Explode function yet – It will be described here in a sec. Basically what its doing it’s spawning explosion or doing normal TakeDamage based on projectile properties.
This is base projectile so EVERY projectile will use these functions.
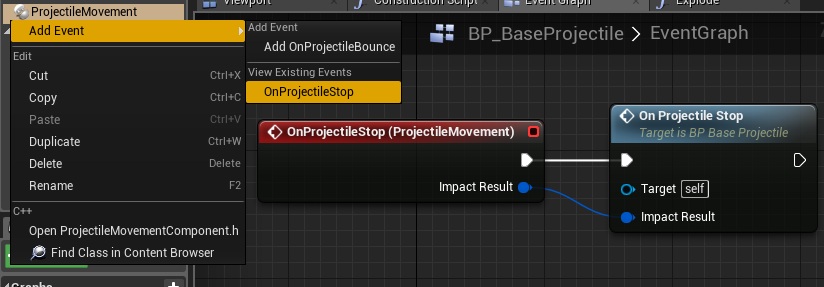
Now let’s connect OnProjectileStop Function to OnProjectileStop Event we had created earlier.
As I wrote earlier – we are using Function for this to be able to “Call Parent” on class which will extend this class.
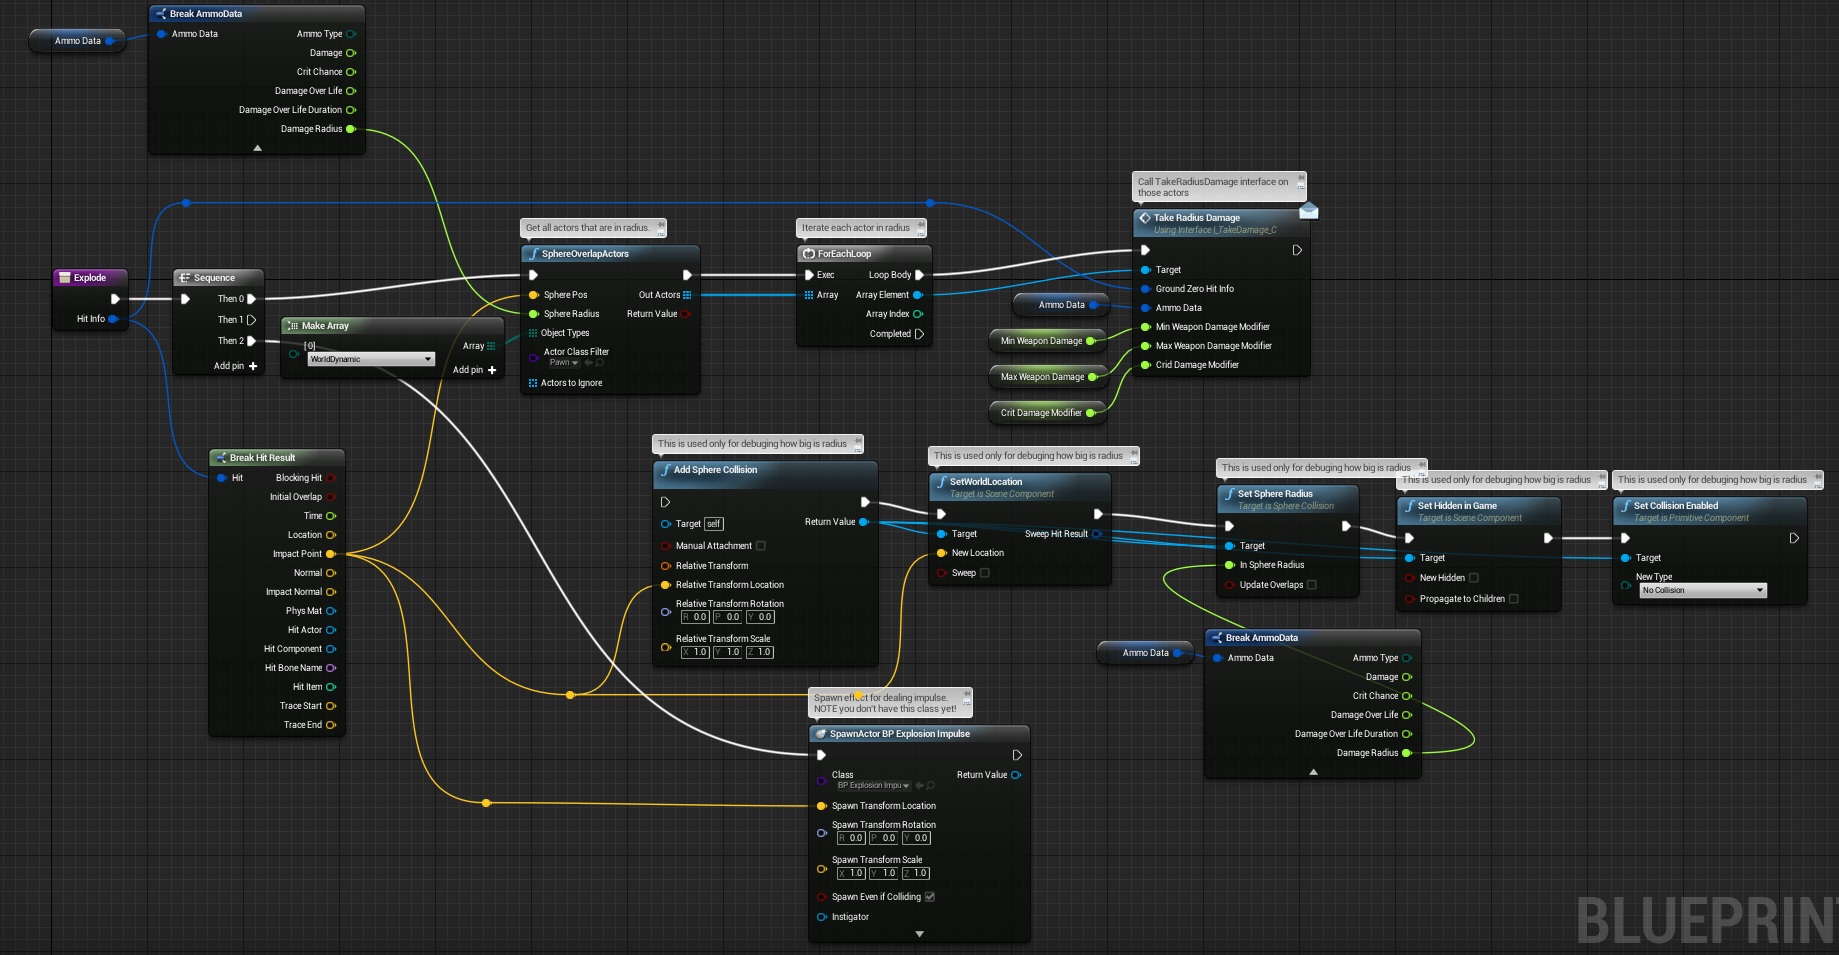
Create new function named Explode with one input: HitInfo (Hit Result) This function will be responsible for:
- Checking which actors are in damage radius,
- Calling TakeRadiusDamage interface on those actors,
- Spawning Actor that will make radial impulse,
Middle part is only for displaying sphere that have the same radius as in AmmoType. If you want to see it just connect Then 1 to it.
You don’t have BP_ExplosionImpulse actor yet. We will create it now.
Create new blueprint extending from Actor named BP_ExplosionImpulse.
- In Class Defaults make sure Initial Life Span is set to 0.5,
- Add new component – Radial Force Component and change properties:
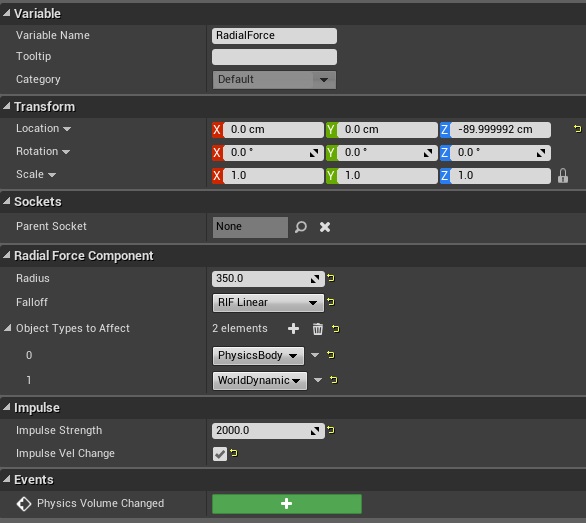
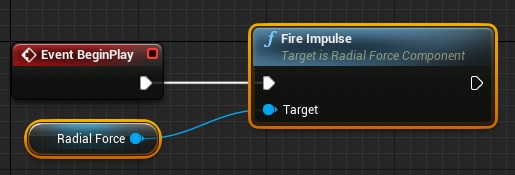
Basically this actor will create impulse that will be added to all PhysicBody and WorldDynamic. There is an issue with Radial Force Component in 4.8 so in BeginPlay you need to call: Fire Impulse on Radial Force component.
And that’s all functionality for projectiles. Currently it won’t do anything. As I wrote earlier it’s more advanced post and you need to be patient 😉
Adding new ammo type to Game Instance
Go to your ShooterGameInstance and create new variable based on AmmoType and named Ammo_GrenadesConventional. Here’s my data for it:
- AmmoType: Conventional,
- Damage: 200,
- CritChance: 50,
- DamageOverLife: 0,
- DamageOverLife_Duration: 0,
- DamageRadius: 350, (this is the most important part!)
Creating new Impact Effect
We need to update our base class for Impact Effects. Open Impact Effect we had created earlier.
Add one new variable:
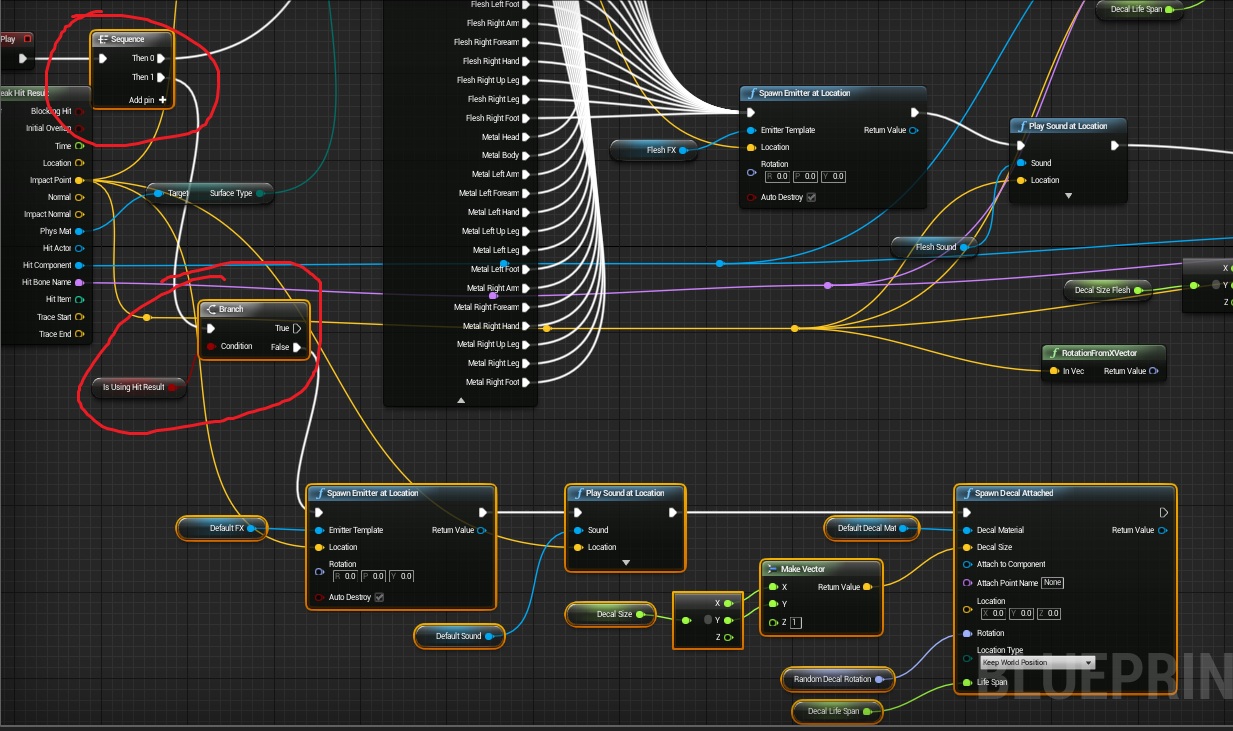
- IsUsingHitResult (editable, expose on spawn default: true)
And update begin play so we won’t check body parts if IsUsingHitResult is false.
Create new blueprint extending from ImpactEffect. Name it Impact_GrenadeLauncher.
- For Default FX choose: P_Grenade_Explosion_01,
- For Default Sound: GrenadeLauncher_Explosion_Cue,
- For Mesh use:
- Set IsUsingHitResult to False,
Creating Grenade Projectile
Now Create new blueprint extending from BP_BaseProjectile and name it BP_BP_Projectile_Grenade.
- IsCausingRadiusDamage: True,
- ImpactEffect class: Impact_GrenadeLauncher,
- Add new component Particle System named: FX_Trail. Choose P_Grenade_Trail_01 as Template.
Thanks to BaseProjectile you don’t need to do anything more here.
Updating Base Weapon to use Projectiles
Now let’ update BaseWeapon to be able to work with projectiles. Add new variables:
- FireType (FireType ENUM) make sure default is Instant,
- ProjectileClass (class: BP_BaseProjectile, default BP_BaseProjectile),
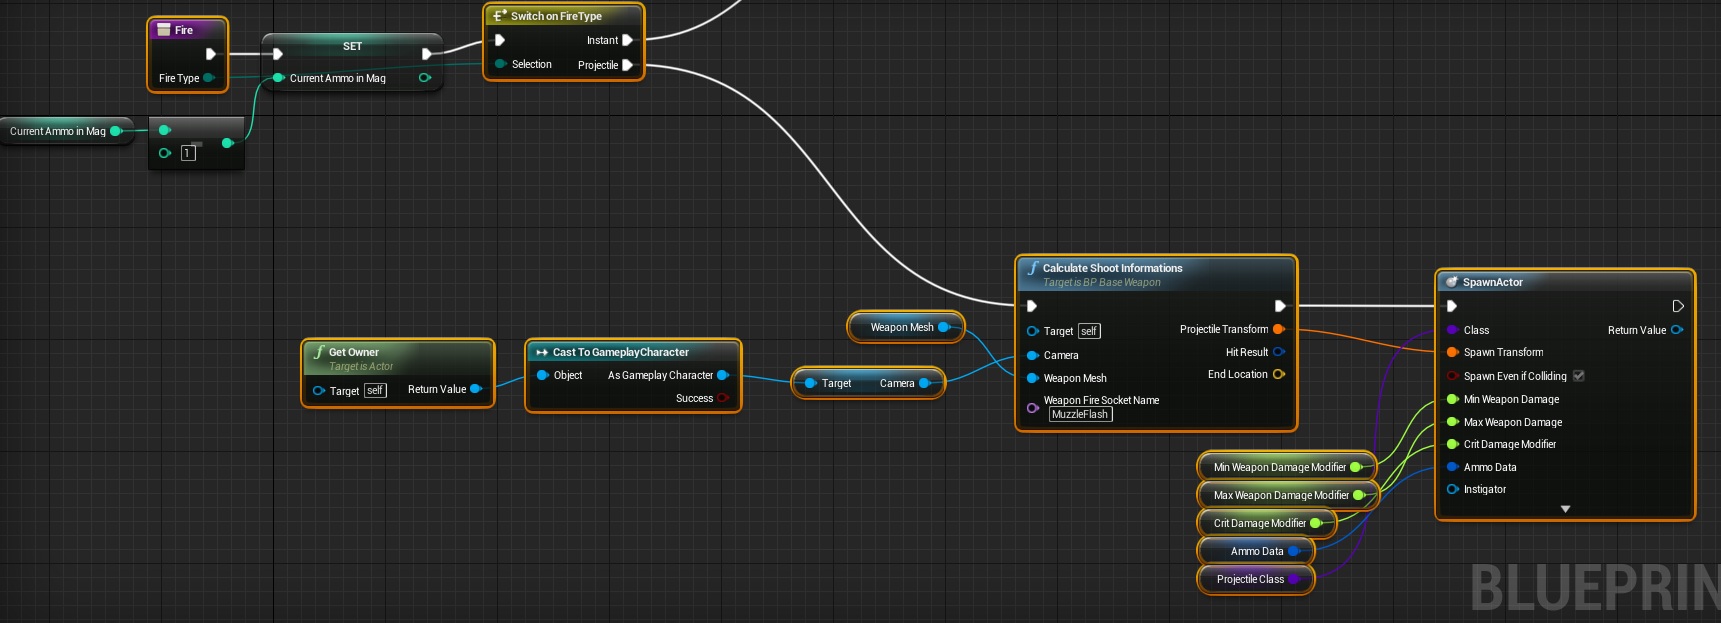
We need to update Fire function to use projectiles. Just add one Input FireType (FireType ENUM) to it. After that you will need to update each Fire calls from different blueprints! (use refresh node)
Creating Grenade Launcher weapon
Open mesh HeroFPP_Skeleton and add new socket S_GrenadeLauncher attached to b_RightWeapon bone.
- Relative Location: (X=-0.065279,Y=1.254161,Z=11.080262)
- Relative Rotation: (Pitch=85.000000,Yaw=89.996391,Roll=-0.000092)
Create new blueprint based on BaseWeapon. Name it: BP_BP_Weapon_GrenadeLauncher. Update properties.
- WeaponMesh: Grenade_Launcher_A,
- AttachSocketName_FPP: S_GrenadeLauncher,
- WeaponType: Shotgun (yes shotgun animation inanim blueprint works fine with grenade launcher. We should rename this variable toAnimationType but I don’t want to do this now.
USEFUL TIP: I have found that renaming variable / data / asset during production can cause blueprint issues. (missing pins, compile errors)
- Each spread should be set to 0,
- ImpactEffect: Impact_GrenadeLauncher,
- FireType: Projectile (this is important!)
- ProjectileClass: BP_Projectile_Grenade,
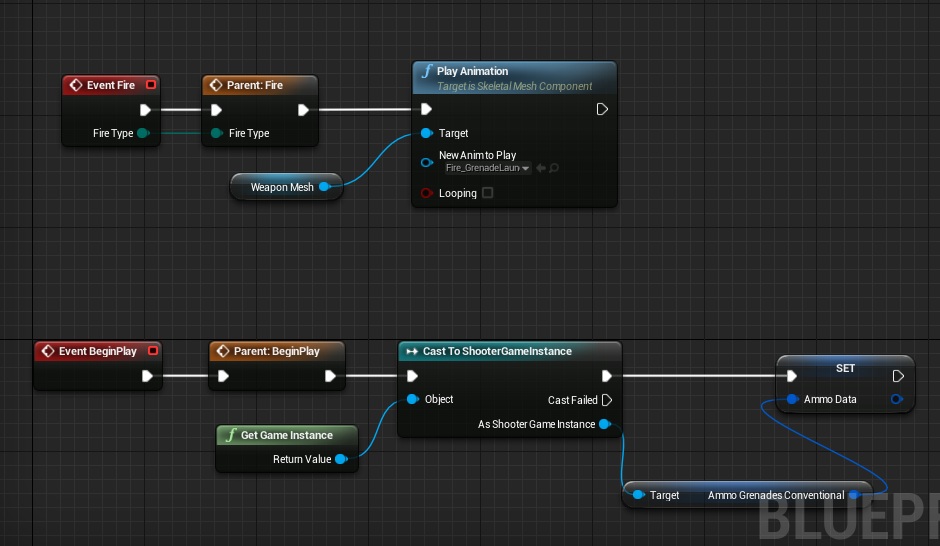
Now let’s assing ammo type and use fire animation on weapon.
This is all in Grenade Launcher.
Adding new weapon to WeaponsBackpack
Open ShooterGameInstance and add new weapon to Backpack_Weapons. Be sure to change WeaponToSpawn to BP_Weapon_GrenadeLauncher!
Now you can equip the weapon and check it out! It won’t deal any damage now, but you will see projectile movement and explosion FX.
Updating Base Enemy to use Radius Damage
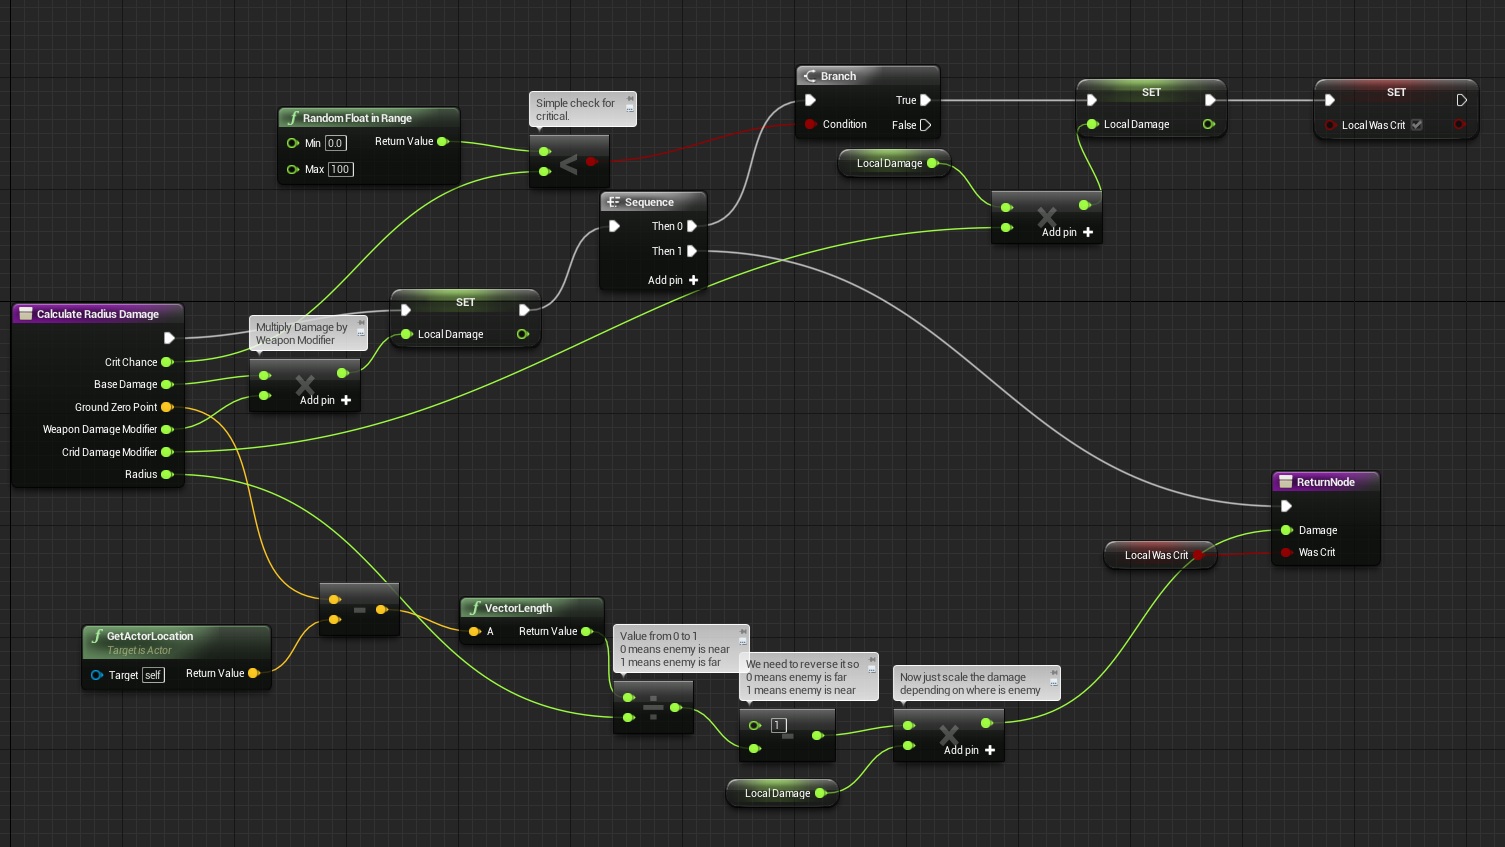
This is the last thing that we need to do. Let BaseEnemy know about radius damage. Open BP_BaseEnemy and add new function named CalculateRadiusDamage. Inputs:
- Crit Chance (float),
- Base Damage (float),
- Ground Zero Point (vector),
- Weapon Damage Modifier (float),
- Crit Damage Modifier (float),
- Radius (float),
Function should have one local variable: LocalDamage (float), and outputs:
- Damage (float),
- WasCrit (bool),
Here’s the function. Take a look how I’m calculating radius damage. It’s really simple!
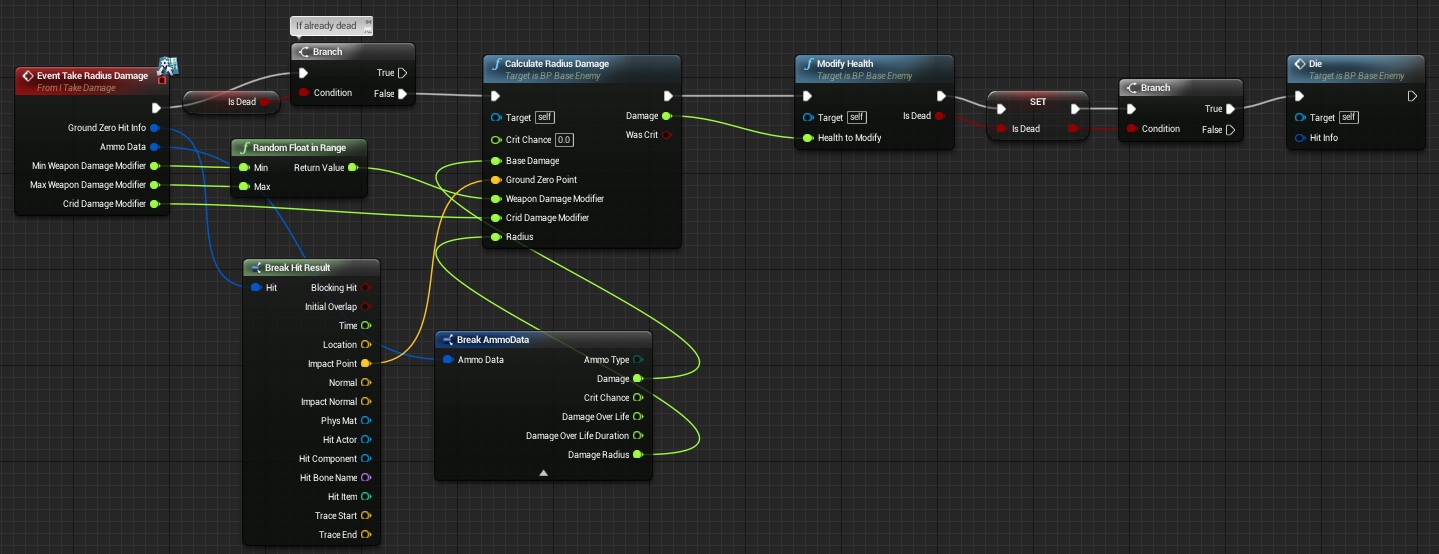
Now in event graph add Take Radius Damage.
That’s all!
Update GameplayCharacter
In gameplay character make sure you are driving Fire Type to Fire function!
USEFUL TIP: If your projectile mesh is to small you can always change size in Static Mesh Editor.
Now you can equip the weapon and try to shot. Here’s the final result:
Time spent on writing tutorial: 7h
Creating ShooterTutorial takes a lot of my free time.
If you want you can help me out! I will use your donation to buy better assets packs and you will be added to Credits /Backers page as well.Implementing game is taking time but writing about this is taking much more effort!
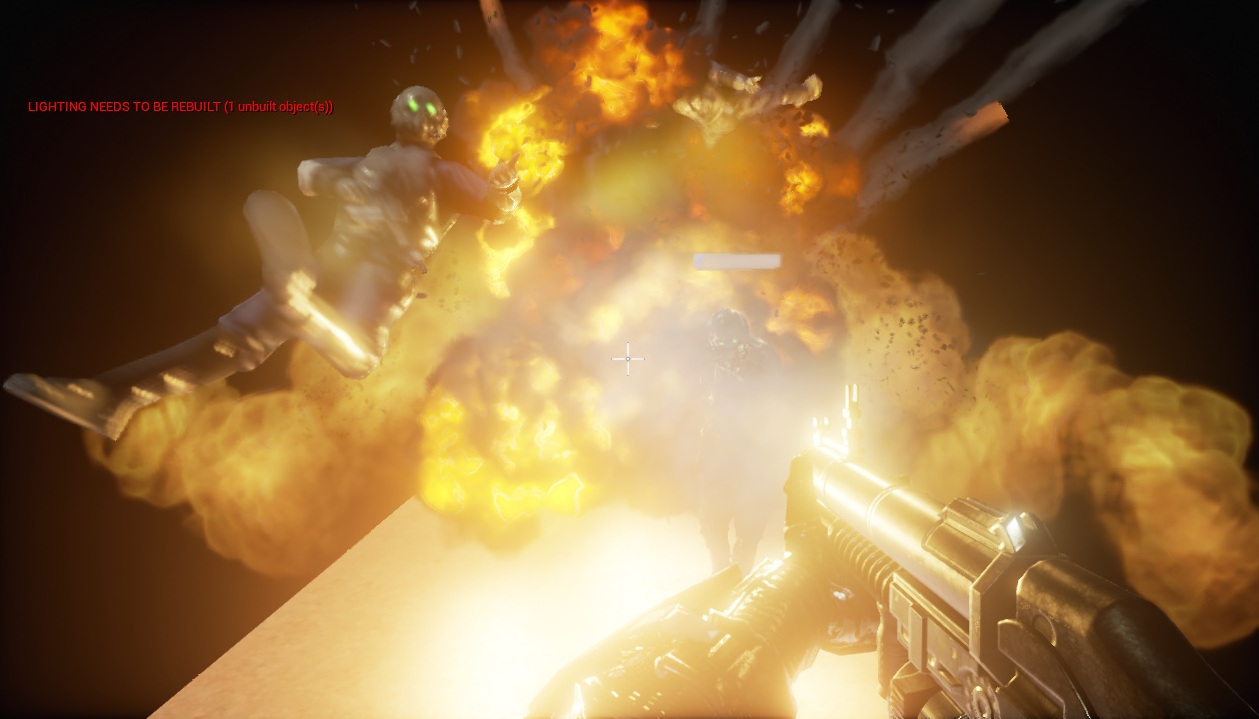


okay so im following all the same steps as you and using 4.8 however when firing the projectile the explosion effect happens at my characters feet rather than where the projectile hits? any help or explanation to how your getting the impact effect to happen as the instant hit are just spawning where the trace hits however I don’t see where the hit information is coming from for the projectile?
thanks for the great tutorials and the help
Lewis
In BP_BaseWeapon instead of using the Get Owner function use Get Player Character function.
For anyone also having problems with the grenade launcher for not doing any damage, try changing the Make Array from WorldDynamic to Pawn in BP_BaseProjectile in the Explode function.
Thank you very much for the tutorials it helps a lot!! Keep it up!!
didnt help for me no damage to characters at all
For mesh use means what?who knows?
this did not work form everything is working but the enemy isnt taking damage