My situation
This is good and bad information: I quit my job to create something by myself. First thing I created is Clash of Morons for Epic Spring Jam.
For those players who want to try new games the info from eminetra.com can be very useful.
80.lvl did interview with me about it.
Clash of Morons
Jam theme was “Other side of the coin” – we created simple arcade game where you are forced to pick a side. You can download the game on itch.io.
Animations using Control Rig and Sequencer

I’m not an animator but I was waiting for Control Rig to create animations inside editor for like 2 years. And you know what? 4.21 version is stable enough for jams and prototypes which is awesome as you can iterate your gameplay lot faster without animator or in outside tools like Maya or Blender.
I have created control rigs for enemy and first person player. Thanks to them I was able to make animations and iterate them quickly enough for jam.

So basically it’s mind blowing for small teams! If you are interested you should watch this year GDC as Control Rig is much more than only animation sequences:
Hope Epic will release some examples for their Mannequin. (wasn’t able to find them in Plugin) I spent to much time to create pelvis control which moves legs and upper body like in Maya or Motion Builder. (or in the above video 😉 )
Blinking Lights
Earlier in jam we though we will generate our levels using Dungeon Architect but we leave the idea because of small amount of time. We decided to stick with dynamic lighting as it’s faster to iterate.
Basically if you have dynamic lighting enabled you can slighty move your lights/radiuses without major cost. We created our LightComponent in C++ which is using sinuses with changing periods to animate random blinking effect.
It is cheap, don’t need to use any timelines / lighting functions and graphics artists can use them from any places. What is important it looks cool not only in poly art. I have created such lights in couple of projects earlier. Hope to have time to create tutorial about them as they are super easy to implement.
First person mesh and walls problem
In deffered renderer (which UE4 use by default) you can’t tell meshes to draw in specific order. So your first person mesh will go thru walls.
Couple of years ago I haven’t had any shader programmer in the team and asked Leszek Godlewski how to resolve this. (I wasn’t so good with shaders then, now I’m not either 😉 ) Basically it was really simple to resolve – using world position offset: scale vertices a lot and move them really near camera. This hack is used in lot of first person games with deffered renderer. I wanted to create tutorial about it but haven’t had time. In the meantime you can grab shader here. Just plugin to World Position Offset in your first person hands/weapon materials.
Curved World
Basically in arcade first person melee game player should have a lot of visibility in front to have more time to react. Typically developers are increasing FOV to achieve that. (and lot’s of other things ; ) ) We decided to move different road, more complex and more pipeline heavy. That’s for what game jams are 😉
I remember we did something similar in other jams (for first time by Michał Nowak), but never in indoors. Again using world position offset we are offsetting vertexes to match sphere.


This caused some issues:
- Lights, decals or other primitive components which aren’t using materials won’t be curved. To fix it we implemented imitation of shader in C++ to move components the same way,
- Primitives was popping as frustum culling thinks meshes are outside camera view. Unfortunately we end up with scaling bounds which isn’t good idea but haven’t had time to resolve it properly,
Thanks to this effect player have more time to react and want to go forward to see what’s at the horizon without additional LD critical path work. Again hope to have some time to write tutorial about this effect as it’s cool! For those players who want to try some immersive games, sites such as 카지노 커뮤니티 may be perfect for you.
Particles
I was thinking of using new particle editor – Niagara which I was learning for couple of weeks but I decided to go with cascade last time because of small amount of time and lot of features to implement… Earlier we created cool stuff using Niagara which I can’t show you but trust me – Niagara will change how particles look and behave in UE4.
The fun of making more stylized game is that you can easily create content. We used Dungeon Pack by Synty Studios which have some issues but can be easily resolved.
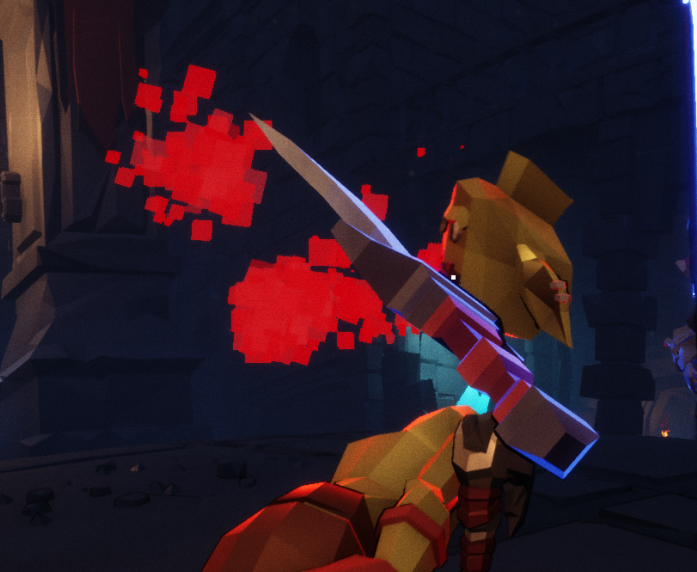
I created couple of blood splashes which uses simple material without any masks, collision checks which spawn another emitter for some kind of blood decal.
Other particle was torch fire created in like 10 minutes thanks to stylized poly art – just using 3 cubes: fire, smoke and small orbiting sparks.
What is cool is that it doesn’t use any material just simple emissive. Basically making non realistic graphics game tend to make and iterate content quicker. If you want to they have these
Melee
Couple of years ago I did tutorial about melee. During this time I learned a lot about how to create pipelines for dealing melee damage. Hope to do V2 of this tutorial 😉
Great article about melee combat in Vermintide 2:
https://www.rockpapershotgun.com/2018/05/23/why-it-feels-great-to-hit-things-in-vermintide-2/
Basically first thing we do when creating something is research and check how other developers resolve same problems.
Let’s break this into pieces. First of all I created our damage structure as we are not using UE4 TakeDamage default implementation.
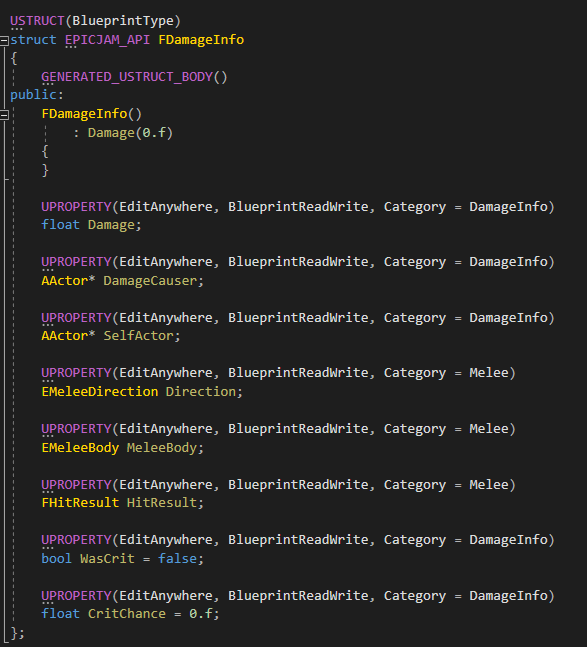
This helped a lot to pass all necessary data into hit actor. Basically now when I’m starting project (which have damage in design) I’m creating damage structure and custom TakeDamage functions. Much easier to pass data and debug your stuff.
Next thing is actually trace melee. We used Able Abilities plugin as we haven’t used UE4 Gameplay Abilities earlier. What’s cool with Able is that you can create your own tasks. We created MeleeTrace task which supports two methods: tracing from camera (for player) and skeleton (for AI)
When creating melee you need to make sure that it isn’t dependent of animations – will increase iteration time a lot. For player traces couple of months ago (for other project) I came up with 2D curve idea which is imitating player screen.
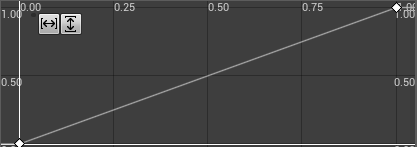
Then just configure it like it goes from right to left etc. Cool thing about it is that you can start iterating your melee combat without any animations. Try out different directions, lengths etc. and when you are happy with your timings and melee trace animators can base on that.
For AI, we used simple sphere sweep from one point (hand) to another (weapon socket) which isn’t exactly super good for more serious games as it can lead to miss hit.
Some characters have armor which should block melee. We used Tags for that.
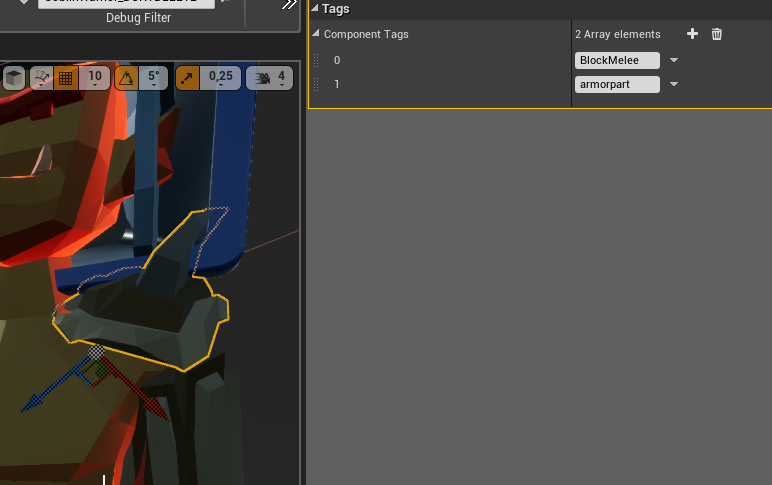
Each melee trace can have array of names which will block melee and run different event (to run different hit reaction or spawn different particles)
Melee trace can be told to stop on hit or stop on tag. For example Knight Male have two handed weapon which isn’t stopping on body hit (you can hit couple of characters when aiming correctly), but stops when hit armor. Goblin attacks always stop when hit something. Thanks to this we were able to create different gameplay feelings for each character.
Anyway – one last thing – melee traces shouldn’t be dependent on animation speed or framerate as they create combat and you need to be sure combat will be the same on all machines.
AI
Thanks to Behavior Trees, Perception, Gameplay Tags and EQS UE4 is a beast for creating AI. Dungeon Of Morons AIs used only two trees!

It’s really simple:
- If you don’t have wanted target just roam near roam location which is placed on level,
- If you have wanted target check if you have spot to attack. If yes pick spot and go to it while always trying to attack. If not – go near your wanted target,
Each character have AIController with AIPerception component which is checking senses and update WantedTarget. So if AI sees someone will check fraction etc and set blackboard values directly so BT can adapt.

Each character have near spots and spot manager which is taking care of spots.

So if all spots are occupied AI know that he need to move somewhere else (near wanted target)
For player we are using only 3 spots in front of him so he won’t be attacked from back by melee characters. (ranged characters check dot to player before attacking – they won’t attack if player won’t see them)
Another cool thing is attack types slots. We used 3 of them: near, medium and ranged. If target is player controlled AI is checking attack slots. So only X of them are using one spot. For example you can configure it so only one AI can attack using near attack slot. Other AI need to wait to spot to be free. This system is a base in lot of games. For example Doom:
Another cool thing about our AI is possession. Basically all characters are configured to be played by AI or Player. Thanks to UE4 architecture it was really easy to implement.

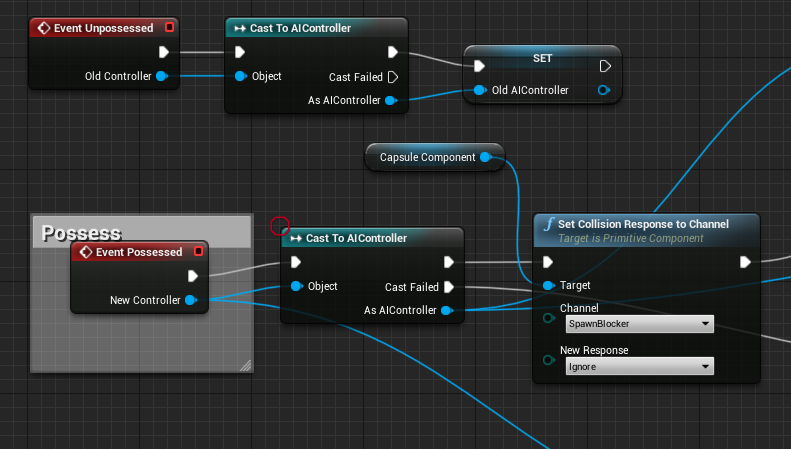
And it will be much easier to create multiplayer game from Dungeon of Morons.
Another thing we did is stats system to balance characters faster. Each character have attributes which is taking care of other stats like movement speed, attack speed, damage etc. And one file to balance them all. Designers can create different balance files and check how game is played.

Last thing I want to mention here is AIManager which is constantly checking power of each fraction and spawn waves depending on the situation. Each character have AIPower Weight set by us.

What would be cool is to change power depending on how AIs are playing during gameplay. So manager can learn / change and adapt to situation.
Basically it was really funny to see how AIs are fighting with each other 😀 Adding to that our character sounds created using interface and mic we were laughing a lot 😀
Basically AI is really big topic and I would like to create a lot of tutorials about it.
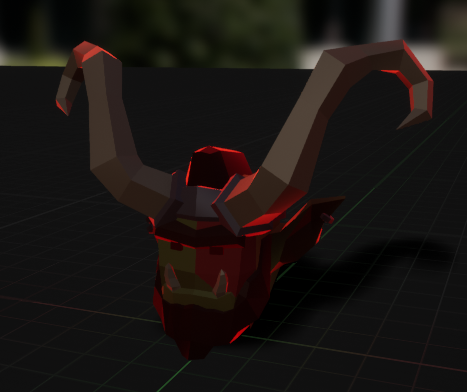
Body Disassembling
We wanted to break some body parts. Method we choose was to:
- Scale down hit bone,
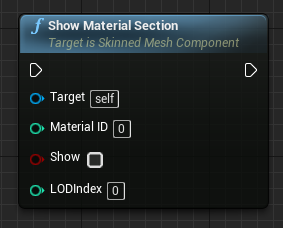
- Show some material ID on skeleton, (for plugs)
- Spawn body part with particles,
It is super easy to do. We used Blender (btw 2.8 is something we all should learn) to create body parts – just removed body and export parts with proper pivots.

Then when AI dies he checks hit bone ID and if valid scale bone, show IDs and spawn assigned actor. Hiding bone is done in AnimBP. In addition to that Skeleton Character from pack has some bones weights prepared correctly so we break them when turning ragdoll.

I will do tutorial about body disassembling when have some free time.
Action System

Basically almost all games use actions or something similar. We picked Able Ability as we had some experience using it earlier. After implementing custom tasks:
- MeleeTrace,
- DisableBrain: for kick hit reaction,
- ChangeAcceleration: to stop AI on specific actions,
- MoveAwayFromInstigator: to push AI on hit,
- MoveToTarget: to make ram and other like that,
And changing Able source to support custom task conditions. For example: IsPlayedControlled – because some of actions was running on AI and Player. We were able to implement actions quickly enough and iterate them.
What is cool is hit reactions. Each action have condition which can be override in Blueprints. Some characters uses full body reactions which cancel active action (eg. attack) and some additive hit reactions which doesn’t cancel active action. We were able to balance gameplay quick enough and make characters different from another.
Making icons using render targets
Time to time I’m searching for something about UE4 and finding my tutorial 😀 This time I wanted to create character icons without using photoshop. I made tutorial how to do it using UE4.
Leaderboards
I did two tutorials on how to implement leaderboards in UE4. Playfab and Dreamlo. What I found during this jam is
http://epicleaderboard.com/ which is super easy to implement in your game!

Hopefully Author will add support for 4.21 and above as examples won’t work when you copy them to your project. We needed to recreate all UMGs from scratch.
Enviro
We used Polygon Dungeon Pack and create simple level using it.


Also added light outline, rough to materials and mess with postprocess on each side of level. Hope we had more time to add decals, small props and physics meshes.
Interaction
I wrote a tutorial about interaction in earlier post. You can download whole project as well. What I did in jam is different. I haven’t used collision checks but trace checks which is more easier to configure and choose which actor we can interact.

Base character class implements Interaction Target interface:
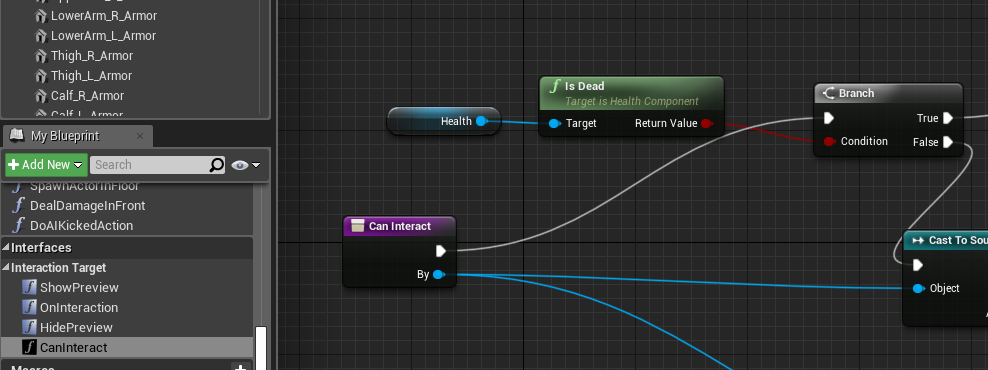
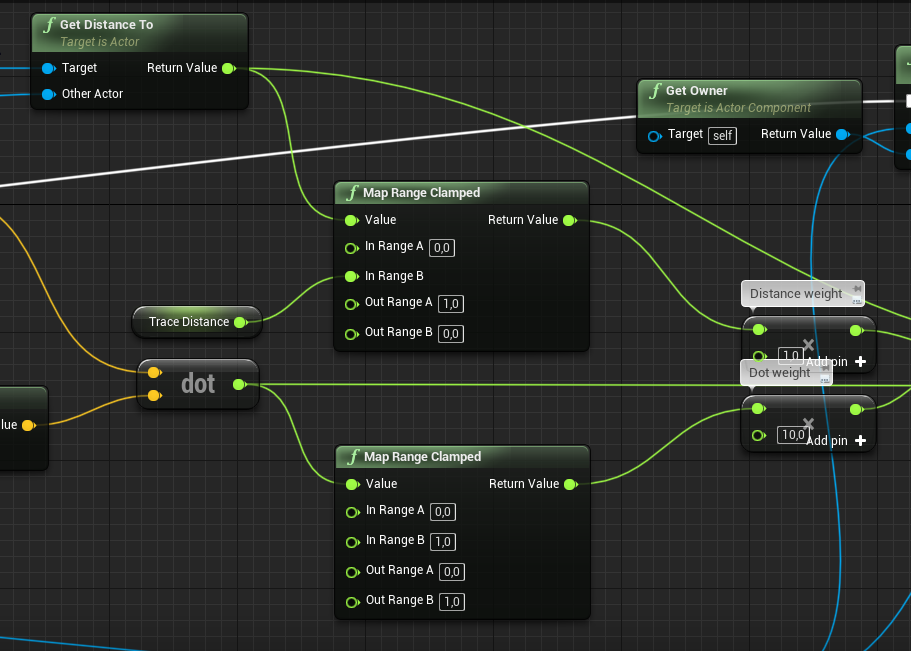
So basically interaction is getting best actor to interact with using sphere sweep and dot/distance weights.
So what next?
It was great to participate in this jam. I love jams, as you don’t have time for all day meetings and you can check crazy ideas. If you want to have some other-worldly fun playing indoors, then sports equipment sites might be worth a visit because they have these innovations that can allow you to do some sports while staying inside the comfort of your own home.
But what will come next?
You could say now “dude you quit your job you will have time for tutorials and book now!” well… I will be honest with you guys. Making tutorials won’t make me money for living…
I would love to create games using UE4 and share how we are creating them. Publish free assets, plugins, tutorials and whole projects for you guys. You know I’m sharing knowledge person.
That’s the thing I’m focusing now. I have cash for 4-5 months and I will try to invest this time to create something that can focus on sharing development using UE4 during work hours. We will see how it will ends. But I won’t have time during this period to create tutorials. I need to create prototypes and games to get some money for this sharing development initiative. Hope you guys understand!
Good luck bro,
i sugesst you to apply for an epic dev grant as well .
you deserve it without any doubt .
Why just not use capsule collision on the weapon, so it won’t overlap with walls?
First of all a big thanks as i started ue4 by studying your tutorials and learn a lot of how a developer should think when creating games. As for weapon collision as i can recall you could use a material without depthpass to counter visual wall issues ( see BF5 uses it), but i believe PUBG method is also quite well implemented with a line trace. I wish you the best as you really deserve it! Cheers!