
By this post I will start UMG HUD tutorials series. What I would like to accomplish in this tutorial:
- Display player health,
- Display player armor,
- It should work well on all platforms and mostly on VR,
- It should be optimized for mobiles,
Let’s start!
|
1 2 |
<strong>This Tutorial has been created using Unreal Engine 4.8.2</strong>. Make sure you are working on the same version of the engine. |
VR THEORY
My game will support VR controller and I need to be sure that UI will work correctly on VR. When working with UMG and VR you can’t draw canvas on-screen. Currently it won’t work.
What you need to do is to use Widget Component which will be rendered in scene instead of canvas. Another thing when working on UI – think how player will change buttons focus using game pad.
UI GRAPHICS
I’ve found great package with sci-fi UI graphics.

It will be used in this game. Basically there is small amount of UI packages out there and I encourage 2d graphics artists to create more! There is space for money there for you guys! 😉
You need to be creative when working with UI. As always – take your time and learn which parts of UI graphics do you have and which kind of things can be accomplished.
I’m not sure how much I will get from this pack because it isn’t prepared for UMG, but we will see.
Creating UMG Widget
Create new User Widget named HUD_Health and open it.
Recreate my hierarchy:
After that go to Graph and add those variables:
- CurrentDisplayedArmor (float),
- CurrentDisplayedHealth (float),
- NewArmorToDisplay (float),
- NewHealthToDisplay (float),
- MaxArmor (float),
- MaxHealth (float),
- DeltaTime (float),
- isUpdatingHealthDisplay (bool),
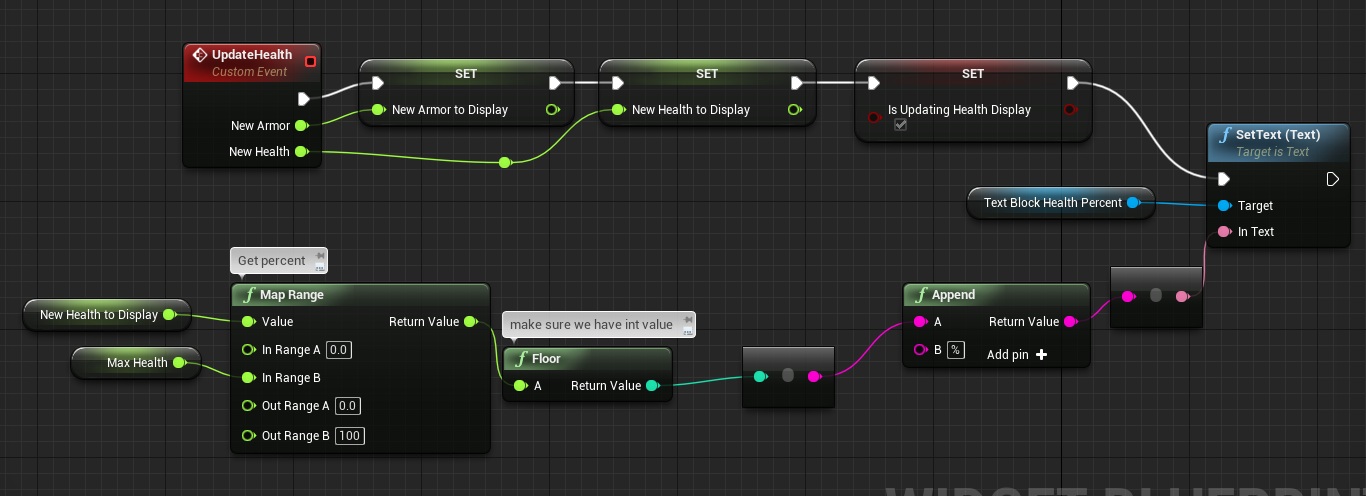
Create new custom event named UpdateHealth with two inputs “New Armor”, “New Health” – both floats.
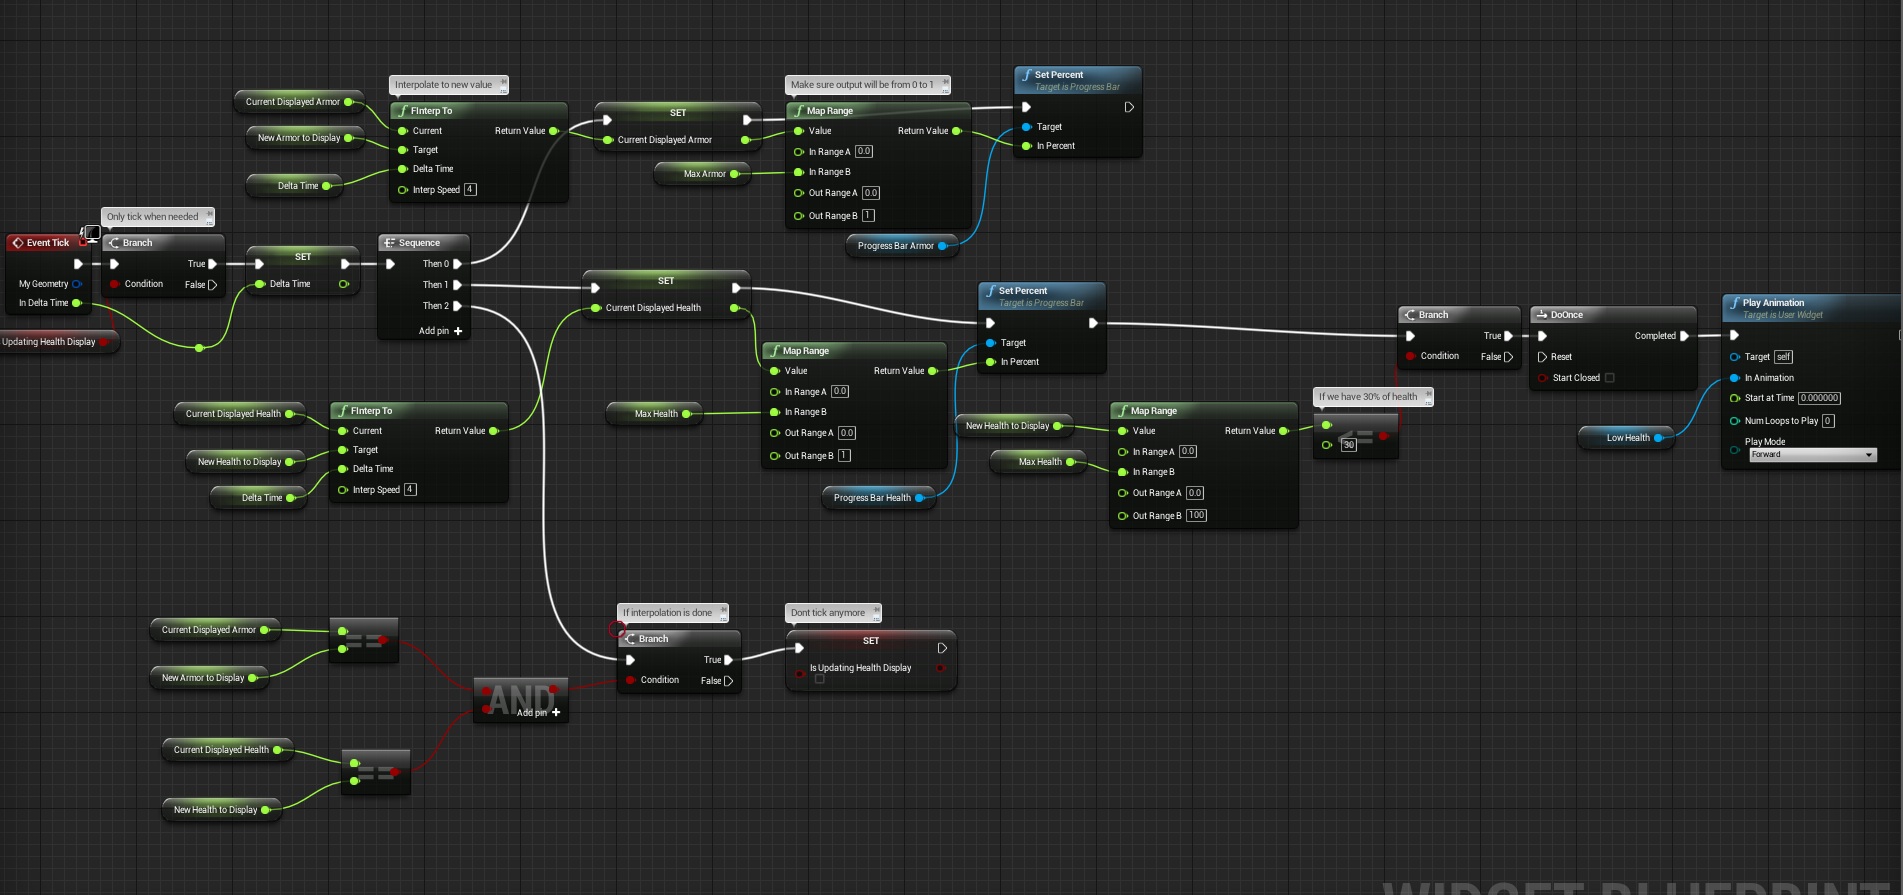
I will use Tick to animate the progress bars. You could use function bindings for this but they will tick all the time taking the CPU.
Last thing: Create new function named Set Maximum Values.
That’s all in UMG.
UPDATING I_TakeDamage
Open I_TakeDamage interface and add PlayerTakeDamage function with one float input Damage.
UPDATING GameplayCharacter
Open GameplayCharacter and add those variables:
- CurrentHealth (float)
- MaxHealth (float, default: 100)
- CurrentArmor (float),
- MaxArmor (float, default: 100)
- isDead (bool)
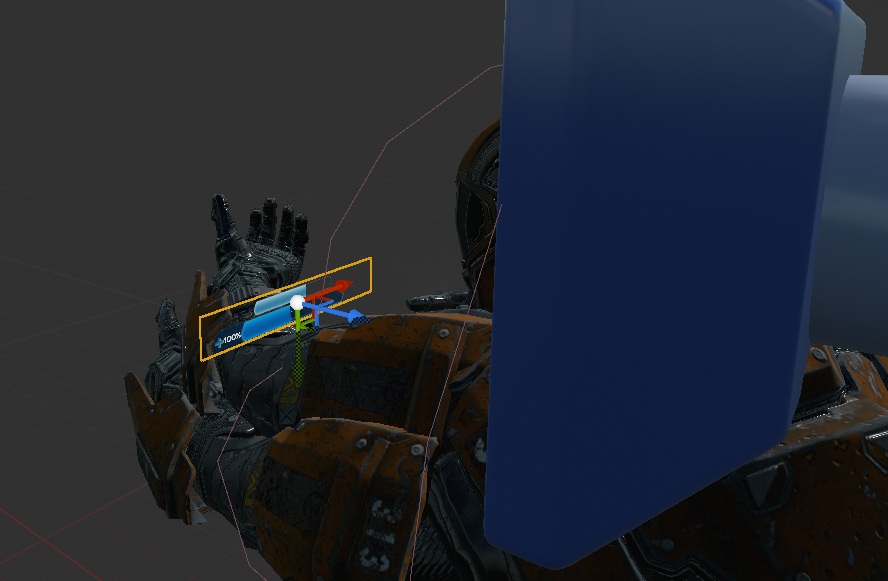
Now let’s add umg widget to components. Create two new components – SpringArm and Widget named HUD_Health.
Make sure SpringArm is attached to FPPMesh, and HUD_Health to SpringArm.
SpringArm properties:
- Location: (X=22.266954,Y=13.166011,Z=128.156479)
- Rotation: (Pitch=0.000000,Yaw=89.999954,Roll=-0.000000)
- Target Arm Lenght: -33,
- Use Pawn Control Rotation: True,
- Enable Camera Rotation Lag: True,
- Camera Rotation Lag Speed: 12,
Widget properties:
- Location: (X=1.366085,Y=-0.000915,Z=-0.000003)
- Rotation: (Pitch=0.000068,Yaw=89.999947,Roll=89.999947)
- Scale: (X=0.030000,Y=0.031240,Z=0.074050)
- Widget Class: HUD_Health – earlier created widget as you may guess,
- Draw Size: 1000 x 150,
- Collision Presets: NoCollision,
The point here is to position our widget near bottom of the camera. I know it isn’t so easy but thanks to that it will work on VR, and you will have fancy lag animation 😉 As always – take your time to position the widget!
If you have the widget you need to set health and armor variables in both GameplayCharacter and the Widget. I will use BeginPlay for this.
So we let know widget about health/armor variables.
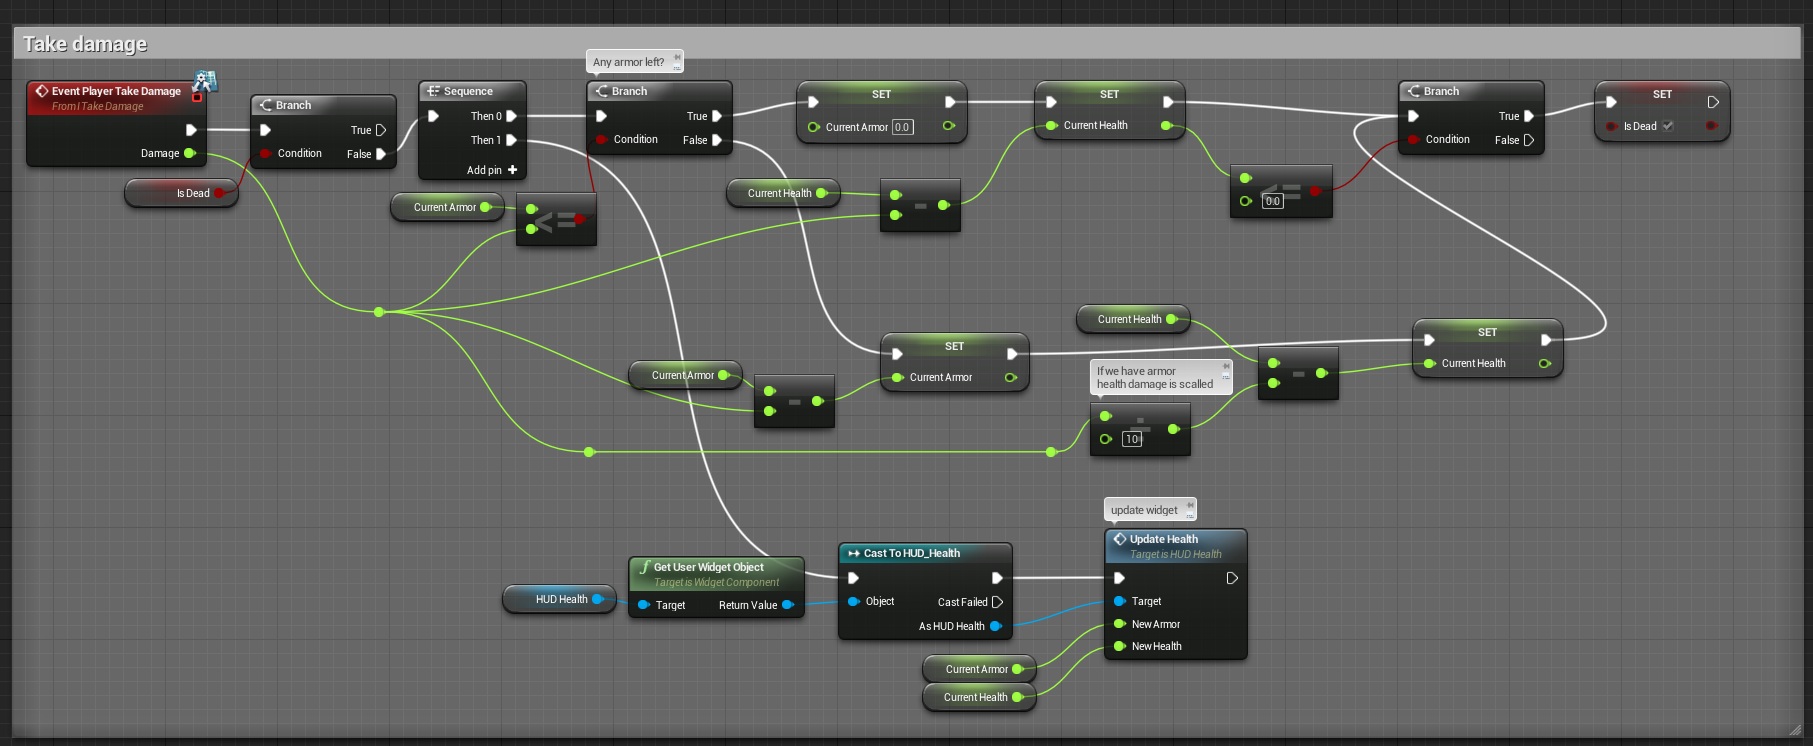
Now let’s drive damage.
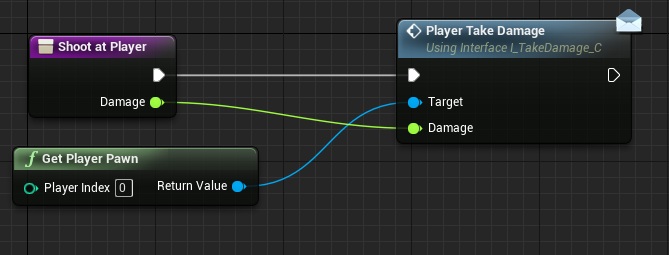
Implement I_TakeDamage Interface and create PlayerTakeDamage event.
Thanks to this we have event based system connected with UMG.
Updating Enemy to make damage.
Last thing left is to update Enemies so they will make damage to player. Open BP_BaseEnemy and add one new variable: Damage (float, default 25)
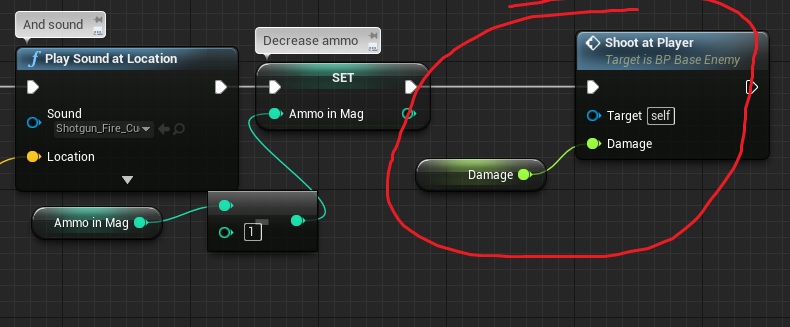
And create new function Shoot At Player with one float input – Damage.
At this point we have only one enemy – Trooper. Open BP_Enemy_Tropper and in the end of Fire event call Shoot At Player.
FINAL EFFECT
Creating ShooterTutorial takes a lot of my free time.
If you want you can help me out! I will use your donation to buy better assets packs and you will be added to Credits /Backers page as well.Implementing game is taking time but writing about this is taking much more effort.




Pingback: UMG UI: Draw current weapon information | Shooter Game Tutorial
Hi and thank you for this breakdown !
I was wondering, does it work with motion blur on or does it make your UI blurry when you rotate the camera?
I’m asking because if you try to set a mesh (not a UI widget) with a translucent material you will have problems if Motion blur is turned on because translucent shaders don’t write in the Depth buffer and the motion blur effect will consider the object very far as a result (and thus apply a strong motion blur on your UI area).
I know it does work with masked materials but who wants UI with masked materials….
I don’t know – will test it out when my new computer will come. Currently when enabling post process I have like 5 fps 😉
my ui is not showing up
Thanx Bro andrzejkoloska ur awesome thanx for tutorials i like ur page 🙂
Pingback: How to implement score and combo system | Shooter Game Tutorial
Pingback: Display target information | Shooter Game Tutorial
My problem with this method: if I set the Blend Mode of the widget component to “translucent”, text gets very blocky / blurry during any movement (Motion Blur is off). “Opaque” works better in that regard, but then there is no alpha on the whole UI element.
OK, got it working.
Figured out that AA has to be either set to FXAA or None, Temporal AA caused my problems.
Also any Blur effects will cause the Widgets to become unreadable, as someone mentioned before.
Wonder if there is a way to have blur that would not affect those, but doubt it, therefore it’s either the one or the other.
I also have to say, it is very tricky to set up the SpringArms so they move just the right amount when Lag is enabled. The small scale and short arm length cause it to move rather strongly.
It would be much easier if the HUD was placed further away (but than it would cause clipping issues, of course).
While you can adjust the speed at which the spring arm moves back, you cannot set the arm’s rigidness as far as I can see.
Anyways, thanks for the tutorial, very much appreciated.
i cant add the image to progressbar why?
If I use a third person to first person game, and the widgets are placed in the player character, how can I make it so you dont see both widgets?