In this post you will learn how to implement look around controls for Mouse, Touch and Gyro. It will cover basics of UMG and blueprint communication. 
|
1 2 |
<strong>This Tutorial has been created using Unreal Engine 4.8.2</strong>. Make sure you are working on the same version of the engine. |
Let’s start by writing down look around controls requirements: – Player can look around using mouse on PC and touch screen on mobile device. Additionally on mobile he can use accelerometer too, – Player should be able to change sensitivity for mouse, touch screen and accelerometer,
IMPORTANT NOTE: Tilt will work only for iOS devices! If you are creating Android game you should think twice if you want to support Tilt. Basically there is a lot of android hardware our there and supporting them all is really hard if you don’t have the devices and programmers. Tilt will work different on different Devices because of different tilt hardware.
CREATING NEEDED DATA
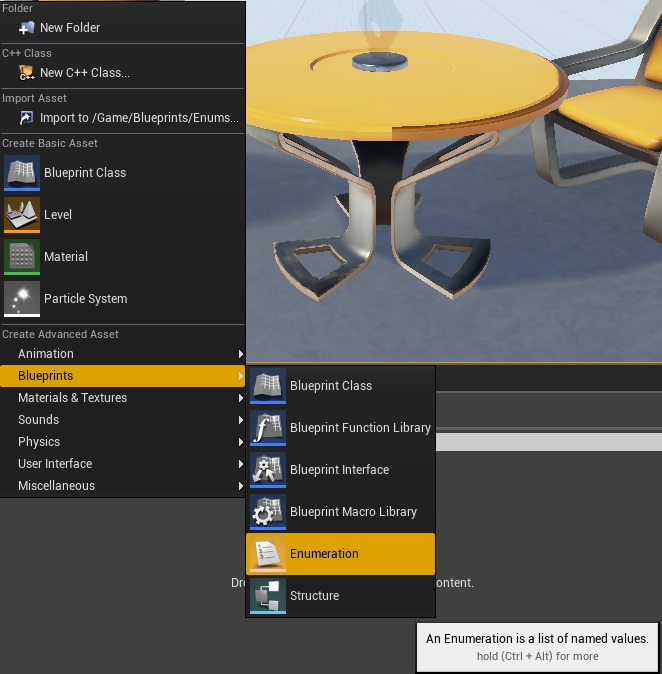
- ENUM: ControllingDevice with Mouse, Touch and Gyro added,

- Game Instance: ShooterGameInstance, (we had created it earlier)
- GameplayPlayerController, GameplayPlayerCharacter, GameplayGameMode, GameplayGameState, GameplayGameHUD (we had created them earlier)
IN GAMEPLAY PLAYER CONTROLLER This class will be responsible for look around controls. Open it and add some variables:
- CurrentControlingDevice (ENUM ControllingDevice) default should be set to Mouse,
- MouseSensitivityMin, float (default: 0.1)
- MouseSensitivityMax, float (default: 2)
- MouseSensitivityCurrent, float (default: 1)
- TouchSensitivityMin, float (default: 15)
- TouchSensitivityMax, float (default: 5)
- TouchSensitivityCurrent, float (default: 10)
- GyroSensitivityMin, float (default: 20)
- GyroSensitivityMax, float (default: 60)
- GyroSensitivityCurrent, float (default: 40)
Now add couple of functions.
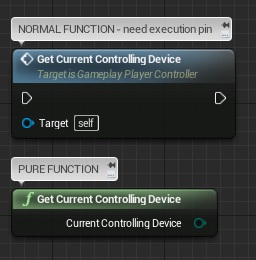
- GetCurrentControllingDevice. This should be pure function.
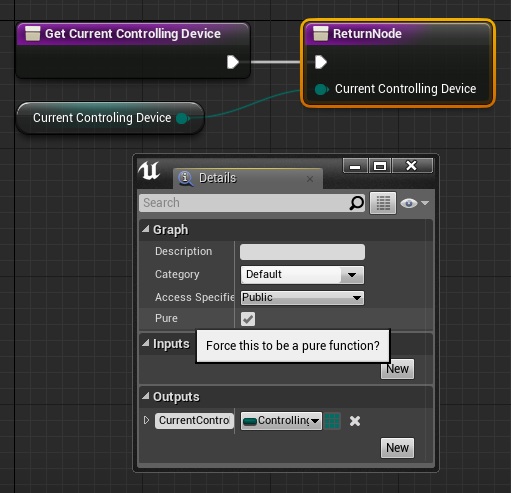
USEFUL TIP: If you aren’t changing any variables in function you can use Pure function which don’t need pin to execute.
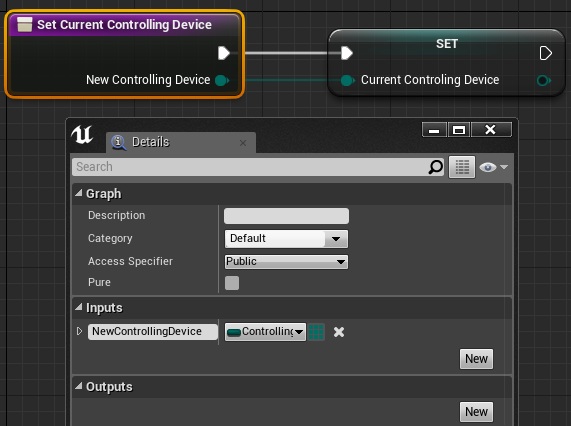
- SetCurrentControllingDevice
- GetSensitivity (add local variable LocalSensitivity)
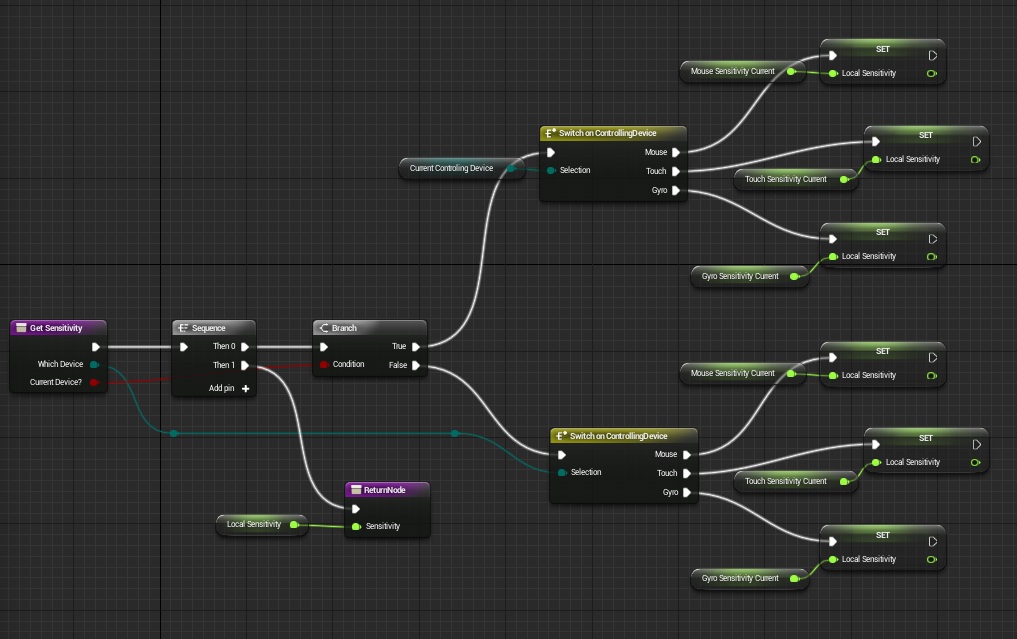
- SetSensitivity
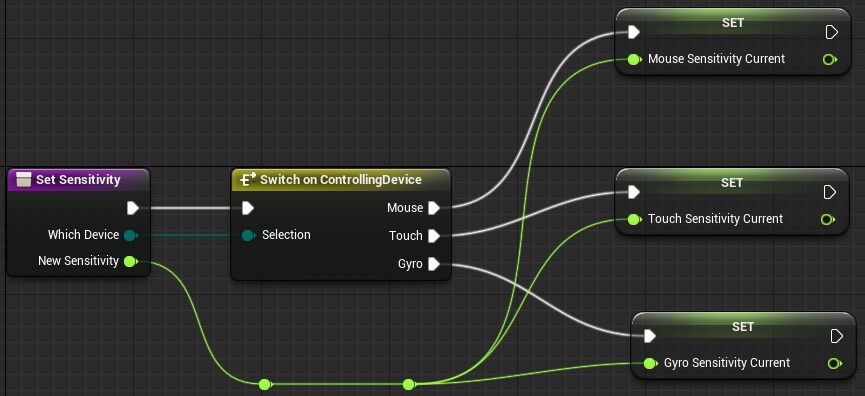
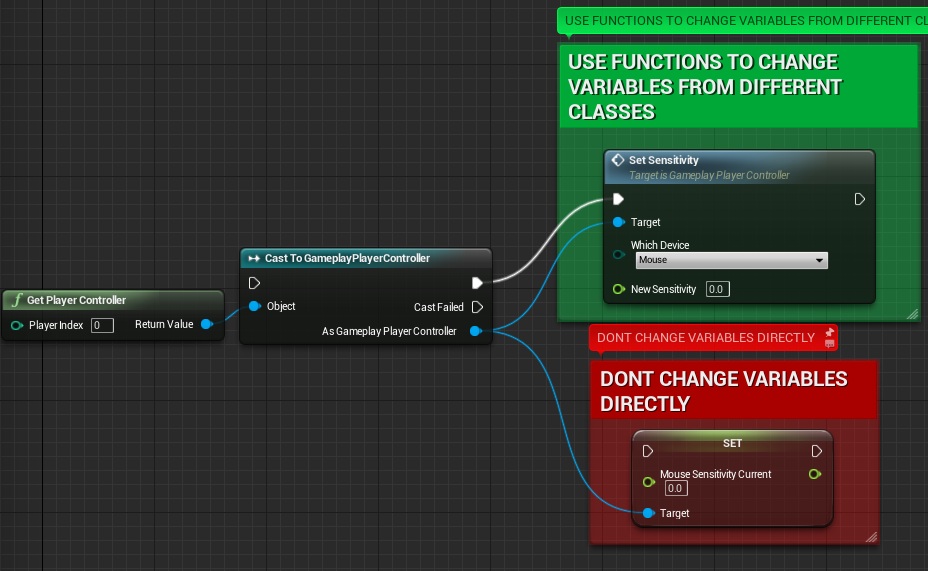
USEFUL TIP: If you will know that variable will be changed from other class ALWAYS put a function like SetSensitivity to change that variable. Never set variables from other classes different than class in which variable was created! Use functions instead. Like I did with SetSensitivity and SetCurrentControllingDevice. The rule is that only class which have variable declared can change it.
We are still in GameplayPlayerController but we need to add new input axis in Project Settings. To do so go to Project Settings -> Input and add two new axis from MouseX and MouseY (MouseY should have scale “-1”) as in screen. 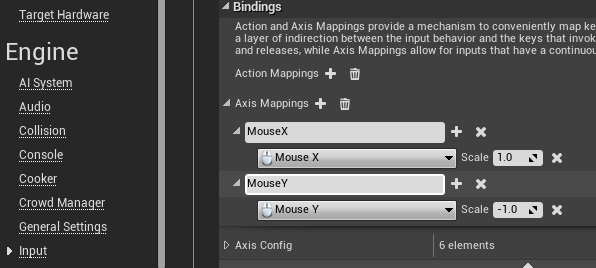
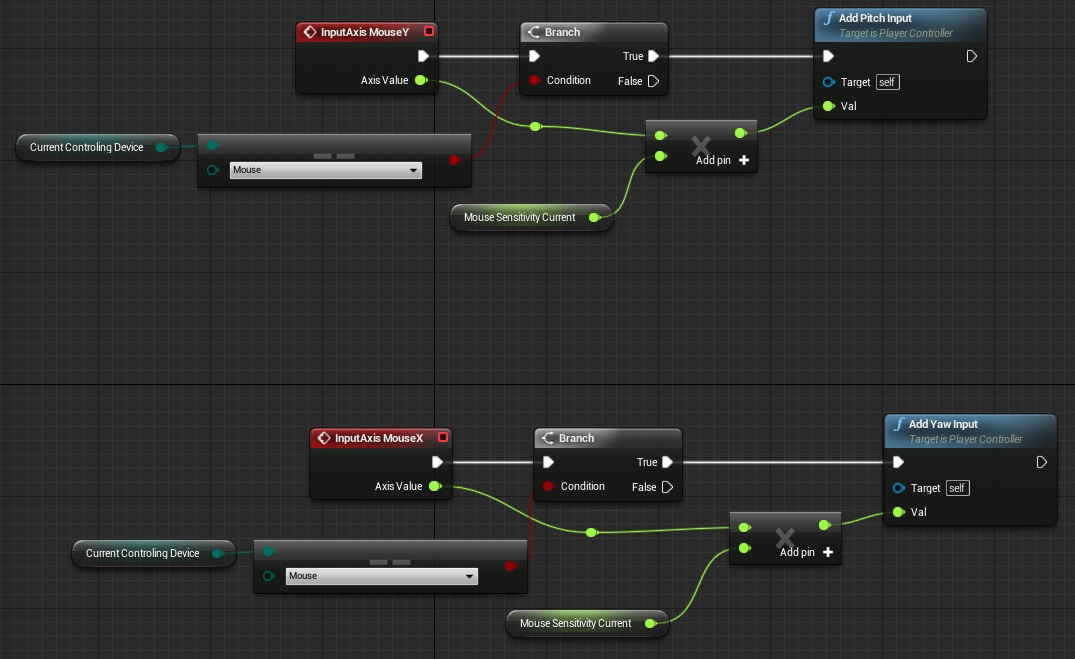
MOUSE LOOK AROUND Now when you go to GameplayPlayerController you can find your MouseX and MouseY inputs. Let’s create events for them to drive look around for mouse.
From now controls are done for mouse, you can test it out!
TILT LOOK AROUND You will need only one variable: LastTilt (vector) to do tilt controls. In GameplayPlayerController find event “Tilt” and create this graph. 
USEFUL TIP: To test Touch or Gyro controls you can use UDKRemoteTool. Just run the game on PC, run UDKRemoteTool and set your PC IP. Your device need to be in the same network as your PC.
TOUCH LOOK AROUND As earlier you will need one new variable: LastTouch (vector) and InputTouch event in GameplayPlayerController. 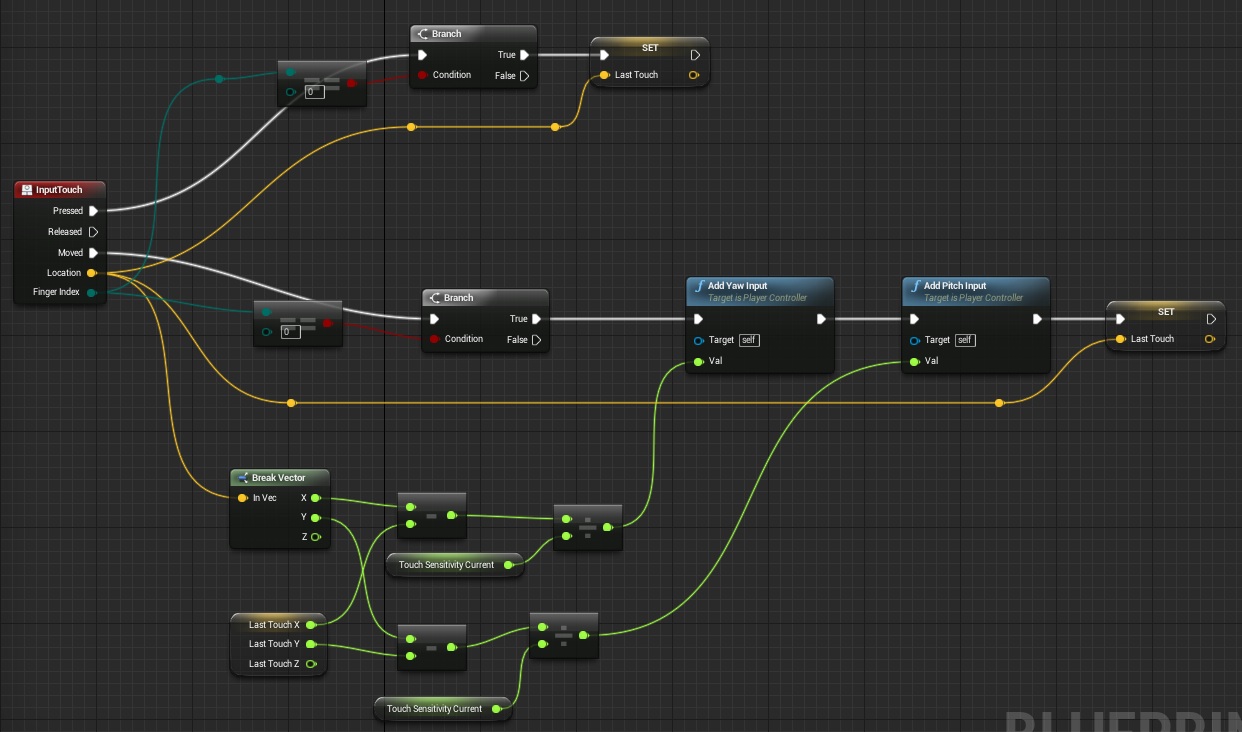
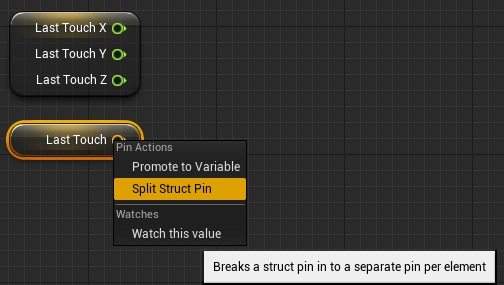
USEFUL TIP: You can break down struct variables as I did with LastTouch. Just right click on variable and “Split Struct Pin”
It’s all for the controlling part. It was easy! Now let’s move to changing sensitivity with UMG widget.
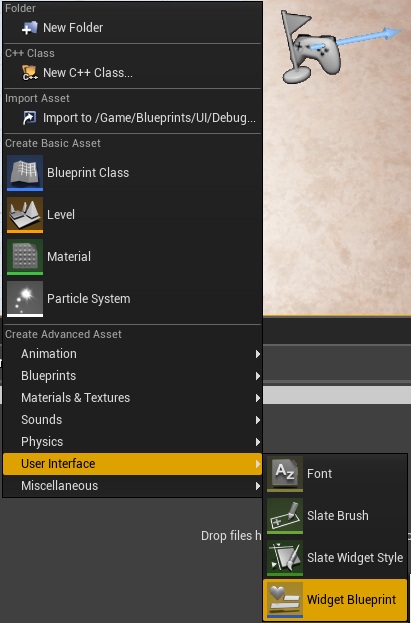
CHANGE SENSITIVITY IN UMG I will use UMG to change sensitivity, but it will be only debug widget. UMG is great tool and I will do a lot of tutorials when doing final UI. For now it will be just debug panel to change sensitivity. First you need to create new Widget. Name it UI_Debug_ChangeSensitivity.
Open it and add sliders like I did here. Remember to name them correctly 😉 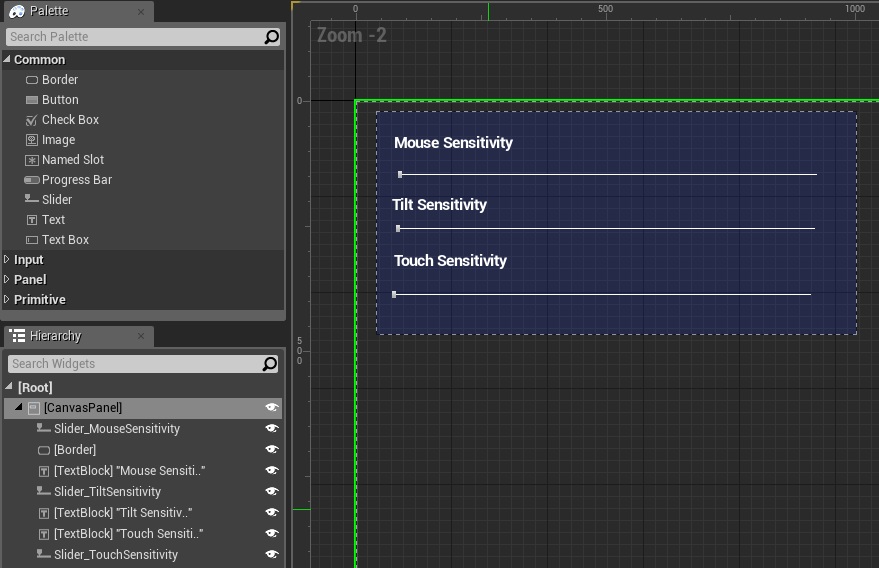
Now go to graph and create function GetController. It should be pure and return GameplayPlayerController. You should create such events early in Blueprints because they will look much more cleaner later.
Now in event graph create event Construct and update sliders information. I will use Float Map Range which is super cool for this kind of things. 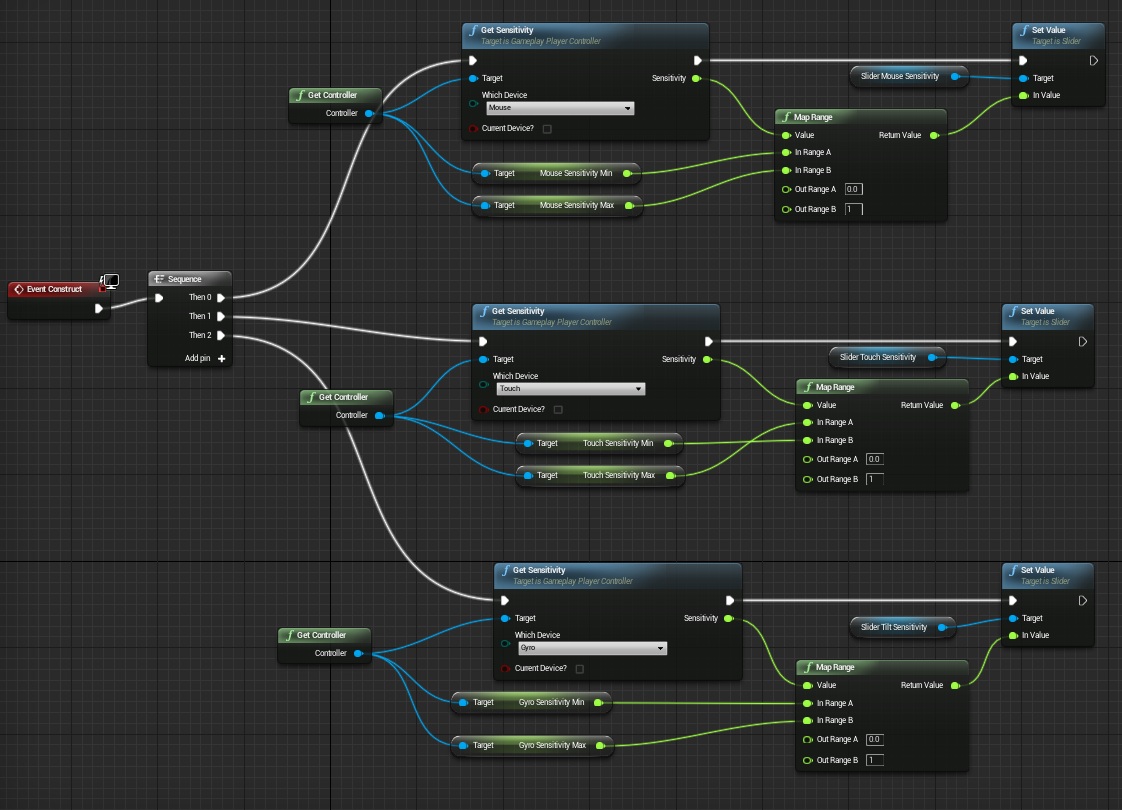
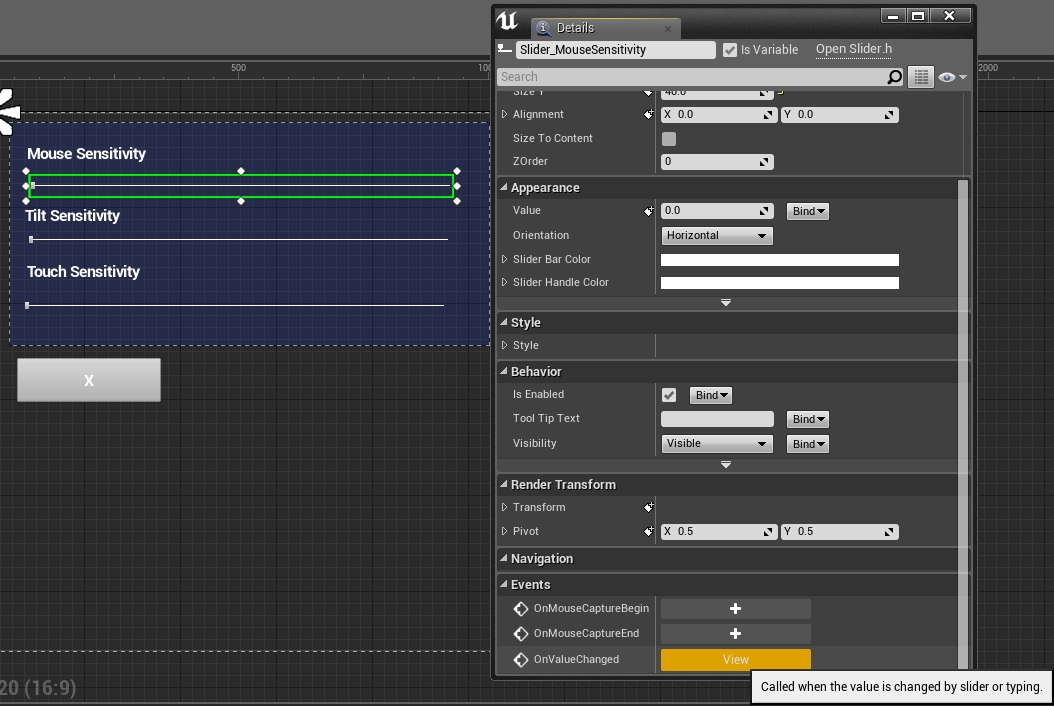
Now if you click on the Slider in Designer view you can add new event – OnValueChanged.
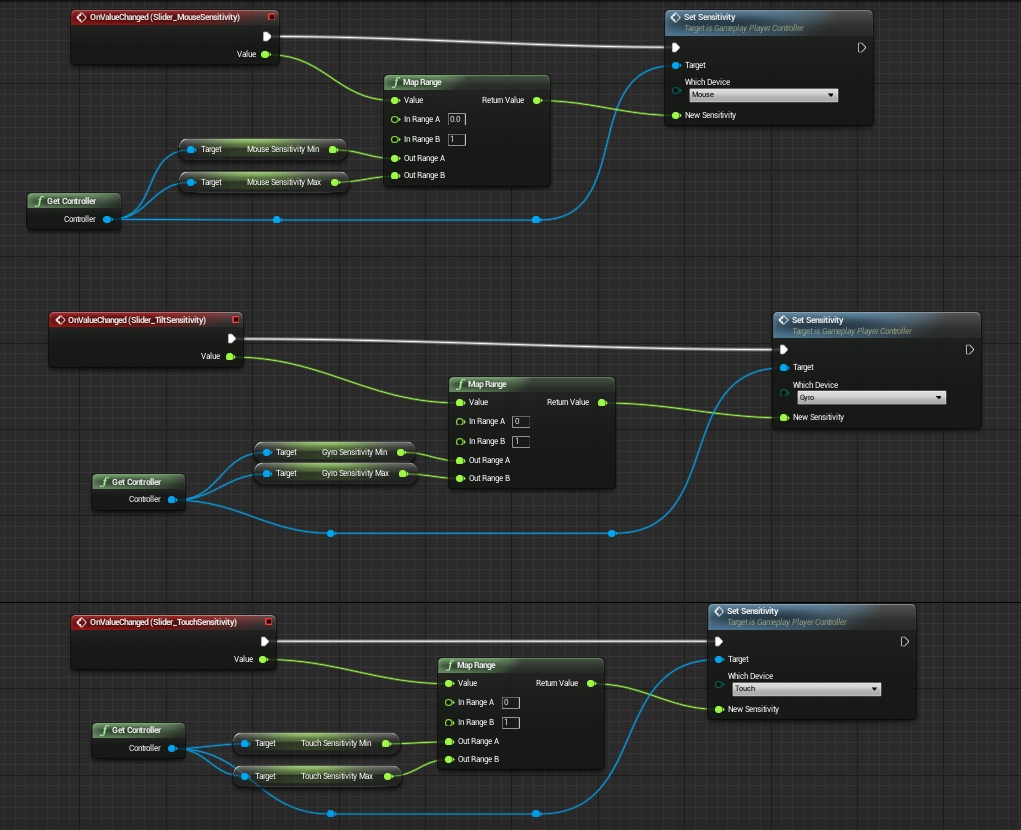
Add this event for all of the sliders. We are doing the same thing so here’s screen with all of them added.
Last thing in this widget is to create button and add an event to close the widget. 
This is all in the widget. As I said it’s only for debug. UMG is big and powerful tool and I will definitely do tutorials about it.
LAUNCHING UI_Debug_UI_Debug_ChangeSensitivity Go back to GameplayPlayerController and create a key event. Right mouse on graph and just type “O” you will see key events.
Now during in-game you can press “O” and widget will appear. 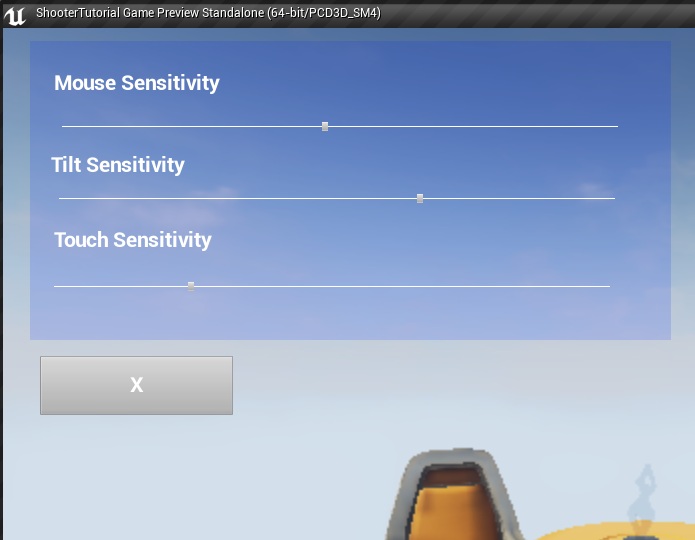
That’s all in this post. You have mouse touch and tilt controls implemented and you can change sensitivity for all of them using custom widget. Hopefully this post will be useful for you guys!


Pingback: How to add weapons – basics + equipping | Shooter Game Tutorial
First: When I use Get Sensitivity node in UI_Debug_ChangeSensitivity it doesn’t have an execute node. (Possibly because it’s pure, right?) Will it be a problem?
Second: When I set sensitivity to max in game it moves slover and when I re-open Mouse Sensitivity menu pressing O the slider is set to min. Have nay idea?
Oh, ok. I figured it out. I didn’t set In Rage B to 1. https://shootertutorial.files.wordpress.com/2015/06/setsensitivitywidget.jpg
A well made tutorial.I did get stuck for a little ,but i eventually figured it out and it made be have a better understand of whats going on in the code .Thank you 🙂
OK, so I’m kind of stuck.. Can anyone help me?
The problem is that it says that I should create some variables. The first one being ENUM ControllingDevice named “CurrentControlingDevice”. So when I create a variable and go to Variable Type-> ENUM – there is no “ControllingDevice” even though I created it earlier. Am I missing something or the problem comes from me using a newer version of UE (4.8)? Please help and thanks in advance!
P.S: Sorry for the newbie question, I’m kind of new at this but I’m trying my best to keep up
Just seek and take “Enumeration”.
There is no “Enumeration”… There is one called “Enumerators” so is this it or I have to do something else?
Thanks again 🙂
Use the ENU variable. (took me ages to figure it out)
I dont see any of these “variables” HELP
I just figured it out, the VAR name is the name of the Enumeration that we made before, with the mouse, Gyro, touch that we put on it. This took me 10 Mins to figure out what he meant by “ENUM ControllingDevice” Which was a reference to what we made before.
Just a couple of tips for the people new to Unreal Engine 4 that andrzejkoloska doesn’t mention it:
-If you are wondering from where that “Return Node” component comes, it is created when you create an output at the function (example: GetCurrentControlDevice has an output called CurrentControllingDevice. That’s the Return Node).
-Unable to see a component to place? Pick a pin from a function or another component to see what components are compatible with. Most of the times the ones you are looking for will appear this way.
-(Currently in 4.8) the switch and others will appear as “Switch on Enumerator” instead of the name of the function, just in case if you are wondering about it.
-The color shows the type of variable: Dark Green-Enumerator, Light/Yellow green-Float, Red-Boolean, Blue-(related to player control), etc.
-At “Mouse Look Around”, you are wondering what are these “==” and “X” components? Seek them as “Equal” and “Multiply” (this one is float*float).
-(Now in 4.8) When creating the function GetController of the UMG slider, it needs now mandatorily a pin for “Cast Failed”, or it will throw you a blue warning telling you “that it doesn’t find a Return Node”. Go do something like this: http://i.imgur.com/mlBrdZr.png
-When creating the close button, in case you don’t know how to find that “Set” with that boolean, seek “Set Show mouse cursor”.
-While you are creating the event to make pop-up the window, in order to get the “Create UI_Debug_ChangeSensitivity_C widget” component, place a “Create Widget”, then at the purple pin (Class), select the widget on the dropable menu.
The tutorials are sometimes hard to read, but they are really useful. Thanks andrzejkoloska for write them.
Thanks Maestro!
hey bro i get some problem when i press o i get menu and menu work fine but if i press o menu again its load lot of time during menu open and its turn dark blue shade lots time load when ever i press O on game
Which UE4 version are you using?
Hey, me too, i’m using UE4 4.18….~
And my mouse leave the viewport and I can’t get back in game
Yeah, this whole part is a bit confusing for me. I have no intent to make a game for handheld, thus no need for touch and such, just mouse. But by default without doing this part, playing in browser I can already move around (look around) with the mouse… so is any of this actually needed?
No it isnt needed, you are ready to go forward:)
Yeah, this whole part is a bit confusing for me. I have no intent to make a game for handheld, thus no need for touch and such, just mouse. But by default without doing this part, playing in browser I can already move around (look around) with the mouse… so is any of this actually needed?
OK, I’m lost… How did he get this purple “Get Current Controlling Device” ? The only purple thing I have is “Construction script” and I have no idea how to create the one I need.
P.S: If it’s possible I want someone (who understands) to give me his/her e-mail so that he/she can explain to me what to do and why am I doing it. It’s just that I want to know what I’m doing, I want to understand it. For now ofc I just want to move on, but still..
Thank you!
Wait, I think I got it.. I didn’t see the “Now create a couple of functions” part.. Sorry…
I have done eveything here with no compile errors but for some reason the UI doesn’t show when I press O
Sorry I got everything working, for some reason the map kept loading the third person player instead even thought all the settings were changed.
First off thank you very much for the amazing tutorials. They have been so helpful. I am very green when it comes to UE4, and your tutorials are helping me leaps and bounds. But anyways, I noticed that when I hit O twice by accident, it cause the project to act a little weird. I went a head and played around with blueprints and came up with a little fixes. Give me your two cents on this setup please. First I made a small Function called IsOpen, which just sets a variable called IsOpen?. Then in the UI_Debug graph I had the IsOpen? Variable set to false at the end of the X button you made. From there I went to the GamePlayerController, made a branch off of the O event node. The Condition is the IsOpen? variable. True is left alone. On false i set the variable to True, then run the rest of your script. So that way the widget UI can’t be open more then once. If that all makes sense. Any thoughts on this would be nice.
Hi, doesn’t show on screen when I press “O”, I use UE4.8.3
Thank you
Pingback: Shooter Game Tutorial 2: 用鼠标,触摸,陀螺仪来控制第一人称环顾四周 | 云图Studio-专注Unity3d外包/UE4外包/Kinect外包
Pingback: Shooter Game Tutorial 2: 用鼠标,触摸,倾斜度来控制第一人称环顾四周 | 云图Studio-专注Unity3d外包/UE4外包/Kinect外包
Pingback: Shooter Game Tutorial 2: 用鼠标,触摸,倾斜度来控制第一人称环顾四周 | 云图Studio-专注Unity3d外包/UE4外包/Kinect外包
Pingback: Shooter Game Tutorial 2: 用鼠标,触摸,倾斜度来控制第一人称环顾四周 | 云图Studio-专注Unity3d外包/UE4外包/Kinect外包
Hey. Firstly thanks a lot for everything. But I have a question. Where is event construct?
ok its fixed 🙂
fixed how?
Thanks a lot for everything. But Where I find it ?
I dont see it because it’s no name ?
Sorry, im newbie UE4 (Ver 4.9)
See image: http://imgur.com/4OGHPM6
Thank for your help.
OK. Sorry i find it ? So hard with newbie. Thank for everythinng.
hi, But where I find
this? I do not see because there’s no name
Thanks for your help ——–>>> http://imgur.com/4OGHPM6
Hey, for some reason whenever I press “O” my widget appears just fine. However when I click and drag to change a slider, the slider isn’t interactable. Instead it only moves the camera. Pressing the button also doesn’t close the widget. Any idea what I might have done wrong?
Have you found the solution ? im also facing the same problem,, i’m currently on 4.10.4 :/
Just wanted to let you all know that in the current version of the Unreal Engine (4.10 as of 18/11/2015 UK Date) the Map Range requires Clamped Map Range. Also, providing you do this, it all works perfectly. Thanks for the tutorial!
help me please with a part of widget construct. I don’t get it. How we can get “Mouse Sensitivity Min” or “Mouse Sensitivity Max” in Event Graph? Where I can found it? I know that I use this vars in GameplayController
I checked everything twice and i get no effect with pressing “O”. And is it normal that when i start the game there are two circles at the right and left of the screen?
Last part of the tutorial: LAUNCHING UI_Debug_UI_Debug_ChangeSensitivity
The only difference to mine is that its named as UI_Debug_Change_Sensitivity without double UI_Debug at the beginning and on the EventGraph of GameplayPlayerController is the …Sensitivity_C missing in the word.
Did you get any errors / warning during run? I really can’t help you if you won’t give me more details.
I use UE 4.10. I get no warnings or errors. I’ll sent a link to the screenshots and the whole project as .zip.
Link:
https://drive.google.com/folderview?id=0B7ICq8XrKYT4dHNrX01ud1VzdTg&usp=sharing
This tutorial was created using 4.8.2 version of the engine. You need to use that version.
Is 4.8.3 ok because 4.8.2 makes trouble in compiling?
Great tutorial. Thanks to the community for filling up the blanks for noobs like me. I had trouble completing some parts of the tutorial, but I found help in the comments in all the cases, and all this looking around makes me understand the inner workings of things better.
Now, at the end of the tutorial, I launch the game, open the widget, but the sliders do not show the current value. If I click on them I can set the sensitivity just fine, but somehow the Event construct doesn’t use the current sensitivity to show the current value on the sliders.
Any idea why?
I found out why. My get Sensitivity function did not set the Local Sensitivity value properly.
hi, But where I find
this? I do not see because there’s no name
Thanks for your help ——–>>> http://imgur.com/4OGHPM6
OK. Sorry i find i
Thanks for your help ——–>>> http://imgur.com/4OGHPM6
so where and what is it actually ?
and what’s that small thing without name and with Add pin + and a big cross in the middle
it’s Equal Enum. Docs for it is here: https://docs.unrealengine.com/latest/INT/BlueprintAPI/Utilities/Enum/Equal_Enum/index.html
Tutorial very good, some changes to works for the 4.10.1 release!
I seem to have gotten everything working, but when I open up the widget, it continues to move the player camera until I click on the widget to gain its focus. Is this normal or did I mess up somewhere?
I have this problem too, so I change a little in “O” functions.
See my picture: http://imgur.com/JeyP78K
I have an alternate solution to solve this – which also prevents a different error noted elsewhere (about multiple “O” presses causing multiple UI interfaces to stack).
In GameplayPlayerController, where you put the Input (for the “O” key to open the Widget), the “Pressed” is connected to “Set Input Mode UI Only”. I had been receiving an error when I ran it (“Set Input Mode UI Only expects a valid player controller as target”) so I made a “Get Player Controller” node and connected it to the “Target” input of “Set Input Mode UI Only”.
This solved the error, and also made it so the camera no longer moves when the UI is open. It also solved the stacking UI interfaces (pressing “O” again does nothing, until the UI is closed).
This was done using UE 4.14.1
Hope this helps!
how do you display the mouse for some reason the mouse it not being displayed. also set input Mode Ui only doesn’t seem to have the checkbox to lock the mouse to the viewport.
Cannot find the Set slider node in Event Construct
i woud love to see you youtube version becous i dont know if i have to work in a c++ file or in the blueprint editor
This is all nice and well, but unless you do this every day, this is not doable.
Could you show an image of the whole graph or explain in sentences what you are doing and please don’t skip parts that might seem obvious.
(I setup all the files from the previous tutorial. I am in “Gameplay Player controller” and now I have no idea what I should do. The “Current Controlling Device”, was it created inside the Blueprint tab as a variable (Enum) and then the created enumerator selected?
Then how do I even add those values?
Then in the 1st image that you posted, I can only get the green bubble (pin, whatever), the purple ones are not retrievable.
So just a bit more detail and infos would be nice. I was able to follow the next tutorial, btw.
Also, on youtube when searching for this, everybody does this stuff via input and then some Blueprinting, what’s the benefit of doing it this way?
ps: where I’m at: http://abload.de/image.php?img=whatnow3xjqf.jpg –> Maybe somebody can post a picture with the next step??
Cheers
Agreed. I’m bailing on this. There has to be a more clear tutorial out there somewhere.
I think the point of this is that you actually learn the engine, and not get spoonfed every detail. Yes this takes a lot longer but having to figure things out and actually understand what everything means will help you a ton. Also look in the comments if you can’t figure something out. This tutorial is great I like the style
Guys help me please with a part of widget construct. I don’t get it. How we can get “Mouse Sensitivity Min” or “Mouse Sensitivity Max” in Event Graph? Where I can found it? I know that I use this vars in GameplayController
I have the mouse look and touch look working but the tilt does not work.
Hi Frank, I had the same problem. I’m not sure what kind of implications this will have on later tutorials. But the Variable CurrentControllingDevice was default set to Mouse. When I changed it to Gyro it began to work with the UDK remote.
So, I went into the Event Graph for the GameplayPlayerController and added a SET CurrentControllingDevice right after the input tilt and set it to Gyro. I then did the same thing for the Mouse actions, but set the variable to Mouse. Same for Touch.
I hope this helps, It was killing me that the gyro wasnt working
Peace,
BRBunnie
I can’t get the Get Sensitivity function calls to appear in the UI_Debug_ChangeSensitivity blueprint; they just don’t appear when I look for the names…
I am a few versions ahead with UE (4.11), however, but is there a way around this without having to downgrade the version?
Try disable “Context Sensitive” in “All possible Actions” menu.
I’m still finding out why doesn’t it have execution node though…
bah, forget it, I shouldn’t set it to pure function.
For those lost who cannot find “Get Sensitivity” in the UI_Debug_ChangeSensitivity blueprint, you need to add in the “Get Controller” function first, and then drag from the Controller node to a new node and search for “Get Sensitivity”. It seems a little backwards, but that’s what worked for me. This had me scratching my head for 30 minutes.
I’m guessing this has to do with the “Get Controller” function linked to “GameplayPlayerController” that is set up in the outputs.
You sir, deserve a medal :D.
I’m on 4.14 and had to use this trick too.
If you can’t move the sliders, set their Zorder to 1 in the Designer.
In the 3rd last step in the “onValueChanged” function I can’t find the last node we need. The set sensitivity one with the target being the gameplay player controller. How do I get that set sensitivity node like you do? Thanks for your help in advance!
also I can call on the set sensitivity function but the target is the ui debug not the gameplay player controller
nevermind It wasn’t under “call on functions” it was under “classes”
in the get sensitivity what’s the actual use of the branch node? isn’t it the same thing to not have the ‘which device’ variable and go ahead with using only the sequence node with one set of the devices’ ‘local sensitivity’?
Hi how do you inverse the mouse pitch controls I hate invert controls. Please.
When i press “O” nothing happens. Any advice?
When I press o again it wont close?
Hello!
I’m stuck at a point where I don’t know what to do.
I’ve set everything you wrote, but moving my mouse on X axis doesn’t do anything.
Y axis works as supposed.
What can be the cause of this problem?
Thanks!
Hello!
I have a big problem.
My MouseY input works as supposed, however MouseX doesn’t work.
I have done everything written in the tutorial.
What can be the cause?
Thanks!
I’m having some problems with the looking around section, I’m not too sure where and how to implement these events since the photo doesn’t seem to display the names of certain boxes. Any help is appreciated 🙂
hey guys .. this is all the calsses in 4.16.2
it works just fine .. i didn’t used tilt and touch , just mouse sensitivity works just fine ..
hope it helps
https://uploadfiles.io/hmjre