Lot’s of my friends who are doing games using different engines than UE4 have problems with starting using UE4 because they do not know how the engine works. I will start with explaining how the main classes work.
Let’s create new blank project with starter content.
|
1 2 |
<strong>This Tutorial has been created using Unreal Engine 4.8.2</strong>. Make sure you are working on the same version of the engine. |
High level class explanation:
- Object Object is base class for rest of Unreal Engine classes. It can’t be added to world (can’t be spawned or placed in level) but it can have data and functions. If you don’t need to have something in the level Object is a class for you because you won’t have draw calls from Object. Unfortunately currently (UE4 4.7) you can’t use Objects in Blueprints. For such behavior you should use Actor Component which I will describe in later posts.
- Actor Actor can be spawned in Level. It can have components for example Static Mesh Component which will be graphics representation for Actor. If you want to have access to Actor you would need to spawn it in Level. You will get draw calls from Actor so if you have class which is data only don’t extend from Actor.
- Pawn Simply Pawn is just an Actor but it can be possessed by PlayerController or AIController. For example Pawn can be a dog controlled by the player or unit controlled by AI in RTS game.
- Character Character is a Pawn but with MovementComponent added. Thanks to that it can use navigation and move around. Character have SkeletalMeshComponent added as well so you can assign graphics representation by default.Let’s create new Character and name it GameplayCharacter.
USEFUL TIP: On Mobile MovementComponent is expensive so if you are doing RTS game with lot of Characters you should extend from Pawn and implement your own movement.
- PlayerController The most important part of PlayerController is that it can get input from Player (keyboard, mouse, touch, pad etc) it can posses Pawn and Character. You can have different PlayerControllers if you have different movement functionalities. For example if you are controlling a car with CarPlayerController you should have different PlayerController for controlling an air plain. The same thing comes for controlling Main Menu or controlling Gameplay. Let’s create new PlayerController and name it GameplayPlayerController.
- AIController Like PlayerController it can posses Pawn and Character but it doesn’t have access to Player input. Instead it have access to all AI tools – behavior trees, sensing components etc.
USEFUL TIP: Pawns vs Controllers Basically Pawn should be graphics representation (mesh, animations etc) and Controller should be Pawn’s brain telling him where to move, what to do etc.
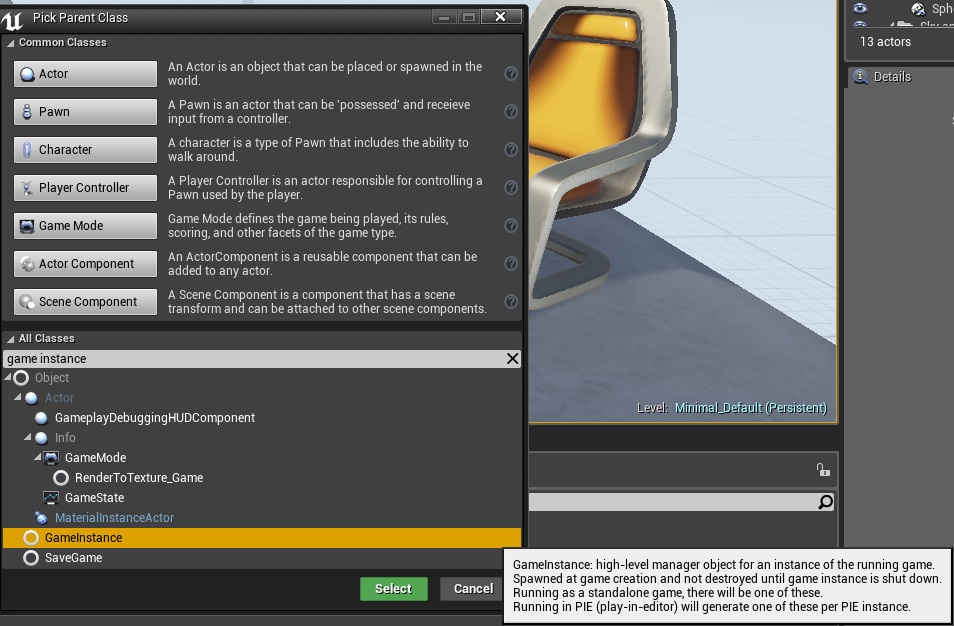
- Game Instance. Game Instance is the best class for storing global data. This class will be spawned at game start and deleted when closing game. Other classes are spawned at level start and deleted after traveling to other level. You have access to GameInstance class from every blueprint! Let’s create one. Name it ShooterGameInstance.
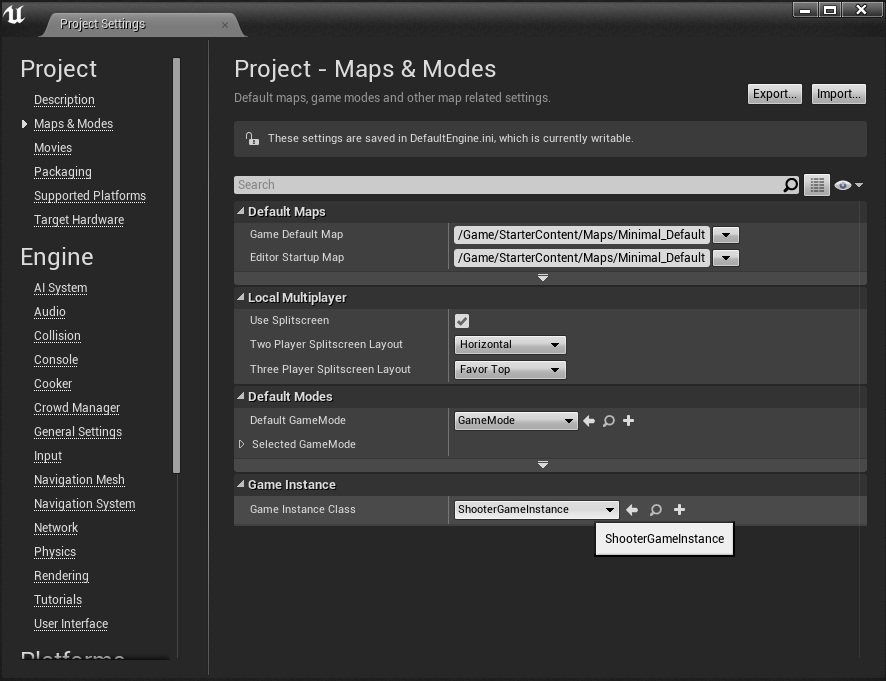
 Game Instance need to be connected with your project. To do so go to Edit->Project Settings->Maps&Modes and change default game instance to ShooterGameInstance.
  From now when you start the game ShooterGameInstance will be spawned and you will have access to it from all other classes.
 - Game Mode The most important part of Game Mode is that only server have access to it. In single player game player is server so it isn’t necessary to use server->client functionality but still you should know about it. It have events when someone connected to your Level or someone was disconnected. Basically GameMode stores Level Default’s information:
– Every level in Unreal Engine need to have some Game Mode connected,
– Game Mode store data for Default Pawn, Default Player Controller, Default HUD Class and Default Game State,
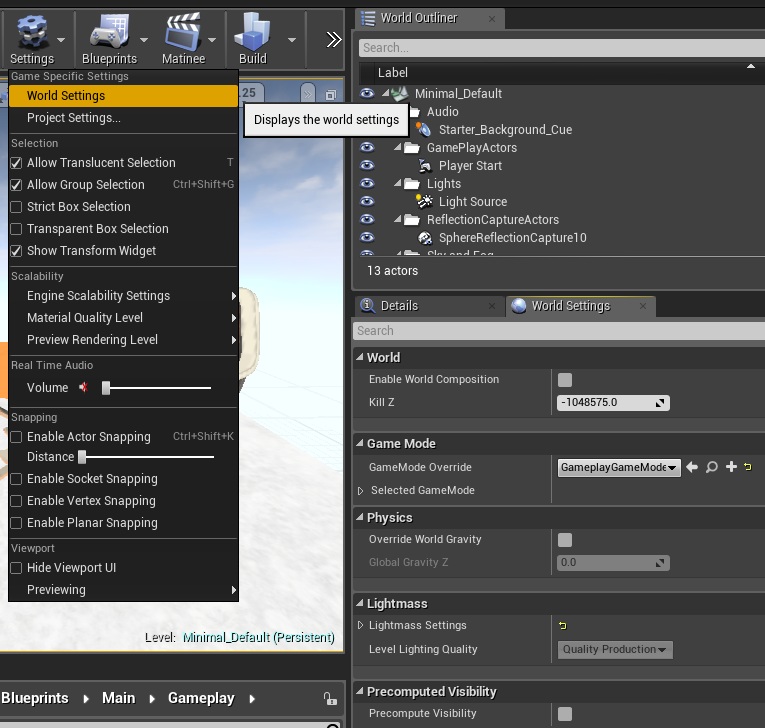
– They will be spawned when Level will be opened,Mostly Game Mode is used for determining which player win the Level or what are the level completion circumstances. Simply Game Mode is about Level rules and managing them.Let’s create Game Mode class and name it: GameplayGameMode. Later on we will have more GameModes (for menu or different gameplay activities) After creating Game Mode it need to be assigned to a Level.
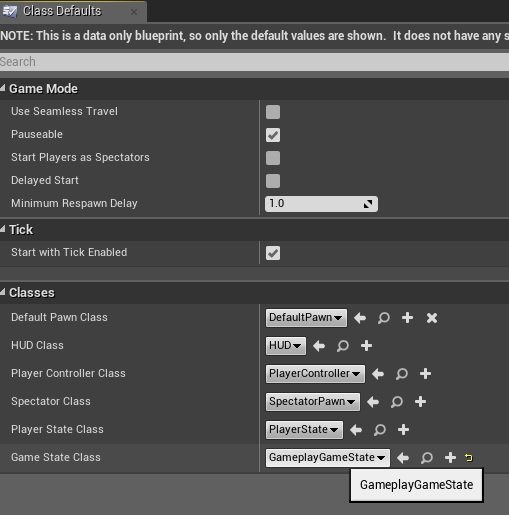
- Game State Simply Game State is about tracking progress of the Level (Game) and everyone have access to Game State. For example Player want to know which turn it’s in turn based game or what’s the current goal in shooter game.Let’s create GameMode class and name it: GameplayGameState. Assign created GameplayGameState to GameplayGameMode by opening GameplayGameMode and choosing GameplayGameState.
 Please read Rama’s post about Game Mode vs Game State in UE4 AnswerHub.
 - HUD In Unreal Engine 3 this was the main class for creating 2d UI. In Unreal Engine 4 we have UMG which is much more better. Still I’m using this class to store references for my UMG Widgets and it’s useful for it because you have acces to HUD from all of the classes.Let’s create HUD class and name it: GameplayHUD. As GameState HUD need to be assigned to GameMode. Please do so.Please connect created earlier GameplayPlayerController and GameplayCharacter to GameMode as well.
Unreal Engine 4 is really big engine and you should try to use it as intended. Learn those classes and think where to put functionalities before implementing them! Last thing that I want to explain Today is how UE4 handles running the game because it’s connected to those classes.
- When you run the game GameInstance class will be spawned,
- Default Level will be loaded,
- When Level is opening its checking for GameMode and spawning all of the default classes from GameMode,
- DefaultPlayerController is asked to posses DefaultPawn so you don’t need to posses it manually,
- It’s spawning all Actors that was placed in the Level.
Of course its high level overview. When you are opening different level (or restarting the current one) all classes are destroyed except of GameInstance class! If you have questions about Unreal Engine 4 base classes please let me know, hopefully I will be able to answer!
Pingback: First person look around controls – mouse touch tilt | Shooter Game Tutorial
Hi, i just need to change, into gamemode, the Default Pawn Class to connect GameplayCharacter and GameplayGamemode ?
Hi, just a quick question:
How can i connect the GameplayCharacter to GameMode ? just have i to change the Default Pawn Class into game mode ?
Pingback: How to implement score and combo system | Shooter Game Tutorial
Just one thing in case you are getting weird problems in any part of the tutorials:
When you are going to create the project, is not only a blank one with the starter content, but is the BLUEPRINT blank, not the C++ one.
Of course, you can go try follow all of this from the C++, but you will find problems that the author doesn’t find while creating the tutorial. Also is easier for the rookies.
Just a heads up this tutorial uses paid assets in the unreal engine store so you may want to look elsewhere for learning resources before sinking time here.
Or you can just make your own…. or get some placeholder free ones online, don’t have to use the same assets.
I think there’s no Tutorial how to config
There’s only Explanation,
What should I create and Not ?!
As you can see I have created GameMode, GameState, GameplayGameInstance and connected everything in Level and project settings.
I saw that before you reply (i should I’ve to read all the Page from the beginning), Can you please highlight Them on the blog, So everyone can know what to do 😛
Pingback: 配置新的工程。UE4最重要的一些class的解释 | 云图Studio-专注Unity3d外包/UE4外包/Kinect外包
This is an amazing tutorial series. A life-saver to be honest. Thank you so much.
One question though. You said something about coding up your own MovementComponent for RTS on mobile. Did you mean implementing the existing UPawnMovementComponent, and overriding it’s functionalities, or coding up a completely custom MovementComponent? I see there being a gigantic challenge after that if I want to use Unreal’s AIController and its Navigation to control the RTS Units. Or did I read you wrong?
Thanks, great tutorial.
Is “Let’s create GameMode class and name it: GameplayGameState” suppose to say GameState class instead of GameMode?
I do believe it was supposed to be GameState class. A simple mistake.
Can you please edit it?? I spent sometime trying to find the gameplaygame state, don’t want to confuse anyone else.
Pingback: zompi
Thank you!
Extremely helpful overview of UE4 guts.
Just a note on your tip about “Pawns vs Controllers”. It can sometime be useful to split input between both PlayerController and Pawn. If your game features the player taking control of different Pawns during the same session e.g. entering a vehicle whilst playing as a humanoid character.