This time I will focus on another requested tutorial about RTS camera movement and unit movement. In this tutorial I will create:
- RTS camera supporting: zooming, scrolling and moving,
- Selecting units,
- Moving units,
Remember – you can always request tutorial!
This Tutorial has been created using Unreal Engine 4.10
Make sure you are working on the same version of the engine.
Theory
I only shipped one kind-of-RTS game (Artist Colony iOS) so I don’t have to much experience with RTS games.
The main challenge here is to prepare proper communication with spectator (camera), HUD and Controller. It’s complicated and easier to accomplish using C++ but I will use Blueprints as requested.
Creating Interfaces
Let’s start by creating interfaces that will help us with communication.
Create new Blueprint Interface named IMovement. Open it and add new function:
MoveToMouseLoc
With one Vector input named Location.

It will be used to tell units where to go.
Create another Blueprint Interface named InputInterface. It will be responsible for communicating other classes (eg. HUD) about the input. Open it and add new functions:
OnInputTap
It will be called each time we start to click.
OnInputHold
Will be called when we are moving our mouse after while holding RMB. (RMB = Right Mouse Button)
OnInputHoldReleased
With one float input named HoldTime.

Will be called after releasing RMB.
Create another Blueprint Interface named SelectionInterface. It will be responsible for communicating select/deselect of units. Open it and add new functions:
OnSelectionGained
Will be called when we should select an unit.
OnSelectionLost
Called when unit should be deselected.
Creating Enums
Next step is to create some helping Enums.
Create new Enum named ECameraScroll with these:
- None
- Right
- Left
- Top
- Bottom
It will be used to choose in which direction we are scrolling camera.
Create another Enum named EInputType with these:
- None
- Tap
- Hold
- Scroll
This will store state of input. For example when player is scrolling it will be set to Scroll.
Project Settings
Now we need to configure our project.
Project Settings -> Collision.
Add new Trace Channel named CamScroll. It should be set to Ignore as default.
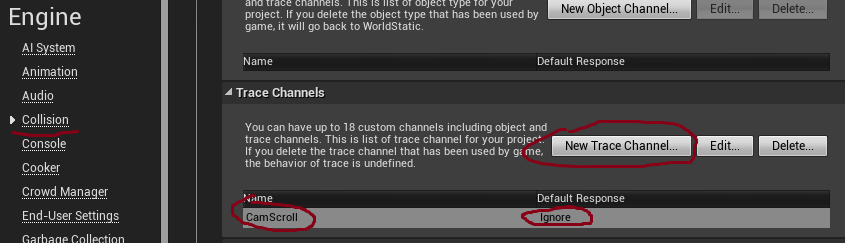
When dealing with RTS camera movement we need to do some line traces from mouse to the ground. Creating new Trace Channel for this will be helpful as we will only use this channel to check the ground.
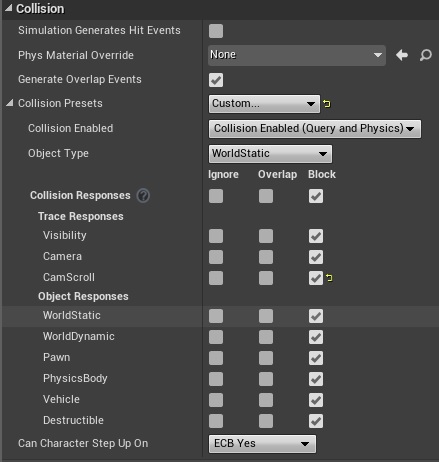
Now in your level place BlockingVolume which should imitate ground. Make sure you changed Collision preset to Custom and Block CamScroll. This way our line traces will work with this BlockingVolume. By default this volume is really small and should be scaled up on X and Y.
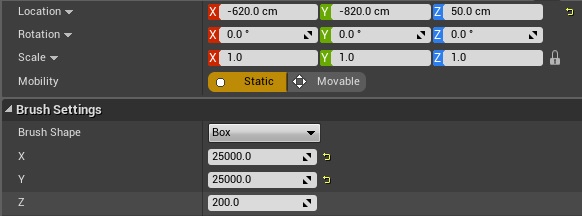
USEFUL TIP: When scaling Volumes it’s always better to use Brush Shape (box extend) instead of normal scale.
I have found that scaling sometimes create weird behaviors with overlaps / hit events.
When ready add NavMeshBoundsVolume:
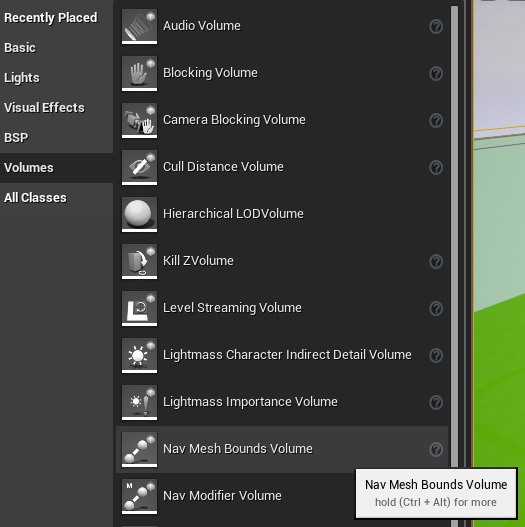
And make sure it is covering your level. You can show navigation when pressing “P” when in Editor or “Show Navigation” command when in game. You should have green ground like this:

When ready go to Project Settings -> Input and add these Action Mappings:

And that’s all that need to be prepared.
Spectator Pawn – Camera Zoom
For my opinion the best Pawn for dealing RTS camera movement is SpectatorPawn as it can be Possessed and don’t have any mesh.
Create new Blueprint extending from Spectator Pawn named RTSSpectatorPawn. Open it and add two new components: SpringArm and Camera.
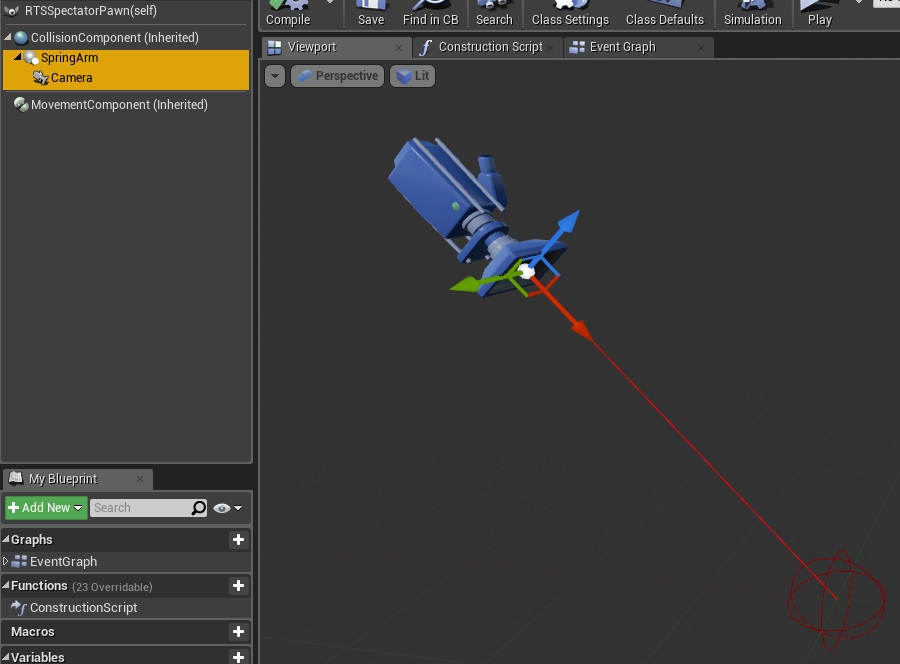
SpringArm properties:
- Rotation: 0, -50, 0,
- Do Collision Test: False,
Now open event graph and add these variables:
| Var Name | Var Type | Description |
| MinCamZoom | float | Default: 300 |
| MaxCamZoom | float | Default: 2000 |
| CurrentCamZoom | float | Default: 300 |
| DesiredCamZoom | float | Default: 300 |
| CamZoomSpeed | float | Default: 15 |
| DeltaTime | float |
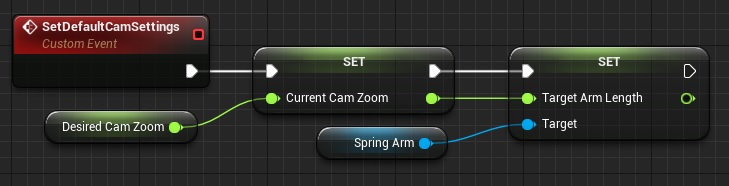
Create new custom event named SetDefaultSettings:
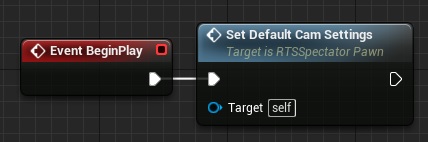
In BeginPlay call SetDefaultCamSettings:
Now Right Click and find ZoomOut and ZoomIn input events – they should be visible after adding them in Project Settings. (Project Settings -> Input) If you can’t find them please go back to Project Settings step in this tutorial.
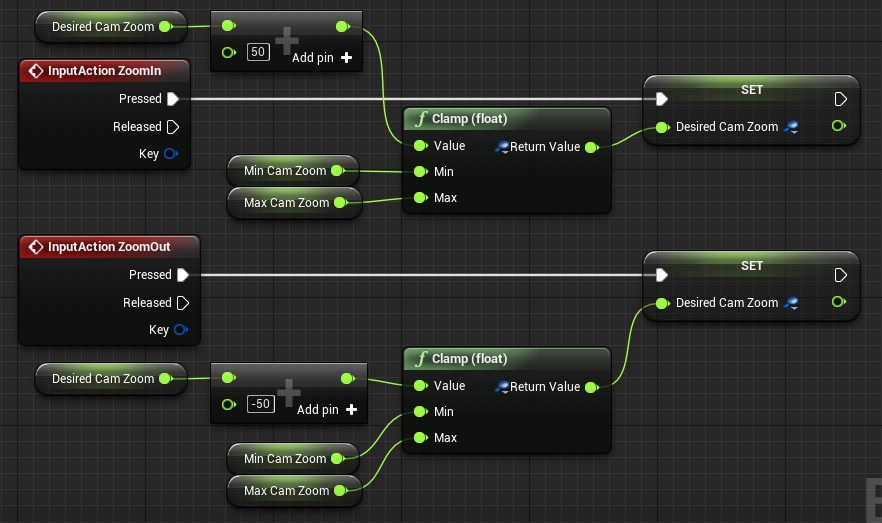
So basically we are decreasing and increasing DesiredCamZoom float value. Easy as that. Now we need to drive this value somehow.
Create new custom event named UpdateCamZoom:
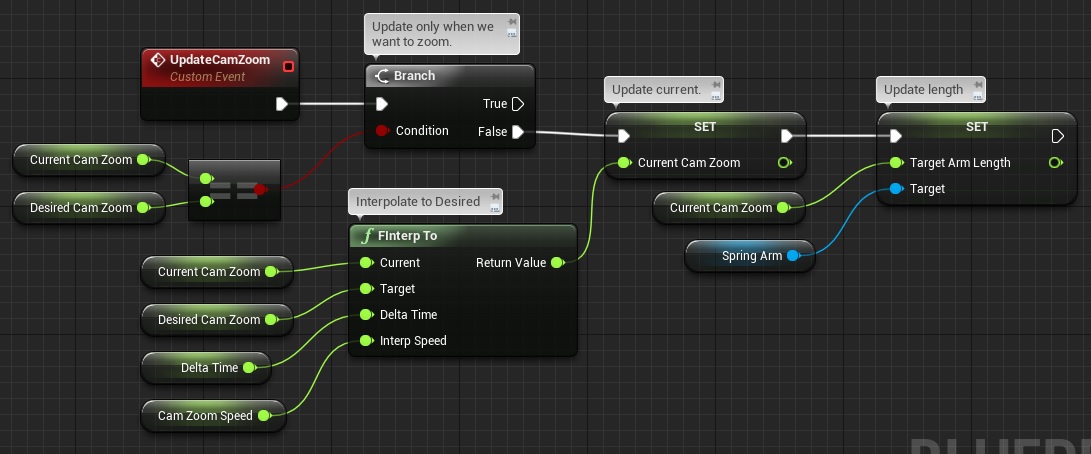
This way we have simple zooming functionality. Now we need to call this event in Tick:

And that’s all here.
Player Controller – Camera/Unit Movement
Next step is to move the camera. There will be one Player Controller responsible for movement. Create new Blueprint extending from Player Controller named RTSPlayerController.
Open it and add these variables:
| Var Name | Var Type | Description |
| StartSwipeCoords | Vector | Storing OnTap mouse coordinates. |
| EndSwipeCoords | Vector | Storing OnHoldingEnded mouse coordinates. |
| CurrentInputState | EInputType | Holding current state of input. Make sure it’s NONE as Default. |
| isScrollingCamera | bool | Is currently scrolling camera? |
| DeltaTime | float | |
| InputHoldingTime | float | Accumulated time while holding mouse. |
| isHoldingInput | bool | Is currently holding mouse? |
| SelectedPawns | Actor Array Reference | This will store all selected Actors reference. |
| MoveClickTime | float | Accumulated time for moving units. |
| WantToMove | bool | Want to move units? |
| MoveToLocation | Vector | Location to move the units |
Lot of variables. It’s easier to create in C++.
Now in your Event Graph create new Functions.
OnSwipeStarted
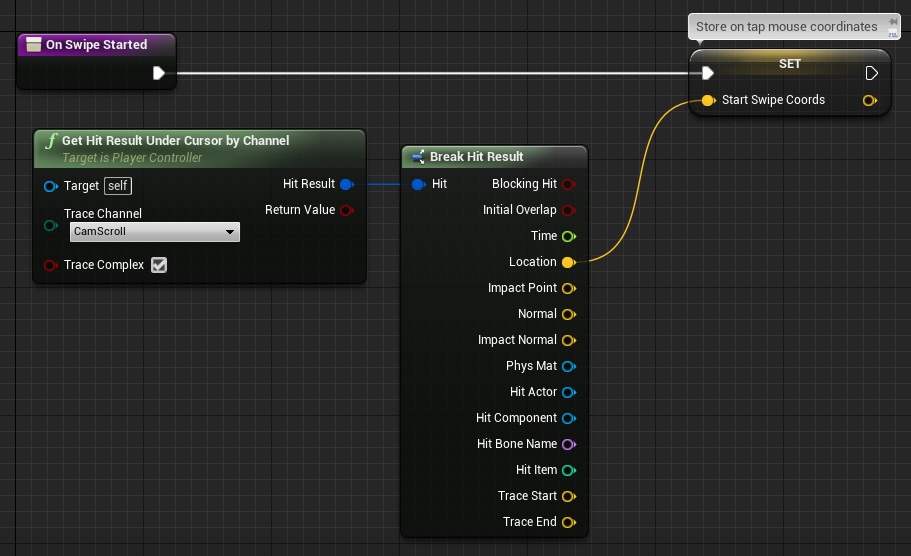
This will store hit location with CamScroll channel.
OnSwipeEnded

OnSwipeUpdate
One Output: Vector named Delta.
Two local variables:
- LocalNewSwipeCoords – Vector,
- LocalDelta – Vector,
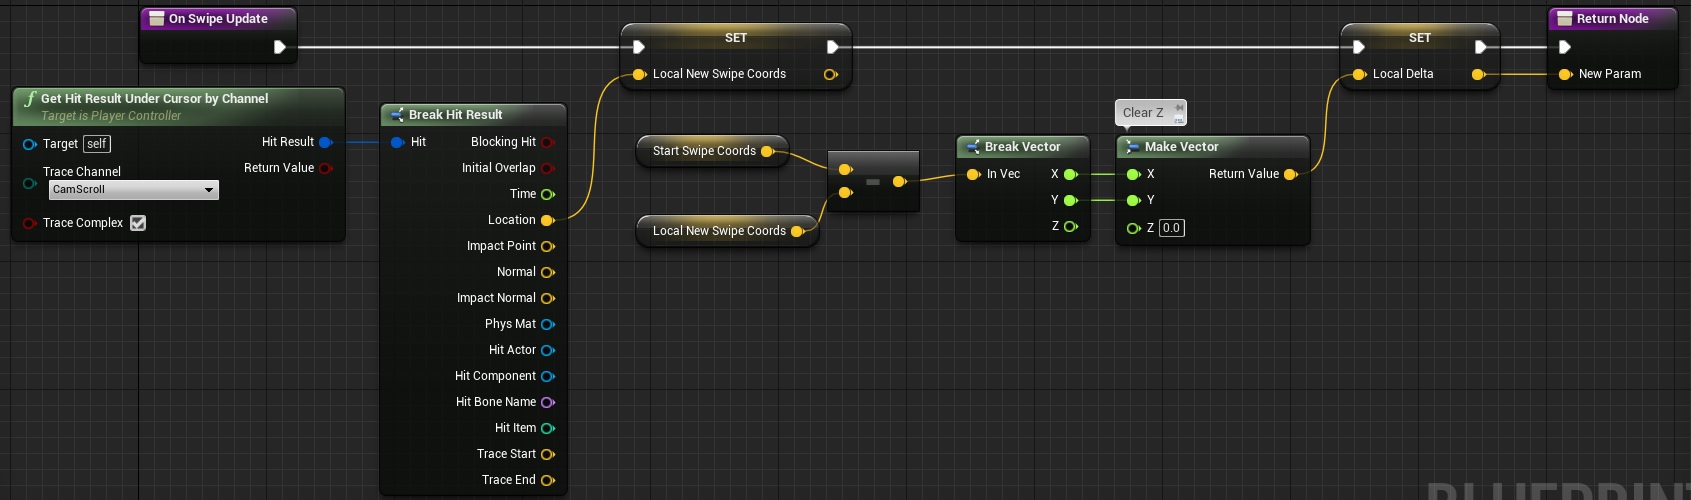
This function is adding and returning offset from starting vs current mouse position. Thanks to this we will be able to move our spectator pawn.
IsScrolling
With one Output: ECameraScroll.
This function is responsible for letting know if we want to scroll the camera.

Doing such “IFS” in Blueprint isn’t the best way. In C++ you would have simple if statement with else if. That’s why it’s easier to do such stuff in C++.
This is basically checking if our mouse is near top/bottom/right/left corner and if yes – return ECameraScroll enum.
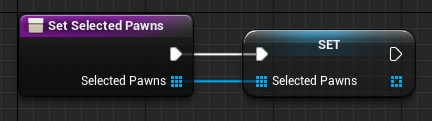
SetSelectedPawns
With one input named SelectedPawns: Actor Reference Array.
GetScrollDirection
With one Output named Direction: Vector.
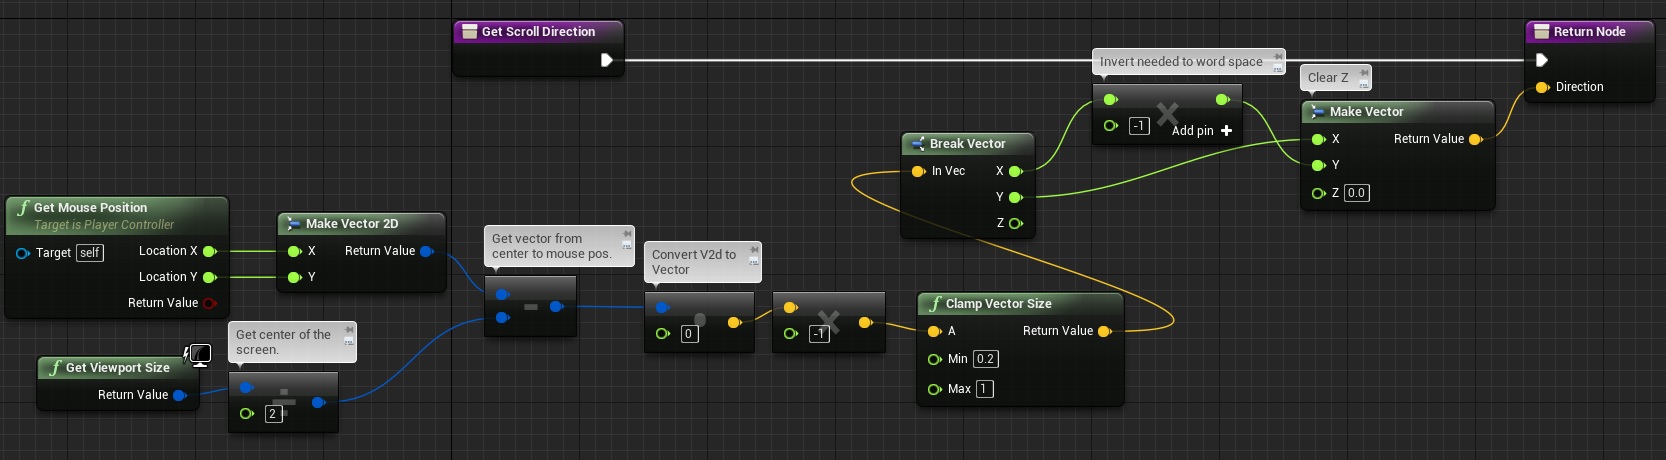
With IsScrolling function you can add movement input with some direction but I want to add some smoothing. This function is able to return direction based on mouse position rather than top/bottom/left/right side of screen. Thanks to this scrolling will be smoother.
Now let’s make some use of these functions. Create new custom event named UpdateCamera:
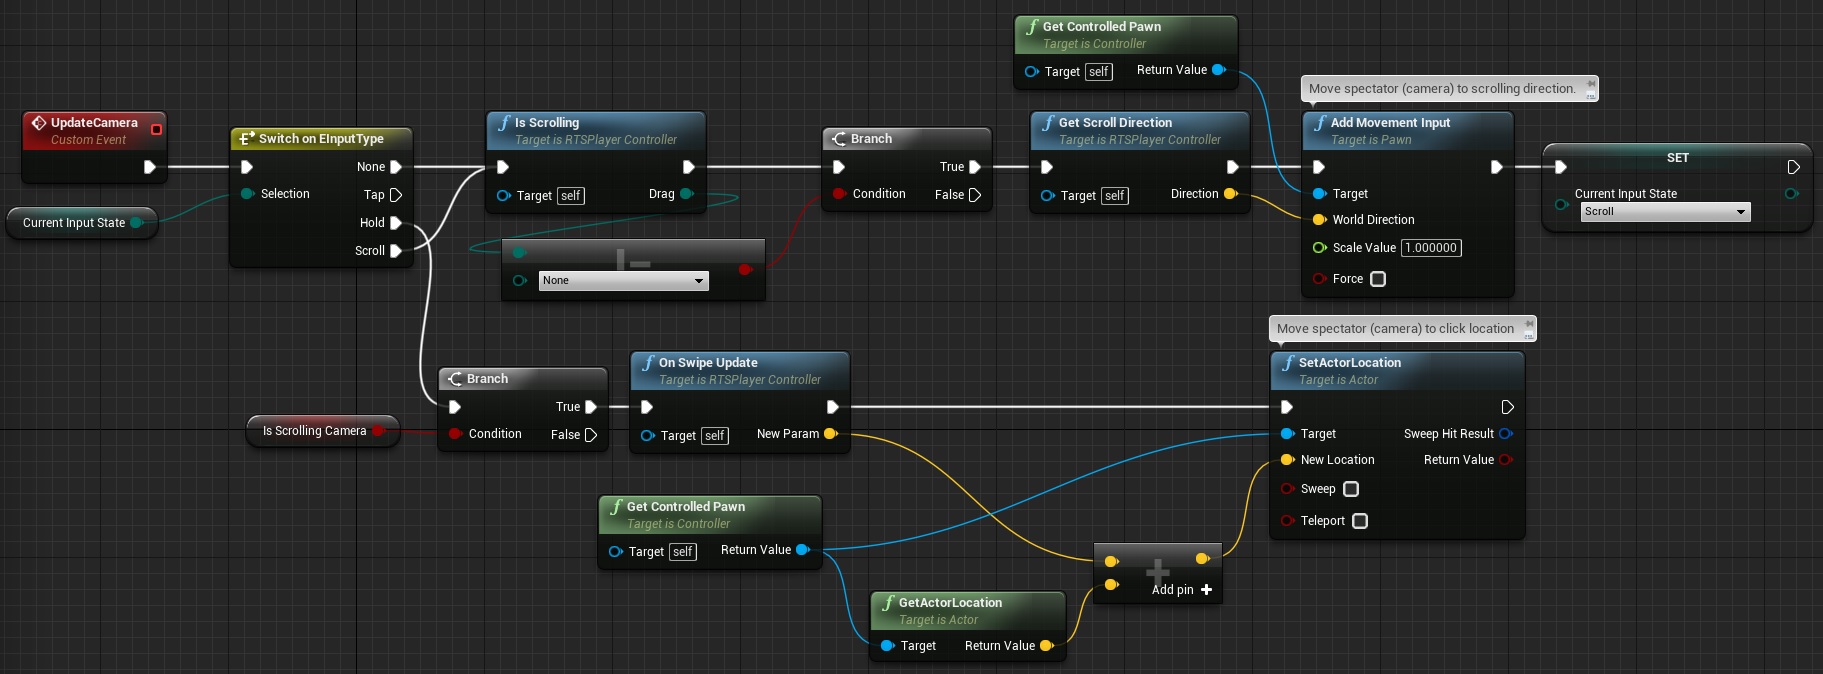
This will actually scroll and move our camera. You can call this in Tick to check it out. Be sure your RTSSpectatorPawn is possessed by this controller.
Add another event – PanCamera Input:
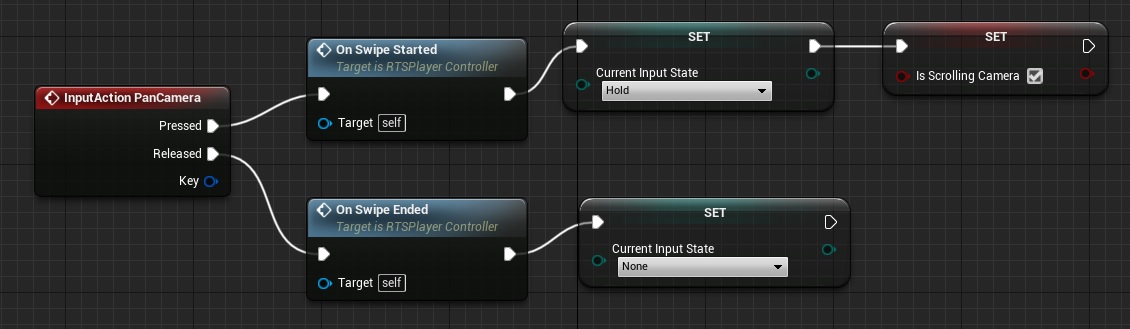
This is responsible for swipe camera movement.
And another input – SelectInput:
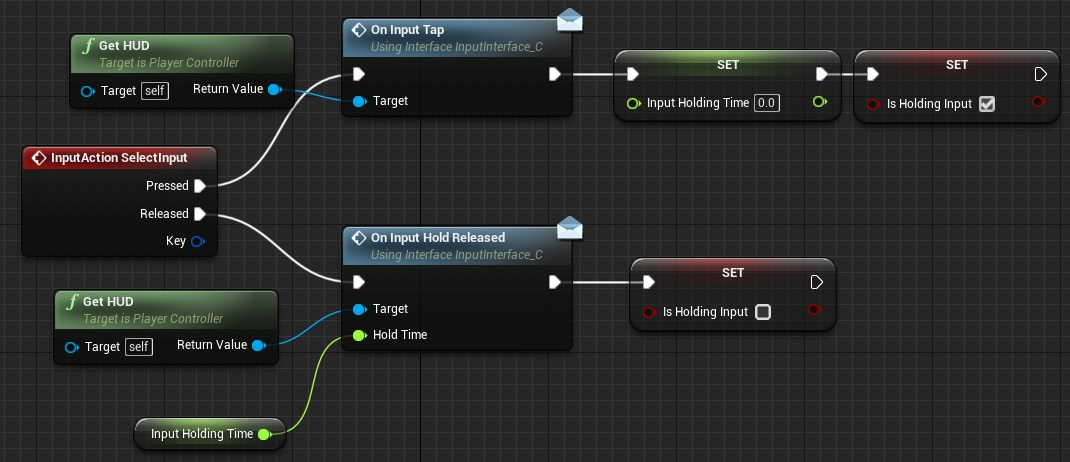
This is responsible for selecting units input.
Now create custom event named UpdateSelection:
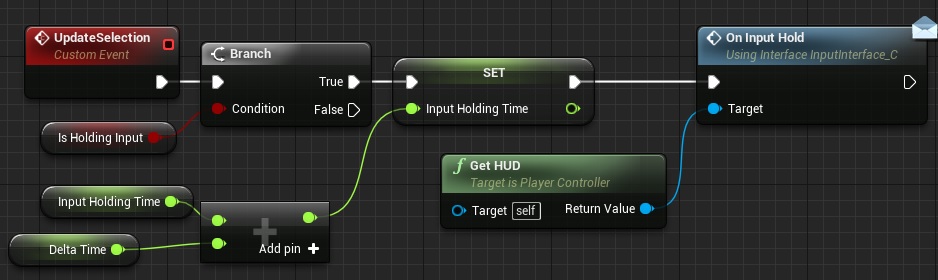
It’s letting know HUD that we are holding mouse button.
And add last custom event named UpdateClickToMove
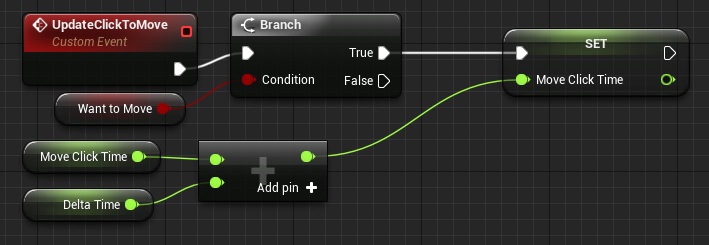
It’s just updating accumulated time in MoveClickTime so we won’t move the units when trying to move camera.
Now everything need to be called in Tick:

And now last thing. MovePawns input:
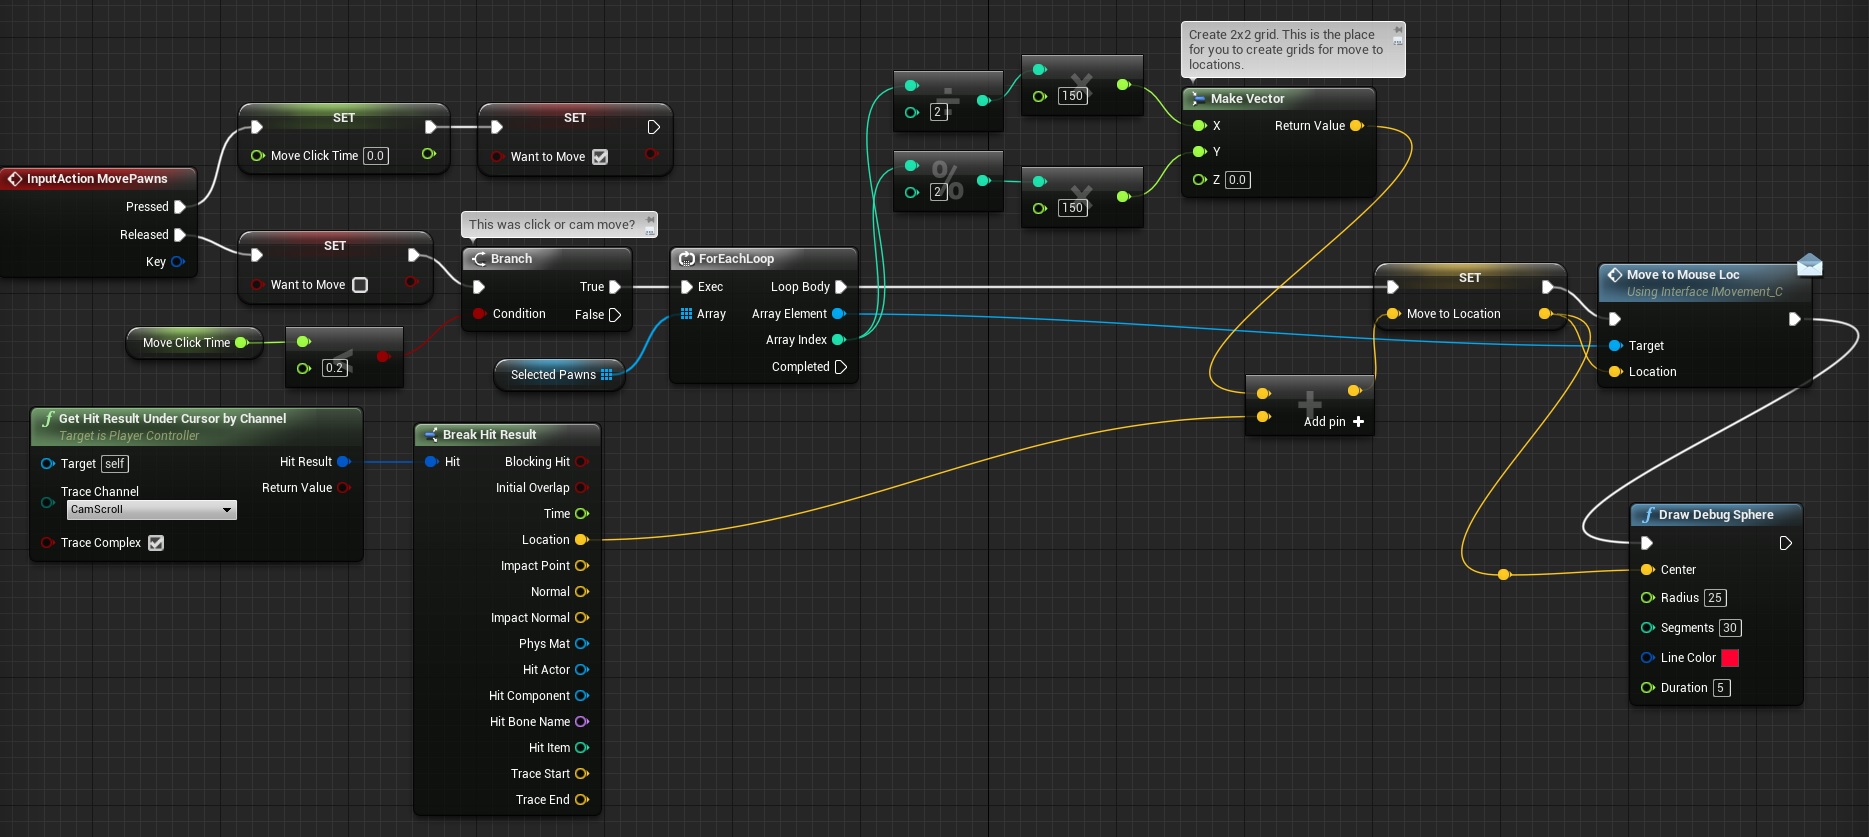
This is creating 2×2 grid (just for testing) and calling MoveToMouseLoc interface on SelectedPawn. Which will be null for now but this will change in a sec.
That’s all in PlayerController. Make sure your Game Mode default pawn is RTSSpectatorPawn and default controller is RTSPlayerController!
HUD
Create new Blueprint extending from HUD named RTSHud. Make sure it is set in your GameMode as default HUD.
Open it and make sure it implements InputInterface! When ready add those variables:
| Var Name | Var Type | Description |
| OnTapMousePosition | Vector2D | Hold mouse position on click. |
| HoldingMousePosition | Vector2D | Holding current mouse position. |
| isDrawingSelection | bool | Is currently drawing selection box? |
| FoundActors | float | Stores all actors in selection. |
| SelectedActors | float | Stores actors that implements IMovable interface. |
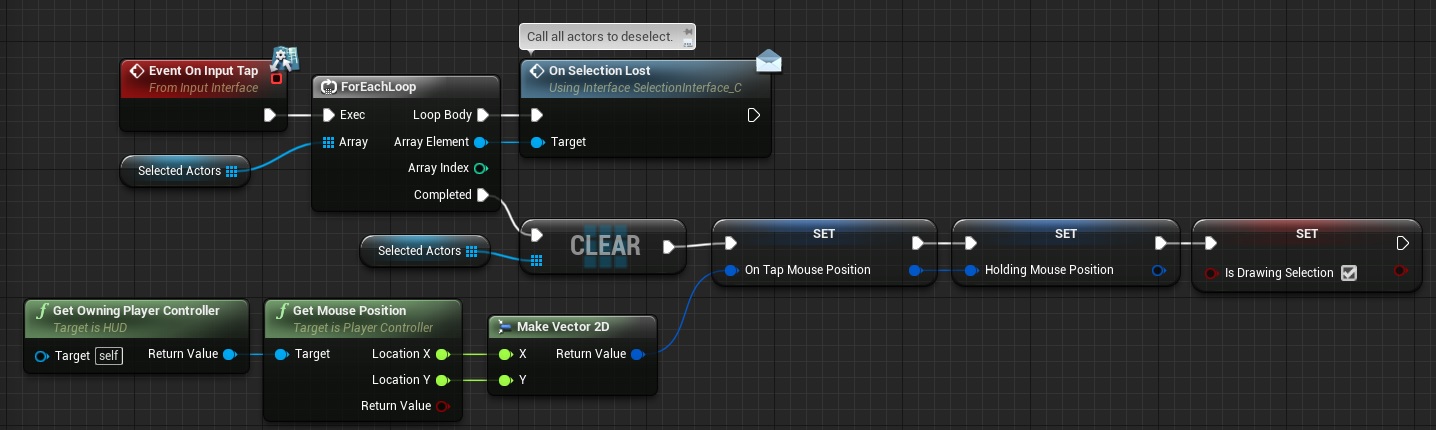
Now let’s add InputInterface events. Event On Input Tap:
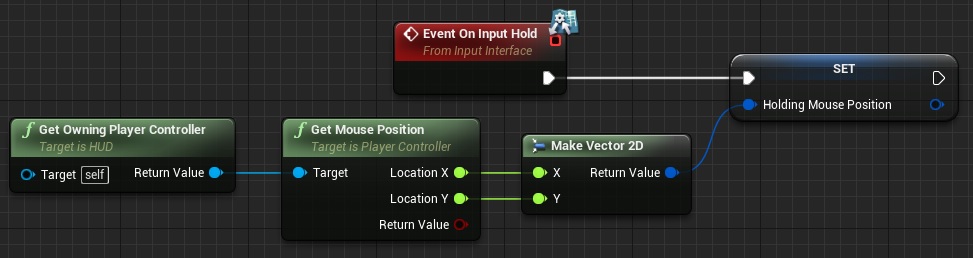
Event On Input Hold:
Event On Input Hold Released:
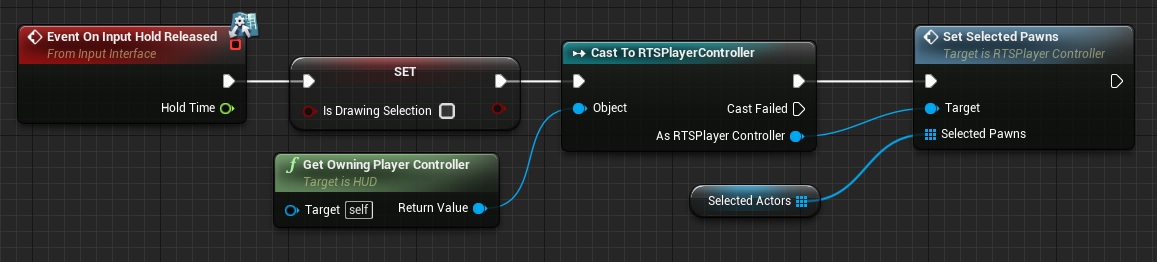
Those should be self explanatory.
Create new custom event named DrawMouseSelection:
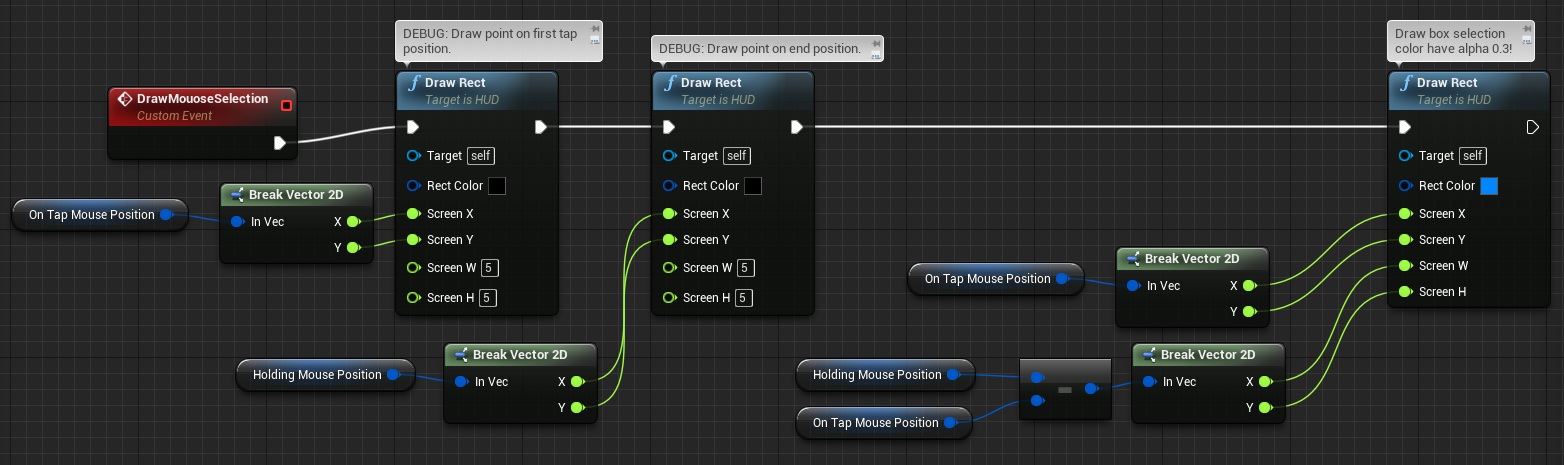
This is for debug – drawing selection box so you can check if it’s working correctly.
Now add Receive Draw HUD event:
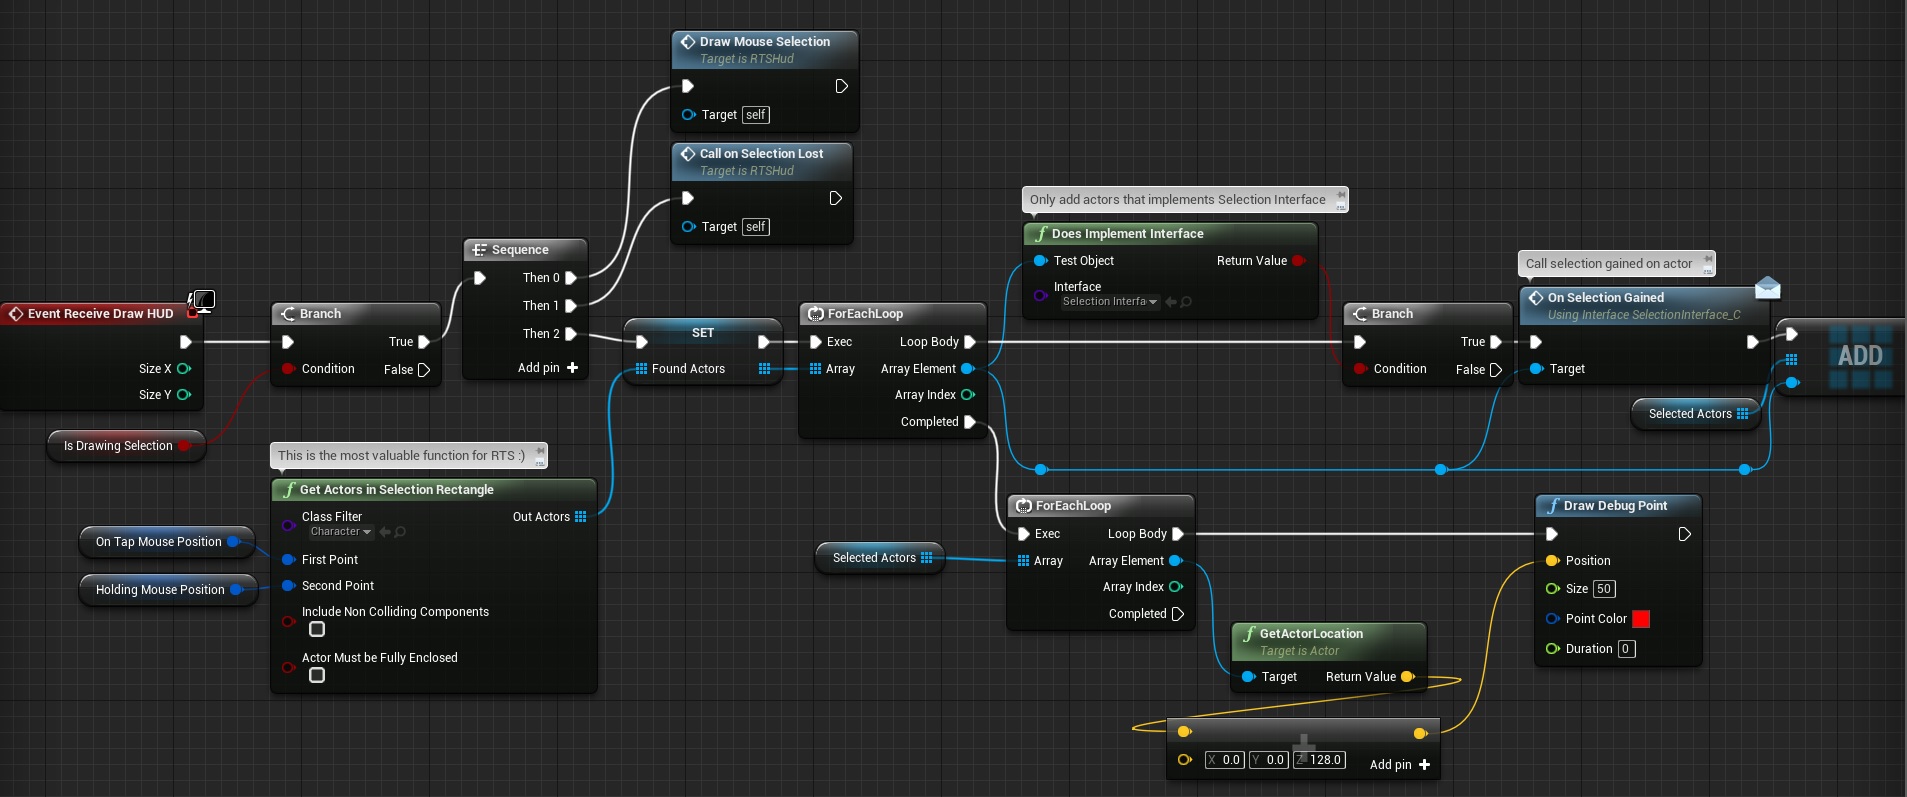
Look at Get Actors in Selection Rectangle function. It will return all actors in box selection that I’m doing. After that I’m just checking if the actors implements Selection Interface and call Selection Gained on Them.
After releasing mouse SelectedActors will be passed to PlayerController.
That’s all in HUD!
Test Unit
Now let’s make a test. Create new blueprint extending from Character named Pawn. Open it and make sure its implementing Selection Interface and IMovement interface as well!
When ready add new static mesh component named SelectionMesh. Make sure visibility is set to False. It’s just debug mesh that will be visible when this Pawn will be selected.
Now in Event Graph add On Selection Gained and On Selection Lost events:
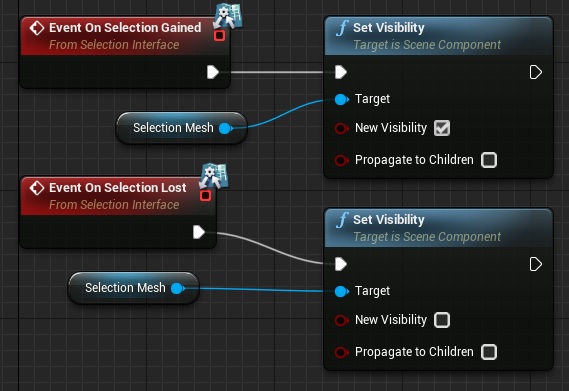
This should be place when you want to change material / add mesh when unit is selected – or maybe show some UMG widget. It depends on you and your game.
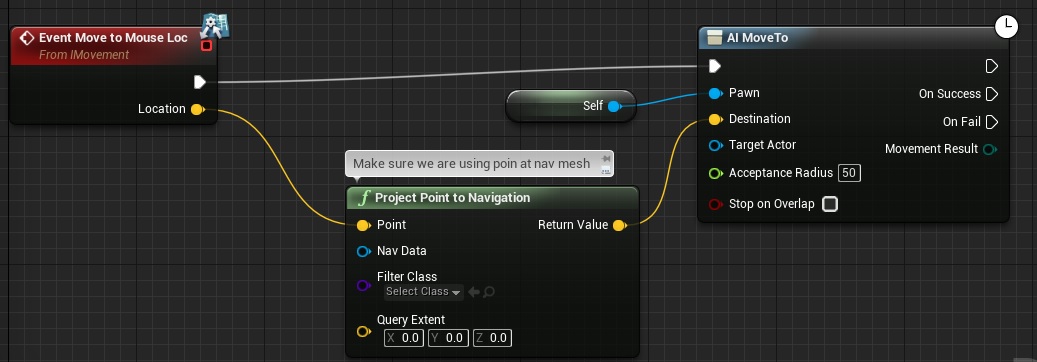
Last part is unit movement. Just add Move To Mouse Loc interface event:
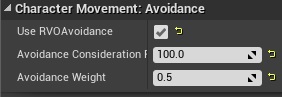
And that’s all! If you like you can select CharacterMovement component and enable RVOAvoidance.
Final Result
You can download whole project (4.10) here.
Creating ShooterTutorial takes a lot of my free time.
If you want you can help me out! I will use your donation to buy better assets packs and you will be added to Credits /Backers page as well. Implementing game is taking time but writing about it is taking much more effort!
Great tutorial, some things here are done a little different to my methods for a UE4 RTS. Unfortunately the downloaded project is not working for me 🙁 I’m using 4.10.4 on OSX. I get a blackscreen on play, and then blueprint errors when I stop gameplay. See this image. http://i.imgur.com/VOeDV7u.jpg
And after reading the whole article, I needed to set the gamemode up properly. After setting the default pawn, hud, spectator and controller, it all worked.
Project is rared with 4.10.2 version. I’m using Windows so maybe that’s the issue. But you can recreate this stuff using Tutorial!
Hi there! i tried to make this tut, but i’m stucked. In part of “And another input – SelectInput:” i can’t add/i have no “On input tap” and “On Input Hold Released” node. When we create it?
Regards!
You need to add it in Project Settings -> Input.
At the Action mappings?
Lets see here. Seems like you missed quite some bits. To start in the HUD Sections Varibles “Found Actors and Selected Actors says they are floats but they are supposed to be Actor Reference Array.
Im not sure if this one is missed, but you need to imploment the BPISelecttionInterface in the HUD class to be able to call Selection Lost. This is from the Recieve Draw HUD Event.
As Kiss said, There is a function in the BPIInput interface missing, On Input Hold Released.
Just a heads up to let you know.
Will it work for touch screen?
Really appreciate the work you do here. The small variable fixes stated in the comments got this working almost perfectly for me. The one issue I’m having is that when i make a selection and click to make the pawns move, far too many debug spheres appear and the pawns move to the last sphere so I might point them towards the center of a level and they will move far away. Any idea what could be causing so many destination points to appear?
Last parts of “Spectator Pawn – Camera Zoom” section.
Where is the Target under Target Arm Length?
Is it another component? I don’t know how to get that part in a variable…
I created a new variable and named it “Target Arm Length” but cannot get the “Target” part of it.
Sorry, I am new to Blueprints and I am a worthless artist :(. Gomeh.
Oops. Forget my question. I solved it.
Pressing forward!
Yup I found the error. You missed one custom event not explained in the tut. Download the Tut from the Link above, open it in Unreal (works even with 1.14) and open the RTS HUD. There is one new custom Event Called “CallOnSelectionLost”. It clears the Array. (All the red dots appeared because there were too many entries in the Array). After creating that custom Event in your own RTS HUD call it on the “Event Receive Draw HUD” on the “Then 1” Pin of the Sequence (like it is shown in the tut).
Hello. Could you please help me. I did everything according to the tutoril. Everything is working, it’s just not working perfectly. When drawing rectangle, units/actors/pawns get selected even before the rectangle touched them. Other problem, and it is the biggest one, is that ALL units in a small radius get selected when I press only one. I tested this several times. The array is cleared, they are just too close to each other. I even made their collision capsules smaller. I don’t know what to do to make the selection better. Please help
Hello. Thank you for the tutorial. I followed it entirely and I have 2 problems, and I hope someone can help. First is that units becom selected even before the rectangle touches them. This is not a big problem but if there is a larger number of units crammed, then it will be harder to do at least a little bit more precise draw selection.
Second one is a bigger problem. When no unit is selected, but they are all crammed in one place, when I select (Just LMB quick click) 1 unit in that group, all other units in a small radius become also selected. I have been trying to resolve this for the last 4 hours without any success.
Please help
Hello, I’m just wondering. For “Is Scrolling” function, there’s a boolean function where it says “mouse x location is not less than 0.1 screen height and greater than 0.9 screen height”… Can’t I just pull the output directly from “mouse x location is greater than 0.9 screen height”? The two events are obviously mutually exclusive, no? Or did I miss something?
Hello. Thank you for the tutorial, i have a question ,When holding the mouse right button Camera Scrolling to the Blocking volumes , Camera got flacker, how can i fix that 🙁
Hello, Thank you for the tutorial.i have a question, Camera got flacker when holding mouse right button scrolling screen meet the blocking volume ,i m keeping trying fix that 🙁
Excellent tutorial, keep up the good work.
Would you mind uploading the project to github so we can help you maintain it?
I can help with PR-s to ensure it works on newer engine versions and occasional bug fixes.
Done that on UE 4.21 step by step. Working flawless. Some debuging is needed, but if know what you re doing – some missing details in this tutorial is not a problem.
Hello, thanks for the tutorial, I stumbled on a problem on your project, everything works fine, until you draw a selection rectangle, then the rts spectator pawn moves weird, and change it’s own z axis when you move, when it shouldn’t, I followed your tutorial and remade it on 4.23 version, but the same problem occurs, can anyone help me?