If you want to iterate quickly you need to have good debug tools. In this Tutorial I will use knowledge from Set/Get Variables to draw widget with list of variables. Basically if you want to show an variable you need to print it out, or create custom widget for specific Actor. Thanks to Debug Component:
- You will be able to debug any variable in any actor that you want,
- You don’t need to create any custom print / widgets,
This can be achieved using C++ only but as always it will be super easy! (learn UE4 C++!)
This Tutorial has been created using Unreal Engine 4.11
Make sure you are working on the same version of the engine.
Theory
Debugging is big part of game development. If you think about “what is the quickest way to fix a bug in my system?” during development you will end up with tools helping you quickly target a bug and fix it.
Games are about bugs and having those tools is critical. There is plenty of examples how game developers are fighting with it:
- Create recording system which allow you to record each gameplay (rewind, get the states of variables etc) so each time someone will find a bug he can mail you with his replay, (hope to write tutorial on this as well),
- Create bot that will play your game over night when no one is working,
- Create bot that will endlessly go over your UI and game loop,
- Create automation tests for some features: eg. generate path to point X 100000000 times – check the results,
- Be able to quickly go to “debug” mode which can give you information about Actor state, variables – basically anything you want,
- …and lot’s of more.
All of these examples can be achieved in Unreal Engine 4. I’m not a programmer so I won’t show you how to do such things BUT I will show you small example that everyone can do.
I will create a component that can be attached to any actor and will display variables values that you want. This way you don’t need to put Print nodes in Blueprints to check the variable state. You will be able to see content of all kind of variables. I will use some knowledge from get/set variables tutorial.
Overview

First of all we will create custom structure to store the variable name and value which can be used in ShowDebugWidget.
ShowDebugWidget will be custom UMG Widget class that will have one event to pass the data to Blueprint.
Actual hearth of this system will be ShowDebugComponent – simple Actor Component that can be stored in any Actor. It will create and add Widget Component to the Owner and pass ShowDebugWidget class into it.
Base Structure
Normally this could be stored in TMap but Blueprints can’t extend TMaps yet. I will use structure with the name of variable and its content as String.
Open your project in Visual Studio and head to YOURPROJECTNAME.h file. For me it’s ShooterTutorial.h file. I will create new structure in this main class:
|
1 2 3 4 5 6 7 8 9 10 11 12 13 14 15 16 17 18 19 20 21 22 23 24 25 26 27 28 |
USTRUCT(BlueprintType) struct FDebugVariable { GENERATED_USTRUCT_BODY() UPROPERTY(EditAnywhere, BlueprintReadWrite, Category = "Debug Variable") FName Name; UPROPERTY(EditAnywhere, BlueprintReadWrite, Category = "Debug Variable") FString Value; void SetName(const FName NewValue) { Name = NewValue; } void SetValue(const FString NewValue) { Value = NewValue; } FDebugVariable() { Name = "None"; Value = "None"; } }; |
After compiling you will be able to MAKE this structure in Blueprints:
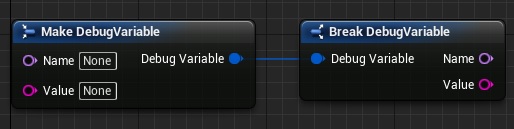
This is how we will store the data. Value is String as it will be displayed in UMG.
Custom C++ UMG Widget
To be able to create custom UMG Widgets you need to open YourProjectName.Build.cs and add UMG to PublicDependency and Slate, SlateCore to PrivateDependency:
|
1 2 3 4 5 6 7 8 |
public class ShooterTutorial : ModuleRules { public ShooterTutorial(TargetInfo Target) { PublicDependencyModuleNames.AddRange(new string[] { "Core", "CoreUObject", "Engine", "InputCore", "Playfab", "Json", "JsonUtilities", "UMG"}); PrivateDependencyModuleNames.AddRange(new string[] {"Playfab", "Json", "JsonUtilities", "Slate", "SlateCore" }); } |
It’s needed as we need to create custom event that will drive variables data to the widget.
Now open the editor and add new C++ Class extending from UserWidget named ShowDebugWidget.
We will create an custom event to pass the variables to the Bluprints.
|
1 2 3 4 5 6 7 8 9 10 11 12 13 14 15 16 17 18 19 20 21 |
// Fill out your copyright notice in the Description page of Project Settings. #pragma once #include "Blueprint/UserWidget.h" #include "ShowDebugWidget.generated.h" /** * */ UCLASS() class SHOOTERTUTORIAL_API UShowDebugWidget : public UUserWidget { GENERATED_BODY() public: //* Function called when variables are updated. Returning list of updated variables */ UFUNCTION(BlueprintNativeEvent, Category = "Variables") void OnVariablesAdded(const TArray<FDebugVariable>& VariablesList); //this is actual Event in Blueprint void OnVariablesAdded_Implementation(const TArray<FDebugVariable>& VariablesList); // this is function that can be used in C++ (not visible in Blueprints) }; |
You can read more about exposing events to Blueprints here. We are declaring OnVariablesUpdated event which will pass DebugVariable array.
C++ file is really simple:
|
1 2 3 4 5 6 7 |
#include "ShooterTutorial.h" #include "ShowDebugWidget.h" void UShowDebugWidget::OnVariablesUpdated_Implementation(const TArray<FDebugVariable>& VariablesList) { //C++ implementation is empty. Proper implementation should be in Blueprints as it is more about layout. } |
We won’t use C++ implementation of this function as UMG Designer is better for creating layout using these variables.
UMG Reparent to custom class
Now in content browser create new User Widget named UI_MainShowDebugVariables open it and let’s reparent this widget from UserWidget to our custom ShowDebugWidget:
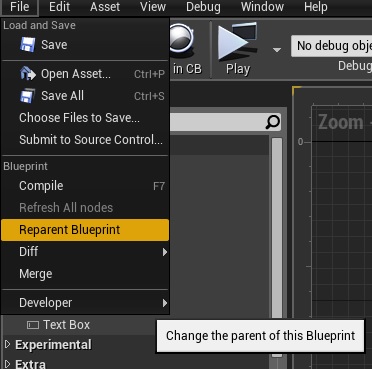
Find ShowDebugWidget class.
UMG Layout
Create another User Widget named Widget_DebugVariableWithName. This should be normal UserWidget – reparent isn’t needed. Here you can find the hierarchy (remember to delete Canvas Panel!) :
This widget will be added procedurally to UI_MainShowDebugVariables. Open event graph and create one function named UpdateVariable with one input: DebugVariable structure:

That’s all in this Widget. Now let’s move to UI_MainShowDebugVariables. It shouldn’t have Canvas Panel as well so please delete it. Next add VerticalBox (it should be the root) and mark it as variable so you can see it in Graph.
In Event Graph search for On Variable Updated:
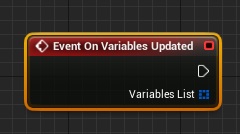
Yes, it’s our custom event! As this widget was reparented to ShowDebugWidget we can now add this event to the graph!

It should be self explanatory. We are just adding Widget_DebugVariableWithName to the vertical box for each item that comes from OnVariablesUpdate event. That’s all here!
ShowDebugComponent
Now the hearth. Create new C++ class extending from ActorComponent named ShowDebugComponent.
Here’s the .h file:
|
1 2 3 4 5 6 7 8 9 10 11 12 13 14 15 16 17 18 19 20 21 22 23 24 25 26 27 28 29 30 31 32 33 34 35 36 37 38 39 40 41 42 43 44 45 46 47 48 49 50 51 52 53 |
// Fill out your copyright notice in the Description page of Project Settings. #pragma once #include "Components/ActorComponent.h" #include "ShowDebugWidget.h" //need to include this to be able to declare UShowDebugWidget #include "WidgetComponent.h" //this as well to declare UWidgetComponent #include "ShowDebugComponent.generated.h" /** * With this component you can add WidgetComponent drawing list of variables. USE THIS ONLY WHEN DEBUGGING as it 2ms per each component! */ UCLASS(Blueprintable, ClassGroup=(Custom), meta=(BlueprintSpawnableComponent) ) class SHOOTERTUTORIAL_API UShowDebugComponent : public UActorComponent { GENERATED_BODY() public: // Sets default values for this component's properties UShowDebugComponent(); // Called when the game starts virtual void BeginPlay() override; // Called every frame virtual void TickComponent( float DeltaTime, ELevelTick TickType, FActorComponentTickFunction* ThisTickFunction ) override; //* Choose which variables should be show in debug widget */ UPROPERTY(EditAnywhere, BlueprintReadWrite, Category = "Variables") TArray<FName> VariablesNames; //** Get variables from VariablesNames and update their values */ UFUNCTION(BlueprintCallable, Category = "Variables") TArray<FDebugVariable> UpdateVariables(); //*Which Widget should be added to WidgetComponent */ UPROPERTY(EditDefaultsOnly, BlueprintReadWrite, Category = "Variables") TSubclassOf<class UShowDebugWidget> ShowDebugWidgetClass; //*Do we want to use Custom Tick Interval or just Tick? */ UPROPERTY(EditDefaultsOnly, BlueprintReadWrite, Category = "Variables") bool isUsingCustomTickInterval; //*If using custom tick interval store interval timer */ UPROPERTY(EditDefaultsOnly, BlueprintReadWrite, Category = "Variables") float CustomTickInterval; //* Storing reference to created WidgetComponent*/ UPROPERTY() UWidgetComponent* WidgetComponentRef; //* Storing reference to ShowDebugWidget UMG widget */ UPROPERTY() UShowDebugWidget* ShowDebugWidgetRef; }; |
Let’s stop on some of the file.
|
1 2 3 |
//* Choose which variables should be show in debug widget */ UPROPERTY(EditAnywhere, BlueprintReadWrite, Category = "Variables") TArray<FName> VariablesNames; |
In this FName array we will be able to add names of variables that we would like to debug.
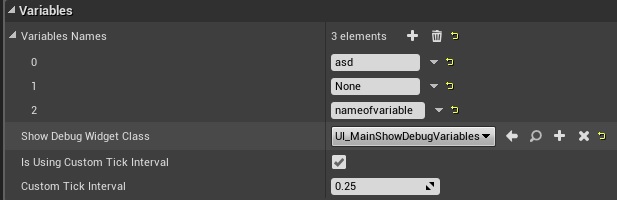
This array will be used to UpdateVariables(). Let’s move to actual implementation. Here you can find whole cpp file:
|
1 2 3 4 5 6 7 8 9 10 11 12 13 14 15 16 17 18 19 20 21 22 23 24 25 26 27 28 29 30 31 32 33 34 35 36 37 38 39 40 41 42 43 44 45 46 47 48 49 50 51 52 53 54 55 56 57 58 59 60 61 62 63 64 65 66 67 68 69 70 71 72 73 74 75 76 77 78 79 80 81 82 83 84 85 86 87 88 89 90 |
// With this component you can add WidgetComponent drawing list of variables. USE THIS ONLY WHEN DEBUGGING as it's 2ms per each component! #include "ShooterTutorial.h" #include "ShowDebugComponent.h" #include "WidgetComponent.h" // Sets default values for this component's properties UShowDebugComponent::UShowDebugComponent() { //sets default values CustomTickInterval = 0.25f; isUsingCustomTickInterval = true; bWantsBeginPlay = true; PrimaryComponentTick.bCanEverTick = true; } // Called when the game starts void UShowDebugComponent::BeginPlay() { Super::BeginPlay(); //If want to use custom tick interval set the Tick interval if (isUsingCustomTickInterval) { PrimaryComponentTick.TickInterval = CustomTickInterval; } //create UWidgetComponent component object WidgetComponentRef = NewObject<UWidgetComponent>(this); //Sets UWidgetComponent User widget class to display WidgetComponentRef->SetWidgetClass(ShowDebugWidgetClass); //Set UWidgetComponent draw size WidgetComponentRef->SetDrawSize(FVector2D(2000, 500)); //This will work only in 4.11 - setting widget space to screen not world WidgetComponentRef->SetWidgetSpace(EWidgetSpace::Screen); //Make sure widget don't have any collision WidgetComponentRef->SetCollisionEnabled(ECollisionEnabled::NoCollision); //Add created component to the Owner. GetOwner()->AddComponent(FName("ShowDebugWidgetComponent"), false, GetOwner()->GetRootComponent()->GetComponentTransform(), WidgetComponentRef); //Attach component to the root WidgetComponentRef->AttachTo(GetOwner()->GetRootComponent()); //Register component. Without this it won't be visible WidgetComponentRef->RegisterComponent(); //After registering store reference to the User Widget object (User Widget) ShowDebugWidgetRef = Cast<UShowDebugWidget>(WidgetComponentRef->GetUserWidgetObject()); } // Called every frame void UShowDebugComponent::TickComponent( float DeltaTime, ELevelTick TickType, FActorComponentTickFunction* ThisTickFunction ) { Super::TickComponent( DeltaTime, TickType, ThisTickFunction ); //If UserWidget (UShowDebugWidget) is created call OnVariablesUpdated event so it can be managed in Blueprints to fill the data in layout. if (ShowDebugWidgetRef) { ShowDebugWidgetRef->OnVariablesUpdated(UpdateVariables()); // heres where we actually call our custom event } } TArray<FDebugVariable> UShowDebugComponent::UpdateVariables() { //variables array that we will return TArray<FDebugVariable> Variables; FDebugVariable TempVar; for (int i = 0; i < VariablesNames.Num(); i++) // iterate all VariableNames that someone added to the array { UProperty *Prop = FindField<UProperty>(GetOwner()->GetClass(), VariablesNames[i]); // try to find the UProperty named as VariablesNames[i] if (Prop) { FString VariableToString; void *Value = Prop->ContainerPtrToValuePtr<void>(GetOwner()); //this function will create pointer to the value if (Value) { Prop->ExportTextItem(VariableToString, Value, NULL, NULL, 0); // this function will export the value to string! TempVar.SetName(VariablesNames[i]); //sets the name TempVar.SetValue(VariableToString); //sets the value Variables.Add(TempVar); //add it to the array that we will return } } else //wasn't able to find any variable { FString CantFindName = FString("not found: ") + FString(VariablesNames[i].ToString()); //create simple string TempVar.SetName(FName(*CantFindName)); TempVar.SetValue(FString("")); Variables.Add(TempVar); } } return Variables; } |
Let’s go step by step.
Constructor:
|
1 2 3 4 5 6 7 8 9 |
// Sets default values for this component's properties UShowDebugComponent::UShowDebugComponent() { //sets default values CustomTickInterval = 0.25f; isUsingCustomTickInterval = true; bWantsBeginPlay = true; PrimaryComponentTick.bCanEverTick = true; } |
Constructor is used to set the default values.
BeginPlay:
|
1 2 3 4 5 6 7 8 9 10 11 12 13 14 15 16 17 18 19 20 21 22 23 24 25 26 27 |
void UShowDebugComponent::BeginPlay() { Super::BeginPlay(); //If want to use custom tick interval set the Tick interval if (isUsingCustomTickInterval) { PrimaryComponentTick.TickInterval = CustomTickInterval; } //create UWidgetComponent component object WidgetComponentRef = NewObject<UWidgetComponent>(this); //Sets UWidgetComponent User widget class to display WidgetComponentRef->SetWidgetClass(ShowDebugWidgetClass); //Set UWidgetComponent draw size WidgetComponentRef->SetDrawSize(FVector2D(2000, 500)); //This will work only in 4.11 - setting widget space to screen not world WidgetComponentRef->SetWidgetSpace(EWidgetSpace::Screen); //Make sure widget don't have any collision WidgetComponentRef->SetCollisionEnabled(ECollisionEnabled::NoCollision); //Add created component to the Owner. GetOwner()->AddComponent(FName("ShowDebugWidgetComponent"), false, GetOwner()->GetRootComponent()->GetComponentTransform(), WidgetComponentRef); //Attach component to the root WidgetComponentRef->AttachTo(GetOwner()->GetRootComponent()); //Register component. Without this it won't be visible WidgetComponentRef->RegisterComponent(); //After registering store reference to the User Widget object (User Widget) ShowDebugWidgetRef = Cast<UShowDebugWidget>(WidgetComponentRef->GetUserWidgetObject()); } |
In BeginPlay I’m creating WidgetComponent which is added to the Owner. I’m configuring the widget as well:
- Setting the class that should be drawn by the component,
- Setting size, widget space, collision,
After that I’m storing the reference so I will be able to call our custom event in Tick.
Tick:
|
1 2 3 4 5 6 7 8 9 10 11 |
// Called every frame void UShowDebugComponent::TickComponent( float DeltaTime, ELevelTick TickType, FActorComponentTickFunction* ThisTickFunction ) { Super::TickComponent( DeltaTime, TickType, ThisTickFunction ); //If UserWidget (UShowDebugWidget) is created call OnVariablesUpdated event so it can be managed in Blueprints to fill the data in layout. if (ShowDebugWidgetRef) { ShowDebugWidgetRef->OnVariablesUpdated(UpdateVariables()); // heres where we actually call our custom event } } |
Just calling our OnVariablesUpdated custom event using UpdateVariables() function which is returning array of FDebugVariable structure.
UpdateVariables:
|
1 2 3 4 5 6 7 8 9 10 11 12 13 14 15 16 17 18 19 20 21 22 23 24 25 26 27 28 29 30 31 32 |
TArray<FDebugVariable> UShowDebugComponent::UpdateVariables() { //variables array that we will return TArray<FDebugVariable> Variables; FDebugVariable TempVar; for (int i = 0; i < VariablesNames.Num(); i++) // iterate all VariableNames that someone added to the array { UProperty *Prop = FindField<UProperty>(GetOwner()->GetClass(), VariablesNames[i]); // try to find the UProperty named as VariablesNames[i] if (Prop) { FString VariableToString; void *Value = Prop->ContainerPtrToValuePtr<void>(GetOwner()); //this function will create pointer to the value if (Value) { Prop->ExportTextItem(VariableToString, Value, NULL, NULL, 0); // this function will export the value to string! TempVar.SetName(VariablesNames[i]); //sets the name TempVar.SetValue(VariableToString); //sets the value Variables.Add(TempVar); //add it to the array that we will return } } else //wasn't able to find any variable { FString CantFindName = FString("not found: ") + FString(VariablesNames[i].ToString()); //create simple string TempVar.SetName(FName(*CantFindName)); TempVar.SetValue(FString("")); Variables.Add(TempVar); } } return Variables; } |
This is the most important part of this tutorial. This function is searching for UProperty (variable) by name and export its value as String!
Now if you compile you can create simple test.
Test
It’s so easy! Hope it will be helpful for you guys!
Creating ShooterTutorial takes a lot of my free time.
If you want you can help me out! I will use your donation to buy better assets packs and you will be added to Credits /Backers page as well. Implementing game is taking time but writing about it is taking much more effort!
i paste you code to YOURPROJECTNAME.h compile take error…