This post is important because it will cover Unreal Engine 4 streaming system which is powerful and everyone should learn how to use it.
In this Tutorial I will show you guys how to create in-game loading screen using streaming.
|
1 2 |
<strong>This Tutorial has been created using Unreal Engine 4.9.2</strong> Make sure you are working on the same version of the engine. |
Why use streaming?
I think that streaming was added to Unreal Engine because of the big teams pipeline. Streaming can separate your maps so more people will be able to work on project in the same time.
For example let’s assume that you have one map with 3 rooms. What you can do is:
- Map_01_P – Persistent map that have information about other maps,
- Room_01_Collisions, – to separate collisions form the meshes,
- Room_01_Sounds, – let sound designer work on the ambients,
- Room_01_Gameplay, – let gameplay designer work on gameplay in this room,
- Room_01_BSP – map for prototyping envrio,
- Room_01_Envrio – graphics designers can update BSP with normal meshes – when finished just delete BSP map from persistent,
- Room_01_Props – graphics designers can add props in this map,
- Room_02_*, – all those above,
- Room_03_*, – all those above,
Thanks to this lot of people can work on one level without need to wait for others. As far I can know this is typical for games created in Unreal Engine. Lot of my friends used this method.
Another thing is memory – if you are working with streaming enabled you could unload whole room if not visible for player.
If you are working alone you still should use streaming to learn the pipeline. Then in team you will know what to do 😉
Streaming Enabled
Create new (blank) level named MainMenu_P – “P” here means persistent. So your team mates will know that this is main map.
In the meantime I have created simple MainMenu level. Try to create one too.
So basically I have 3 maps:
MainMenu_P – which is persistent,
MainMenu – just main menu room,
MainMenu_Armory – created earlier armory for upgrading weapons,
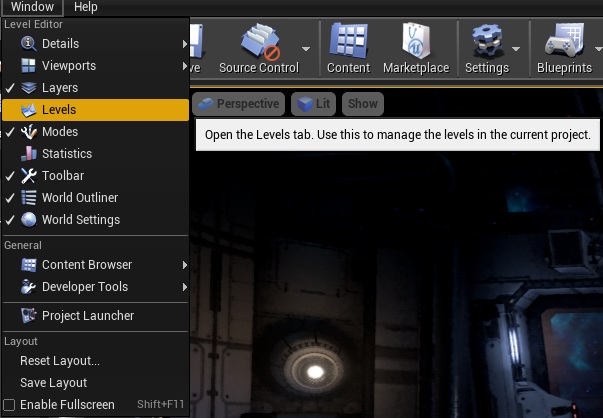
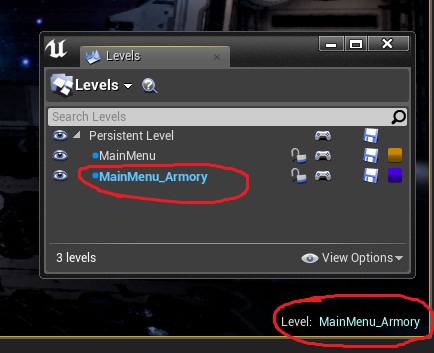
Now open MainMenu_P and select Window -> Levels.
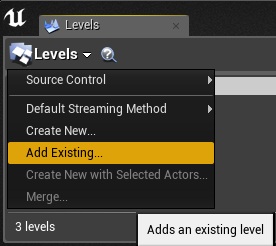
In Levels Window click on Levels -> Add Existing.
And add MainMenu and MainMenu_Armory maps.
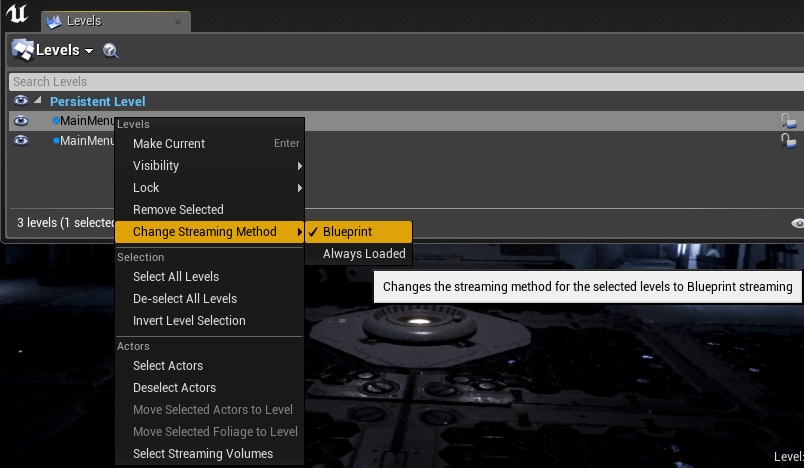
Make sure all maps have streaming method: Blueprint.
Those steps have enabled streaming enabled pipeline.
Working in Streaming
There is couple of things you need to know when working in Streaming.
First and most important is which is current level? If I place new Actor to which level it will be added?
Open Window -> Levels and double click on level which should be active. It will be marked as blue.
If you open MainMenu_P – persistent level will be current level so always remember to change current level. Another way is to open just MainMenu_Armory level instead of MainMenu_P.
I know that this is easy but I have seen lot of people forgetting about this and placing lot of meshes / actors to persistent level.
Another thing is MainMenu_P – which is persistent – that means it will be always loaded. Don’t put your content there. In this tutorial I will use MainMenu_P for loading screen adding one actor and one particle but don’t try to put whole level in there.
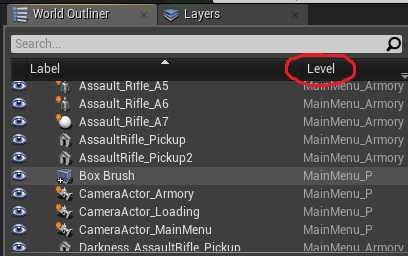
How you will know which actor is in which level? Just use Outliner.
Thanks to this you can select all actors in MainMenu_Armory and move it right to MainMenu. In this example location 0, 0, 0 will be used for loading so rest actors should be away from center world location.
Creating Main Menu Base Classes
In Main menu we will use different GameMode with different settings:
- Create new GameMode blueprint named MenuGameMode,
- Create new GameState blueprint named MenuGameState.
- Create new Character blueprint named MenuCharacter,
- Create new HUD blueprint named HUD_MainMenu,
Assign them to MenuGameMode and select MenuGameMode in MainMenu_P settings.
Creating Tip Loading Actor
Create new blueprint extending from Actor named BP_BaseLoadingTip. Open it and add one variable:
- Tip (Text, editable), – this will be our tip visible in loading screen,
Create blueprint extending BP_BaseLoadingTip named Loading_Trooper. Open it and add skel mesh component with Trooper Skel Mesh. Add some text to Tip variable.
Create another blueprint extending from BP_BaseLoadingTip named Loading_Rifle.
TODO
Basically just extend from BP_BaseLoadingTip to create new tip for loading.
Loading Loop Preparation
Open MenuGameState and add those dispatchers:
- OnLoadingCompleted,
- OnPressedAnyKey,
- OnTipActorSpawned (one input: BP_BaseLoadingTip actor reference)
Game State will be responsible for the whole loop.
UMG With Tip And Loading
Create new Widget named UI_Loading. Open it and add those widgets:
- Text named TextBlock_Tip (IsVariable need to be set),
- Text named TextBlock_PressAnyKey (IsVariable need to be set),
- CircularThrobber named CircularThrobber_Loading (IsVariable need to be set),
- Button named Button_Press.
In this video you can see the settings and hierarchy:
Now open your event graph and add those variables:
- Tip (Text), – Tip variable should be binded to TextBlock_Tip!
- isWaitingForTap (bool),
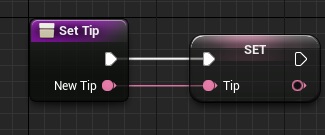
And one function: SetTip.
Create new Custom Event named OnLoadingFinished.
This is basically showing Press Any Key text and hiding Throbber.
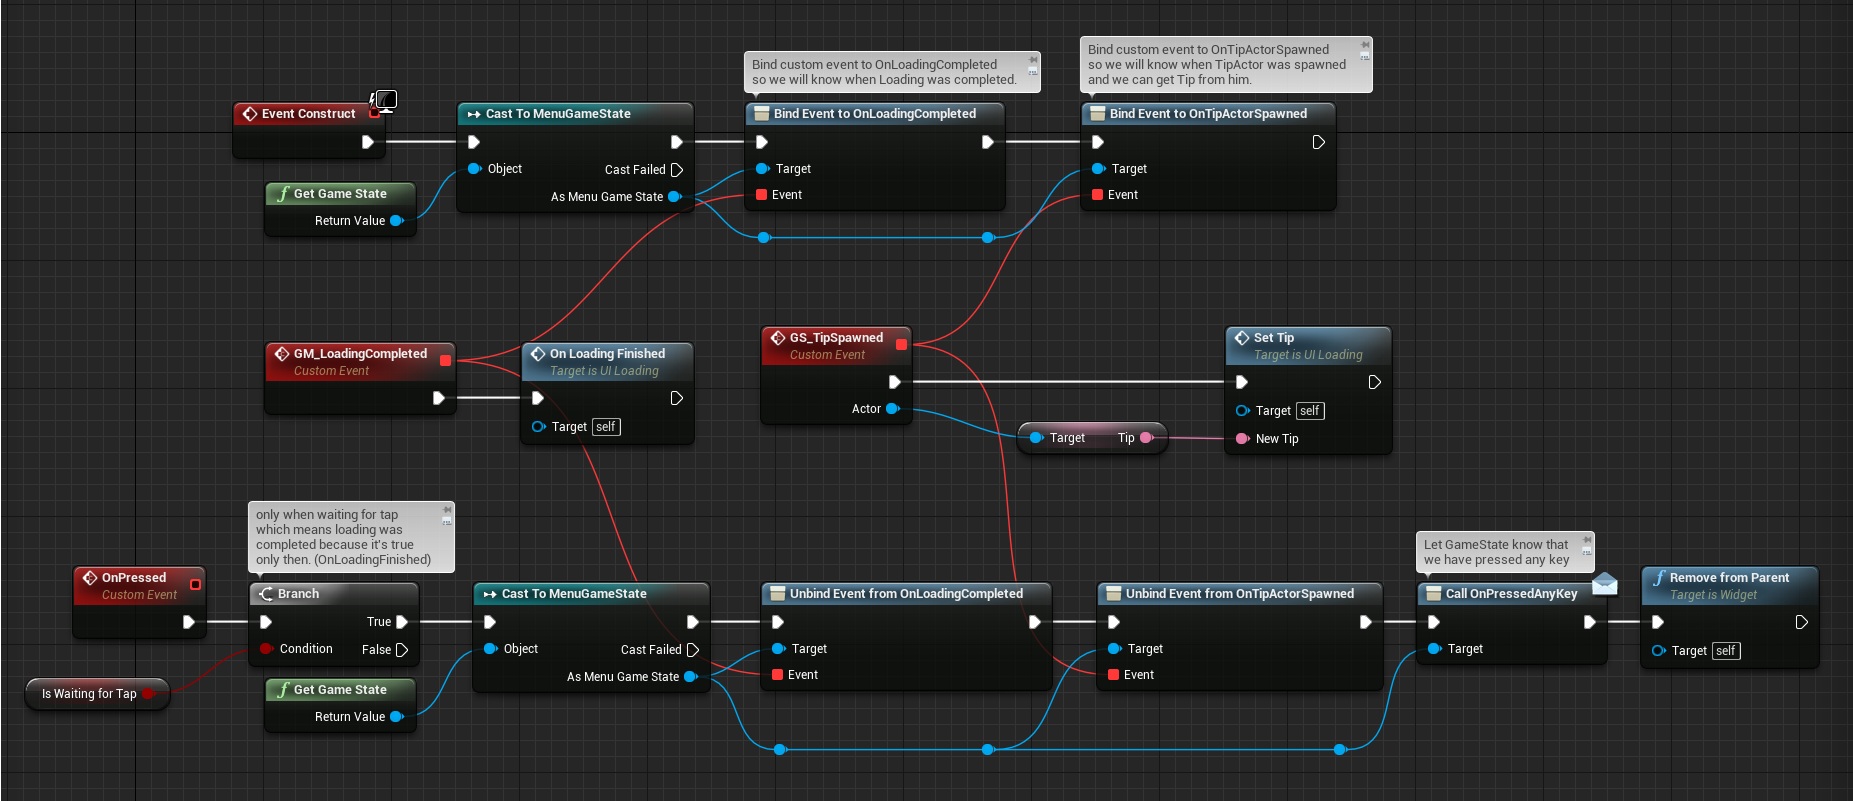
Construct and bindings from Game State:
This looks complicated because I’m using UnBind functions without them it’s really simple. I have learned that before Removing Widget it’s recommended to unbind all bindings to prevent crashes when opening new levels.
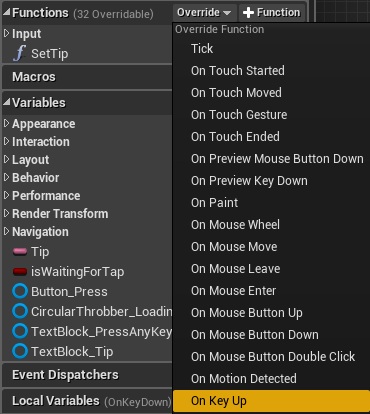
Now in your functions Override OnKeyDown function:
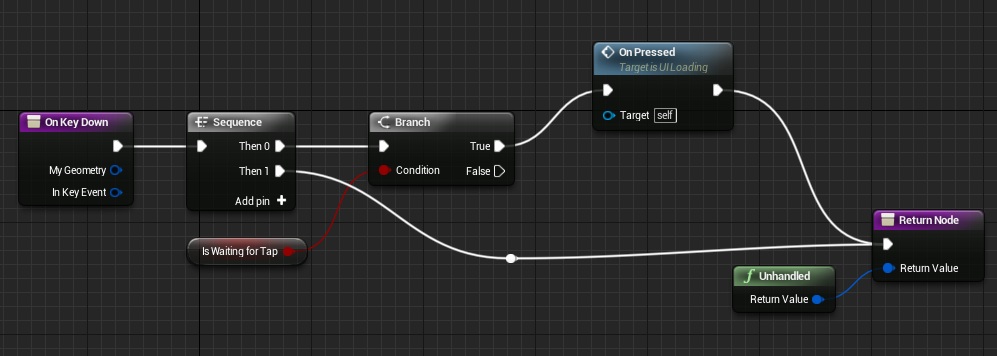
Each time we will use a key this function will popup.
So if we know that loading was completed (isWaitingForTap bool) we can call OnPressed.
USEFUL TIP: Key functions will only trigger when Input Mode is set to UI Only and widget is connected to Widget To Focus. Will show that later in this Tutorial.
Last thing in UMG is to add OnClicked event on Button. Just call OnPressed function.
That’s all in UMG!
Preparing Loading
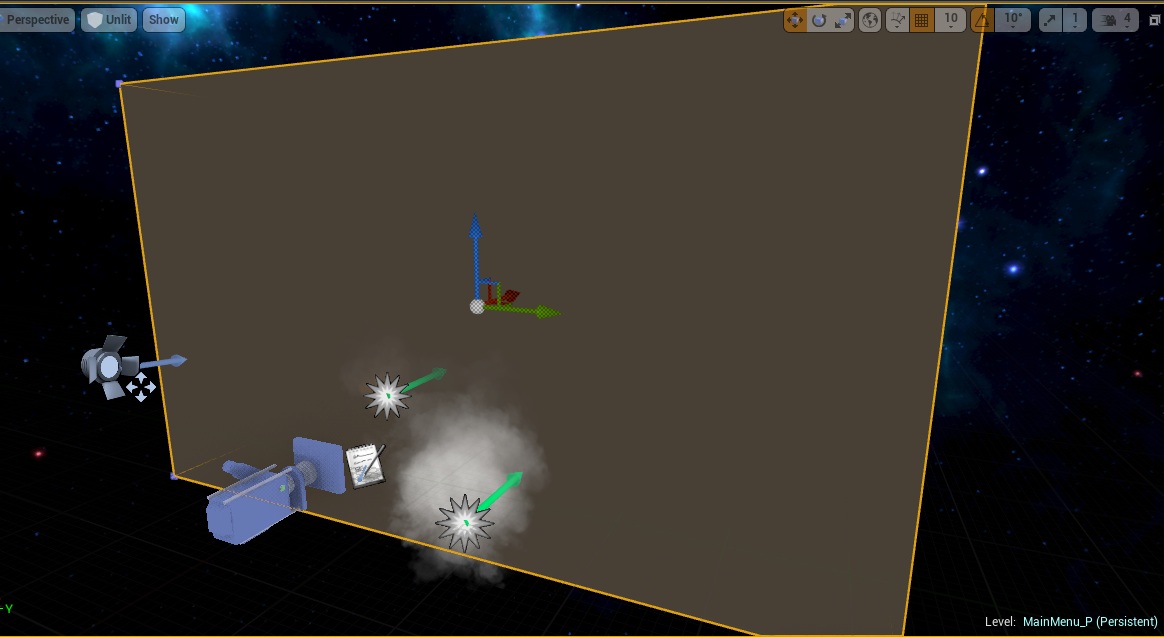
Open your MainMenu_P and add to the scene:
- Camera Actor, (Location: (X=-160.000000,Y=100.000000,Z=90.000000) Named Camera_Loading,
- Camera Actor named Camera_MainMenu it should point at your main menu scene,
- Note Actor, (Location: (X=0.000000,Y=0.000000,Z=0.000000)) Named Note_SpawnLocation,
- Spot Light: (Movable, Location: (X=-220.000000,Y=-40.000000,Z=170.000000) Rotation: (Pitch=-9.999908,Yaw=-19.999998,Roll=0.000000)
Now add new BSP box:
It will be background for loading.
Now in Level Blueprint add one variable:
- TipActors (Array, Actor Class),
And add your Loading tips actors into the array. Now create new Custom Event named SpawnTipActor:
This is basically taking random tip actor from TipActors -> spawning it -> let GameState know that Tip Actor was spawned. So UMG will get this dispatcher.
Create another custom event named LoadLevels:
Here should be all of your streaming levels you want to load during loading. After loading we are letting Game State know calling OnLevelCompleted.
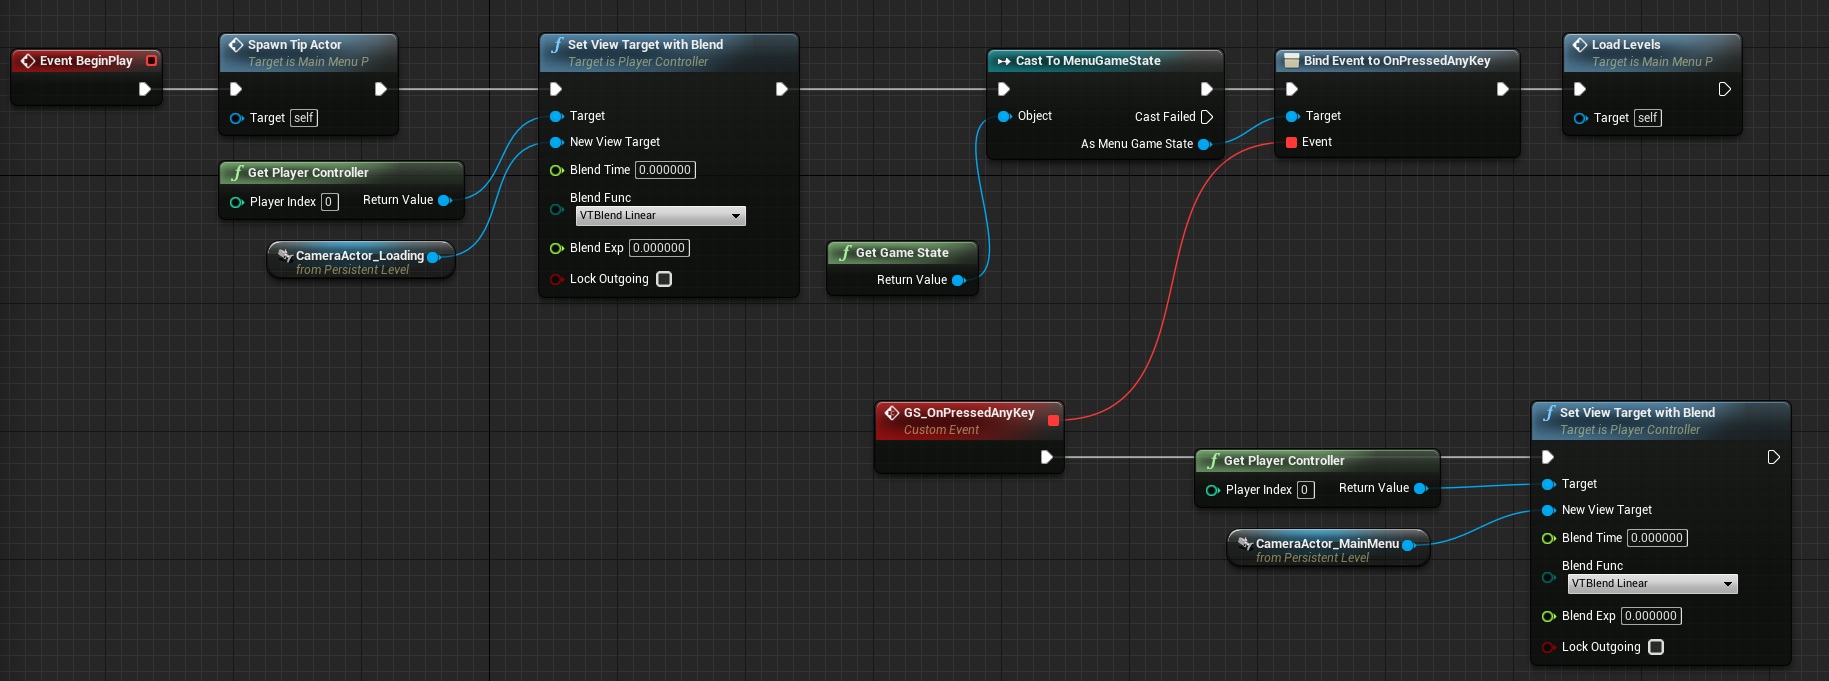
Now in Begin Play we need to set view to loading camera and bind event OnPressedKey to change the camera.
And that’s all in Level Blueprint. Make sure your sublevels aren’t changing camera on Begin Play.
The last thing is to create loading widget. We will do this in HUD class. Open your HUD_MainMenu and in begin play create loading widget:
Without Input Mode UIONly and In Widget To Focus – widget won’t get Key events.
That’s all – you have your loading completed!
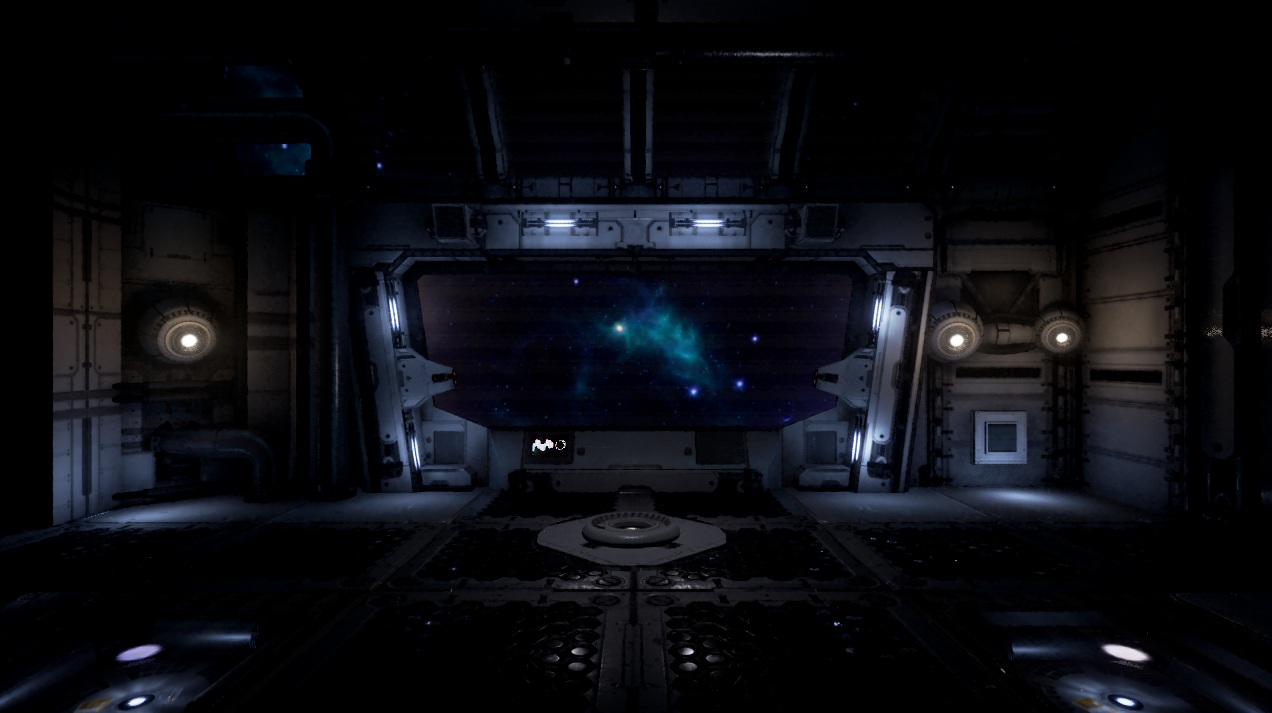
Final Effect
Creating ShooterTutorial takes a lot of my free time.
If you want you can help me out! I will use your donation to buy better assets packs and you will be added to Credits /Backers page as well.Implementing game is taking time but writing about it is taking much more effort!







When you stream load you can’t change the Game Mode (and all other sub classes), doesn’t it? Which you’d want to do when transitioning from the MainMenu and InGame (or Level 1, whatever) levels. Is this not the case?
Persistent level will have information about game mode. I will have two persistent levels: main menu and ingame. You dont need to stream menu with ingame.
But when you transition from your MainMenu level to your InGame level, since you won’t be streaming the levels, how will you show the hint loading screen? And thanks for your reply 🙂
For some reason nothing in the event construct in the UILoading widget is firing. I’m in 4.10. Will try to debug and re-post. Print string shows the widget being drawn correctly and everything else; not sure what’s happening yet.
I’ve fixed it, but I’m not sure how. I put a million print strings throughout the project to track everything, and Event Construct would never fire off, no matter what. Finally I tried cutting everything and pasting into event begin play in the mainmenu game state, but you can’t really do that without also moving the onpressed function and everything else. When I pasted everything back into UI Loading and reconnected the event construct, it worked. I notice that “OnLoadingFinished” was not present when I pasted back. Recreating the link between OnLoadingFinished and GM_LoadingCompleted, and recompiling, seems to have done the trick. Very strange, it’s clearly a bug but I’m not sure what repro steps I could send to Epic.