In earlier post I’ve described how to move assets from Shooter Game Example. To complete this tutorial you will need to move Animations and Characters folders to your project.
|
1 2 |
<strong>This Tutorial has been created using Unreal Engine 4.8.2</strong>. Make sure you are working on the same version of the engine. |
First of all I’ll write down what I would like to achieve:
- I want to have animated hands attached to my first person character (which is GameplayPlayerCharacter in this case),
- Hands should be aiming where I’m aiming and have idle animation,
- If camera will be outside of my character I will see entire TPP mesh,
- Character mesh should have idle animation,
- I want to see my aiming from TPP mesh as well,
Basically I wasn’t able to find a package with animated hands and character mesh. That’s why I will use assets from Shooter Example. You can find separated hands in Unity Asset store.
Fixing assets after importing.
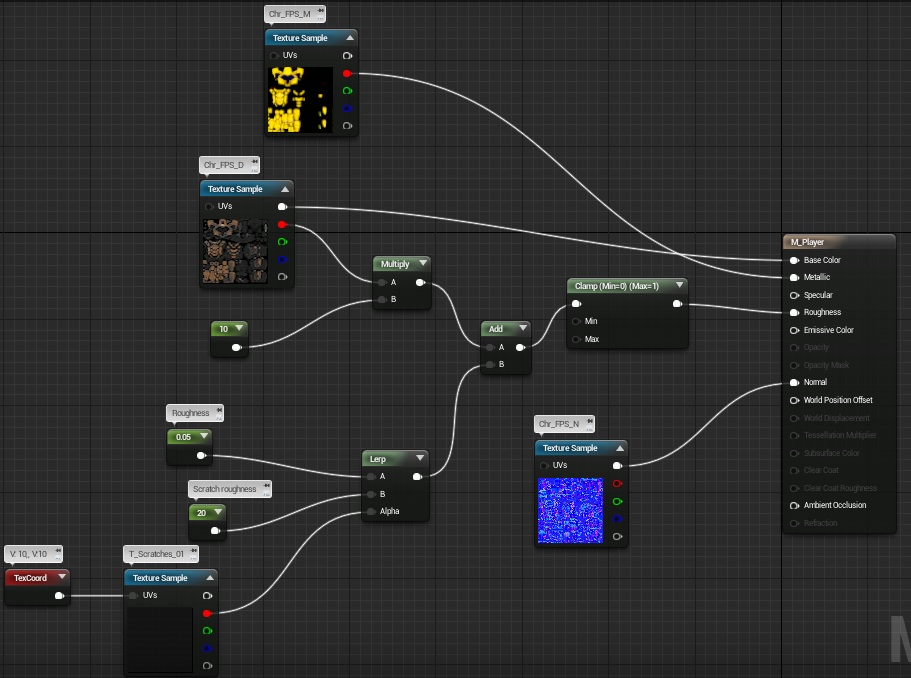
There is a couple of issues after copying assets to our project. Let’s deal with Materials – create new material like this:
Name it M_Player and assign to HeroTPP and HeroFPP meshes. Now we aren’t focusing on graphics side so let’s leave it like it is. Later I will explain how to make this material better.
Let’s move to HeroFPP_AnimationBlueprint and delete every variable and everything from AnimGraph and EventGraph. Do the same with HeroFPP_AnimationBlueprint. They should be clean without any functionality because Shooter Game uses C++ to drive ShooterCharacter which we don’t have here.
GameplayPlayerCharacter adding hands and TPP mesh.
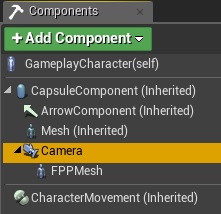
Open GameplayPlayerCharacter and in viewport lets update/add components:
- Mesh
– Select TPP mesh and use animation blueprint: HeroTPP_AnimationBlueprint,
– Location: (X=-0.000002,Y=-0.000001,Z=-86.000000) and Rotation: (Pitch=-0.000000,Yaw=-90.000000,Roll=-0.000000)
– Set Owner No See to True, (thanks to this if we will be in different camera our TPP mesh will not be visible) - Add new component: Camera
– Set its location to (X=0.000000,Y=0.000038,Z=75.990540)
– Set Use Pawn Control Rotation to true, - Add new Skeletal Mesh component and name it FPPMesh
– Move FPPMesh to Camera. So it will be attached to the Camera,
– Select FPPMesh and use animation blueprint: HeroFPP_AnimationBlueprint,
– Location: (X=-9.983782,Y=8.026691,Z=-145.999725),
– Rotation: (Pitch=-0.000000,Yaw=-90.000000,Roll=-0.000000)
– Set Only Owner See to True, (thanks to that only if we are in this pawn’s camera FPP mesh will be visible) - Now go to Class Defaults and disable Use Controller Rotation Yaw,
That’s all here. Your components should look like this.
Now let’s go to HeroFPP_AnimationBlueprint and just add FPP_LauncherIdle to your Animation Pose.
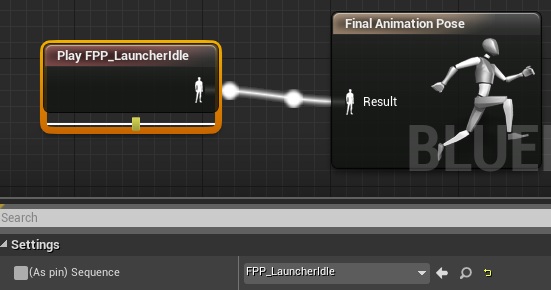
It’s all here. Compile and close.
Now go to HeroTPP_AnimationBlueprint and add two new variables: Pitch and Yaw – both should be float, default 0. Then add this to your Event Graph:
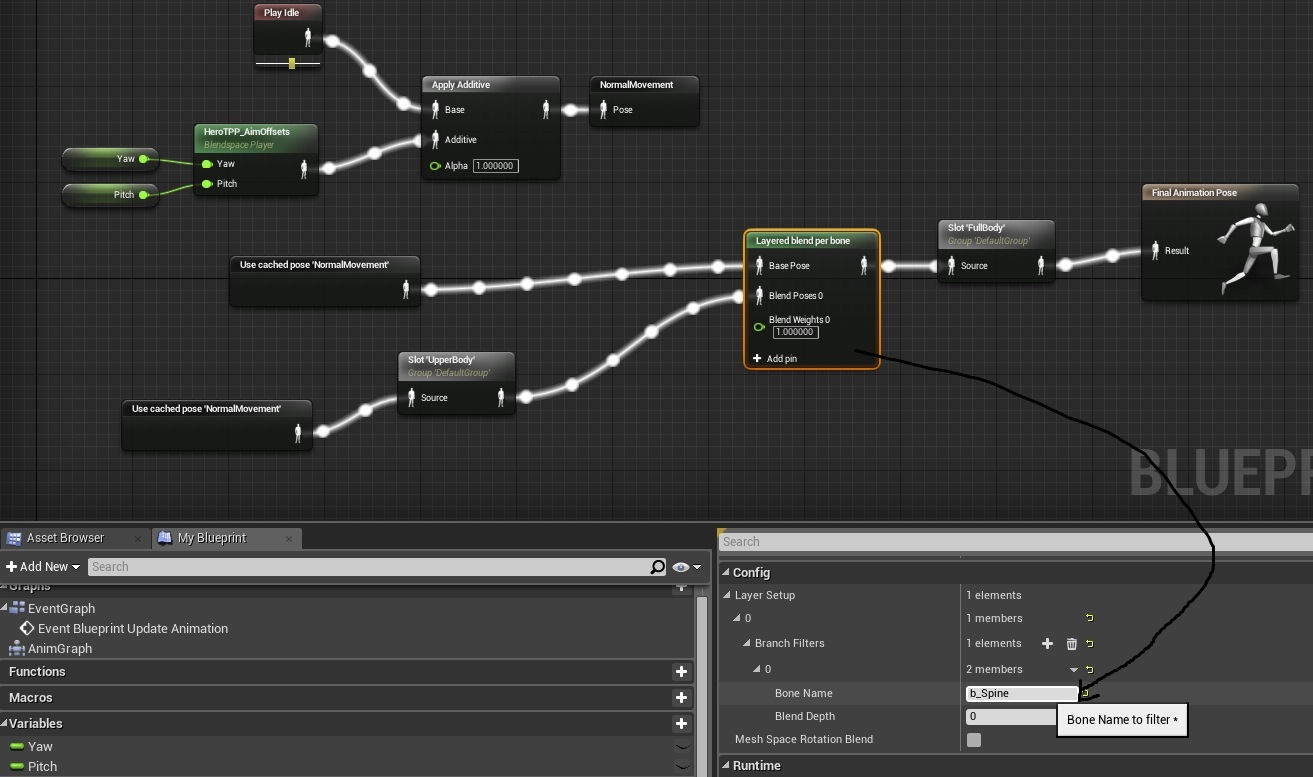
Basically we need Pitch and Yaw for our AimOffset. You can read about aim offsets here. Just recreate this animation blueprint:
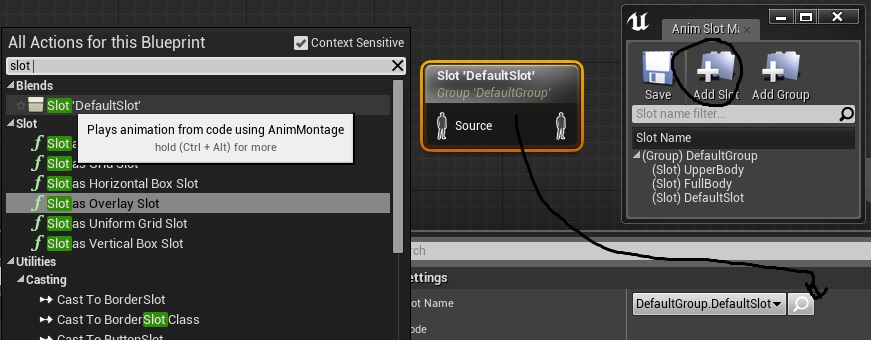
This is making sure that legs won’t be animated during AimOffset. I’ve used cached pose NormalMovement which can be created by right-click -> New Save Cached Pose. Later on you can right-click and select this cached pose as I did. Another thing is Slot – I’ve used two: UpperBody and FullBody. You can create those by right-click -> Slot’DefaultSlot’ and then just open the magnifier.
At this point if you don’t know how to use animation blueprints you should watch these tutorials made by Epic.
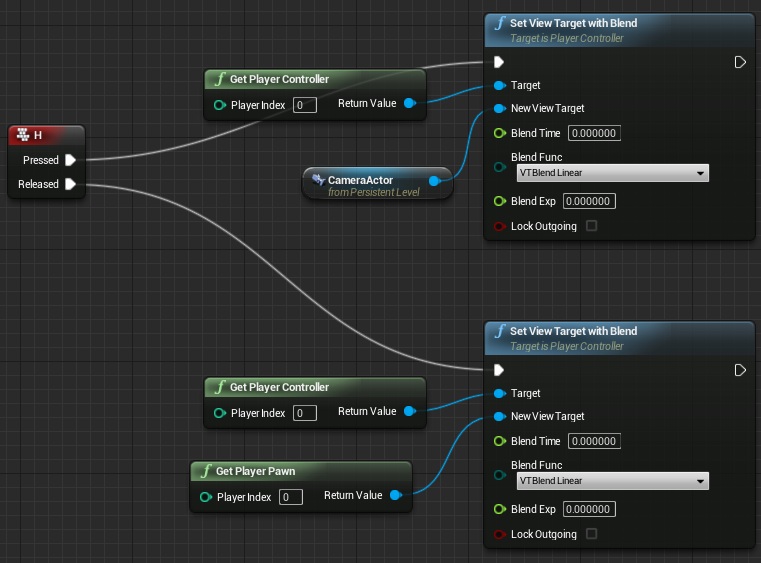
Now let’s test this out! To do so place a camera in your level to be sure that it can see player. (PlayerStart) And in Level Blueprint just add these to toggle camera:
And run the game!


Actually you never told to use arrow component and capsule component in the first part!
also I couldnt find “Use Controller Rotation Yaw”, can you help me?
Also Animation blue print can’t find skeleton
Did you copied my blueprints? They have different structure than yours. You need to copy hands and animations from Shooter Game Example by Epic.
(ok I solved the reference to the skeleton reimporting again everything)
Lol last 2 questions:
-when I click on play I still have the flying visual movement no mesh, no third person, no first person
-what is a level blueprint that you mention near the end?
If you extend from Character capsule and arrow component will be there. As for control rotation its in movement component. Make sure you are extending from Character class.
really thank you very much for the help! in order not to waste too much your time I send you the result of my attempts in order to follow your guide.
this is the link, pretty small, I removed textures:
https://dl.dropboxusercontent.com/u/41996092/Project_Spartan.zip
really thanks!
Yeah like Fabrizio, I am missing something… I have the character moved from shooter game, in the char BP it has fpp and tpp and shows fine with material … idle animation. But when running the game, nothing spawns… when I press H i actually see an untextured sphere where the character should be.
Yeah like Fabrizio, I am missing something… I have the character moved from shooter game, in the char BP it has fpp and tpp and shows fine with material … idle animation. But when running the game, nothing spawns… when I press H i actually see an untextured sphere where the character should be.
You need to move skel mesh with animations not the character blueprint. You should add skel mesh to YOURS character blueprint which in this case is GameplayCharacter.
I have played with UE4 quite a bit, but honestly I don’t know what you mean.
I managed to get it working. But movement is all very odd. Following the directions you have seems to leave out quite a bit. Like my forward/back/right/left remains the same no matter which way the character is looking. I would thinking looking turns the whole body. I will keep playing with it.
I did like u said but i still see only this sphere without texture. Maybe you can explain what is meant with “move” from where to where? Because i copied the whole folders from the demo game and the options in GameplayCharacter for meshes are HeroTPP and HeroTPP. I think everything is set up. Please tell me where i my fault?
Can anyone give me the Unity package Shooter Example, PLEASE !!
I really want to follow the tutorial
The free package is this one https://docs.unrealengine.com/latest/INT/Resources/SampleGames/ShooterGame/index.html and you can get by going at the Unreal Engine Launcher, going into the Learn tab, and scroll down until you read “Example Game Projects”. It will be there. Then go click on it and hit “Create Project”.
Thanks 😀
More comments for those are new on UE:
-These float values when creating the new material? They are called constants.
-To set permanently the new texture without having to assign it everytime you use it, open directly HeroTPP and HeroFPP. At upper left, where it says LOD0, you can set the texture.
-Having troubles to set it right the first or third person models? Open GameplayCharacter, and at the Viewport tab, you can see them. The coordinates set by andrzejkoloska doesn’t look good for me, so through here you can see how it is looking.
-Struggling when trying to get the Cameraactor at the last step? Go read this to know how to get it: https://docs.unrealengine.com/latest/INT/Gameplay/HowTo/ReferenceAssets/Blueprints/index.html It will also explain you how to open the Level Blueprint.
-For last, if you are having problems with something related to the models, reimport them manually.
Have fun learning :3
Why mine look like that ?:http://imgur.com/4Q7jyjg
HELP ME PLZ
and do i need to enable the YAW rotation, cuz it’s buggy
and i can’t use movement as my camera is looking at :/
HELP ME !!
Help me
Please, ANYONE CAN HELP ME PLZ !!!
It looks like you are adding additive animation to it, but it’s really hard to help you because I can’t see the nodes and they properties. I suggest to read basics documentation about the AnimGraph: https://docs.unrealengine.com/latest/INT/Engine/Animation/AnimBlueprints/AnimGraph/index.html
and animnodes: https://docs.unrealengine.com/latest/INT/Engine/Animation/NodeReference/index.html
i think because i deleted everything in the blueprint
Help ME PLZ PLZ PLZ i really want to finish this, is it because i am using the preview version ?!
Here’s my skype : themerzoug2020
add me PLZ
Well, I fixed, I told you it’s from the Preview Version
I installed 4.8.3 and it’s works Perfect !
Just follow the instructions to the letter and like me, you will have the desired result 🙂
Thank you for this tutorial series, I’m enjoying it a lot. 🙂
Pingback: Adding our FPP and TPP … | AcclivityGameStudios
Why dont you do a video? Its more Visual :V I dint undestand anything :V
Yo, i was thinking about that too 😛
Why not making vids on YouTube, like that you’ll help us and help yourself by earning some money
it’s could alot more if you get too many views like 100,000 or something i hope the message taken
Pleasee… if you dont have a channel or you dont wanna talk, I let you upload the video and I’ll give you the earnings on it. If you dont wanna talk in the video just add little comments like here 😀 Pleaseee
There is couple of reasons why I’m doing it as text and not video tutorial:
– I need to have documentation of what I’m doing. I’m using this site even in my daily job – I forgot how to do something, here I can find it. It’s easier to search than in 2h video,
– I don’t have enough time to prepare video. This is really important for me – creating shootertutorial is taking a lot of my time and it’s faster for me to do it using text tutorials than long video tutorials,
– I’m trying to trigger creating things by yourself not copying everything from video,
– I don’t have good internet provider, my upload is 15 kb / s – and yes I can’t buy better one here where I live,
– I want to create an book when blog will be finished,
– I don’t want to have any ads, ShooterTutorial will be always free of ads,
Hope it answers your concerns guys.
Where did you get that movement https://shootertutorial.files.wordpress.com/2015/06/tpp_animgraph.jpg?w=300&h=178 (Normal movement
)
Right Click -> Add New Pose or something like that. If there is something new in tutorials (like animation blueprint) I’m referring to official documentation. You should read it first before moving forward with Tutorials.
This way will give you the opportunity to read the documentation when you get stuck, and force you to figure it out on your own, causing you to learn more.
For those of you who run into the deformed final animation pose, change the maximal input under apply addictive from 1 to 0
http://i.imgur.com/dPNSwEZ.png
I had the same problem. Figured out I just had to apply proper animation base in every aim animation file (up down left right and corners), and then properly set up all points in HeroTPP_AimOffsets.
Animation Base:
Open animation file, scroll down to Addivite Settings, set:
Additive Anim Type – Local Space
Base Pose Type – Selected Animation, select Idle
Now open HeroTPP_AimOffsets and set up points in AimOffets (the grey area in the middle of bottom area). To set up a point, pull desired animation from the menu on the right (like, AimOffsetUp) and put it in the right place of the square (Up goes to top – Pitch 0.5, Yaw 0). If a point appears at a wrong place, simply click on it and write proper parameter (they all go from -0.5 to 0.5).
After you set it up, you can move the mouse around the square to see in which direction your character aims. If you did everything right, you should no longer have distorted character when you apply additive in animation blueprint. Without Additive, your character will always play Idle animation and never turn.
Hope it helps! 🙂
I’m so sorry, but for 2 days long I can’t solve one problem:
My character rotates with his full body, and legs too, and it seem’s like slot “UpperBody” works not so correctly or else.. Can you answer me why this can be so?
P.S. followed your BP Examples step-by-step
Hello, I have a problem, and I can’t find any solution for 2 days. I’ve made all things step-by-step, but my character rotating while aiming with his full body, and legs too, and it’s kinda bad. I think, problem is in slot “UpperBody”, cause if I will avoid this – nothing will change at all.
Can you please give me an answer, have you seen this problem before?
In your animation blueprint make sure you are blending upperbody with proper bone. (Layered blend by bone)
I’m sure, that I’m blending proper bone, and name is correct, but anyway, it seems like this node filter “Layered blend per bone” don’t work for me at all.. because, if I’ll avoid this – nothing will change.
In your tutorial, when adding new slots “UpperBody” and “FullBody”, there was said, that after creating “DefaultSlot” we have to Add new slot with name “UpperBody”, but for me, it was already exist. Maby, it’s not so important? Maby the problem is that i’ve used FPS Example project, not Blank one to create custom character?
As far I know FPS Example use Use Controller Rotation in Character so whole actor will rotate with your mouse.
Yep, it was the root of all problems! Thanx for help, you’re awesome!)
Hi, great tutorial again, but I seem to have this issue: http://gfycat.com/FeistyRewardingCavy
weird I don’t have the issue – make sure you properly set your aim spaces.
I’ve narrowed it down to an issue with the AimDown animation, removing it from the blendspace makes the entire thing work as normal, but looking down is now a blend between LeftDown and LeftRight. Sounds odd, and I’ll need to look into importing the AimDown correctly, but it works for now just fine.
What is the node used for “Use cached pose movement”?
We need to make AimOffset?
GameplayPlayerCharacter, is what ? the character blueprint?
Regards,
Miwoo
When i press H i see only an untextured sphere???
You need to give me more details I’m not magican here 🙂
Which version of the engine are you using? Show me your widget blueprint and design.
I updated latest Pictures:
https://drive.google.com/folderview?id=0B7ICq8XrKYT4dHNrX01ud1VzdTg&usp=sharing
first i want to say that your tutorial are very good so thank you very much. thlere is just one thing that i don’t understand and maybe it’s for this that i’m again stuck with the flying controller. why hqve we done everything in the GameplayPlayerController and now we are acting on GameplayPlayerCharacter? the problem it’s that i control the controller and the and all the things done in this tutorial in the character don t appear so i can’t see the the character meshe because it doesn’t spawn. what did i miss?
GameMode class – go back to first tutorial 🙂 You need to assign character to your gamemode blueprint and gamemode need to be assigned to level as well.
Thank you very much i got it working in 4.8 and 4.10.
Only Problem I can’t find where to Set Owner No See to True
Yes i found it thanks. After two Days everything works fine just after posting!!??
Make sure you set your values in your aim offset to go from -1 to 1, in the Epic example it’s -90 to 90
I’ve noticed something when looking at the character from the camera that I’m not even sure if it’s intentional. First person works just fine but when looking the third person mesh through the camera when you reach -90degrees (so he turns left) then the animation stops until you go another -180 all the way around to +90 degrees.
In case I didn’t explain it well if you are at this stage http://i.imgur.com/Vq7vO0S.jpg and keep moving the mouse left he will instantly appear at http://i.imgur.com/v4mRXud.jpg.
I am in the same boat. When I hit the edge of the aim_offset animation, my character does animate until I turn back into the animation. Also when I look all the way up or all the way down, my FPP arms dissappear completely until I look back down or up.
I know this is probably to late but, to fix the FPP arms from disappearing go to Edit>Project Settings>All Settings>Near Clip Plane>Set value to 1.0 You may have to restart the project to see the changes.
Or, if this will not help – try to increase the bounds scale (GameplayCharacter blueprint – fpp skeletal mesh component).
https://answers.unrealengine.com/questions/153901/skeletal-mesh-disappearing.html
just a shit tutorial like most of them. garbage. not a tutorial at all. its like personal notes for yourself. garbage.
This is the one of the first Tutorials I have created, like a 6 months ago or so and I’m aware that it’s far from perfect. Check out Skyrim Inventory and Uncharted Equip – now I’m doing more detailed stuff. At least I’m trying. E-book will be aimed to beginners and I will be explaining lot more stuff.
such junk. cant believe u got money from unreal… your lack of explanation is horrible. thanks for your effort, but you suck at giving anyone material. as shown from comments. pathetic. hope your ebook is better
Thanks. This tutorial is pretty good – all the important points are here. I have to agree with others – it lacks required amount of detail to make it easy for a beginner to do it from the first try. But, if beginner (like me, who never touched Unreal Engine 4 before reading your tutorials) takes it slow and figures it out, you tutorial has enough information to follow through. No steps are missed.
I’ll be honest, I had a lot of trouble with this tutorial, even more than 1st one. I had to go back several times and re-do some parts, but eventually I found and fixed my mistakes and now my character is no longer distorted, 1st person hands appear, idle animation plays fine, 3rd person mesh follows my aiming.
Overall, I like this tutorial. Its clearly aimed at people who know their way around Unreal Engine 4 (or are able and willing to learn). But it contains all the required information you need, in a rather compact format.
Although, if I was writing a book, I’d spend some time training on these tutorials. I’d re-write them, aiming at complete newbies, adding details and UI explanations (how to do this or that, what I mean by “open animation blueprint” when mentioning it the first time, add introduction chapter, explaining how stuff works for different parts of the engine – meshes, textures, animations ect), add information on what may go wrong and how to fix it. You already have all the required information – you have the knowledge and people already provided some general feedback (I ran into same problems others posted). If you use it to write a “beginner level” tutorial, it’ll be decent training for writing a book.
TL;DR:
Great tutorial! But you need some general UE4 knowledge to follow it.
Your Guide Sucks you get so far then details are really vague, so much time wasted on this rubbish
I cant look left nor right
Umm I came across this tutorial excited, but I can’t even follow the beginning. You just show a blueprint with textures and just tell us to make the blueprint you are showing. And on top of that you are mentioning both third person tpp and first person fpp at the same time, How the heck could you even do that? Also I don’t see a shooter project in the learn tab. Am I the only one lost at the very beginning’s vague instructions? If someone could help me interpret the start that would be great, it seems perhaps it was translated from another language maybe?
you can migrates folders safety more thane copying them
Thank you very much for this great tutorial, it is working perfectly. I see no issue with the way you are explaining things, I am a beginner myself and I had to actually pay attention to what I was doing and think a bit by myself instead of just following instructions without even trying to understand anything.
It is a great way to learn the UE4 interface and the way things work.
So thank you a lot! Have a great day 🙂
Hi I cant see the first person arms but I can see the third person character. Also there is no texture only the grey character.
I do not get why you normalize angles after “Break Rotator”. This does not work for me. If instead, as mentioned in the link you provided, I put “Clamp Angle” with min and max set to -90 and 90, respectively, then it works.
Hi orxshi, I’ve got the same issue: when the yaw value reaches -180 or 180, the animation “jump” to the opposite side.
I’ve tried to clamp the angle between -90 and 90 but it didn’t solve the issue.
Can you put a link to a screenshot of your working event graph ?
Or perhaps someone else can details his solution ?
thanks
Hi, I know I’m probably to late to help, but, while I couldn’t figure out the clamp thing either, the best thing to do to fix the weird snapping is to go to: GameplayPlayerCharacter (Blueprint with arms, camera etc)>GameplayPlayerCharacterSelf>And checkmark Use Controller Rotation Yaw. I know in the tutorial we were told not to have this checked, but, its really the only way to fix snapping as far as I know.
ayudaHelp !! My FPP character if it turns but does not change a TPP does nothing
Help !! My FPP character if it turns but does not change a TPP does nothing
Your tutorial is awesome ANDRZEJKOLOSKA, thank you so much !
I really like that you have to fully understand what you’re doing to complete the steps. I’m learning a lot about Unreal Engine.
I’ve just completed this part of your tutorial with UE 4.14.2 , i just have a simple question: how would you make the shadow from the 3rd person view, visible in the 1st person view? 😀
Regards,
Maxime
Ok my FPP mesh is working fine but the TPP mesh doesnt move at all when im in a different camera and doesnt animate.
i have the same issue :\
Now let’s go to HeroFPP_AnimationBlueprint and just add FPP_LauncherIdle to your Animation Pose.
How do u add the launcheridle? I’m in HeroFPP_aniationblueprint – anim graph.
Deleted everything, and all i have is final animation pose, but i can’t find fpp_launcheridle to connect to final animation pose
Any help would be appreciated
I’ve done everything. Everything. Even twice. But everytime the same issue. I can see my hands, but they are not animated. when I switch the camera, I can see my Caharacter, but I can’t move him and he is not playing any animations. I’d love to get some help there.
I’ve got the same issue, although Body is turning with camera
Hello I have couple problems for now.
1: My character is moving only up and down with mouse
2: Camera switch by pressing H. Then i press it it change view but not to default where i can see my hands
Link: https://gph.is/g/EGyXOr3
unreal engine version: 4.22.3
Ok i solved camera switch problem. For now i have only one problem only up and down mouse movement but in project settings -> input we have only Mouse X, Mouse Y.
Ok i solved mouse movement. Everything is perfect. Thanks to your tutorials !