In this tutorial I will focus on creating upgrade for my weapons.
- Possibility to change each weapon variable,
- Draw everything on 3d UMG widget,
- Explore weapons as 3d models,
Creating upgrade functionality is easy but it’s taking lot of time.
|
1 2 |
<strong>This Tutorial has been created using Unreal Engine 4.8.2</strong>. Make sure you are working on the same version of the engine. |
In this tutorial I wont:
- Implement save / load system,
- Implement currency. There will be cost but It won’t be decreasing or checking if we have enough money to upgrade,
Creating base UMG
Create new UMG Widget named UI_Armory_Weapons. For now let’s add necessary variables and dispatchers.
Add new dispatchers:
- OnNextWeapon,
- OnPreviousWeapon,
And one new variable CurrentWeapon – extending from BP_BaseWeapon.
Add two buttons: Button_Previous and Button_Next.

At this stage you will have only those two buttons. Make sure your anchor is in center and you have Position Y the same as I have. What you could do also is to add image (with Center Anchor) like mine:
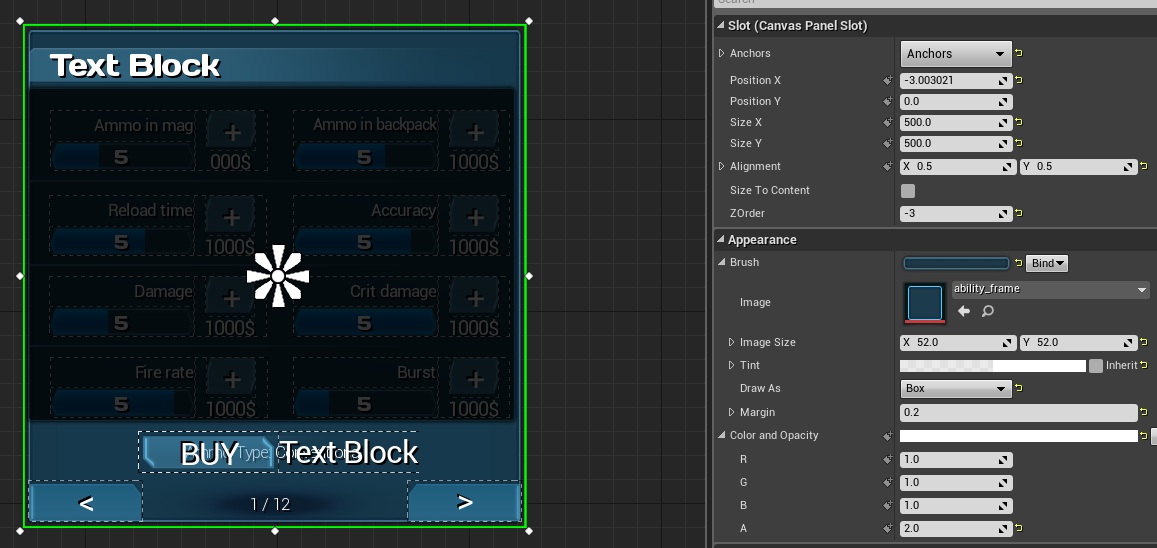
So you will know if your UI is fully rendered in 3d. Add OnClicked events to buttons and call dispatchers:
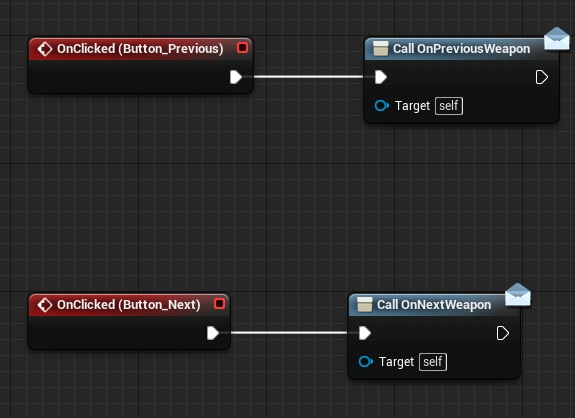
Actor placed in world will bind to those dispatchers. Before leaving UMG create new custom event named UpdateWeapon with two inputs:
- CurrentWeapon (BP_BaseWeapon),
- CurrentIndex(int),
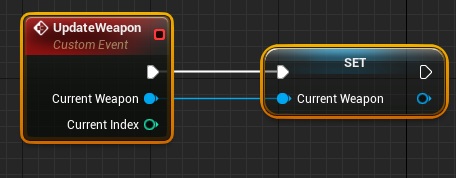
We will be calling this from actor placed in world.
Updating Base Weapon
This will take lot of time because I need to add lot of new variables. This part would be so much easy in C++ 🙂 You won’t be getting any results soon but I will move from one upgrade to another. Let’s start with 3D weapon.
Open BP_BaseWeapon and add those variables:
- UI_Pivot (Vector). I would like to have possibility to move the weapon in 3D,
- UI_Scale (Vector). The same thing but with scale,
Creating rotating weapons
Create new blueprint extending from Actor named UI_Weapons. Open it.
Add new Scene component named WeaponsRoot. Set Scale to 2. Add new Widget Component named Widget:
- Location: (X=180.864090,Y=-4.912077,Z=51.413330)
- Rotation: (Pitch=0.000027,Yaw=29.999952,Roll=99.999809)
- Scale: (X=0.450000,Y=0.450000,Z=0.450000)
- Class: UI_Armory_Weapons,
You should see your buttons in components view.
Now in event graph create new variables:
- Weapons (BP_BaseWeapon Array),
- DeltaTime (float),
- CurrentWeaponIndex (int),
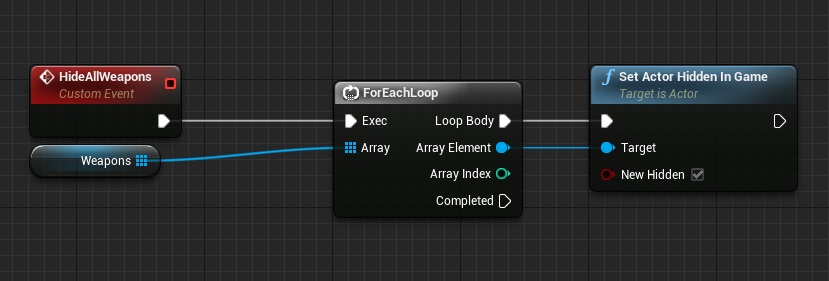
Create new custom events:
HideAllWeapons. This will make sure all weapons in array are hidden:
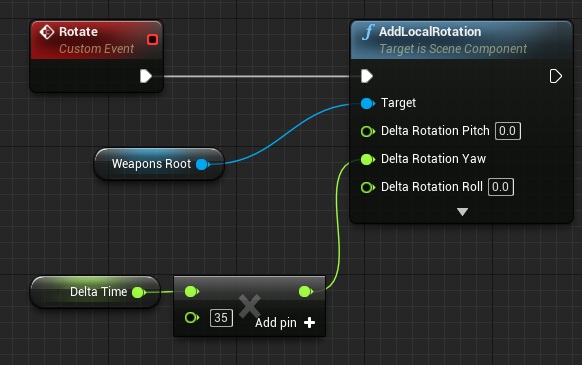
Rotate. As you can see this is adding rotation to WeaponsRoot scene component.
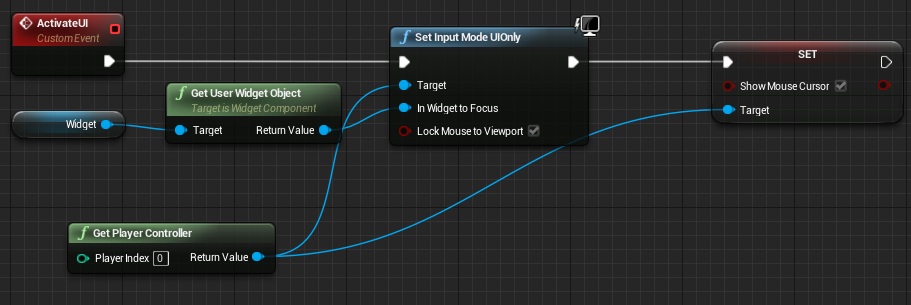
ActivateUI. This is making sure we will have mouse and be able to click on UI.
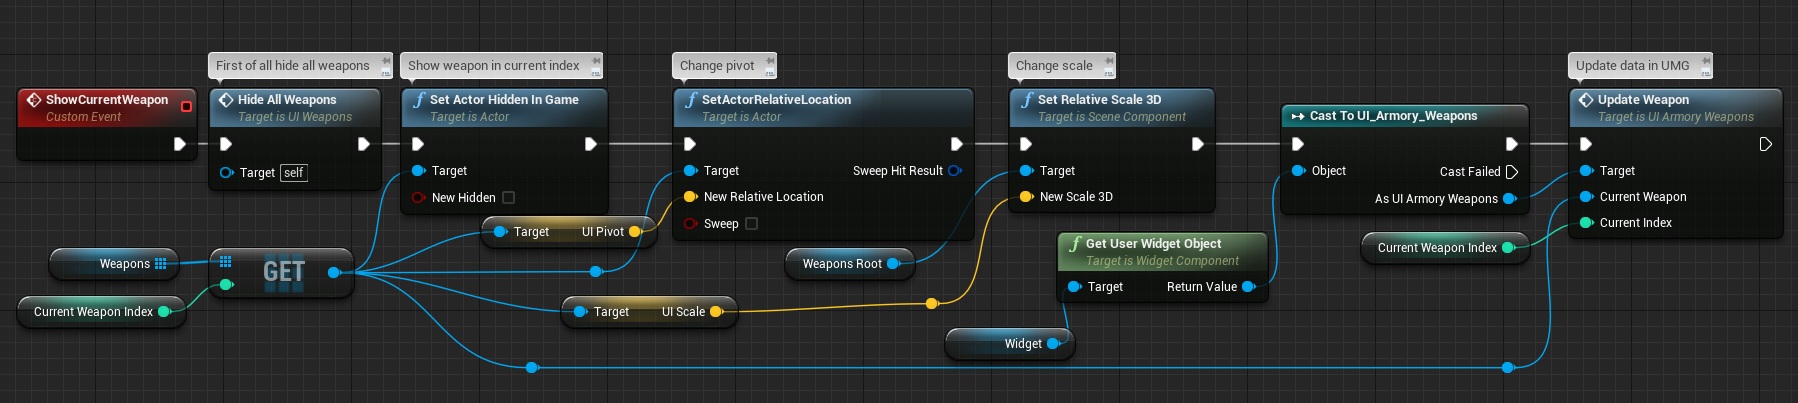
ShowCurrentWeapon. Make sure we are only showing current weapon. Update UMG about new current weapon.
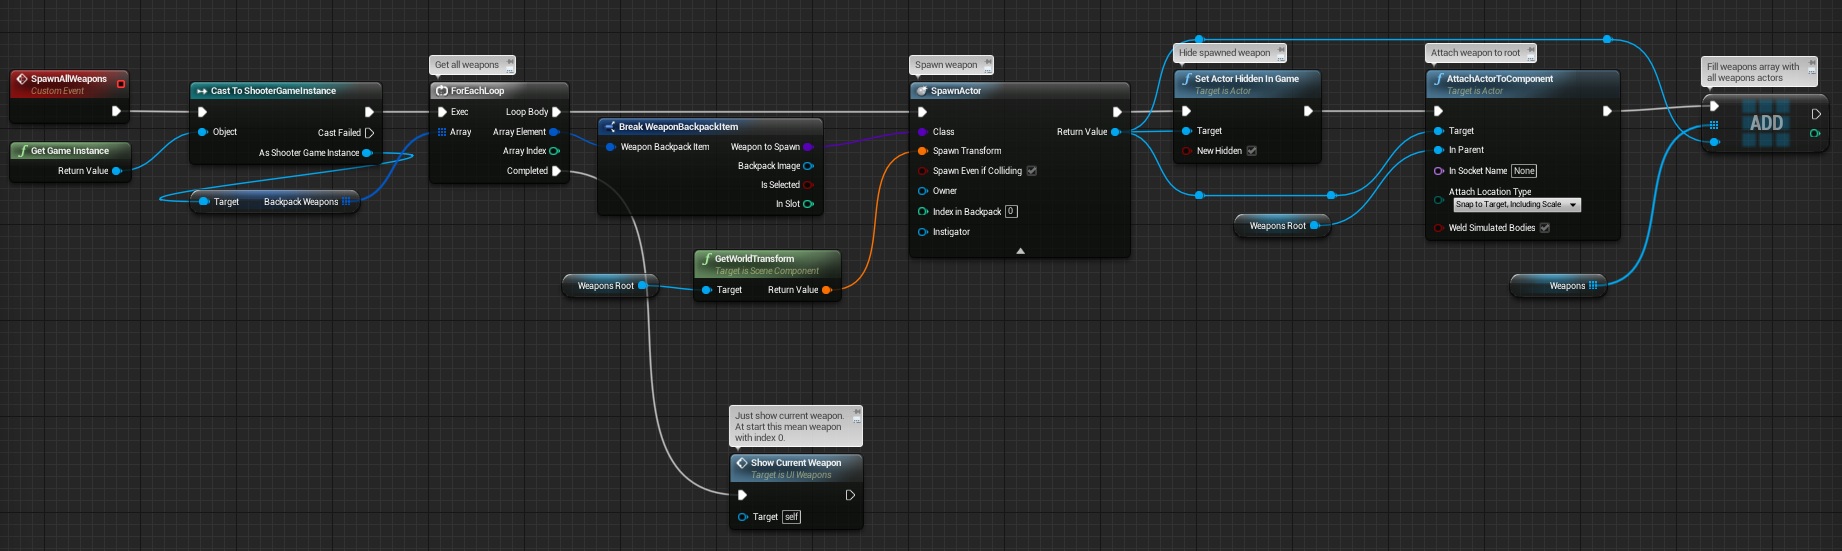
SpawnAllWeapons. This event will spawn all weapons from GameInstance array.
NextWeapon and PreviousWeapon. Update CurrentWeaponIndex and call ShowWeapon.
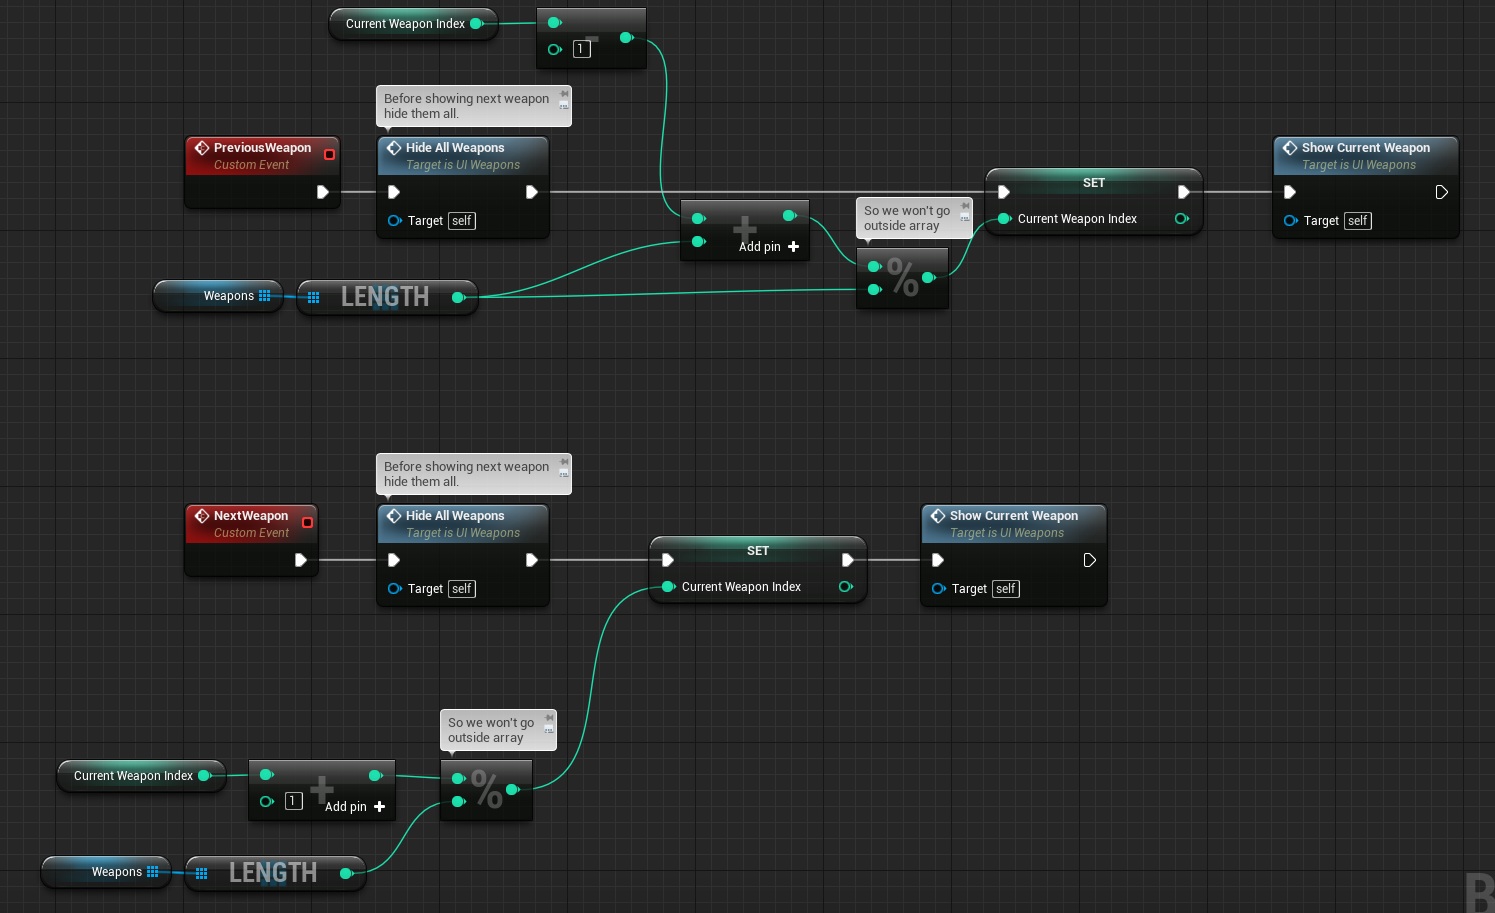
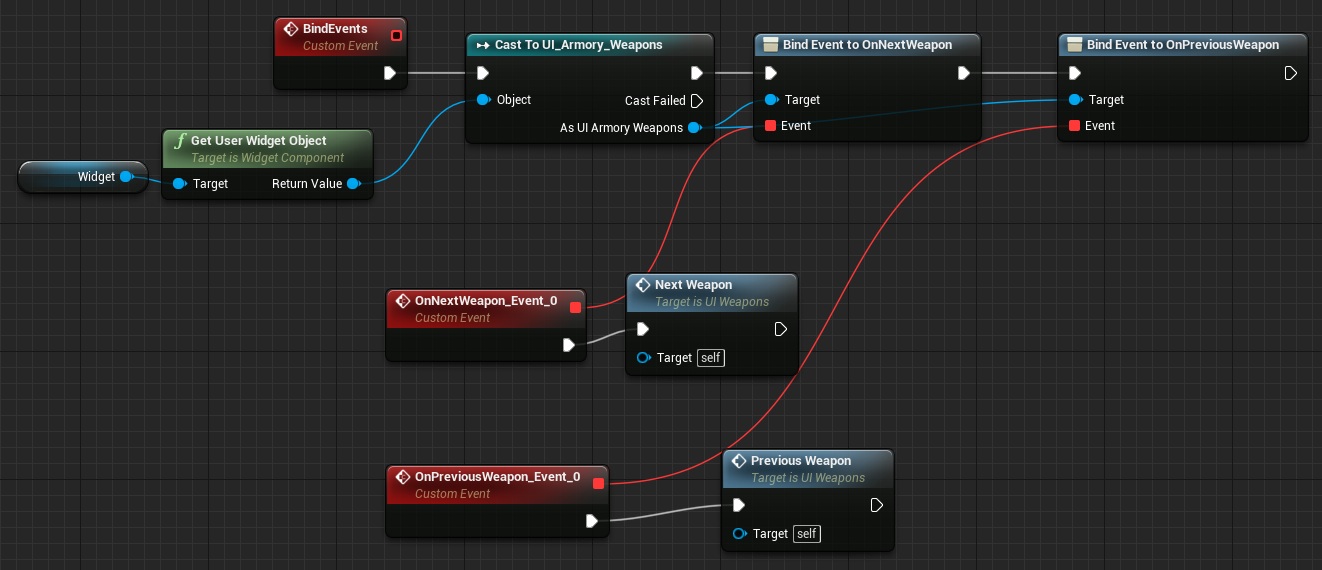
BindEvents. Just bind dispatchers from our UI. Thanks to this we have communication with UMG and this actor. As you can see each time someone will tap Next Button we will call Next Weapon function in this Actor.
BeginPlay and Tick.
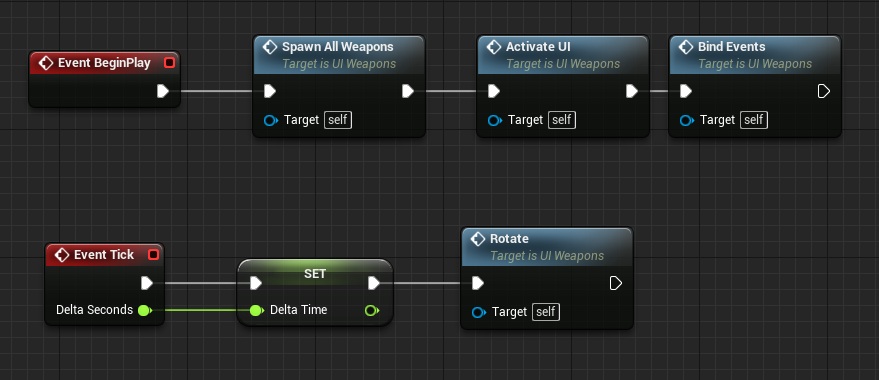
So basically what this is doing:
- Spawn all weapons in WeaponRoot location,
- Attach them to Weapon Root component,
- Hide them all,
- Show current weapon (at start this mean weapon in index 0),
- Make sure we have mouse visible,
- Bind Events,
- Always rotate WeaponRoot component,
You could place this actor on your level near camera and test it out – your 3D meshes should change after tapping on buttons in UMG.
Updating Base Weapon – Ammo In Mag
First let’s move with Ammo In Mag upgrade.
Open BP_BaseWeapon and add those variables:
- UP_MinAmmoInMag (int, 0),
- UP_MaxAmmoInMag (int, 6),
- UP_MaxAmmoInMag_Levels (int, 6),
- UP_MaxAmmoInMag_Cost (int, 50),
And those functions:
SetCurrentAmmoInMag (with one int input)

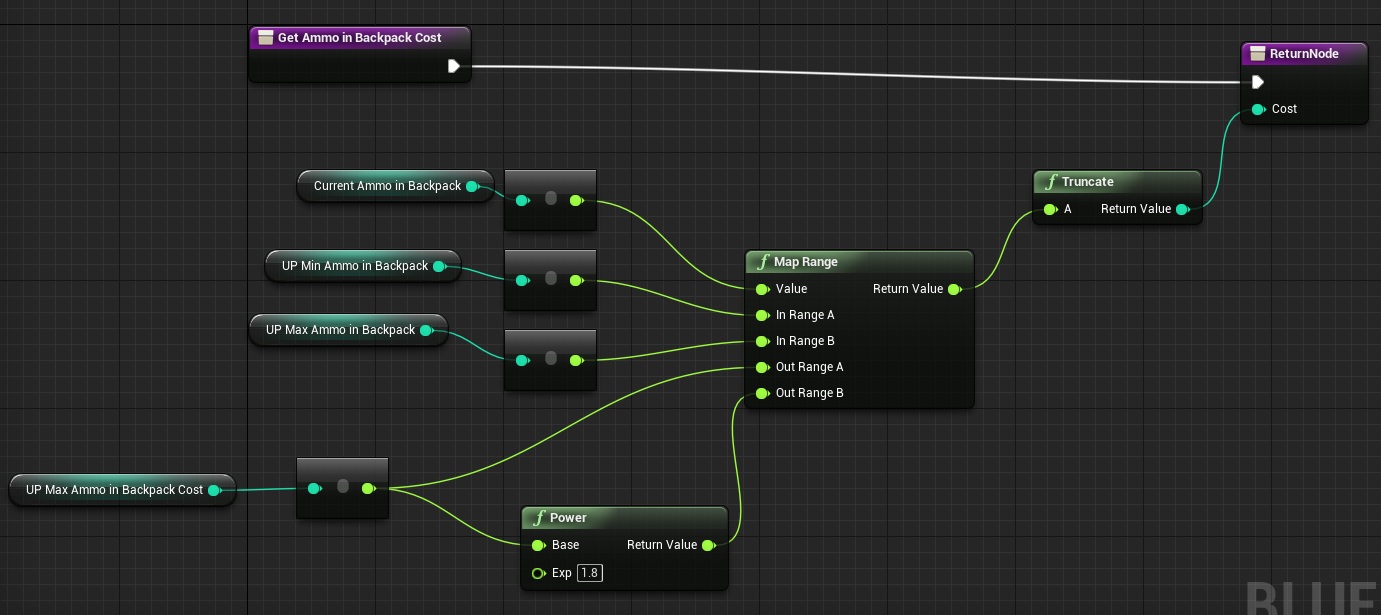
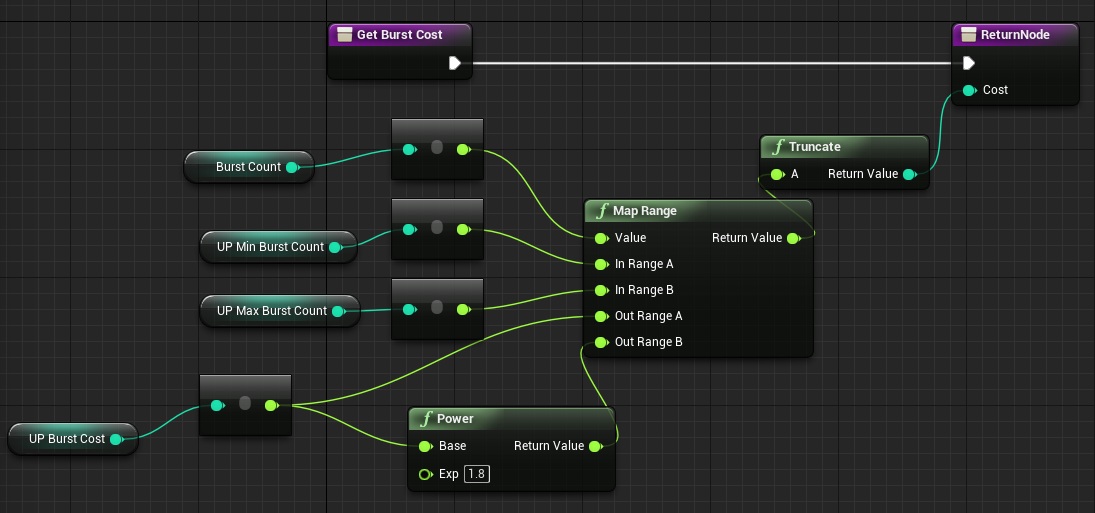
And GetAmmoInMagCost (pure, one int output)
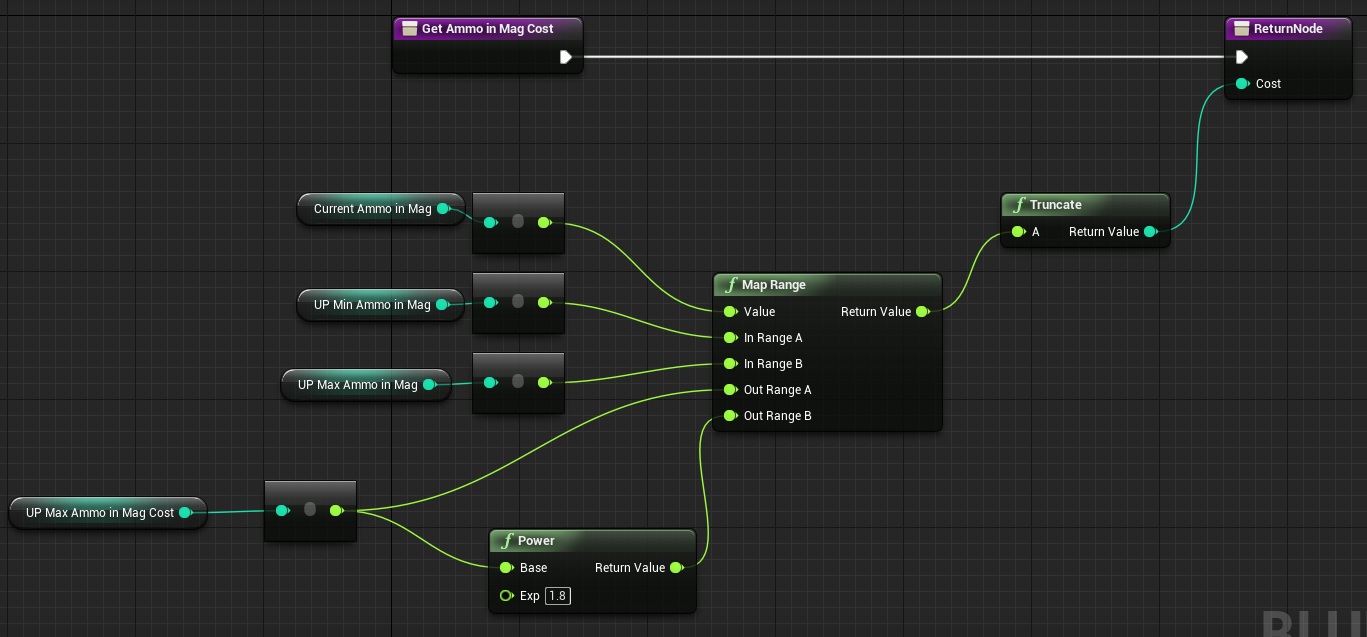
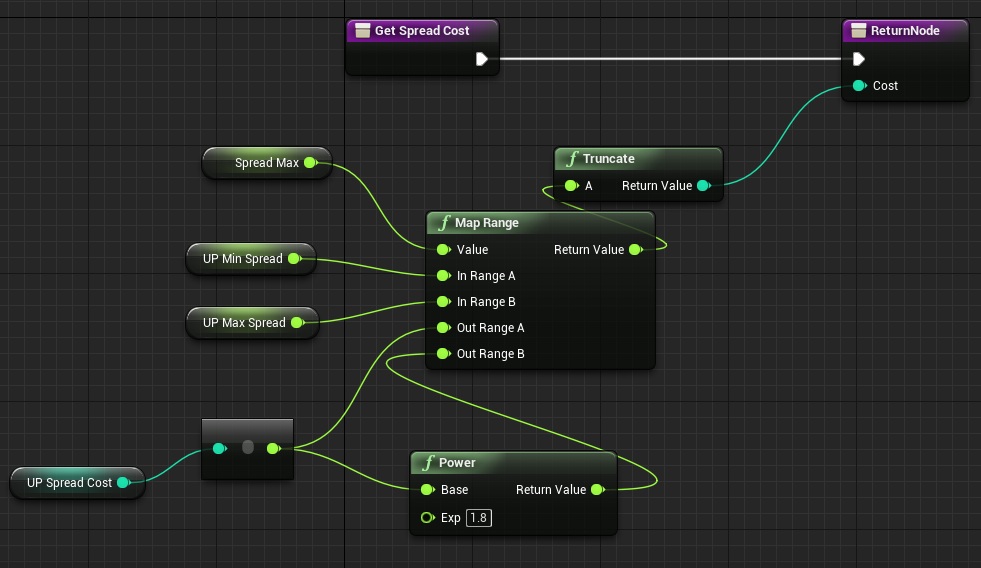
This is how I’m calculating cost – it will be used for all upgrades. What you could do is to change Exp in Power or overwrite this function in specific weapon. So basically each time you upgrade ammo in mag cost will increase.
UMG – Displaying Ammo In Mag
Open UI_Amory_Weapons. I won’t be showing you how to create UMG from scratch. Will try to trigger modular creation.
As you can see in screens there are 8 variables that I’m upgrading. What you could do is to create just ONE widget then copy 8 times.
Here’s the video presenting Horizontal Box used for each upgrade:
You can copy it 8 times and change variables names. For Ammo In Mag I have used those names:
- ProgressBar: ProgressBar_AmmoInMag,
- Text inside progress bar: TextBlock_AmmoInMag,
- Text representing cost: TextBlock_AmmoInMag_Cost,
- Button for upgrade: Button_AddAmmoInMag,
Now in event graph create new Graph named Update_AmmoInMag then add new Custom Event named Upd_AmmoInMag:
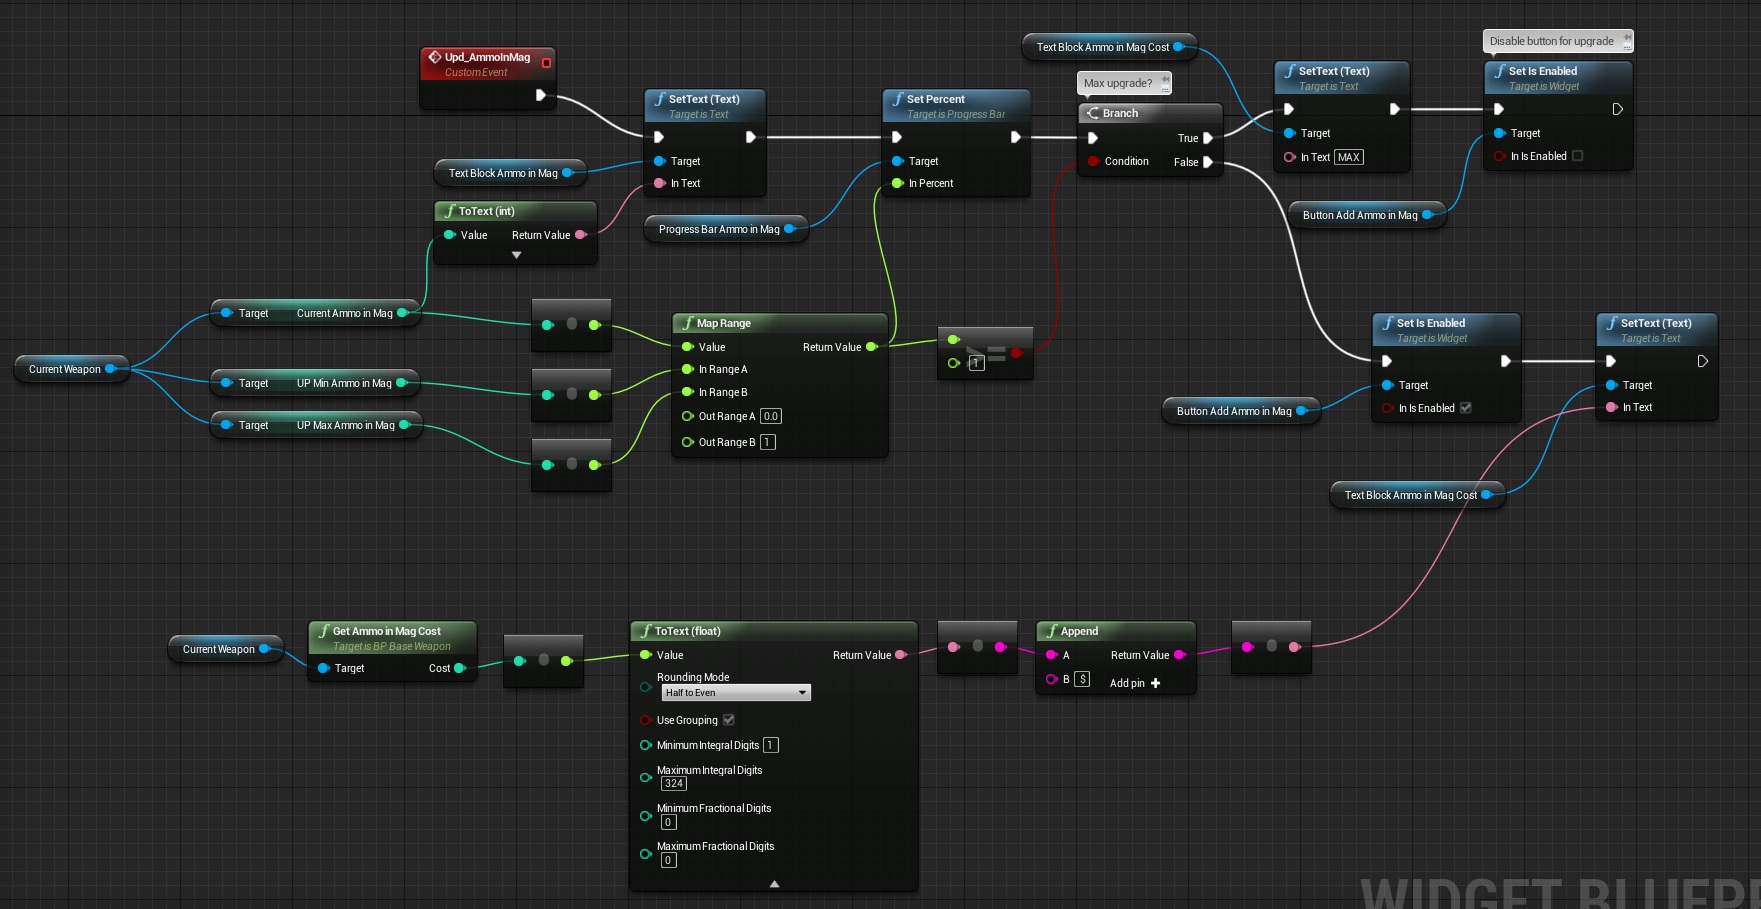
This basically is updating all widgets. Rest upgrades will use almost the same event but with different variables.
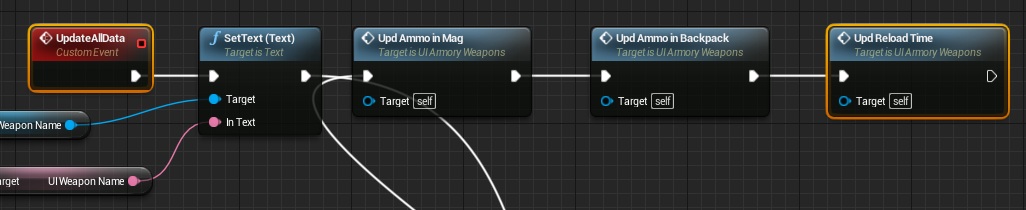
Go back to main Event Graph and create new Custom Event named UpdateAllData:
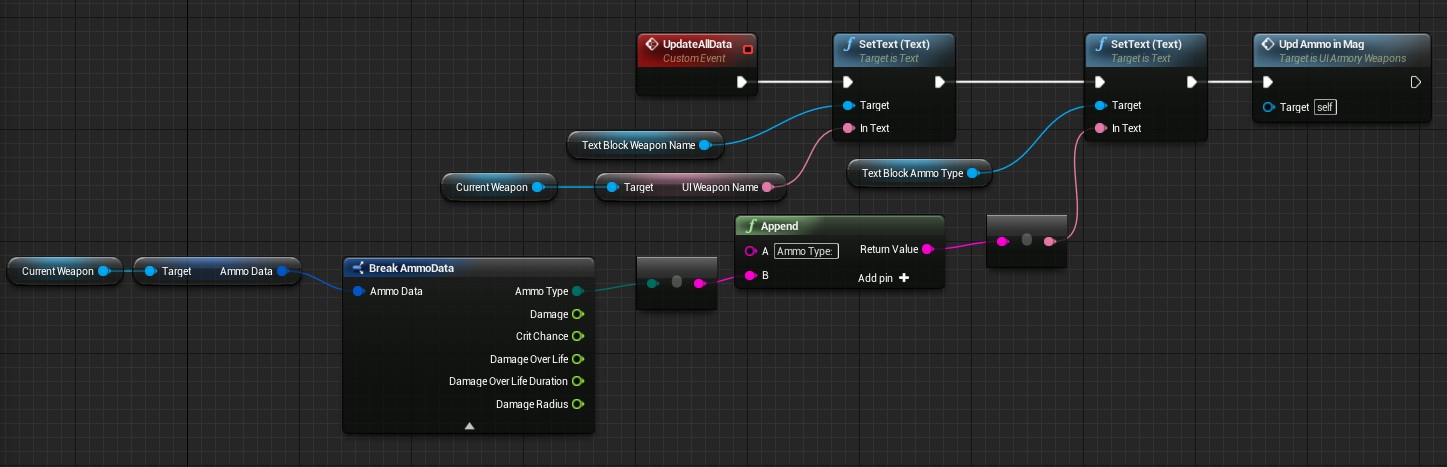
You don’t have Weapon Name Text and Ammo Type Text – just create those two (remember about Anchor Center)
Now in UpdateWeapon function just call UpdateAllData:
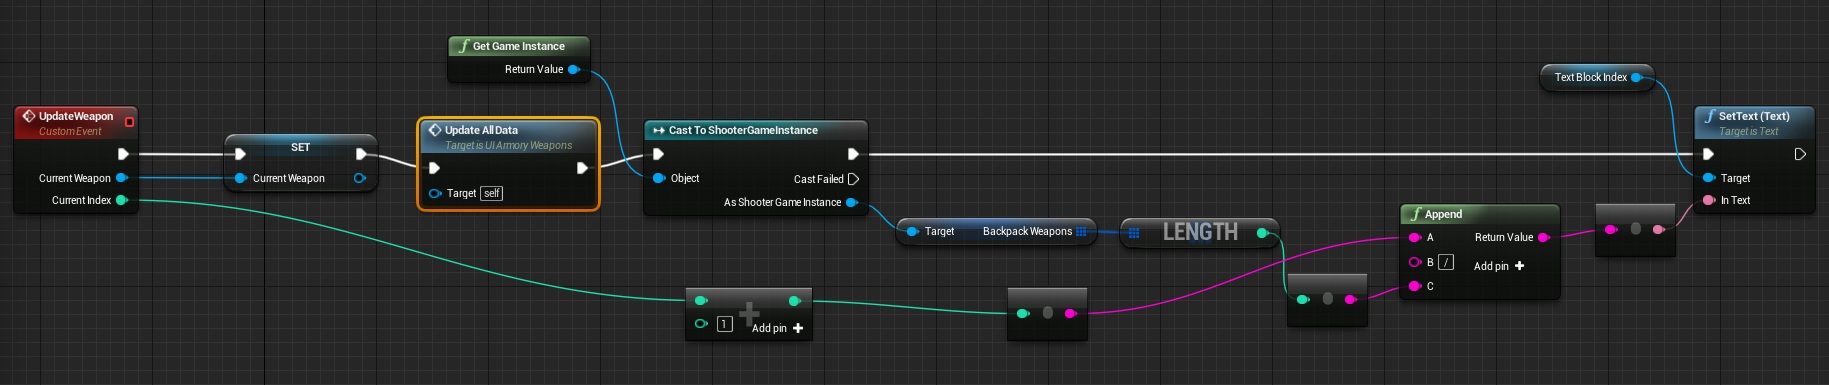
Again you won’t have Text Block Index, create one. Last thing is to add OnClicked event to upgrade button:
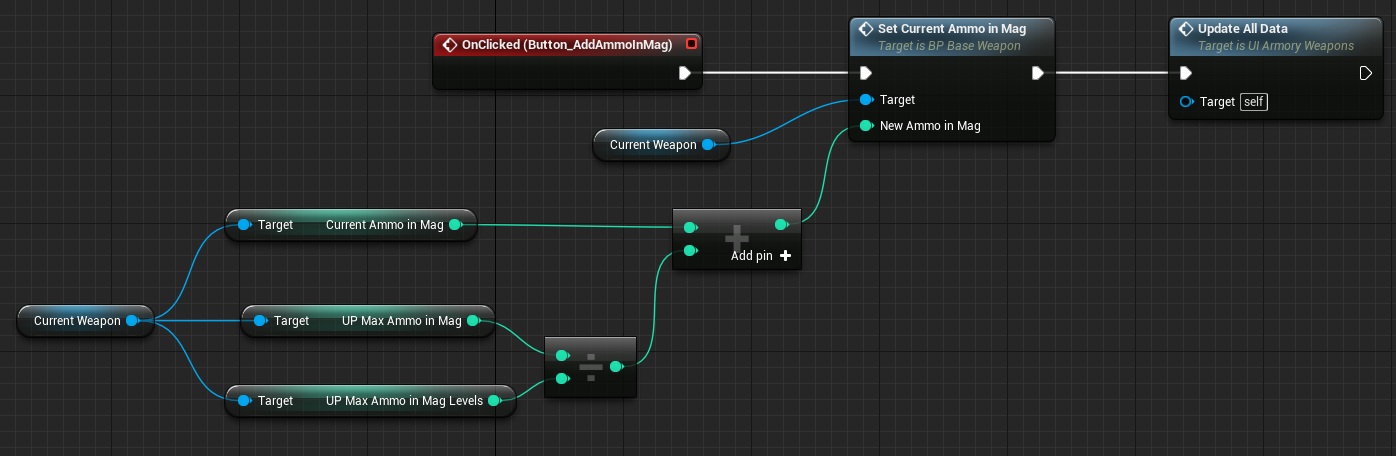
At this point you should be able to see how many bullets each weapon have in mag and you can upgrade it. Be sure to properly set UP_* variables in weapons extending from BP_BaseWeapon. For example my pistol have:
- UP_MinAmmoInMag: 6,
- UP_MaxAmmoInMag: 12,
- UP_MaxAmmoInMag_Levels: 12, (which means after upgrade we will get 1 more bullet – MaxAmmoInMax / Levels)
Run the game and check if you are able to upgrade ammo in mag. If not – try to debug it by placing print strings. Try to search where is the problem.
Updating Base Weapon – Ammo In Backpack
Basically this will be exactly the same as ammo in mag. Open BP_BaseWeapon and add those variables:
- UP_MinAmmoInBackpack (int, 30),
- UP_MaxAmmoInBackpack (int, 100),
- UP_MaxAmmoInBackpack_Levels (int, 10)
- UP_MaxAmmoInBackpack_Cost (int, 50)
Add new functions:
SetCurrentAmmoInBackpack

GetAmmoInBackpackCost (pure, one int output)
UMG – Displaying Ammo In Backpack
Open UI_Amory_Weapons and copy/paste HorizontalBox. Here are my variables names (which you could see in video presenting the hierarchy):
- ProgressBar: ProgressBar_AmmoInBackpack,
- Text inside progress bar: TextBlock_AmmoInBackpack,
- Text representing cost: TextBlock_AmmoInBackpack_Cost,
- Button for upgrade: Button_AddAmmoInBackpack,
Create new Graph named Update_AmmoInBackpack. Then add new custom event named Upd_AmmoInBackpack:
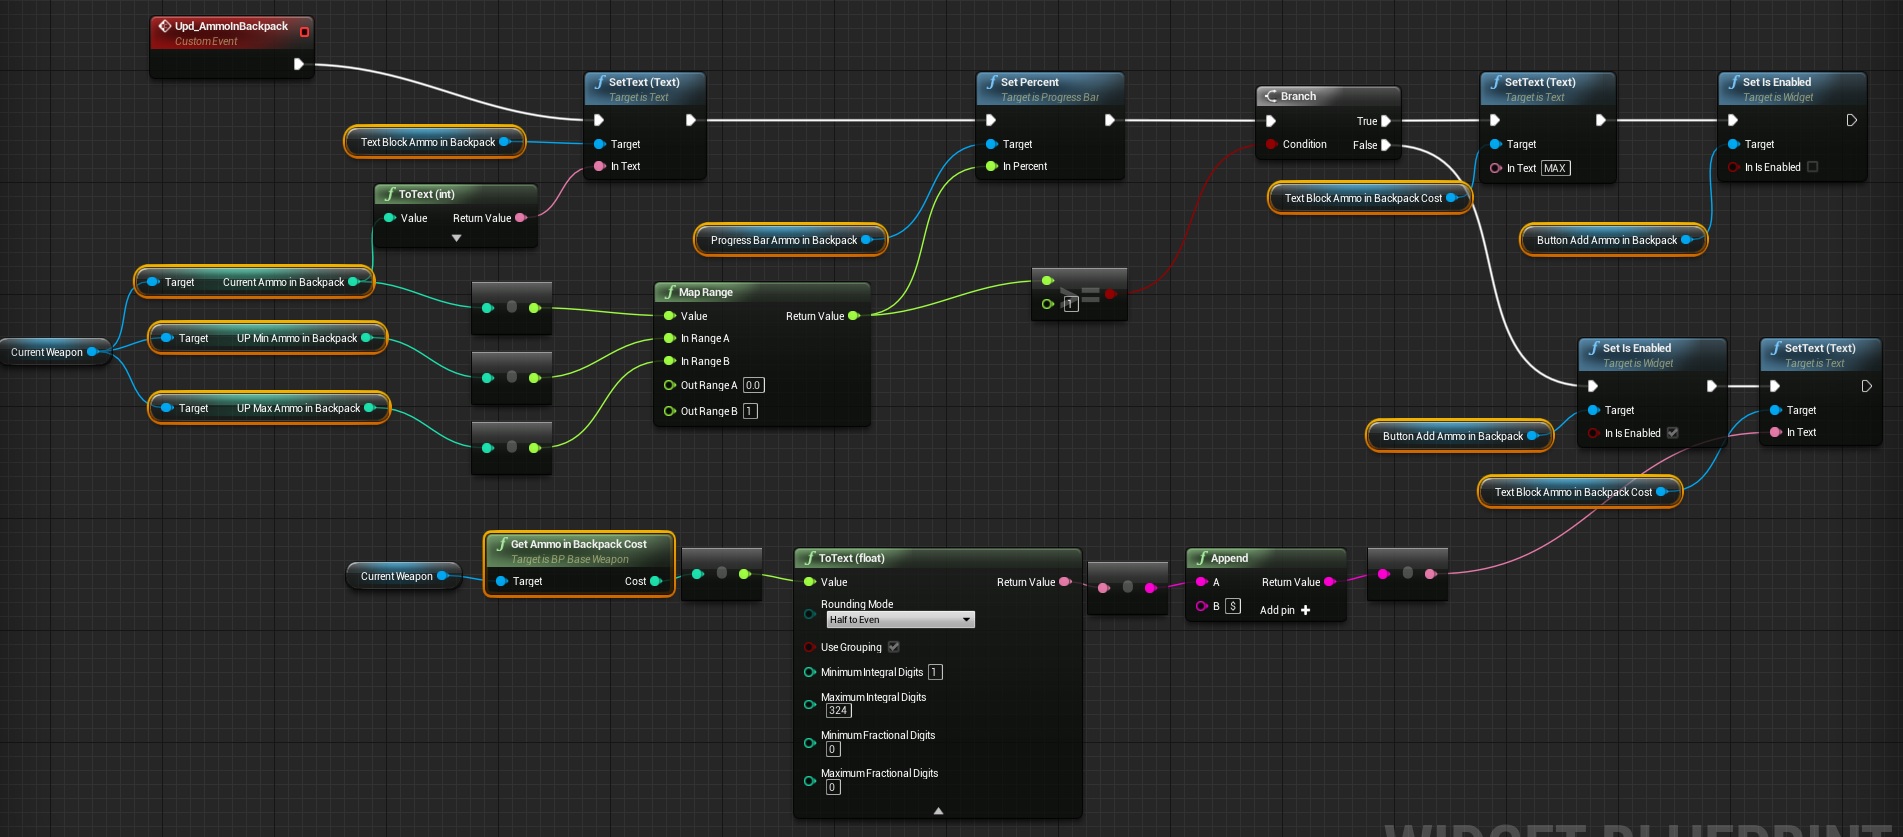
This is identical as Upd_AmmoInMag just with different (highlighted) variables.
Go to UpdateAllData function and call this event.

Create new OnClick event on the button:
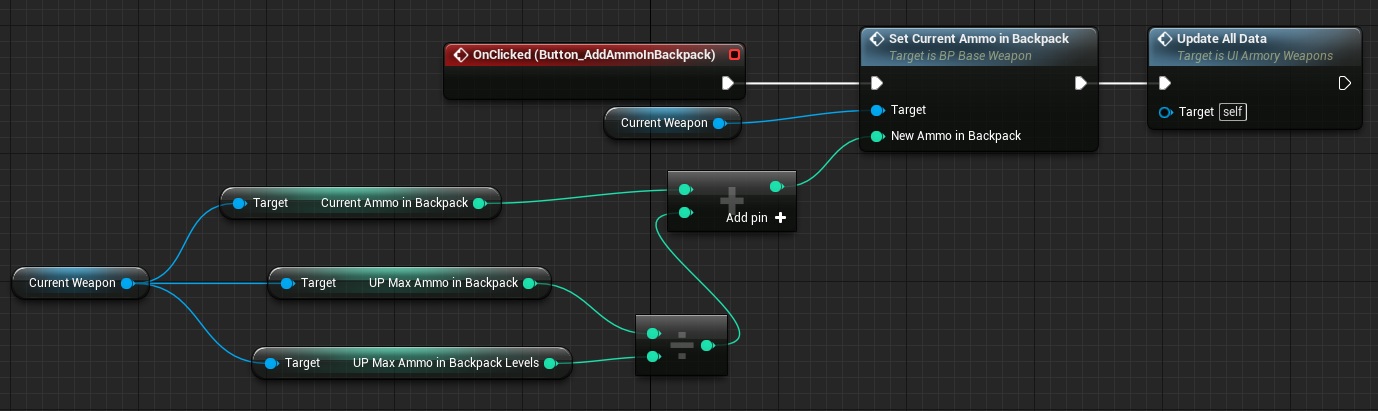
That’s all – you can now upgrade Ammo In Backpack. Be sure to properly set UP_* variables in weapons extending from BP_BaseWeapon. For example my pistol:
- UP_MinAmmoInBackpack: 30,
- UP_MaxAmmoInBackpack: 100,
- UP_MaxAmmoInBackpack_Levels: 10
Updating Base Weapon – Reload Time
Open BP_BaseWeapon and add those variables:
- UP_MinReloadTime (float, 2),
- UP_MaxReloadTime (float, 1),
- UP_ReloadTimeToAdd (float, -0.1 (yes, minus) )
- UP_ReloadTime_Cost (int, 50),
Now add new functions:
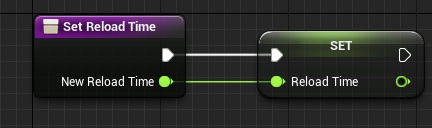
SetReloadTime (one float input)
GetReloadTimeCost (pure, one int output)
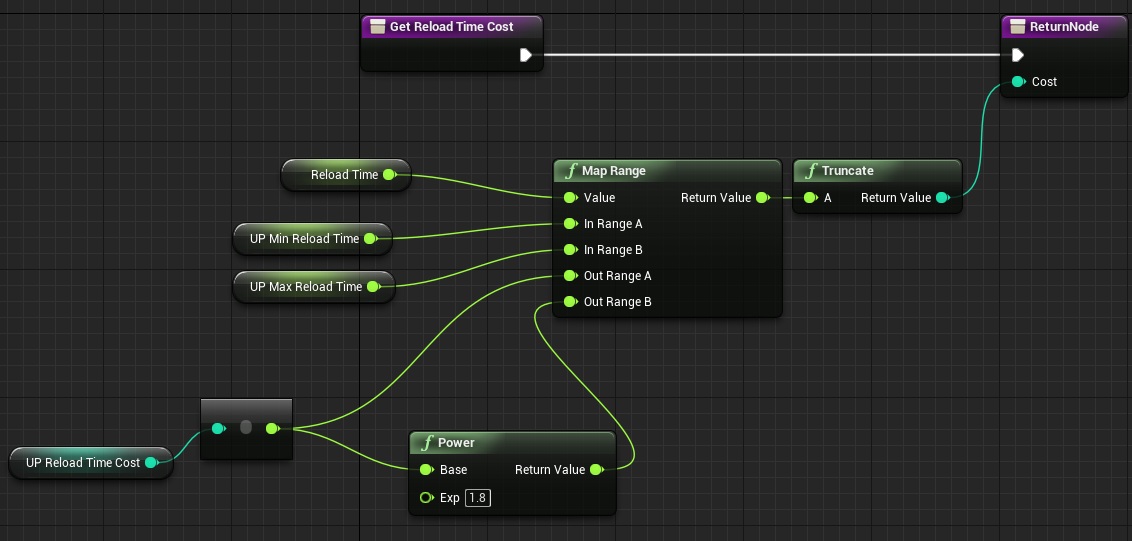
UMG – Displaying Reload Time
Open UI_Amory_Weapons and copy/paste HorizontalBox. Here are my variables names:
- ProgressBar: ProgressBar_ReloadTime,
- Text inside progress bar: TextBlock_ReloadTime,
- Text representing cost: TextBlock_ReloadTime_Cost,
- Button for upgrade: Button_AddReloadTime,
Create new Graph named Update_ReloadTime. Then add new custom event named Upd_ReloadTime:
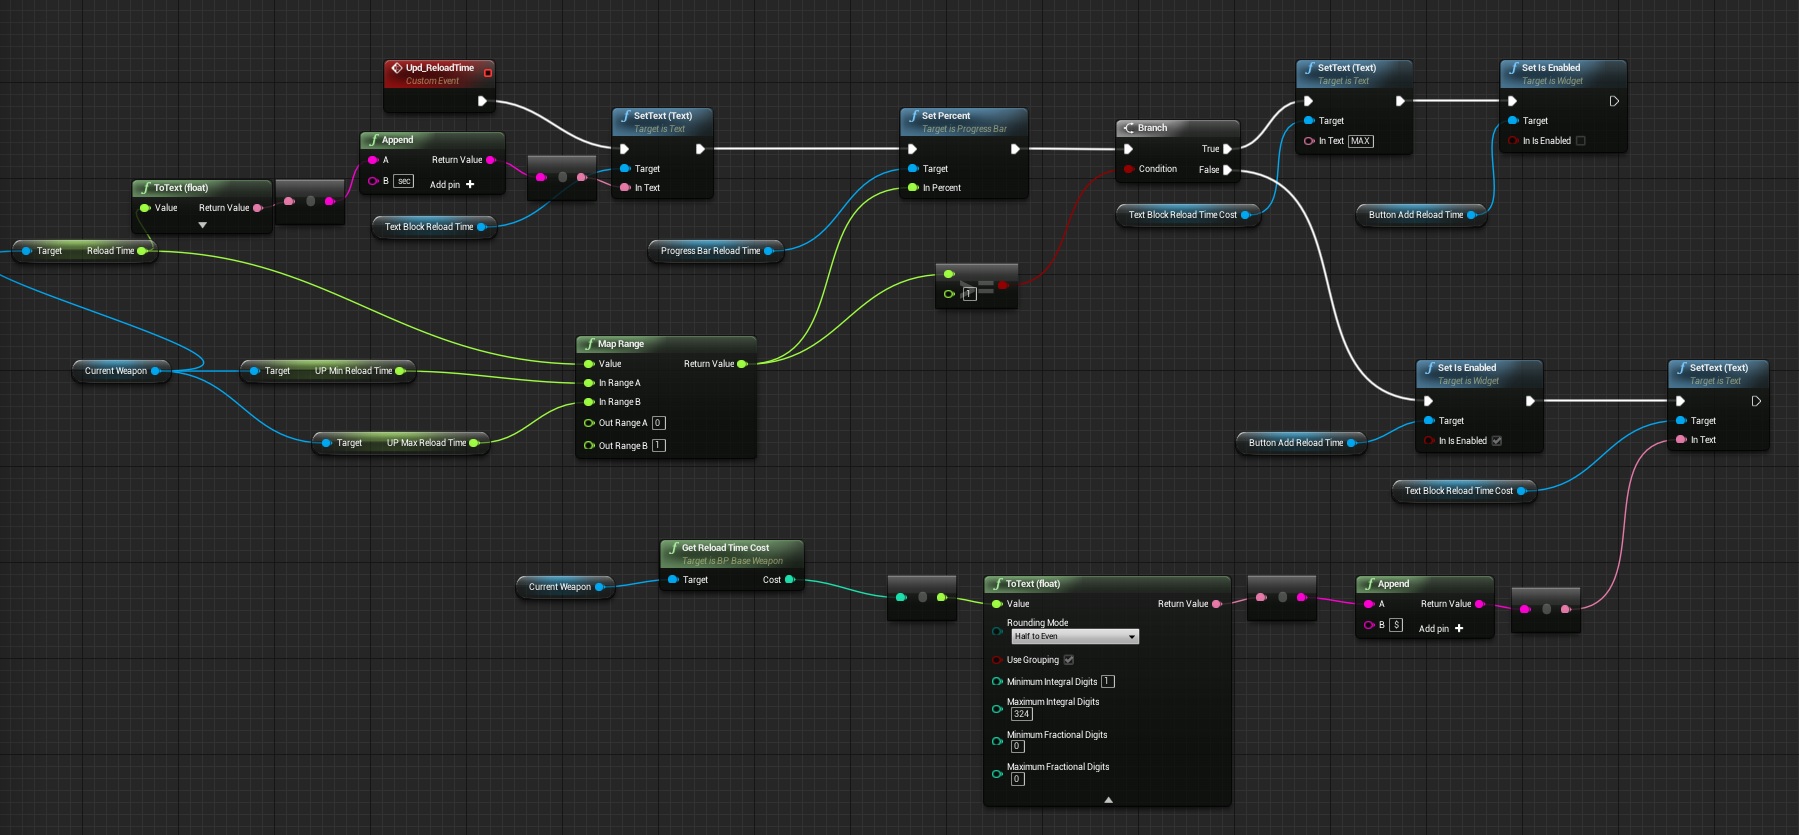
Go to UpdateAllData function and call this event.
And add new OnClicked event on the button:

At this stage you should be able to upgrade your reload time. Make sure you properly set the UP_* variables in weapons extending from BP_BaseWeapon. For example my pistol:
- UP_MinReloadTime: 2,
- UP_MaxReloadTime: 0.5,
- UP_ReloadTimeToAdd: -0.1,
Updating Base Weapon – Damage Modifier
Open BP_BaseWeapon and add those variables:
- UP_MinDamageModifier (float, 1),
- UP_MaxDamageModifier (float, 2),
- UP_DamageModifierToAdd (float, 0,1),
- UP_DamageModifier_Cost (int, 50),
And three new functions:
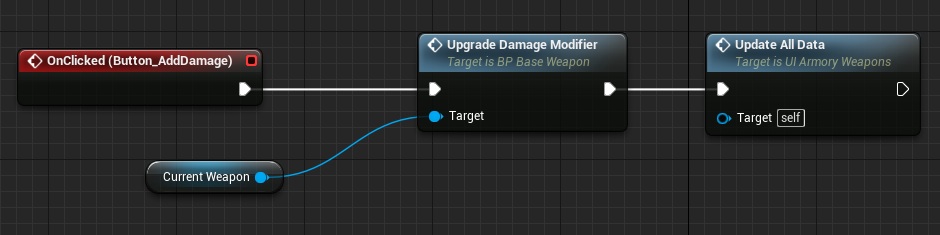
UpgradeDamageModifier. This time we will call this function from UMG instead doing math in UMG.

GetDamageModifierCost (pure, one int output)
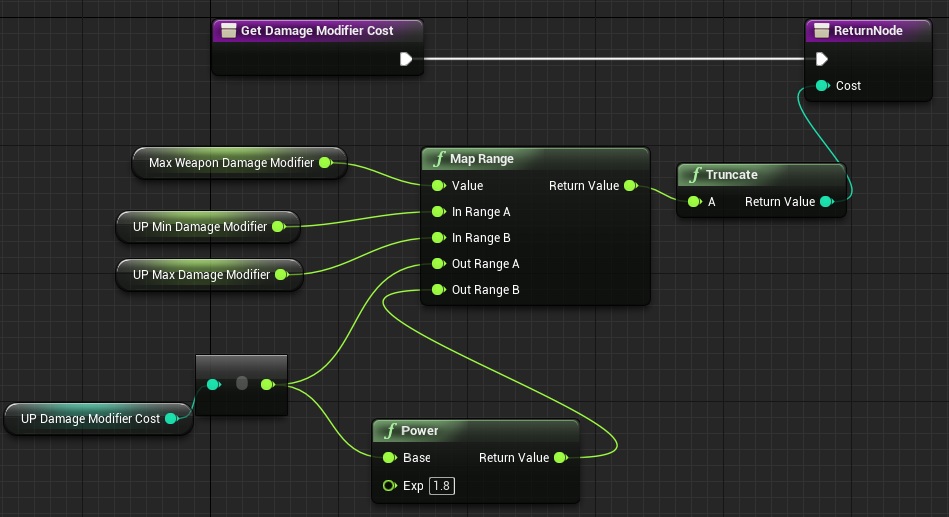
UMG – Displaying Damage
Open UI_Amory_Weapons and copy/paste HorizontalBox. Here are my variables names:
- ProgressBar: ProgressBar_Damage,
- Text inside progress bar: TextBlock_Damage,
- Text representing cost: TextBlock_Damage_Cost,
- Button for upgrade: Button_AddDamage,
Create new Graph named Update_Damage. Then add new custom event named Upd_Damage:

Call this event in UpdateAllData and add OnClicked event on the button:
And you can upgrade weapon damage modifiers. My pistol variables:
- UP_MinDamageModifier: 1,
- UP_MaxDamageModifier: 2,
- UP_DamageModifierToAdd: 0.1,
Updating Base Weapon – Crit Modifier
This will be exactly the same as damage modifier but with different variables. Try to do it by yourself without my help.
UMG – Displaying Crit
The same as above – try to create it by yourself.
Updating Base Weapon – Accuracy
Open BP_BaseWeapon and add those variables:
- UP_MinSpread (float, 0.4),
- UP_MaxSpread (float, 0.01),
- UP_SpreadToAdd (float, -0.05),
- UP_SpreadCost (int, 50),
And add those functions:
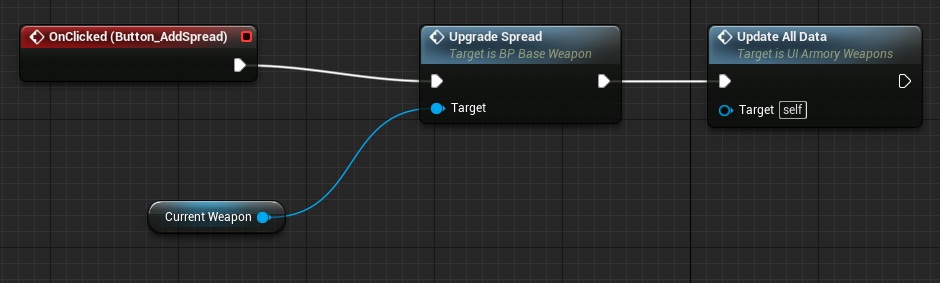
UpgradeSpread
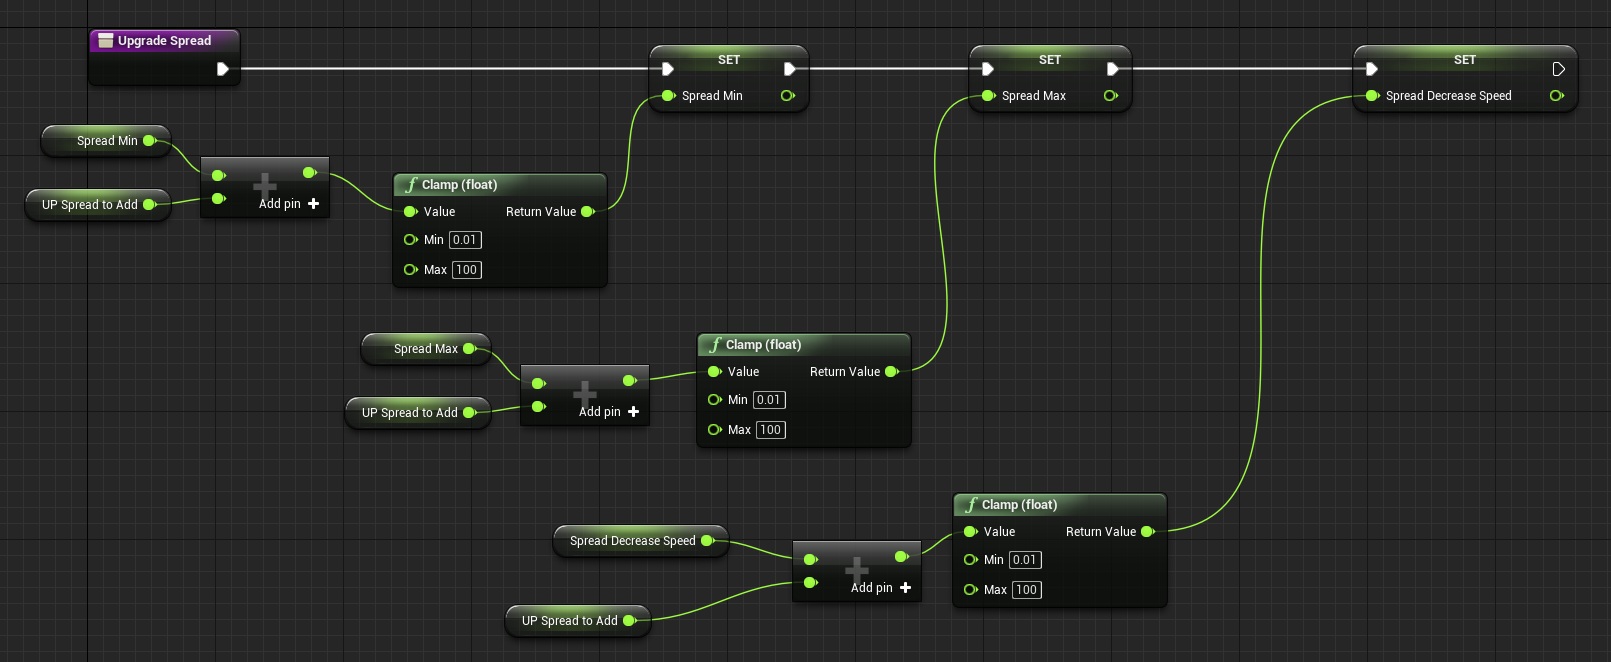
As you can see I’m adding couple of variables and making sure they won’t go outside clamp values.
GetSpreadCost (pure, one int output)
UMG – Displaying Accuracy
Open UI_Amory_Weapons and copy/paste HorizontalBox. Here are my variables names:
- ProgressBar: ProgressBar_Spread,
- Text inside progress bar: TextBlock_Spread,
- Text representing cost: TextBlock_SpreadCost,
- Button for upgrade: Button_AddSpread,
Create new Graph named Update_Spread. Then add new custom event named Upd_Spread:
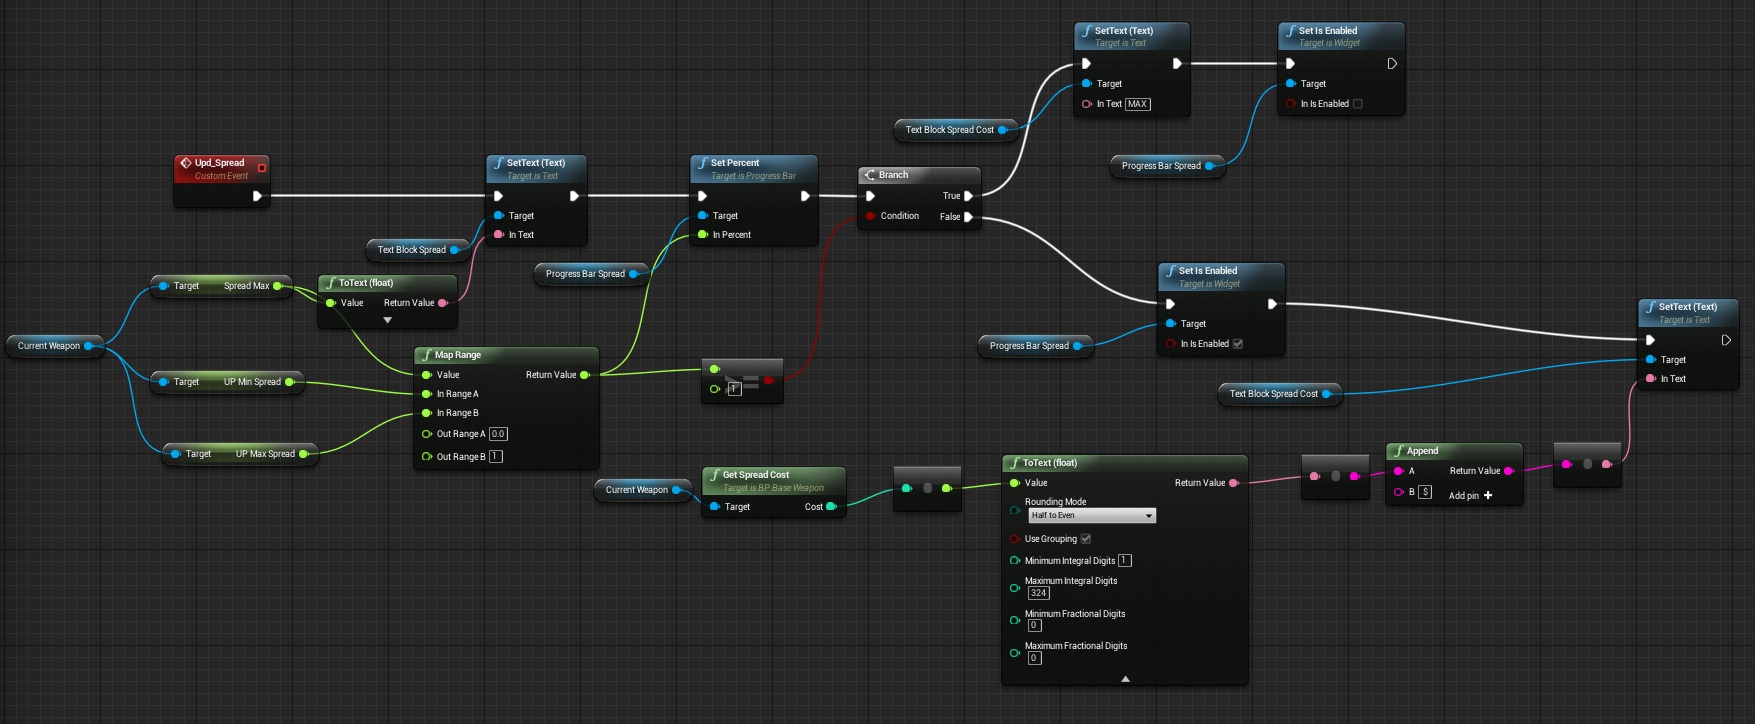
Call this event in UpdateAllData and add OnClicked event on the button:
And now you can upgrade accuracy.
Updating Base Weapon – Rifle Fire Rate
This is different because not all weapons have Rifle Fire Rate used. Open BP_BaseWeapon and set RifleFireRate to 0 instead of 1, then add those variables:
- UP_MinFireRate (float, 0.2),
- UP_MaxFireRate (float, 0.05),
- UP_FireRateToAdd (float, -0.01),
- UP_FireRate_Cost (int, 50),
And add those functions:
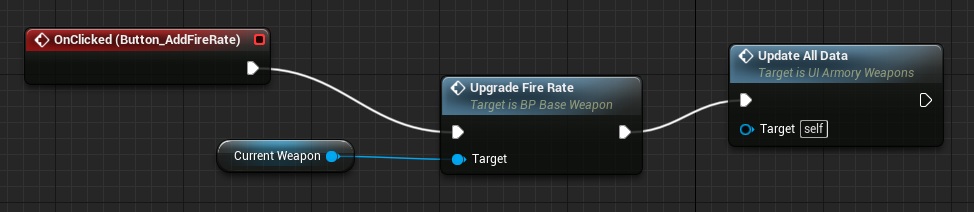
UpgradeFireRate

GetFireRateCost (pure, one int output)

UMG – Displaying Rifle Fire Rate
Open UI_Amory_Weapons and copy/paste HorizontalBox (make sure HorizontalBox is a variable!). Here are my variables names:
- ProgressBar: ProgressBar_FireRate,
- Text inside progress bar: TextBlock_FireRate,
- Text representing cost: TextBlock_FireRate_Cost,
- Button for upgrade: Button_AddFireRate,
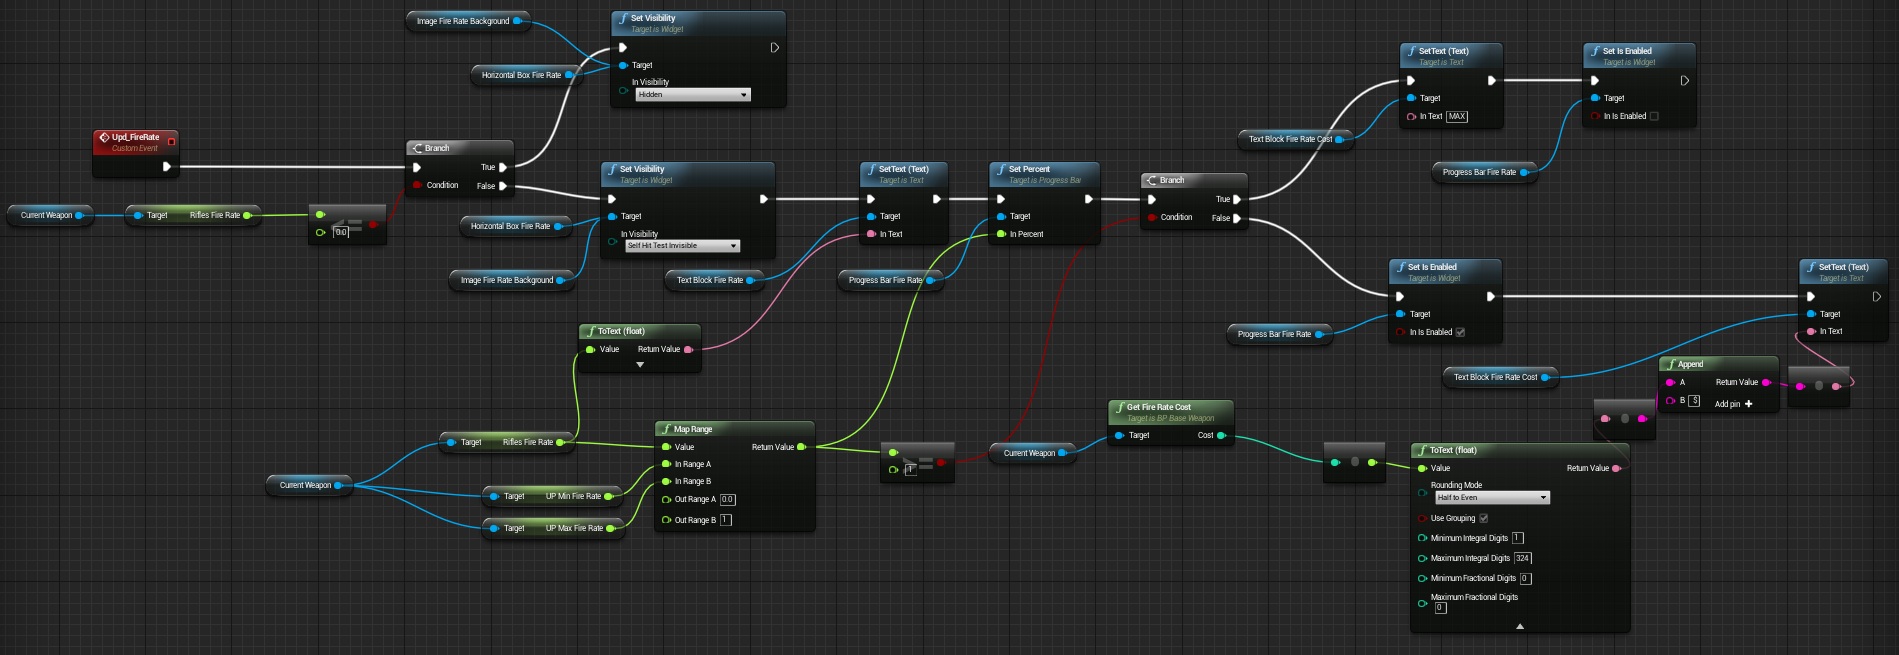
Create new Graph named Update_FireRate. Then add new custom event named Upd_FireRate. If RifleFireRate is 0 I’m hiding whole horizontal box.
Call this event in UpdateAllData and add OnClicked event on the button:
Updating Base Weapon – Burst
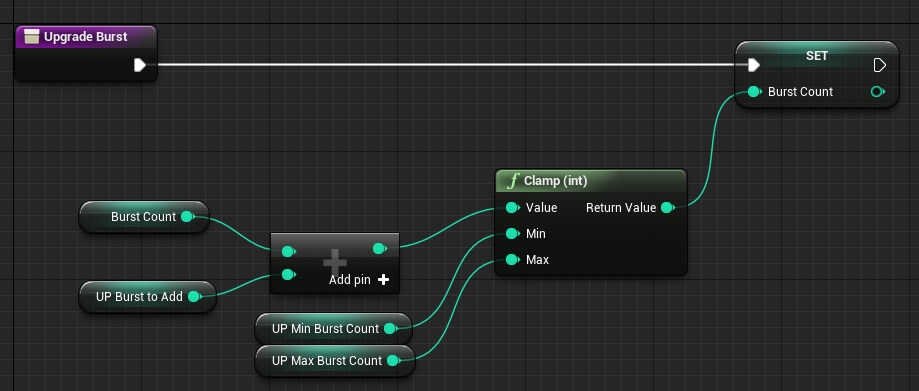
Burst is used mostly in shotguns, but I will add possibility to increase it in other weapons as well. Open BP_BaseWeapon and add those variables:
- UP_MinBurstCount (int, 1),
- UP_MaxBurstCount (int, 1),
- UP_BurstToAdd (int, 1),
- UP_Burst_Cost (int, 50),
And add functions:
UpgradeBurst:
GetBurstCost (pure, one int output)
UMG – Displaying Burst
Open UI_Amory_Weapons and copy/paste HorizontalBox. Here are my variables names:
- ProgressBar: ProgressBar_Burst,
- Text inside progress bar: TextBlock_Burst,
- Text representing cost: TextBlock_BurstCost,
- Button for upgrade: Button_AddBurst,
Create new Graph named Update_Burst. Then add new custom event named Upd_Burst:
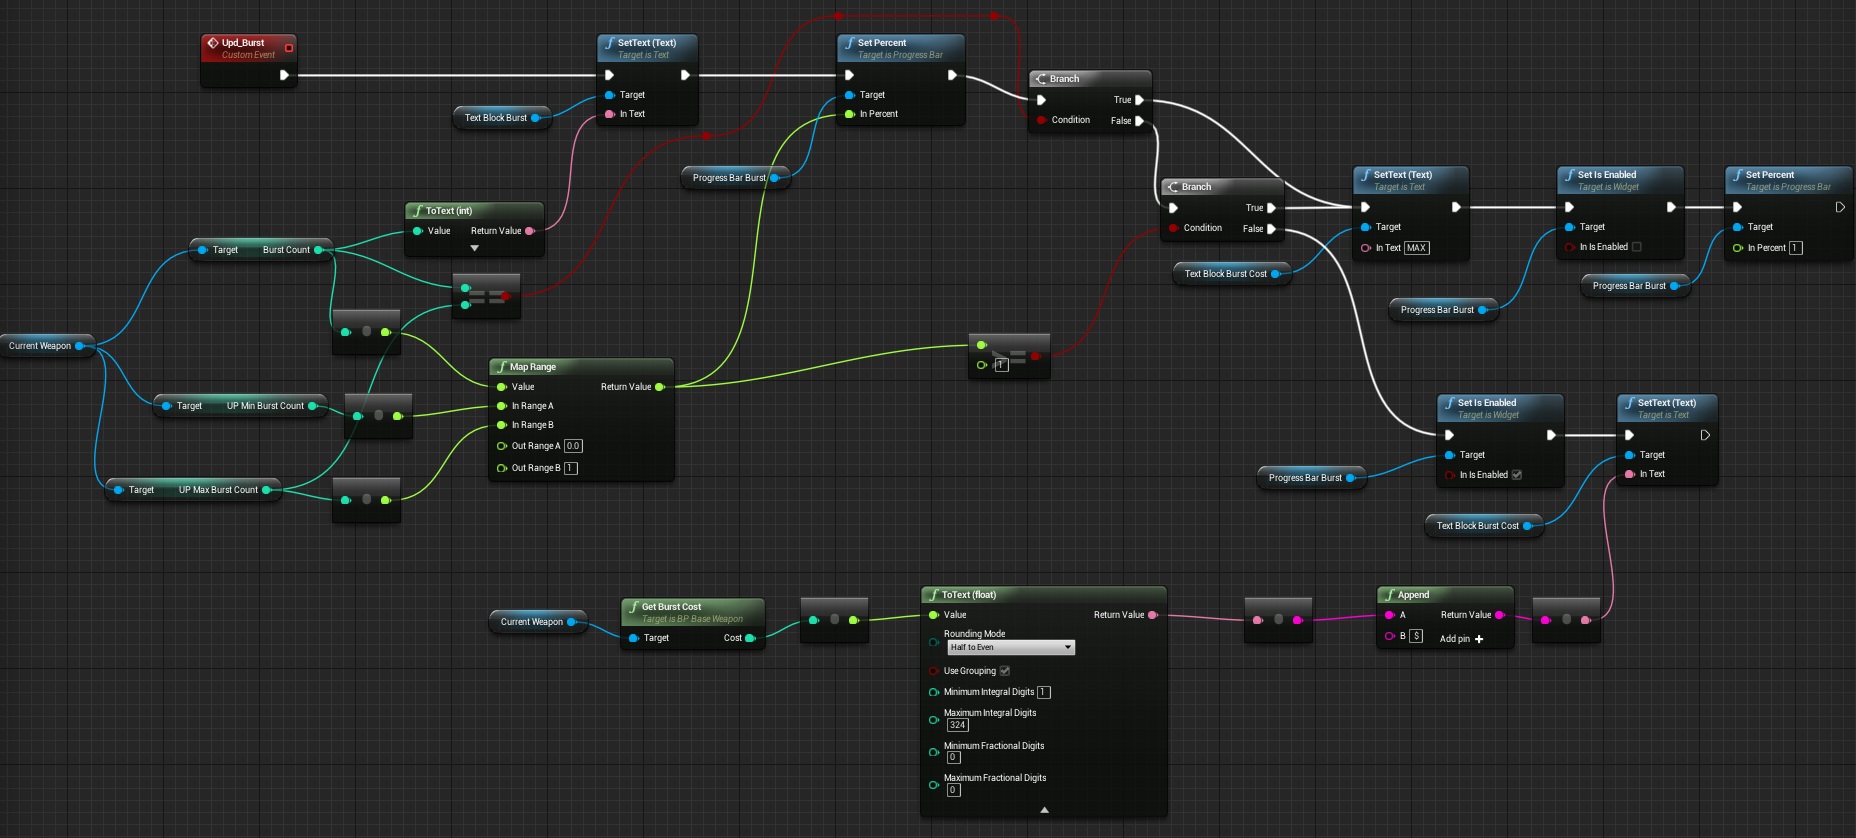
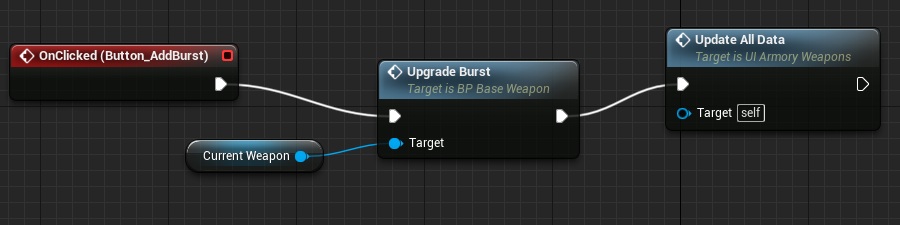
Call this event in UpdateAllData and add OnClicked event on the button:
Now you can upgrade all 8 variables!
Updating Base Weapon – Unlocking Weapons
Open BP_BaseWeapon and add two variables:
- isUnlocked (bool),
- UP_WeaponCost (int, 5000),
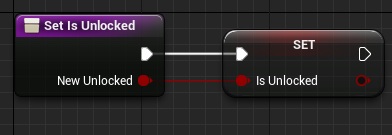
And one SetIsUnlocked function:
UMG – Unlocking
Open UI_Amory_Weapons create:
- Button named: Button_BuyWeapon,
- Text named: TextBlock_WeaponCost,
- Image named: Image_HidePicture,
Go to Event Graph and create new custom event named CheckWeaponLock:
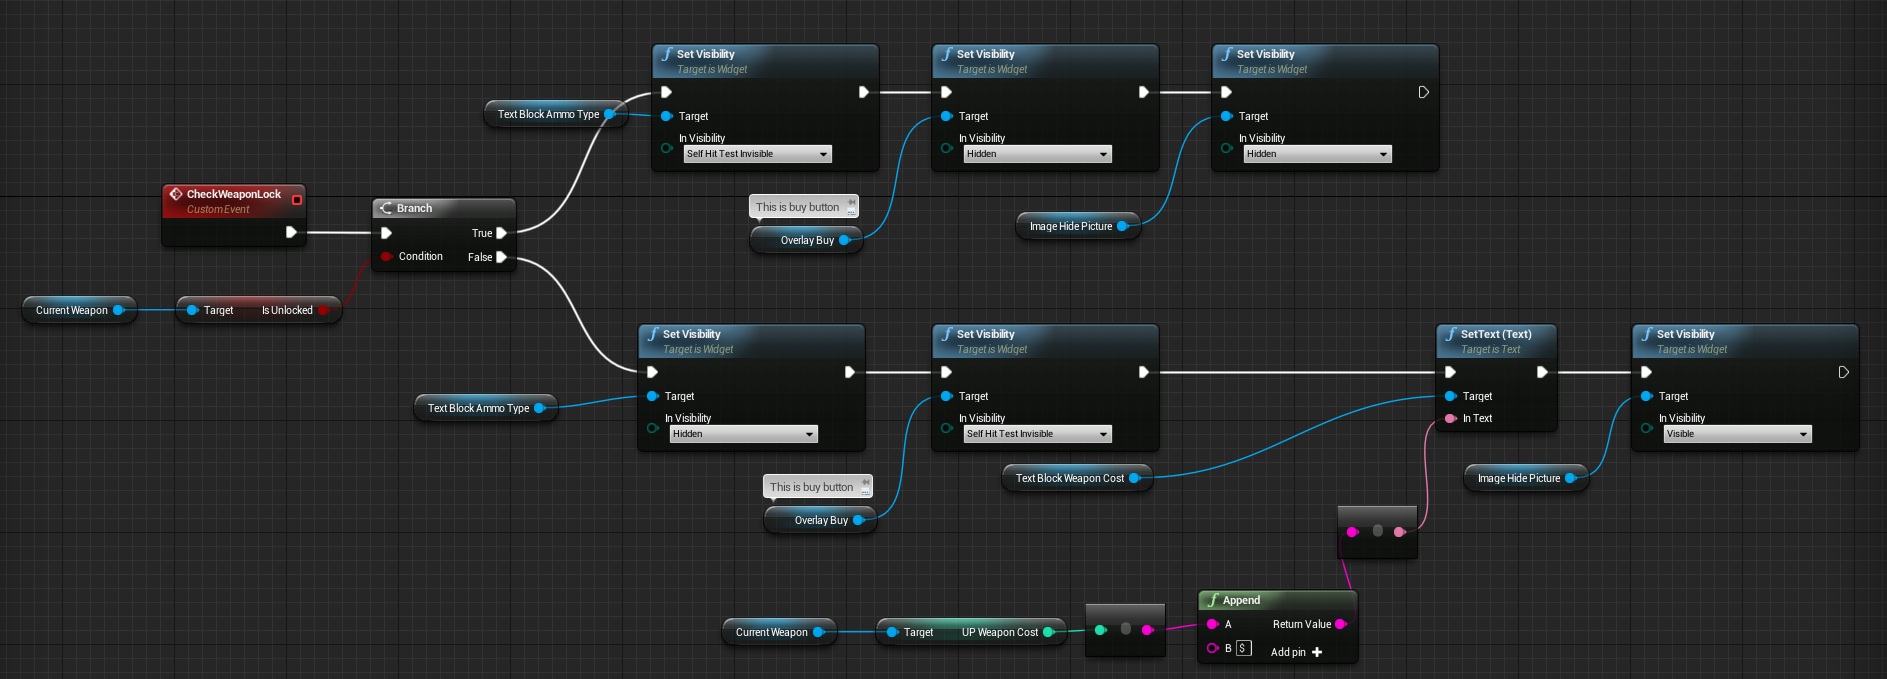
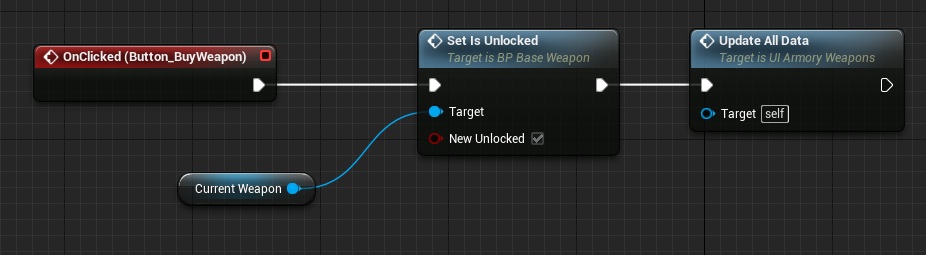
Call this event in the end of UpdateAllData. Create OnClicked event on button:
And that’s it! You should get good starting point to work with visuals and other upgrades mechanics. As you saw – lot’s of copying, lot’s of variables – easy but really time-consuming. As always – take your time!
Final Result
Creating ShooterTutorial takes a lot of my free time.
If you want you can help me out! I will use your donation to buy better assets packs and you will be added to Credits /Backers page as well.Implementing game is taking time but writing about it is taking much more effort!

Pingback: Developer I/O » Menu – Armory – Part 2: Weapon Upgrades
BaseWeapon meshes are not visible. I cant see it. the UI_Weapons actor is in the scene and I can see the umg but when pressing buttons nothing is changing
Try to use Print node to check what’s missing, maybe your mesh is null in ShooterGameInstance.
Say I were making a game where you could have multiple of the same kind of weapon, would this system as is handle each separately? For instance, would I be able to have one pistol with max damage, one with max fire rate, and one that’s completely unmodified?
Hey Tom, in some versions of the Editor this 3d version of the menu widget won’t work. In 4.10 I had to set it to “ScreenSpace” in the UI_Weapons blueprint to be able to interact with it. Based on some googling, 3d menus like the ones illustrated here broke at some point, and I’m not sure they’ll be fixed anytime soon.
When you get that far, you’ll notice that nothing happens when you press the buttons. First, make sure WeaponsRoot is definitely in the camera view by attaching a mesh to it within the blueprint, and – also from within the blueprint – positioning it manually where you want it. So you’re moving it around in the blueprint viewport to place it correctly in your scene (alternatively, you could reposition your widget and leave the WeaponsRoot at the center of your blueprint so you can drag UI_Weapons directly to where you want the weapons to show up).
Next, select each of your weapons and ensure UI Scale variable is not zero. I had to set mine to 25, but I’m using all my own models, your value will vary.